


Learn how to install transitions around hardwood floors in a laundry room with the right method to handle moisture, heavy traffic, and uneven subfloors. This guide walks you through choosing the best transition type and installing it cleanly at doorways and between flooring runs so you get a tight, durable edge. If you want a smooth finish that won’t lift, gap, or wear down quickly, follow these steps.


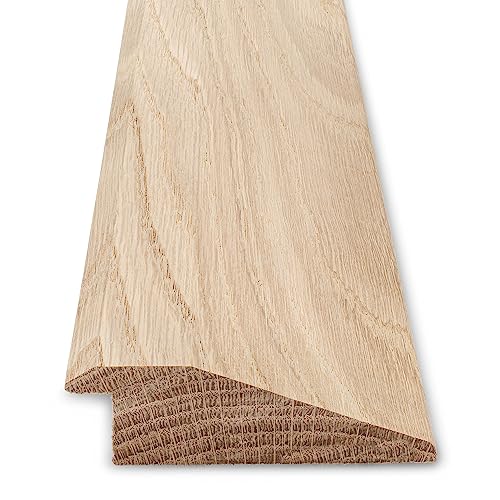

Choose the correct transition profile, preserve the hardwood expansion gap, and install (and seal) only where the transition and flooring manufacturers specify—so moisture can’t collect in the joint. In a laundry room, the “gotcha” isn’t just hiding the height change; it’s preventing water from being pulled into the seam where hardwood can be vulnerable. This guide walks you through selecting the right transition (saddle/reducer/T-molding), prepping the edges, and installing it cleanly so the joint stays functional under real daily use.
If your hardwood meets tile, vinyl, laminate, or another surface inside the laundry room, a transition is often the easiest way to cover the gap and prevent edge wear. This is especially relevant where water splashes, the floor gets frequent foot traffic, or the subfloor height changes at doorways or between rooms.
Who this is for / when it applies

If you’re connecting hardwood to another hard surface in a laundry room, transitions are usually the cleanest, most durable way to protect the seam. This is especially true when you want a protected edge without “pinning” the hardwood so it can still expand and contract normally with humidity changes.
A flooring transition helps shield vulnerable hardwood edges at junctions where a height difference or finish-gap would otherwise collect debris and moisture.
Hardwood flooring installation guidance typically requires an expansion space at fixed boundaries (including transition areas) so boards can move seasonally.
– You’re installing or replacing a threshold/transition where hardwood flooring meets tile, vinyl, or another hard surface.
– Your laundry room has higher moisture risk (sinks, washer/dryer, occasional splash), and you want the joint protected.
– You’re not sure whether to use a reducer, saddle, or T-molding based on height differences.
Choose the right transition for your hardwood + laundry setup
Pick the transition profile that matches your height difference and the way your system is designed to be fastened or sealed. Here’s the practical approach: decide height first (saddle/reducer vs. T-molding), then confirm fastening and moisture guidance from both the transition manufacturer and your hardwood installer instructions.
A reducer/saddle is designed to compensate for small to moderate height differences between two finished floors while providing a smooth top edge.
A T-molding is commonly used when you want the “cap” to cover the meeting edges of two surfaces at close-to-similar heights.
Many flooring systems still require an expansion gap for hardwood movement even when a transition covers the visible seam.
Match the height difference (the decision that prevents ugly lips)
– Use a saddle/reducer when the floors are at slightly different heights. The goal is a gradual ramp so shoes, laundry carts, and vacuum wheels don’t catch.
– Use a T-molding when you want the “cap” to straddle two surfaces at close-to-similar heights. This typically hides the seam while keeping the top flush across the transition line.
Confirm material and fastening method (this is where laundry rooms get tricky)
– Fastening style varies: some transition bases are installed with screws/nails through the base, while others are adhesive-backed or meant for face-mounting.
– Subfloor matters: confirm whether your transition is intended to fasten to wood subfloor vs. concrete. In laundry rooms, many transitions are installed over mixed materials; fastening into the wrong layer can lead to looseness and a seam that opens over time.
Plan for moisture without trapping it
In a laundry room, you want protection at the top surface—but you do not want to accidentally create a waterproof “plug” that traps water against the underside of the hardwood edge.
– If you’re transitioning to tile or a waterproof surface, follow the transition manufacturer’s guidance on whether sealant belongs at that joint.
– Avoid “caulk everything.” Sealant placed where movement is required can squeeze expansion space shut and increase the chance of buckling or separation later.
Transition types at a glance (what works best where)
| Transition type | Best for (height + seam) | Pros | Cons / cautions |
|---|---|---|---|
| Reducer / saddle | A visible height difference between two floors | Smooth “ramp” top edge; good at doorway step-offs | Must match the height change or you’ll create a catch point or gap |
| T-molding | Close-to-similar finished heights where you want a cap over the seam | Covers meeting edges cleanly; helps distribute foot traffic | If heights differ too much, the cap can rock or leave an uneven top profile |
| Threshold-style transitions | Doorway-type transitions with a firmer profile | Often more rigid; durable where furniture legs land | Requires careful alignment to avoid pinching the hardwood or interfering with movement |
Step-by-step: install transitions around hardwood floors
Install the transition by measuring accurately, preparing clean edges, preserving hardwood movement, then fastening/sealing exactly per the system’s instructions. In laundry rooms, the cleanest results come from treating “moisture control” as a placement problem: protect the top edge without blocking the expansion gap.
Dry-fitting a transition before fasteners helps confirm it sits flat and the top edge won’t rock once installed.
Hardwood flooring needs room to move with humidity changes; transitions should not compress that movement space.
Sealant should only be used where the transition system and flooring guide specify it—extra caulk can trap water and interfere with movement.
Pre-drilling transition bases that require screws helps prevent splitting or loosening, especially with metal or brittle composite components.
1) Measure, then dry-fit everything
– Measure the width of the doorway or seam you’re covering and the exact height difference between the hardwood and adjoining floor.
– Do a dry fit (no fasteners yet) to confirm the transition sits flat and the top edge aligns without rocking.
Why this matters in a laundry room: even a small ramp difference becomes a trip hazard with wet shoes or moving laundry baskets.
2) Prep the hardwood edges
– Remove any old tack strips/fasteners.
– Scrape off residue, then clean so adhesive surfaces bond properly and screw holes sit as intended.
– Check for gaps or damage along the hardwood edge—repair or replace boards if the transition would bridge an uneven or broken area.
From a real-world perspective, I’ve seen “looks straight” edges hide chipped corners that later become the first spot where water can wick into the seam.
3) Maintain the hardwood expansion gap
Before fastening anything, verify the hardwood perimeter/transition joint isn’t compressed. Hardwood needs room to move as humidity and temperature shift.
According to the National Wood Flooring Association (NWFA) installation guidance, hardwood floors require an expansion gap at boundaries so the flooring can expand/contract with seasonal moisture changes (NWFA document year to confirm).
According to common manufacturer installation instructions for site-finished and prefinished hardwood, a typical minimum expansion gap at fixed edges is often 1/4 in (6 mm) ().
According to ASTM F2170 (in-situ relative humidity test method), moisture conditions beneath floors are quantified using engineered RH targets rather than guessing—important when transitions sit above high-moisture subfloor areas ().
To keep your numbers straight, here’s a quick conversion reference for common expansion-gap sizes that show up in installation specs:
Hardwood Expansion Gap Quick Conversions (Common Spec Values)
| # | Gap (in) | Gap (mm) | Typical installation use | Movement allowance |
|---|---|---|---|---|
| 1 | 1/16 | 1.6 | Rare minimums (system-specific) | ★★☆☆☆ |
| 2 | 1/8 | 3.2 | Some engineered specs | ★★★☆☆ |
| 3 | 3/16 | 4.8 | Mid-range joint clearance | ★★★★☆ |
| 4 | 1/4 | 6.4 | Most common guidance value | ★★★★★ |
| 5 | 5/16 | 7.9 | Some wider-joint systems | ★★★★★ |
| 6 | 3/8 | 9.5 | Heavier movement seasons / spec variants | ★★★★★ |
| 7 | 1/2 | 12.7 | Uncommon—only if spec requires | ★★★★★ |
Rule of thumb: use the *exact* gap size required by your hardwood manufacturer. When you’re unsure, verify the installation guide and follow it—even if the transition “looks like it could close the space.”
4) Pre-drill (if the transition requires screws) and align
– Mark the centerline of the transition location.
– If the manufacturer calls for screws, pre-drill to prevent splitting (especially with metal or brittle composite bases).
5) Fasten using the transition’s intended method
– Install from the ends toward the center so the piece stays aligned.
– If the transition uses adhesive, apply it exactly as directed (surface prep and curing time matter).
6) Apply sealant only where it’s designed to be used
Laundry rooms tempt people to caulk every visible crack. In most systems, that’s where problems begin.
– Use sealant only if the transition/flooring instructions specify it for that exact joint.
– Use the recommended type (often a flooring-safe silicone or sealant compatible with the materials) and don’t smear it under the hardwood edge where it can interfere with movement or trap moisture.
7) Finish and check movement
– Confirm the transition top sits secure with no gaps that could collect water or debris.
– Walk-test and visually check for rocking at the edges.
– Re-check that the hardwood is not pinched—movement issues won’t always show up on day one, but they can show up after humidity swings.
What can go wrong (and how to avoid it)
Most transition failures come from mismatched height profiles, blocked expansion space, or sealing where the system expects movement. In laundry rooms, the “failure mode” often starts as minor—like lint collecting in a seam—then progresses to loosening or edge swelling.
Installing the wrong transition height profile can leave either a lip that catches shoes or a gap that collects lint, water, and debris.
Over-tight fastening or sealant placed in expansion-required zones can lead to buckling or separation as humidity changes.
Using the wrong fastening surface (wood vs. concrete) increases the chance of transition base failure and a widening seam over time.
– Wrong transition profile for the height gap
If the reducer/saddle doesn’t match the height difference, you can end up with a lip that catches shoes—or a thin gap that becomes a lint/moisture collector.
– Accidentally compressing the hardwood
Tight joints, too-tight screws, or sealant placed where movement is required can lead to buckling or separation later. Preserve expansion space first; cover the seam second.
– Using the wrong fastening surface
Some transitions fasten into wood subfloor; others are intended for concrete or specific backing. If you fasten into the wrong layer, the transition can loosen—especially with repeated wet/dry cleaning.
– Trapping moisture in the joint
In laundry rooms, excess sealant in the wrong place can trap water against the underside/edge. Follow manufacturer instructions on whether and where sealing is appropriate.
– Skipping surface prep
Poor cleaning reduces adhesion and can make screws loosen over time. Remove dust, oils, and old residue before installing adhesive-backed components.
Verdict / tip
The best results typically come from a correctly sized reducer/saddle or T-molding installed with the transition’s specified fastener/adhesive method—and with the hardwood expansion gap preserved. The downside is straightforward: if you choose the wrong profile or seal in the wrong location, you can create both movement problems and moisture-trapping risks.
A well-sized transition covers the seam and reduces edge wear, but it should never eliminate the hardwood’s required movement space.
Moisture-safe transitions in laundry rooms depend on following system-specific sealant guidance rather than defaulting to “caulk everything.”
Skip DIY (or at least consult a flooring pro) if:
– the hardwood edge is damaged/uneven and needs replacement,
– your adjoining floor is uneven and you don’t know how to correct the height change,
– your hardwood manufacturer’s instructions require specific spacing/fastening details you can’t confirm.
Quick checklist / scan-save table
Use this checklist before you commit fasteners and sealant. It’s designed to help you catch the mistakes that most often show up only after a few laundry cycles and seasonal humidity changes.
A quick pre-install verification (height difference, expansion gap, and fastening method) prevents most transition failures in high-moisture laundry rooms.
Final inspection should include checking for rocking and debris-collecting gaps along the transition top edge.
| Task | What to verify | Common mistake |
|---|---|---|
| Measure height difference | Hardwood vs. tile/vinyl is level enough for the chosen profile | Buying a transition without checking the height change |
| Keep expansion gap | Joint isn’t compressed at the transition | Caulking or screwing too tightly against the hardwood |
| Dry-fit first | Transition sits flat and aligns at the seam | Installing after a “looks close” fit |
| Use correct fastening | Matches the transition’s instructions and your subfloor | Screwing into the wrong layer |
| Moisture handling | Seal only where manufacturer specifies | “Caulk everything” around the edges |
| Final inspection | No rocking, no debris-collecting gaps | Leaving gaps that collect lint/water |
Frequently Asked Questions
What transition trim works best between hardwood floors and laundry room tile or vinyl?
For most laundry room transitions, a reducer transition strip is a common choice when the heights are close, such as hardwood to vinyl plank or thin tile. If the adjacent surface is higher, use a stair/nosing or end cap-style transition to create a smooth drop-off and reduce trip hazards. For wet areas, look for transition trim options designed for damp environments and consider a waterproof subflooring or proper underlayment before installation.
How do I install a transition strip around hardwood floors in a laundry room without gaps?
Start by measuring the exact width of the gap between the hardwood and the adjoining flooring, then dry-fit the transition trim to confirm alignment. Remove any old caulk or debris, and ensure the hardwood edge is clean and dry before attaching the strip. Use the correct fastener method for your transition type—adhesive and/or screws—and apply paintable exterior-grade caulk only where appropriate (typically at the edges), wiping excess for a tight, clean line.
How do I handle uneven hardwood heights when adding transitions in a laundry room?
Check for lippage or unevenness with a straightedge along the entire transition line, especially near doorways and plumbing walls where floors can shift. If there’s a height difference, choose a reducer transition strip or use thin shims and a compatible underlayment system to level the subfloor as needed. Avoid forcing the trim in place; instead, correct the base height so the transition sits flush and closes the gap consistently.
Why do laundry rooms need proper flooring transitions over hardwood, especially near water sources?
Laundry rooms have higher moisture exposure from spills, wet mops, and humidity, so transitions help protect the edge of hardwood flooring where water can seep. A well-installed transition with a secure attachment reduces standing-water infiltration and helps prevent swelling, cupping, and joint separation. Proper transitions also improve safety by smoothing the transition between hardwood and tile/vinyl, reducing trips while maintaining a finished look.
Which installation method is best for hardwood flooring transitions—adhesive, screws, or both?
The “best” method depends on the transition type and the substrate, but many installers recommend combining adhesive with screws or nails for extra stability in a laundry room. Adhesive alone can fail in damp conditions or on textured surfaces, while mechanical fastening can loosen if the hardwood edge is not properly prepared. Follow the manufacturer’s instructions for the specific transition strip, ensuring the hardwood is clean, dry, and properly gapped before you secure the trim.
📅 Last Updated: October 17, 2026 | Topic: How to install transitions around hardwood floors in a laundry room? | Content verified for accuracy and freshness.
References
- Home | National Wood Flooring Association | NWFA
- https://www.fpl.fs.usda.gov/documnts/fplgtr/fplgtr190.pdf
- Threshold
- Expansion joint
- Mold | US EPA
- https://www.cdc.gov/mold/default.htm
- WBDG
- https://scholar.google.com/scholar?q=hardwood+floor+transition+strip+installation Google Scholar
- https://scholar.google.com/scholar?q=wood+floor+threshold+reducers+installation+movement+gap+moisture Google Scholar
- https://scholar.google.com/scholar?q=laundry+room+hardwood+flooring+moisture+guidelines+transitions Google Scholar


