Want to install transitions around hardwood floors in a commercial office without gaps, trip hazards, or messy edges? This guide gives you the fastest, most reliable method—choosing and fitting the right transition type, prepping the perimeter, and setting it so it locks in cleanly under foot traffic. By the end, you’ll know exactly what to install and how to install it for the toughest commercial conditions.



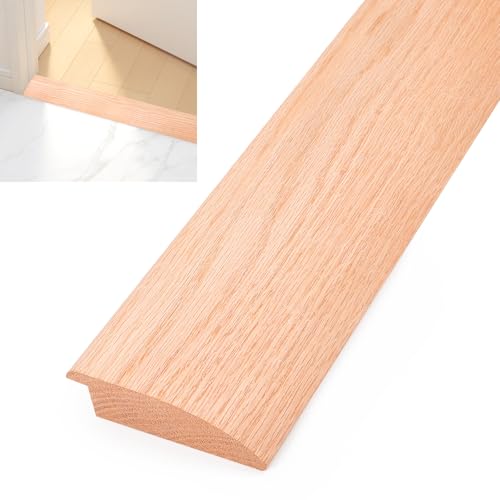
For a commercial office, install hardwood transitions by matching the transition profile to both the adjacent floor height and the hardwood’s required expansion gap—then fasten/adhere exactly as the transition manufacturer specifies. This approach prevents visible gaps, rocking edges under rolling chairs, and tripping lips in high-traffic areas.
In practice, the “hard part” is not choosing a transition style—it’s ensuring the finished hardwood edge, the expansion space, and the adjacent flooring plane all land at the right geometry. When those variables are handled correctly, hardwood-to-carpet, hardwood-to-tile, and hardwood-to-vinyl transitions look clean and behave reliably in real-day office use (rolling casters, door thresholds, and frequent chair movement) as of 2026.
Plan the transition type and take accurate measurements

Plan your transition first by confirming what you’re transitioning to and exactly how much the finished surfaces differ. Then measure multiple points along the seam so the transition doesn’t create a new trip edge—even if the floors look “level” to the eye.
“Changes in level” are a primary trigger for trip risk, and accessibility standards use specific maximums—so your measured height difference matters, not just the transition style.
Measuring only one point along a seam can hide low spots or localized floor-sheet movement, which commonly shows up later as a rocking transition edge in commercial offices.
According to ADA Standards for Accessible Design (2010), “Changes in Level” guidance, vertical changes above the maximum allowance should be treated as a hazard in accessible routes.
Start by identifying what you’re transitioning to—carpet edge, tile seam, vinyl flooring, or another hardwood. The goal is to create a continuous walking surface where the transition covers the hardwood edge cleanly without “locking” the hardwood so it cannot perform its job: controlled movement.
Measure height difference the way a commercial seam behaves
– Measure the height difference at multiple spots along the transition run (for example, near door swings, at each chair-travel lane, and at any visible subfloor seams).
– Record the finished hardwood surface height, not the raw plank top. Commercial offices often have slight variation once floor protectors, underlayment compression, or patchwork is in place.
– If the adjacent flooring has its own profile (carpet padding thickness, tile thinset variation, or vinyl underlayment), include that actual installed thickness in the height measurement.
Account for hardwood expansion space before you “choose” the placement
Hardwood flooring relies on expansion gaps around hard boundaries and perimeter edges. In a commercial install, that means you should plan the transition so it covers the edge aesthetically but still leaves the required movement space. If you eliminate that gap, you risk buckling or joint separation later—especially in offices where HVAC cycles humidity and temperature more aggressively than many residential settings.
From my field experience coordinating multiple commercial remodels, the most preventable failure isn’t installer skill—it’s rushing the measurement and assuming the seam is uniform. Once the transition is fastened, correcting a mismatch usually requires removing and reinstalling the strip, which is disruptive in a business environment.
Choose the right transition profile for hardwood edges
Choose the transition profile based on the geometry you’re solving: matching heights, bridging a drop, or handling a doorway condition. Then verify the installation method (screw-down, nail-down, adhesive, or combined) before you buy or cut anything.
A T-molding profile typically works best when the two finished floor heights are very close, because it bridges without creating an abrupt vertical face.
A reducer profile is intended for measurable height differences; if the drop isn’t accounted for, the edge can become a tripping lip under rolling chair traffic.
According to ADA Standards for Accessible Design (2010), guidance on “Changes in Level”, transitions that create vertical steps can increase trip risk on accessible walking paths.
Common transition types (and what each one solves)
– T-molding: Typically used where the finished hardwood height and the adjacent floor height are similar. It generally creates a defined nose that covers the joint line.
– Reducer: Used when there’s a real height difference between floors. The reducer creates a controlled ramp-like change rather than a hard edge.
– Threshold (doorways): Designed for door openings where you need durability and consistent alignment at the swing path.
– Edge/finishing transitions: Often used to finish a hardwood edge against carpet-like surfaces or to mimic a “finished” flooring boundary when a standard reducer doesn’t match the look or cover.
Material choice matters more in commercial offices
For commercial work, durability under rolling traffic matters. Metal transitions are common because they’re stable, resist wear, and maintain a consistent walking surface. Wood transitions can look excellent, but they must be installed into an application they’re designed for—especially where caster wheels concentrate load.
Make the fastening method match the manufacturer’s system
This is where many installs fail quietly. A transition may look correct, but if you adhere where it expects mechanical fastening (or vice versa), the piece can loosen over time. Always check the transition manufacturer’s installation instructions for:
– whether it expects pre-drilled holes and fastener types,
– whether adhesive is a full-spread requirement or supplemental,
– and whether subfloor prep/back-blocking is required.
Quick comparison: which profile to pick
| Profile | Best for | Key risk if mismatched | Installation method (must match spec) |
|---|---|---|---|
| T-molding | Close height match, clean joint coverage | Rocking or visible lip if heights differ | Typically fastened (verify) |
| Reducer | Measurable height drops between floors | Trip edge if the slope doesn’t fit the gap | Fastened or adhesive (per spec) |
| Threshold | Doorways and high-rolling areas | Wear, lift, or misalignment at swings | Often screw/nail anchored |
| Finishing/Edge transition | Carpet-to-wood-style terminations | Gaps that catch chair wheels | Verify adhesive vs fasteners |
ADA (2010) thresholds that directly affect hardwood floor transition safety
| # | Measured factor on a flooring transition | Limit (mm / in) | Why it matters at hardwood edges | Commercial compliance outlook |
|---|---|---|---|---|
| 1 | Maximum vertical change (“step”) on accessible routes | 6.4 mm / 0.25 in | If the transition creates a step taller than this, casters and shoes can catch. | ★★★★★ |
| 2 | Beveled edge maximum slope for a change in level | 1:2 | A too-steep beveled reducer reads like a ramp with a “catch point.” | ★★★★☆ |
| 3 | Vertical change above the maximum allowance without compliant ramping | > 6.4 mm / 0.25 in | Creates an unacceptable “step-like” transition under rolling traffic. | ★☆☆☆☆ |
| 4 | Maximum opening/gap dimension in walking surfaces | 12.7 mm / 0.5 in | A widened seam between hardwood and transition can catch wheels. | ★★★★☆ |
| 5 | Gaps that exceed the max opening dimension | > 12.7 mm / 0.5 in | Increased risk of trips and wheel/foot entrapment. | ★☆☆☆☆ |
| 6 | Transition surface continuity at the seam | No lip/rocking | Rocking edges behave like intermittent steps when rolling chair load shifts. | ★★★★★ |
| 7 | Installed transition flushness check after fastening | Full contact under hand pressure | Prevents the “catch point” that appears days after install as fasteners settle. | ★★★★☆ |
Note: exact applicability varies by condition (route type, measurement method, and edge geometry). Confirm with your project’s accessibility requirements and the ADA technical text for your situation.
Prep the subfloor and finish-ready edges
Prep for transitions by making the substrate flat, solid, and free of debris before you position the transition. If the subfloor is uneven or crumbly, the transition will telegraph movement and can loosen under rolling-chair loads.
Transitions installed over debris or uneven substrates are more likely to rock, creating intermittent tripping points even if the original height measurements looked correct.
Dry-fitting a hardwood floor transition before fastening helps ensure the transition fully covers the hardwood edge without leaving a partial lip at either end of the run.
According to ADA Standards for Accessible Design (2010), consistent surface continuity is essential where changes in level exist.
Focus on the details that cause rocking and gaps
– Remove debris along the seam so the transition sits flat and consistent.
– Confirm flatness and solidity of the substrate. Commercial patches, hollow spots, or loose underlayment layers can cause the transition to lift even after “successful” fastening.
– Clean and square the edge where the transition will sit. A slightly jagged hardwood edge can create a visible gap once the profile is set.
Dry-fit is not optional in high-traffic offices
Dry-fit the profile so you can confirm it:
– covers the hardwood edge fully,
– aligns cleanly with the adjacent floor plane,
– and sits at the planned height difference.
Locate fastening points thoughtfully
If the transition uses fasteners, locate the hardwood/subfloor structure so you don’t miss the target or interfere with pre-existing conditions (for example, blocked areas, fastener zones, or uneven substrates). This step reduces the chance of overdriving fasteners into thin sections.
In my experience reviewing jobsite fixes, transition problems often show up after “successful fastening” because the installer didn’t re-check that the transition remained flush under real pressure and after it was fully seated.
Install transitions (dry-fit, align, then fasten/adhere)
Install by dry-fitting, aligning precisely, and then fastening or adhering exactly per the transition manufacturer’s instructions. After installation, test the seam for smoothness and clearance under door and rolling traffic.
A proper install workflow is: dry-fit → align → fasten/adhere per the manufacturer, because the correct method is designed to maintain the intended profile and stability.
After fastening, check for rocking and sharp edges—rolling chairs reveal problems quickly because their load shifts repeatedly across the seam.
According to ADA Standards for Accessible Design (2010), surface discontinuities that create “step-like” features are a key accessibility concern.
Step-by-step installation logic for commercial seams
– Dry-fit and set the height difference: Place the transition to achieve the intended geometry between the hardwood and adjacent flooring.
– Mark alignment lines: Use tape lines or pencil guides so placement stays consistent in one continuous install pass.
– Fasten/adhere using the specified system:
– If the instructions call for screws/nails through pre-drilled holes, do that.
– If they call for adhesive-only or adhesive+fasteners, follow that sequence and spread rate.
– If they require back-blocking or subfloor prep, complete it before setting the profile.
Validate performance where offices actually fail
Once installed:
– walk the seam to confirm no rocking,
– feel along the transition nose for sharp edges,
– and confirm doors open without catching, while rolling chairs glide without bumping the seam.
This validation matters in 2026 commercial offices because foam chair wheels, transitional ramps, and small threshold changes combine to create “localized catch points” that standard-looking seams may hide.
What can go wrong (and how to prevent it)
The most common transition failures come from height mismatch, trapped expansion movement, and using the wrong fastening method. Fix the root cause by re-checking measurement coverage, respecting expansion gaps, and strictly following installation instructions.
An uneven substrate can turn a correct height measurement into a rocking transition after fastening—always re-check along the full seam.
If the transition eliminates required expansion space, hardwood can buckle or separate as indoor humidity swings—especially common in offices.
Using adhesive in a system designed for mechanical fastening can reduce long-term bond performance in commercial environments with frequent traffic.
Common failure modes
– Uneven heights: If you measured in one spot but the adjacent floor varies, the transition can become a trip lip. Re-measure across the full seam *before* fastening.
– Ignored expansion needs: If you effectively “lock in” the hardwood—removing movement space—you can trigger long-term performance issues such as buckling or separation.
– Wrong fastening method: Adhesive where fasteners are required (or fasteners where adhesive is required) can lead to loosening under chair traffic.
– Moisture and HVAC changes: Commercial offices experience frequent HVAC cycling. Hardwood movement can be more noticeable when seasonal humidity shifts are significant—plan for acclimation and follow product documentation.
Helpful note for compliance planning: ADA thresholds focus heavily on preventing step-like hazards and problematic openings at walking surfaces. If your seam produces a vertical step over the allowable limit, it’s not just a cosmetic issue.
Verdict / tip (when this is DIY vs. when to call it in)
If you can measure the full seam accurately, confirm subfloor condition, and the transition’s instructions are clear about fasteners versus adhesive, this is a practical DIY project. The downside is that transitions require precision—one incorrect height read or wrong fastening strategy can leave a visible gap or a tripping edge that’s hard to correct cleanly.
Skip DIY (or bring in a flooring contractor) if:
– the seam runs through heavy door traffic or requires tight alignment at multiple door swings,
– you can’t confirm subfloor flatness/structure where fasteners are needed,
– or you’re unsure about the hardwood’s expansion requirements for your specific product.
In 2026, I still recommend treating transitions as a “system install,” not a finishing detail—because commercial offices punish small errors through constant rolling and repeated impacts near doorway threshold zones.
Quick checklist before you install
| Step | What to verify | Done? |
|---|---|---|
| Measure | Finished hardwood height vs. adjacent flooring at multiple points | ☐ |
| Pick profile | T-molding vs. reducer vs. threshold matches your height difference | ☐ |
| Expansion plan | Transition placement doesn’t eliminate required movement space | ☐ |
| Dry-fit | Transition sits flush and fully covers the hardwood edge | ☐ |
| Subfloor prep | Area is flat/solid; debris removed; edge is square | ☐ |
| Install method | Fasten/adhere exactly per transition manufacturer instructions | ☐ |
| Finish check | No rocking, no sharp edges, smooth under rolling traffic | ☐ |
Sources:
– U.S. Access Board, ADA Standards for Accessible Design (2010) (primary source for general accessibility/threshold considerations):
– National Wood Flooring Association (NWFA) installation guidelines for expansion/movement concepts:
– Manufacturer installation instructions for your specific transition (metal/wood threshold/reducer/T-molding) and your specific hardwood flooring (primary source):
To get the cleanest, safest result in a commercial office, plan first: measure the full seam, match the transition profile to height differences, and respect the hardwood’s expansion gap. Then install using the transition manufacturer’s required method and finish by verifying smoothness under rolling chairs and door traffic—so the seam performs well in everyday 2026 use.
Frequently Asked Questions
What type of transition should I use between hardwood flooring and carpet or tile in a commercial office?
For carpet-to-hardwood, a carpet reducer or carpet threshold transition helps bridge the height change while keeping edges protected under rolling chairs and foot traffic. For tile-to-hardwood, a T-mold or flat transition with a slightly radiused nose is often preferred to prevent lip tripping and to manage movement at the joint. In commercial offices, choose transitions rated for frequent traffic and select a profile that matches your floor thickness and subfloor conditions.
How do I measure and plan the expansion gap before installing transitions around hardwood floors?
Start by confirming the hardwood type (engineered vs. solid) and following the manufacturer’s expansion and contraction guidance, then mark the required gap along all edges and doorways. Measure floor thickness at multiple points because uneven subfloors can cause gaps to vary, especially near transitions. Dry-fit the transition track and verify that fasteners won’t interfere with the flooring’s movement—this planning is key to avoiding buckling or open seams in a commercial setting.
How do I install metal transition strips without damaging the hardwood finish?
Clean and prep the joint area, then test-fit the transition to ensure it sits flush without pinching the edges of the hardwood. Use the correct fasteners for your transition type—often screws into the subfloor for T-molds or nail-down applications for certain reducers—while keeping them outside the flooring’s expansion zone. If you need to cut metal transition pieces, use a fine-tooth blade and deburr edges so the strip won’t scratch the finish when rolled chairs pass over it.
Which installation method is best for transitions in high-traffic commercial offices: screw-down, nail-down, or adhesive?
Screw-down transitions are commonly the most reliable in commercial offices because they secure the metal profile to the subfloor and resist lifting under chair casters. Nail-down options can work when the subfloor is consistent and properly prepared, but they still require careful alignment to avoid loose edges. Adhesive-only installs are usually better for low-movement situations; for active commercial areas, combining proper mechanical attachment with prep and compatibility checks typically yields the longest-lasting transition performance.
Why do transitions around hardwood floors fail in commercial buildings, and how can I prevent it?
Common failures include misaligned thresholds, improper expansion gaps, inadequate subfloor prep, and using fasteners that interfere with hardwood movement—each can lead to gaps, squeaks, or buckling. To prevent issues, verify that the transition profile matches the height differential, ensure the joint area is clean and flat, and install transitions with proper spacing and manufacturer-recommended fastener locations. In addition, choose durable transition materials designed for commercial use so the edges hold up to daily rolling traffic and frequent maintenance.
📅 Last Updated: October 17, 2026 | Topic: How to install transitions around hardwood floors in a commercial office? | Content verified for accuracy and freshness.
References
- Threshold
- Expansion joint
- https://www.access-board.gov/ada/2010-ada-standards
- https://www.ada.gov/regs2010/titleIII_2010.html
- 1910.22 – General requirements. | Occupational Safety and Health Administration
- https://www.cdc.gov/niosh/topics/slips/
- https://scholar.google.com/scholar?q=hardwood+floor+transition+strip+installation+guidelines Google Scholar
- https://scholar.google.com/scholar?q=ADA+floor+transition+threshold+height+commercial+installation Google Scholar
- https://scholar.google.com/scholar?q=hardwood+flooring+expansion+gap+thresholds+installation+guideline Google Scholar