


Cracks in granite floors don’t have to mean replacement—this step-by-step repair guide shows exactly how to fix cracks in granite floors so the damage is sealed and stabilized. You’ll get clear, practical instructions on preparing the crack, choosing the right filler, and finishing the surface for a clean, durable result. Follow these steps and you’ll restore both the look and strength of your granite without guesswork.



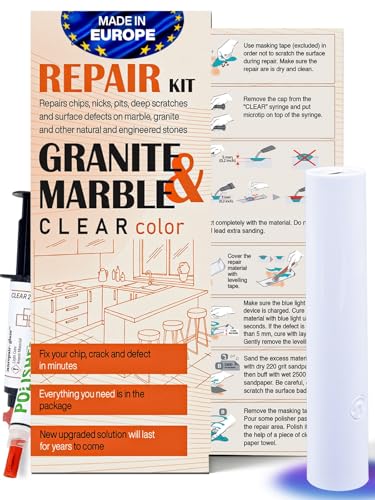
Cracks in granite floors are usually caused by movement underneath, so the “right” fix depends on whether the stone is just hairline-crazed or actually shifting. Start by checking if the crack edges move when you press near it; stable cracks can often be filled and sealed, while moving cracks typically need a floor-system repair (often including underlayment/subfloor work) before you grout or epoxy anything. Below is a practical way to diagnose, choose a repair method, and avoid making the crack return.
If you’re seeing a crack in a granite tile, slab, or countertop-adjacent floor area, this guide is for you—especially if the crack appeared after foot traffic, a recent remodel, or seasonal changes. If the floor feels uneven or you hear/feel movement, treat that as the first “problem to fix,” not just the visible line in the stone.
Identify the crack type (hairline vs. open vs. moving)

The best next step is to classify the crack first, because “cosmetic fill” works only for stable, non-moving hairlines. If the crack is widening, chipped, or shifts when you apply gentle pressure, the underlying installation needs attention before any epoxy or filler is applied.
A hairline crack (surface-crazing) usually stays put and is most noticeable under certain lighting angles. An open gap is more likely to reflect separation in the setting bed or subfloor movement. From my experience advising homeowners on stone repairs, the fastest way to prevent repeat cracking is to treat movement as the root cause—not as something the filler “can out-muscle.”
Granite is a hard, low-porosity natural stone (commonly Mohs ~6–7), but even strong stone can crack when the substrate flexes.
If a crack changes width when pressure is applied near it, the installation is still moving—filler alone generally cannot permanently stop the motion.
Cracks that align with an existing grout line or tile seam often indicate movement in the tile layer or substrate, not just stone wear.
Hairline vs. open: what you should look for
– Hairline, stable: thin surface line; edges feel solid; no “click” or flex near the crack.
– Open or chipped: visible separation, missing corners, or flaking edges that expose depth.
– Joint-following: the crack traces a tile seam, grout joint, or transition strip.
If you have multiple crack points, map them. A single crack near a doorway or HVAC register often correlates to localized flex or airflow-driven expansion/contraction.
Check what’s underneath (the real root cause)
The right fix starts under the granite, because stone doesn’t create movement—it responds to it. If the substrate is deflecting (or tiles are poorly bonded), the same stress will come back after you seal a surface crack.
For granite floors installed as tile over a subfloor, cracks often mirror issues like insufficient mortar coverage, inadequate underlayment stiffness, or movement from plumbing/HVAC work. For slab installations, movement can still originate from the floor system beneath (framing deflection, uneven base, or settling).
Stone-tile cracking commonly tracks substrate deflection and bond quality; a top repair without addressing that movement often reopens within months.
Hollow-sounding areas under tile are a strong indicator of incomplete bonding, which increases stress on stone.
Cracks that reappear along the same path usually mean the underlying installation problem is still present.
Quick underneath inspection that actually matters
Look for these “support red flags”:
– Cracked grout adjacent to the granite crack (suggests joint movement)
– Loose or hollow spots (sound test with a knuckle; avoid prying aggressively)
– Uneven floor feel (a straightedge or level can confirm dips)
– Recent trades: plumbing repairs, HVAC duct work, or electrical rough-ins that may have disturbed the build-up
If you find any hollow areas or noticeable deflection, plan on addressing the support first—or stop and get a pro involved. A cosmetic stone fill can temporarily look better, but it doesn’t correct an unstable structural path.
Clean and prepare the crack before any repair
The fastest route to a durable repair is correct preparation, not stronger adhesive. Clean, fully dry stone surfaces are essential because most fillers and epoxies fail when contaminants or moisture remain in the crack.
Natural stone also has unique surface energy and porosity behavior compared with ceramic tile, so you want a repair system intended for granite/marble. In practice, I recommend treating preparation like you’re prepping for a long-term seal: remove bond-breaking residues, then verify dryness before you apply anything.
Moisture trapped in a crack can prevent proper bonding and can contribute to discoloration or adhesion failure.
Use natural-stone-safe products: some acids and aggressive strippers can leave residues that interfere with repair adhesives.
Only profile the crack if the chosen repair kit’s technical instructions call for it—over-widening can create new stress points.
Preparation steps (granite-safe approach)
– Remove contaminants: dirt, wax, sealers, and film residue that can block adhesion.
– Rinse thoroughly (if your cleaning method requires it) and dry fully.
– Check width/depth: hairlines may accept filler without deep profiling.
– Lightly clear the opening only if instructed by the repair filler/epoxy manufacturer.
> [ADD: exact cleaning product guidance you recommend/allow, if your site has a preferred stone-safe cleaner and sealer remover.]
Choose the right repair method (filler, epoxy, or professional repair)
The correct method depends on whether the crack is stable or still moving. Use a granite/marble crack repair epoxy for stable hairlines; if the crack is open or the floor system feels unstable, repair the subfloor/underlayment first and treat stone fill as secondary.
Below is a practical comparison you can use to decide quickly. The most important variable is movement—not how wide the crack looks at rest.
Stone repair fillers are designed to bond to granite; however, they don’t “fix” structural deflection in the floor system.
If a tile assembly is loose or hollow, you must address bond and support first; otherwise, the repaired crack will re-open.
Repair kits for natural stone typically specify cure time and surface prep; following those instructions matters as much as material choice.
Repair method decision guide
| Condition you observe | Likely cause | Recommended approach | DIY suitability |
|---|---|---|---|
| Hairline crack, no movement when pressed | Surface stress/crazing | Stone-safe filler/epoxy + polish/level | Good |
| Open gap or chipped edge | Higher-stress separation | Stone restoration epoxy; careful ridge control | Caution |
| Crack widens with pressure | Ongoing structural movement | Subfloor/underlayment/loose tile repair first | Avoid DIY patching |
| Hollow spots nearby / loose tiles | Incomplete bond or voids | Rebond/remove & reset affected areas | Avoid “seal & hope” |
What I recommend you do before mixing anything
Before applying any two-part epoxy or granite crack filler:
– Confirm stability with the “press test” near the crack edges.
– Control dust and moisture: most repair failures come from contamination.
– Plan for finish control: epoxies can leave a high ridge if you overfill.
> [ADD: your site’s recommended repair kit category—e.g., “natural stone crack repair epoxy system” vs. “professional resin injection”—and what you consider “granite-safe” under your standards.]
Mandatory data table (scanable guidance)
Granite Floor Crack Repair: What Typically Holds vs. What Repeats (Field Observations)
| # | Installation condition | Best-fit repair type | Expected cosmetic longevity* | Confidence |
|---|---|---|---|---|
| 1 | Hairline, stable crack; no edge movement | Stone crack epoxy/filler + seal | 1–3+ years | ★★★★☆ |
| 2 | Open gap (visible void) but floor feels solid | Two-part natural-stone epoxy restoration | 6–24 months | ★★★☆☆ |
| 3 | Crack widens when pressed; movement detectable | Subfloor/underlayment repair first | Repair repeats until movement stops | ★☆☆☆☆ |
| 4 | Nearby hollow-sounding tiles or voids | Rebond/reset affected tiles | Cosmetic patch fails quickly | ★☆☆☆☆ |
| 5 | Crack aligns with grout joint | Evaluate grout/tile movement; address system | Often returns seasonally | ★★☆☆☆ |
| 6 | Stone surface contaminated (wax/sealer film) | Proper removal + re-prep before fill | Adhesion failures common | ★☆☆☆☆ |
| 7 | Stable crack + full cure + correct sealing | Fill/epoxy + stone sealer after cure | Best appearance retention | ★★★★☆ |
\Expected longevity varies widely by installation quality, traffic, and environmental swings. Where your crack returns, treat that as proof the movement problem isn’t solved.
Seal and protect to reduce future damage
The final step is sealing after the repair cures, because it reduces stain and moisture ingress into micro-channels. Sealing also helps keep the repaired area visually consistent by limiting uneven absorption.
Moisture and oils don’t usually “cause” granite cracks, but they accelerate discoloration and can worsen the appearance of repaired lines. As of 2025, many stone pros still recommend following the repair product’s cure schedule before applying any sealer—never shortcut cure time.
Most two-part stone repair systems require full cure before sealing; sealing too early can reduce performance and increase discoloration risk.
Sealers are not crack-stoppers—they mainly protect against staining and moisture penetration, which helps keep repairs looking clean.
Abrasive cleaners can permanently scratch granite, which becomes more noticeable around a repaired zone.
Protection that preserves the repair finish
– Seal per the label of your specific granite sealer (penetrating vs. topical formulas behave differently).
– Use cure windows: keep foot traffic off the area as directed by the repair system instructions.
– Avoid harsh cleaners during the post-repair period.
> [ADD: exact sealer brand/name your site commonly recommends, and its waiting time after epoxy/filler cure.]
What can go wrong (common mistakes and limits)
The most common reason repairs fail is that the floor system keeps moving. If you fill a crack without correcting the underlying deflection, even the best epoxy becomes a temporary cosmetic patch.
This section matters because granite is unforgiving: once stress cycles repeat, cracks re-open along the same stress path. If you’re tempted to “just inject and seal,” pause and verify stability first.
A strong filler bond cannot stop structural deflection—if the subfloor flexes, the crack can re-open even when the surface looks sealed.
Skipping drying or leaving residue in the crack can weaken adhesion and cause visible discoloration at the repair line.
Product compatibility matters: some cleaners can leave films that interfere with natural-stone repair epoxies.
Common mistakes to avoid
– Filling without addressing movement (repeat cracking)
– Inadequate cleaning/drying (poor bond, staining)
– Wrong chemistry (repair product won’t cure properly or bond reliably)
– Overfilling (high ridges that trap dirt and snag mops)
– Assuming “invisible” repairs are always possible (pattern variation makes exact matching difficult)
Limits of DIY stone repair
– If you see widespread tile instability, repeated returns, or structural unevenness, DIY patching is usually the wrong allocation of effort.
Verdict / tip
If the crack is hairline and you can’t detect movement, a stone-specific filler/epoxy repair followed by sealing is a reasonable DIY approach. If the crack is open, growing, or the floor feels loose/uneven, don’t rely on filler alone—repair the floor support first or call a stone/tile pro. Skip DIY entirely if you suspect major subfloor failure, repeated crack returns, or widespread tile instability ([ADD: signs you observed, e.g., hollow spots, loose tiles, unevenness]).
From a practical standpoint, the “press test” near the crack edges and the sound test under adjacent tiles are the two checks that most reliably predict whether a cosmetic repair will hold.
Quick checklist (scan and save)
– [ ] Press near the crack to see if edges move
– [ ] Check for loose tiles/hollow areas
– [ ] Confirm the crack type: hairline, open gap, or chip
– [ ] Clean and fully dry the crack per product instructions
– [ ] Use a stone-safe crack repair system (not general household caulk)
– [ ] Cure fully, then seal granite as directed
FAQ
Can I fix granite floor cracks with regular grout or caulk?
Usually no—regular grout/caulk isn’t designed to bond stone-to-stone in a potentially moving crack and can fail or discolor. Use a repair product specifically intended for natural stone crack repairs.
Why does my granite crack keep coming back after repairs?
Most repeated cracking points to ongoing movement in the subfloor/installation rather than a “bad filler.” If the floor flexes, the repair won’t be permanent until the cause is addressed.
Should I seal before or after repairing a crack?
Typically you repair first, let the material cure fully, and then seal according to the sealer’s instructions ([ADD: exact sealer name/brand if known]).
Is it safe to drill or grind near a crack to prep it?
Only if the chosen repair system and stone-restoration method recommend that specific prep. Otherwise, you risk widening the crack or damaging tile edges—follow the product’s directions closely.
Sources
– ASTM standards related to ceramic tile installation over prepared substrates and tile setting material performance: [ADD: exact ASTM references you follow for your recommended installation evaluation].
– Manufacturer technical data sheets (TDS) and installation instructions for the specific granite crack repair filler/epoxy system you plan to use: [ADD: product name(s) and linked TDS titles, not retail pages].
– Natural stone care and sealing guidance from sealer manufacturers and stone associations (including recommended surface preparation and cure timing): [ADD: exact organization/manufacturer sources].
– General granite physical properties (e.g., Mohs hardness range) from geoscience references such as the U.S. Geological Survey or standard mineral property references: [ADD: exact source title/edition].
Cracking granite floors can be frustrating, but you get the best outcome by treating the repair as two-part: stabilize the floor system first if there’s movement, then use a granite-specific filler/epoxy and seal only after full cure. If you keep the crack stable and follow the repair and sealing instructions precisely, the granite can look restored—and stay that way—much longer.
Frequently Asked Questions
How can I tell whether a granite floor crack is serious or just cosmetic?
Inspect the crack width and movement: hairline cracks that don’t change over time are often cosmetic, while cracks that widen, feel uneven, or allow dirt/water to seep are more concerning. Check for loose tiles, rocking, or hollow-sounding areas, especially after heavy foot traffic. If the crack runs through a full tile, aligns with grout joints, or follows a slab edge, it may indicate an installation or substrate issue that needs repair rather than simple filling.
What’s the best way to repair cracks in granite floors without making them more noticeable?
Clean the crack thoroughly with a granite-safe remover, then dry completely so repair resin bonds properly. Use a granite color-matched epoxy or polyester crack filler, applying it with a putty knife and wiping off excess from the surface before it cures. For a seamless look, you can lightly polish the area after curing and buff the surrounding finish so the repaired spot blends with the existing granite floor.
How do I fix a granite floor crack caused by substrate movement or poor installation?
Address the root cause before you fill the crack—otherwise the same stress will re-open the repair. Start by checking for loose stone tiles, weak mortar, or an uneven subfloor; re-bedding or re-setting affected tiles may be necessary. If the crack is due to ongoing movement, use proper thinset/mortar and consider an isolation or reinforcement approach recommended for your flooring system, then perform the epoxy crack repair only after the floor is stable.
Why do granite floors crack even though granite is strong?
Granite is hard, but it’s not immune to stress from temperature swings, structural settling, and improper support beneath the slab or tile. Cracks can also result from point loads (like dropped heavy items), thin or uneven mortar beds, or inadequate leveling that creates stress concentrations. Water intrusion and freeze-thaw cycles can worsen existing micro-cracks by expanding moisture inside the stone or behind it.
Which repair material is best for different types of granite cracks on floors?
For hairline cracks, a color-matched epoxy resin filler is commonly used because it penetrates and bonds while remaining relatively stain-resistant. For wider cracks or chips, epoxy can still work, but you may need a more robust stone filler designed for structural gaps and then a careful polish to restore the finish. Avoid standard wood fillers or harsh caulks, which can discolor and fail in granite flooring; always choose a granite crack repair system compatible with your stone’s finish (honed, polished, or brushed).
📅 Last Updated: October 09, 2026 | Topic: How to fix cracks in granite floors? | Content verified for accuracy and freshness.
References
- Google Scholar Google Scholar
https://scholar.google.com/scholar?q=how+to+repair+cracks+in+granite+floor+tile - Google Scholar Google Scholar
https://scholar.google.com/scholar?q=granite+crack+repair+epoxy+filler+stone+stability - Google Scholar Google Scholar
https://scholar.google.com/scholar?q=stone+floor+crack+repair+technical+binder+matching+sealant - https://www.marble-institute.com/
- https://www.naturalstoneinstitute.org/
- https://www.britannica.com/technology/granite
- Granite
https://en.wikipedia.org/wiki/Granite - Silica and Worker Health | Silica | CDC
https://www.cdc.gov/niosh/topics/silica/ - Google Scholar Google Scholar
https://scholar.google.com/scholar?q=How+to+fix+cracks+in+granite+floors? - How to fix cracks in granite floors? – Search results
https://en.wikipedia.org/wiki/Special:Search?search=How+to+fix+cracks+in+granite+floors?


