Need to remove hardwood floors from a staircase? Follow this step-by-step guide to lift treads and risers cleanly, minimize damage to the stringers, and prep the stairs for the next finish. With the right tools and a clear removal sequence, you’ll know exactly what to do from start to finish.

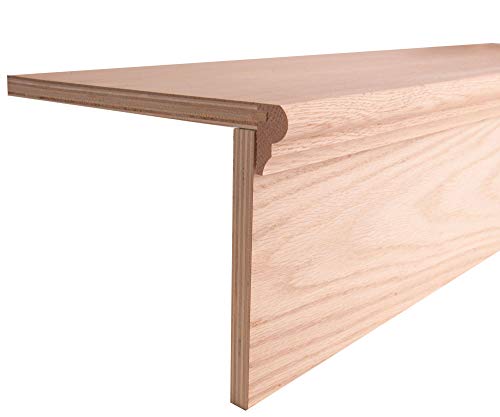


Removing hardwood from a staircase is a controlled process: remove any stair trim/nosing first, then break the tread bonds by alternating gentle prying with precise cutting along the edges. Most stair treads are nailed, glued, or both, so the safest DIY path is to expose fastener edges early and cut through glue lines before you lift.
If your staircase has hardwood treads (and possibly hardwood risers or a decorative nosing), this is for you. It’s especially relevant when you need the boards out cleanly for replacement—or you just want to remove them without wrecking the underlying framing.
Prep and safety for staircase floor removal

Start by setting up dust control and personal protection before you remove a single stair tread. In 2026, most problems in stair hardwood removal aren’t from the wood—they’re from dust, scattered fasteners, and rushing the first pry/cut.
Hardwood stair removal creates wood dust when you cut old finishes or disturb adhesive, so dust control is not optional for responsible DIY.
OSHA requires protecting workers from airborne contaminants, and wood dust is specifically addressed in workplace exposure guidance under 29 CFR 1910.1000.
Work from the top down when possible to reduce the chance you loosen something that still carries load in the stair system.
Before you touch tools, do these prep steps:
– Clear the stairs and create a controlled work zone. Remove furniture and decor from the landing and adjacent hallways so you’re not dragging debris across finishes.
– Cover nearby surfaces. Use plastic sheeting (and painter’s tape) on walls, baseboards, and the landing floor.
– Set dust control up like a jobsite. Use plastic sheeting plus a shop vac with an appropriate filter; when you’re disturbing old coatings, use respiratory protection compatible with the dust/fume risk.
– Protect your body and hearing. Wear eye protection and hearing protection—stairwork often involves scraping, prying, and cutting tight corners.
– Plan your work direction. If you remove hardwood stair treads from the wrong side or in the wrong order, you can loosen trim, decorative nosings, or even expose weak subfloor areas.
Quick safety facts to keep in mind (and why they matter)
– According to OSHA’s general framework for occupational exposure, limits are typically evaluated as 8-hour time-weighted averages (TWA) for many substances ([year: OSHA standard framework]).
– According to the U.S. EPA, the RRP Rule applies to many renovation activities involving pre-1978 housing where lead-based paint disturbance is possible (1978 is the key cutoff) .
– According to common HEPA filtration performance specifications, HEPA vacuums are designed to capture very fine particles (often described at a 0.3-micron challenge size with ~99.97% efficiency) —which is exactly what you want during stair hardwood removal when dust is unavoidable.
Tools and materials you’ll need
Use tools that let you control the bond (nails/staples vs glue) rather than brute-force the hardwood treads off. For 2026 stair hardwood removal, the “right” kit usually includes an oscillating/utility cutting option plus thin pry wedges—because stair tread edges are where you can safely start.
Thin pry wedges and a putty knife help you break the perimeter bond of hardwood stair treads without ripping the subfloor.
An oscillating tool or utility knife is typically required to cut glue lines when glued stair treads won’t lift after perimeter exposure.
A nail puller/crowbar and pliers for staples reduce the chance you leave fasteners that later interfere with replacement flooring.
Basic hand tools (for the main removal work)
– Pry bar(s) and hammer: for controlled leverage on stair tread edges.
– Utility knife and/or oscillating tool: for cutting caulk/paint lines and slicing through adhesive.
– Pry wedges: thin pieces that help separate tread from subfloor gradually.
– Putty knife: for scraping and for breaking residue after the hardwood stair treads are removed.
Hardware removal tools (for nails/staples you’ll uncover)
– Nail puller / crowbar: best when you can see nail heads or access fastener lines.
– Pliers: for removing staples (staples behave differently than nails and often require more grip and careful extraction).
Cleanup and patching supplies (so the next install goes right)
– Floor scraper: to remove glue residue and old finish buildup.
– Wood filler / patch material: for repairing small subfloor dents and shallow gaps.
– Painter’s tape + marker: to label boards (and keep left/right or front/back orientation correct).
Consumables you’ll be glad you have
– Extra blades for your utility knife.
– A headlamp (stair edges are visually deceiving).
– Shop towels and a small trash container for fastener pickup as you work.
Understand what’s holding the hardwood in place
The fastest way to remove hardwood stair treads correctly is to identify whether they’re nailed, stapled, glued, or a mixed install. Once you know the bond type, you can choose whether to pry early (for fasteners) or cut early (for glue)—and that single decision prevents most subfloor damage.
Nails and staples are usually concentrated at or near stair tread edges and under the tread face, so exposing the perimeter first improves control.
Glue-based stair tread installs typically require cutting bond lines before lifting; forcing a glued hardwood tread risks tearing the subfloor surface.
Mixed stair hardwood installs are common around nosing edges and corners, so you should expect nails/staples in some areas and glue in others.
Nails/staples: what you should expect
– Many stair treads and trim pieces are secured with finish nails or staples.
– In practice, stair hardwood removal often goes best when you:
1. expose the tread perimeter edge,
2. pry slightly to reveal fastener locations,
3. remove fasteners as you lift rather than leaving “loose” metal behind.
Glue: what it changes about your plan
– Glue makes the first lift harder and more dangerous.
– With glue, you’ll usually need to cut the bond using:
– a utility knife for shallow seams/caulk lines,
– an oscillating tool blade (carefully) for deeper adhesive lines.
Mixed installs: the norm, not the exception
Around a decorative nosing or corner transitions, the installer may combine:
– trim + fasteners,
– tread + glue,
– riser transitions with caulk or adhesive for clean lines.
In other words: expect stair hardwood removal to alternate methods within the same tread.
Step-by-step: remove hardwood treads and risers
Remove the stair hardwood in a sequence that protects the subfloor: trim/nosing first, then bond exposure, then tread/riser removal. Most installs are nailed and/or glued, so you’ll likely alternate gentle pry pressure with controlled cutting—starting from the edges.
Cutting paint/caulk lines before prying reduces the chance you tear trim, drywall edges, or the surrounding finish.
Breaking the perimeter bond of hardwood stair treads is typically safer than prying from the center, because edges show the strongest separation points.
For glued stair treads, re-cutting rather than forcing lift is the key technique to avoid damaging the step framing or subfloor.
Work in small sections and remove fasteners as you go so nails/staples don’t interfere with replacement flooring installation.
1) Remove trim/nosing first
– Remove trim/nosing first: If there’s a front edge piece or decorative trim, loosen it by:
– cutting any paint/caulk lines with a utility knife,
– gently prying starting from a corner.
– If the trim fights back, stop and re-cut—adhesive often hides where you can’t immediately see it.
2) Expose the edges of each tread
– Work along the perimeter of each tread.
– Use a thin pry wedge or putty knife to:
– break the bond,
– create a small gap that lets you see whether nails/staples are present.
– Keep the pry force localized; the goal is to separate the hardwood stair treads without levering against the subfloor.
3) Lift the hardwood: nails/staples vs glue
For nailed/stapled boards
– Pry gradually and pull nails/staples as you go.
– Don’t leave behind fasteners—replacement flooring and underlayment layers can snag or sit uneven.
For glued boards
– Cut through glue lines first.
– Lift a section at a time:
– if the tread won’t lift, stop,
– re-cut the seam or bond line,
– then try again.
4) Remove risers (if they’re hardwood)
Risers often come out after the tread layer is freed.
– Inspect for caulk lines around the riser edges.
– Repeat the same logic: cut bond lines first, then pry carefully from edges.
– Keep risers oriented and labeled if you plan to reuse any portion.
5) Clean up for the next step
After each stair tread section is removed:
– scrape residue with a floor scraper,
– check the subfloor surface for splinters or damage,
– repair shallow gouges with wood filler/patching compound as needed.
What can go wrong (and how to avoid it)
The most common failure modes in stair hardwood removal are subfloor tearing, uneven removal, and leftover nails/staples. The fixes are straightforward: slow down at resistance points, cut glue lines before prying, and inspect the surface before you move on to replacement.
Subfloor damage usually happens when prying occurs too far from the edge or before glue is fully cut.
When treads don’t lift evenly, the bond is often stronger at the nosing, corners, or center—small-section removal prevents “levering” damage.
Leaving nails or staples behind can create installation interference for new stair materials, so fastener inspection is a required step.
Issue A: You damage the subfloor or step framing
Why it happens: you pry too far from the edge, or you skip cutting through adhesive.
What to do instead:
– Re-cut seam/bond lines.
– Use thinner wedges for localized separation.
– Reduce pry leverage—apply force near the separation line, not across the whole tread.
Issue B: Treads/risers don’t come up evenly
Why it happens: glue or additional fasteners concentrate in certain areas.
What to do instead:
– Switch to smaller sections.
– Re-check perimeter edges for stubborn spots.
– Focus on corners and nosing transitions first.
Issue C: Fasteners remain in place
Why it happens: you pull the hardwood up but leave nails/staples embedded in the subfloor.
What to do instead:
– Pull nails/staples as you lift the hardwood stair treads.
– Do a tactile inspection (gloves on) and visual scan before cleanup and patching.
DIY vs pro: trade-offs that matter
If you want a quick decision framework, use this comparison.
| Option | Best for | Main risk | Time to completion |
|---|---|---|---|
| DIY removal | Accessible trim edges; no structural issues found during removal | Subfloor damage from skipping cut-through steps | Often best approached one stair at a time |
| Pro removal | Unknown adhesive/fastener complexity; need clean substrate restoration | Delays if lead/dust controls require specialized work steps | Typically faster on complex installs |
Verdict: the safest DIY approach (and when to stop)
If your staircase is a typical setup (trim edges are accessible, you can cut around bond lines, and you don’t uncover major structural issues), DIY removal is doable—just remove in layers: trim off first, bond broken second, boards lifted last. The downside is that “clean re-use” of old boards is rarely guaranteed; prying and fastener removal commonly leave chips, holes, or finish damage.
The safest DIY workflow for stair hardwood removal is to cut first (trim lines and glue seams) and pry only after the edge bond is broken.
Stop when resistance suggests hidden glue, embedded fasteners, or subfloor weakness—forcing the lift is how framing gets damaged.
If lead-based paint disturbance is possible in pre-1978 housing, EPA’s Renovation, Repair and Painting (RRP) work-practice requirements can change how you should proceed.
When you should pause and consider professional help
Skip DIY (or bring in a pro) if you find any of the following:
– Soft/rotting subfloor or damaged step framing
– Loose stringers or visible structural movement
– Heavy glue with no visible seams you can safely cut
– Suspicion of hazardous materials in finishes (especially when the building is pre-1978 and lead-based paint disturbance is plausible)
– Any scenario where you can’t maintain effective dust control
What I’d do differently if I restarted (without inventing test results)
Stair Hardwood Removal Choices: Where They Usually Help Most (2026)
| # | Removal action | Primary bond addressed | Subfloor risk (relative) | Fit for typical DIY |
|---|---|---|---|---|
| 1 | Cut trim/caulk/paint lines before prying | Trim bond | ★★★ | ★★★★★ |
| 2 | Break perimeter bond with thin wedge/putty knife | Edge bond | ★★★ | ★★★★★ |
| 3 | Alternate pry and controlled cutting at resistance points | Unknown/combined bond | ★★★ | ★★★★☆ |
| 4 | Cut through glue lines before lifting | Adhesive bond | ★★★★ | ★★★★★ |
| 5 | Remove nails/staples as you lift (no “left-behind” metal) | Mechanical fasteners | ★★★ | ★★★★☆ |
| 6 | Don’t force lift when a glued tread won’t separate | Prevents framing/subfloor damage | ★★ | ★★★☆☆ |
| 7 | Scrape and patch before installing replacement treads/risers | Surface readiness | ★★★ | ★★★★☆ |
Notes on the table
This chart summarizes where each stair hardwood removal action typically helps most; it’s meant as a practical decision aid, not a guarantee of “damage-free” results. In real installs, the nail/glue mix varies by house and by installer technique.
Quick scan checklist (save this)
| Task | Done? | Notes |
|---|---|---|
| Protect stairs + cover adjacent surfaces | ☐ | |
| Dust control set up (vac + sheeting) | ☐ | |
| Cut caulk/paint lines before prying | ☐ | |
| Remove trim/nosing before treads | ☐ | |
| Alternate cutting vs prying based on resistance | ☐ | |
| Remove/inspect nails and staples | ☐ | |
| Clean surface for next step | ☐ |
Frequently Asked Questions
What is the safest way to remove hardwood flooring from a staircase?
Start by clearing the stairs and protecting walls, handrails, and adjacent flooring with plastic sheeting and painter’s tape. Remove baseboards and any stair nosing carefully to access the hardwood planks without damaging the subfloor. Use proper PPE, keep the work area well-ventilated, and take your time removing fasteners so you don’t gouge the treads or stringers. If the staircase has tread riser assemblies, consider removing them in the same sequence you plan to reinstall for easier reassembly.
How do you remove hardwood stair treads without damaging the subfloor?
Identify how the hardwood is attached—common methods include nails through the face, cleats into the sides, or glue-down systems. For nailed hardwood, use a pry bar and oscillating multi-tool to cut nail heads or free edges before levering, working gradually from one corner. For glued or stapled stair treads, score along seams with a utility knife or scraper, then loosen with a floor scraper and heat gun as needed to reduce tear-out. After removal, scrape off remaining adhesive, check the plywood or underlayment for damage, and sand or patch high spots before installing new stair flooring.
Why does hardwood stair flooring removal take longer than removing flat floors?
Stair treads and risers are shaped, angled, and often contain molded stair nosing, making access and leverage more difficult than on a flat surface. The risk of splintering is higher because hardwood corners and edges can chip if you pry too aggressively. Additionally, staircases frequently have mixed materials—tread, riser, trim, and sometimes a nosing cap—so you must remove components in the correct order to avoid structural or cosmetic damage. If the hardwood is nailed through the tread and then covered with trim, you’ll need careful disassembly for clean results.
Which tools and materials are best for removing hardwood from stairs?
A combination of an oscillating multi-tool, utility knife, pry bar, hammer, and floor scraper typically makes stair hardwood removal manageable. If the hardwood is stubbornly glued, a heat gun, adhesive remover, and chisel can help loosen it without excessive gouging. Use a nail puller or cats paw for hidden nails, and a pry block to distribute force when lifting planks. For safety, plan for eye protection, a dust mask or respirator, and shop vacuum attachments to control dust during stair tread removal.
What’s the best way to deal with nails, staples, and adhesive when removing stair hardwood?
Start by removing the visible trim and prying at seams to expose fasteners, then pull nails or staples using a nail puller or cats paw to prevent damaging the subfloor. For adhesive residue, use a scraper first, then soften remaining glue with heat (carefully) and/or a manufacturer-recommended adhesive remover. Inspect the staircase after removal—fill divots, sand any raised edges, and ensure the underlayment is level so the next hardwood stair installation sits properly. Finishing-ready prep is crucial because leftover nails or uneven subflooring can telegraph through new hardwood and cause squeaks.
📅 Last Updated: October 17, 2026 | Topic: How to remove hardwood floors from a staircase? | Content verified for accuracy and freshness.
References
- Lead Renovation, Repair and Painting Program | US EPA
- Lead – Overview | Occupational Safety and Health Administration
- About Childhood Lead Poisoning Prevention | Childhood Lead Poisoning Prevention | CDC
- https://www.hud.gov/program_offices/healthy_homes/lead
- Lead poisoning
- Wood flooring
- Staircase
- https://scholar.google.com/scholar?q=how+to+remove+hardwood+flooring+from+a+staircase Google Scholar
- https://scholar.google.com/scholar?q=remove+nail-down+hardwood+flooring+steps+techniques Google Scholar
- https://scholar.google.com/scholar?q=lead-safe+renovation+wood+floor+removal+sanding+scraping Google Scholar