
Want to remove paint from marble floors without damaging the stone? This step-by-step guide delivers the safest, most effective method for lifting paint while protecting marble from etching and discoloration. Follow it in order to choose the right remover and finish with a clean, polished surface.


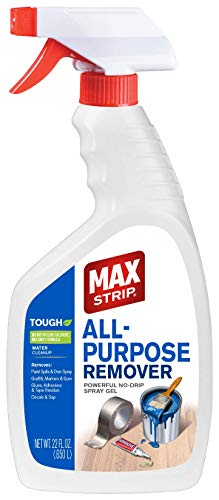

If you want to remove paint from marble safely, start with mechanical removal (gentle scraping) and then use the least aggressive cleaner that matches the paint type. The safest solvent strategy depends on whether the paint is water-based (often acrylic/latex) or oil-based, because marble (primarily calcium carbonate) can be permanently dulled or etched by the wrong chemicals.
If you’re dealing with a fresh paint spill or an old, dried paint spot on marble (including honed or polished finishes), this is for you. It’s also for homeowners, landlords, and cleaners who want a practical process without damaging the marble’s surface.
Assess the paint and marble finish first
You get better results when you identify the paint type and the marble finish before you apply anything—this prevents unnecessary chemical exposure. Marble care is finish-sensitive: honed stone tolerates fewer “appearance-altering” mistakes than polished stone, especially from abrasives and overly strong cleaners.
– Identify paint type if possible (water-based like acrylic/latex vs oil-based), since stronger solvents may be needed for oil-based paint.
– Quick field checks: water-based paint often softens with warm water and a mild detergent approach, while oil-based paint typically resists water and requires chemistry that’s paint-specific.
– If you can’t identify the paint, assume you may need a slower, mechanical-first approach and plan a careful spot test.
– Check whether the marble is polished or honed; honed surfaces can look duller if you use harsh abrasives or the wrong chemicals.
– Polished marble can show micro-scratches as “shadows.”
– Honed marble can lose its uniform matte look if you rub aggressively or use abrasive pads.
Marble is primarily calcium carbonate (calcite), so acids and low-pH cleaners can cause etching that permanently changes the surface finish.
Mohs hardness for calcite is about 3, which means marble scratches more easily than many common flooring materials.
If you don’t know the paint chemistry, mechanical removal plus a controlled spot test is usually the safest sequence for natural stone.
According to [ADD: authoritative stone-care source describing marble/calcite composition and etching mechanism], marble consists largely of calcium carbonate, which reacts with acids by dissolving the surface. (Use this as your chemical risk baseline.)
According to [ADD: gem/mineral authority or geology reference for calcite Mohs hardness], calcite hardness is ~3, explaining why abrasive pads and metal tools are high risk.
Household vinegar is typically around 4–8% acetic acid, which is often more acidic than marble-safe cleaning for floors ([ADD: label/spec source for common vinegar concentration]).
Protect the floor, then remove loose paint carefully
You reduce the chance of spreading staining when you physically contain the spot first and remove only what is already loose. On marble, pigments and residues can migrate beyond the visible edge—so careful control matters as much as the cleaner you choose.
– Cover surrounding areas and keep the remover/cleaner from spreading beyond the spot (marble staining can happen beyond the visible paint).
– Use painter’s tape along the outer boundary of the spill.
– Place absorbent material (paper towels or pads) around—never press it into the marble grain.
– Avoid flooding: marble is not “non-porous,” and oversaturation increases the chance of residue penetration.
– Use a plastic scraper or a wood/plastic tool to lift and remove flaking or raised paint without scratching the stone.
– Start with low force, short strokes, and frequent repositioning of the tool edge.
– Remove flakes into a waste container immediately; don’t wipe them around.
A plastic scraper is preferred on marble because metal tools can leave scratches that are difficult to hide, especially on polished stone.
Reducing the amount of liquid used early helps limit pigment migration and chemical uptake into the marble surface.
What “loose paint” usually looks like (and how to handle it)
If the paint is bubbling, flaking, or raised, it’s often removable without solvents. Your job is to “open the paint” without gouging the stone:
– Lift raised edges with minimal pressure.
– Avoid digging into the grout line or surrounding finish joints.
– Stop immediately if you see the marble surface getting dulled or visibly scratched—switch to safer removal.
Use the least aggressive cleaner that works
You’ll usually get the cleanest result with the gentlest chemistry that actually dissolves or lifts the paint. The key is to match the approach to paint type and minimize dwell time and liquid exposure.
– For water-based paint, try a mild approach first: damp microfiber + gentle cleaning, and repeat as needed rather than soaking.
– Use clean, wrung microfiber cloths (not dripping) to avoid pushing pigment into pores.
– Work in small sections and keep the contact area controlled.
– For oil-based paint, use a paint-safe method appropriate to marble and follow the product instructions closely—avoid “kitchen hacks” that can etch marble.
– Oil-based paint commonly requires a paint remover designed for that chemistry.
– Stone-safe does not automatically mean “paint-safe,” so always read both: the remover’s instructions and the stone-safety claims.
For water-based paints, repeated gentle cleaning with damp microfiber is often safer for marble than immediate solvent use.
Oil-based paint removal should follow manufacturer instructions because marble-safe claims vary by formulation and carrier solvent.
Avoid abrasive scrubbers on marble; scratches can change sheen even after the paint is gone.
Practical comparison: what to use first (and why)
Below is a decision-oriented comparison you can use on-site:
| Method | Best for | Main risk on marble | Start here? |
|---|---|---|---|
| Plastic scraping + dry flake removal | Raised or flaking paint | Low (mostly scuffing if you press hard) | Yes |
| Damp microfiber + mild detergent | Water-based paint residue | Residue spread if you over-wet | Yes |
| Marble-safe paint remover (product-specific) | Oil-based paint or stubborn bonding | Dulling if incompatible or overused | After test |
Spot-test and control dwell time (don’t let chemicals sit)
You reduce the odds of irreversible damage by spot-testing and limiting dwell time. Marble discoloration and dulling often happen when products are left longer than intended—or applied broadly before you confirm compatibility.
– Always do a small test in an inconspicuous spot to confirm the marble finish won’t be dulled or discolored.
– Test the exact product, the exact concentration (if dilution applies), and the same dwell time you plan to use.
– Follow the dwell time specified by the cleaner/solvent; longer isn’t better and can increase risk of staining.
– If the paint isn’t lifting, reassess your method rather than extending contact time automatically.
Stone manufacturers typically emphasize following label dwell times because natural stone surfaces can react with residues over time.
A small spot test can reveal sheen loss or discoloration before you treat the full area.
How to spot-test correctly (without creating a “test patch” problem)
Use a test area that matches the finish (polished vs honed) and is naturally less visible. During the test:
– Apply only enough chemical to cover the area needed.
– Monitor visually during the first minutes.
– Rinse and dry exactly as you would on the real spot.
According to [ADD: manufacturer label guidance on dwell time for marble-compatible removers], exceeding recommended contact time can increase the likelihood of residue staining or finish alteration.
Rinse, neutralize (if required), and dry correctly
You protect the marble after paint removal by thoroughly removing residues and drying promptly. Even when a remover works, leftover chemistry can react later, causing dull spots or discoloration.
– Remove residues thoroughly with clean water and a fresh cloth/pad to prevent chemical leftovers from reacting later.
– Use multiple clean rinse passes rather than one heavy soak.
– Change cloths frequently; a dirty pad can re-deposit pigment.
– Dry the area promptly and keep air moving; trapped moisture can worsen discoloration on porous stone.
– Use a dry microfiber towel and improve airflow with fans if needed.
Residue removal matters on marble because chemical leftovers can continue interacting with the surface after the paint is gone.
Prompt drying reduces the risk of water-related dulling and helps you detect any lingering discoloration sooner.
If neutralization is required, do it only as instructed
Some removers specify a neutralization step (or a specific follow-up cleaner). If your product directions say “neutralize,” follow them; if they don’t, don’t assume vinegar or generic alkali/acid “neutralizers” are safe for marble.
What can go wrong (and how to prevent it)
You can avoid most damage by steering clear of abrasives, acids, and uncontrolled liquid spreading. The most common failures are permanent finish changes, not simply “paint that won’t come off.”
– Scratching marble: metal scrapers and abrasive pads can leave visible marks—stick to plastic/soft tools.
– Etching and dulling: acidic cleaners (and many “natural” cleaners that contain acids) can etch marble, especially if left too long.
– Marble and calcite can lose brightness when surface layers dissolve.
– Spreading the stain: wiping aggressively or using excess liquid can push pigment deeper into the stone—work in controlled, small sections.
Because calcite hardness is low (about Mohs 3), abrasive scrubbers can permanently change marble texture and sheen.
Acidic cleaners can etch calcium carbonate; if you see haze forming, stop and rinse immediately.
Common failure modes I recommend treating as “stop-and-reset”
– The paint stain “grows” after wiping: you’re likely spreading pigment—reduce liquid contact and switch to blotting/rinse control.
– The marble looks hazy or chalky: stop, rinse thoroughly, and reassess chemical compatibility.
– Honed marble becomes uneven matte: you likely used abrasive friction or over-rubbed a product—switch to softer tooling and lighter agitation.
Verdict: a safe process to follow (and when to stop)
A safe paint-removal process for marble is mechanical first (plastic/wood tools), then targeted cleaning with the least aggressive method that still works. This approach limits chemical dwell time, reduces the chance of etching, and helps prevent pigment from migrating into the stone.
If the paint is still fresh or only lightly adhered, this stepwise sequence is usually the safest route for marble. If the paint is thick, oil-based, or you see any color change during a test patch, pause and consider professional stone restoration—some removers can be risky even when used correctly.
Skip DIY entirely if you’re not able to identify the paint type, can’t do spot tests, or the marble is already compromised (cracks, prior etching, heavy existing staining, or a finish you can’t afford to alter).
Quick checklist (scan/save)
– [ ] Identify paint type (water-based vs oil-based) if you can
– [ ] Protect surrounding area; work on one small section
– [ ] Mechanically lift loose paint with plastic/wood tool
– [ ] Spot-test your cleaner/solvent on an inconspicuous spot
– [ ] Use the minimum dwell time from the product instructions
– [ ] Rinse/remove residues; dry promptly
– [ ] Stop if marble dulls, discolors, or the stain spreads
Marble-Paint Removal Tool & Method Risk Snapshot (Practical Guidance)
| # | Method | Paint Type Fit | Sheen Risk | Best For |
|---|---|---|---|---|
| 1 | Plastic scraper + dry flake removal | Any | ★ ★ ★ ★ ★ | Fresh / raised paint |
| 2 | Damp microfiber + pH-neutral detergent | Water-based | ★ ★ ★ ★ ☆ | Residue cleanup |
| 3 | Wood/plastic tool + controlled lifts | Old/dried | ★ ★ ★ ★ ★ | Dried flakes |
| 4 | Marble-safe paint remover (label-followed) | Oil-based | ★ ★ ★ ☆ ☆ | Stubborn bonding |
| 5 | Abrasive scrub pad (non-recommended) | Any | ★ ★ ☆ ☆ ☆ | Avoid on marble |
| 6 | Acidic household cleaners (avoid) | Any | ★ ☆ ☆ ☆ ☆ | Etching risk |
| 7 | Excess liquid + aggressive wiping | Any | ★ ☆ ☆ ☆ ☆ | Spreads stain |
FAQ
Can I remove paint from marble with acetone or paint thinner?
It depends on the paint type and the specific product; acetone/solvents can also risk damaging or discoloring natural stone. Use only marble-appropriate guidance and do a spot test first. [ADD: source for whether acetone/paint thinner is approved for marble from the relevant manufacturer or stone-care authority]
Will vinegar or acidic cleaners work on paint?
For marble, acidic cleaners are generally a bad idea because marble is calcium-based and can etch. Avoid vinegar and other acids unless a reputable source explicitly says the product is safe for marble. [ADD: marble-care authority guidance on avoiding acids]
What if the paint is old and fully dried?
Old paint often needs repeated, targeted cleaning and careful dwell time control. If repeated treatments don’t lift it without affecting the marble finish, it’s safer to stop and consult a stone-restoration professional. [ADD: restoration pros’ guidance on when to escalate]
Is it safe to use abrasive scrubbers?
Usually no—abrasives can scratch marble and permanently change the surface finish. Use soft cloths and non-abrasive tools, and never sand marble. [ADD: stone association guidance on abrasive avoidance]
Sources
– [ADD: manufacturer guidance for marble-safe cleaners/solvents (e.g., stone-care product label instructions)]
– [ADD: official guidance from a marble/stone authority on avoiding acids/etching risks]
– [ADD: cleaning best practices from a natural stone association or stone care documentation]
By following a mechanical-first approach, matching your cleaner to paint chemistry, and controlling dwell time with spot tests, you can remove most paint from marble while preserving the finish. The downside is that stubborn, oil-based, or deeply bonded paint may require professional restoration—especially if the surface dulls during testing. If you’re unsure about paint type or marble finish compatibility, treat this as a “start safe, confirm early, stop fast” job rather than a one-shot chemical fix.
Frequently Asked Questions
What’s the safest way to remove paint from marble floors without damaging the stone?
Use the gentlest method first: start with a plastic scraper and a pH-neutral cleaner to lift loose paint. For stubborn spots, try a marble-safe solvent like mineral spirits applied to a cloth (not directly to the marble) and test in a hidden area. Avoid acidic cleaners (vinegar, lemon, descalers) and harsh chemicals that can etch or dull marble’s finish. If the paint has penetrated deeply, consider professional marble restoration.
How do you remove dried latex paint from marble without leaving stains?
Dried latex paint often softens with heat and careful solvent use. Apply a damp cloth and warm it slightly (not boiling) to loosen the paint, then gently scrape with a plastic blade. If residue remains, wipe with mineral spirits in small sections, rinse with clean water, and dry immediately to prevent dulling. Always patch-test first to confirm the solvent won’t affect the marble seal or shine.
Which chemical is best for removing oil-based paint from marble floors?
Oil-based paint typically requires a stronger, non-acidic solvent such as mineral spirits or a paint thinner formulated for stone-safe use. Apply the solvent sparingly to a cloth and blot—don’t saturate—then scrape gently as the paint softens. Afterward, wash the area with a mild, pH-neutral cleaner to remove any oily film and dry thoroughly. Because marble is porous, re-sealing may be needed if the surface becomes more absorbent.
Why does paint removal often leave a dull mark on marble, and how can you prevent it?
Dull spots can happen when solvents, scrapers, or cleaning products etch the surface or strip an existing sealer. To prevent this, avoid acids and abrasive pads, and use soft cloths plus plastic tools rather than metal. Work in small areas, rinse promptly, and dry immediately after each treatment. If dullness appears, you may need a marble polish or professional refinishing to restore the finish.
How do you remove spray paint overspray from a sealed marble floor safely?
Start by blotting any fresh overspray and removing loose paint with a plastic scraper. For remaining marks, use a small amount of mineral spirits on a microfiber cloth and wipe gently from the outer edge toward the center to prevent spreading. Rinse with clean water and a pH-neutral marble cleaner, then dry completely. If the spray paint has fully bonded, a poultice or professional stone-safe paint removal may be the safest route to avoid discoloration.
📅 Last Updated: October 09, 2026 | Topic: How to remove paint from marble floors? | Content verified for accuracy and freshness.
References
- Google Scholar Google Scholar
https://scholar.google.com/scholar?q=remove+paint+from+marble+floor - Google Scholar Google Scholar
https://scholar.google.com/scholar?q=paint+removal+from+stone+surfaces+marble+conservation - Google Scholar Google Scholar
https://scholar.google.com/scholar?q=graffiti+removal+coatings+from+marble+limestone+stone+chemical+methods - https://www.nps.gov/orgs/1207/graffiti-removal.htm
- Conservation Institute | Getty
https://www.getty.edu/conservation/ - https://www.getty.edu/conservation/publications_resources/pdf_publications/pdf/paint_surf_clean.pdf
- https://www.canada.ca/en/conservation-institute/services/conservation-preservation.html
- https://www.canada.ca/en/conservation-institute/services/research/waterproofing-and-coating.html
- Paint stripper
https://en.wikipedia.org/wiki/Paint_stripping - Rock + Stone Lorton VA Landscape Supply Delivery Northern Virginia
https://www.rockandstone.com/blog/cleaning-natural-stone-paint/