To lay Coretec flooring, start by preparing the subfloor, making sure it is clean, dry, and level. Then, measure and mark the center of the room, and begin the installation from there, working row by row and using a tapping block and mallet to secure each plank in place.
Coretec flooring is a popular choice for homeowners due to its durability, easy installation, and attractive aesthetics. Whether you’re a DIY enthusiast or a professional installer, knowing how to lay Coretec flooring is essential to achieve a flawless and long-lasting result.
In this guide, we’ll provide you with a step-by-step process, covering everything from prepping the subfloor to securing the planks in place. By following these instructions and using the right tools, you’ll be able to transform your space with beautiful Coretec flooring that will stand the test of time. So, let’s dive in and discover how you can lay Coretec flooring like a pro.
What Is Coretec Flooring?
Coretec flooring is a type of luxury vinyl plank (LVP) flooring that has gained popularity in recent years. It is known for its durability, versatility, and realistic appearance, making it an excellent choice for homeowners and commercial spaces alike.
Definition And Overview Of Coretec Flooring
Coretec flooring is a high-quality flooring option that is made up of several layers. It typically includes a top wear layer, a vinyl layer with a wood or stone pattern, a core layer that provides stability, and a backing layer for added support. The core layer is often made of recycled wood and bamboo dust, limestone, and PVC. This combination of materials makes Coretec flooring water-resistant, durable, and stable.
Benefits Of Using Coretec Flooring
- Realistic appearance: Coretec flooring comes in a wide range of designs that mimic the look of natural wood or stone, giving your space an authentic and stylish look.
- Durability: With its wear layer and strong core layer, Coretec flooring is highly resistant to scratches, dents, and stains, making it ideal for high-traffic areas.
- Water-resistance: Coretec flooring is waterproof, meaning it can be installed in areas prone to moisture, such as kitchens, bathrooms, and basements, without worrying about damage.
- Easy maintenance: Coretec flooring is effortless to clean and maintain. Regular sweeping, vacuuming, and occasional mopping with a mild cleaner are usually sufficient to keep it looking its best.
- Simple installation: Coretec flooring often features a click-lock installation system, making it easy and convenient to install without the need for adhesives.
Overall, Coretec flooring is a fantastic choice for those seeking a durable, stylish, and low-maintenance flooring option that can withstand the demands of everyday life.
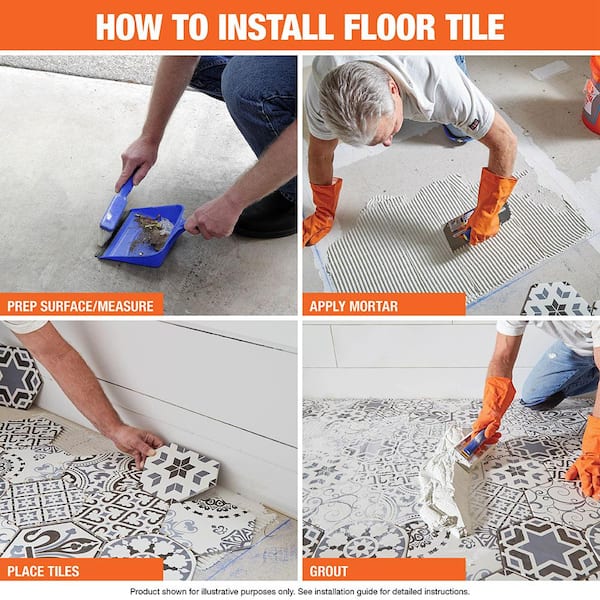
Credit: www.homedepot.com
Planning Your Coretec Flooring Installation
Planning Your Coretec Flooring Installation
When installing Coretec flooring, proper planning is essential for a successful outcome. Before getting started, it’s crucial to measure and assess the space where the flooring will be laid. This involves accurately measuring the dimensions of the room and taking note of any existing flooring or subflooring materials that may need to be removed or prepped.
Another important step in the planning process is choosing the right Coretec flooring style and color. This decision should be based on personal preference, as well as the overall aesthetic and functionality of the space. Coretec offers a wide range of options, from classic wood designs to modern stone patterns, ensuring there is something to suit every taste.
Gathering the necessary tools and materials is the final step in the planning phase. These include adhesive, underlayment, transition strips, and any additional installation accessories recommended by the manufacturer. It’s crucial to have everything on hand before starting the installation to ensure a smooth and efficient process.
Preparing The Subfloor
Before laying Coretec flooring, it is essential to ensure that the subfloor is in the proper condition. Here are the steps to follow:
- Checking the subfloor condition: Thoroughly inspect the subfloor for any signs of damage or moisture. Address any issues before proceeding with the installation.
- Cleaning and leveling the subfloor: Remove any dirt, debris, or adhesive residue from the subfloor. Use a self-leveling compound to even out any uneven areas to provide a smooth surface.
- Installing an underlayment if necessary: Depending on the condition of the subfloor and the type of Coretec flooring you are using, you may need to install an underlayment. This will provide additional sound insulation and moisture protection.
Acclimating Coretec Flooring
Acclimating Coretec Flooring is a crucial step in the installation process to ensure optimal performance and longevity. This process allows the flooring to adjust to the temperature and humidity conditions of the room where it will be installed.
Proper acclimation prevents the flooring from expanding or contracting after installation, which can lead to gaps or buckling. To acclimate Coretec Flooring, it is recommended to leave the unopened boxes in the room for at least 48 hours. This acclimation period allows the planks to adjust to the ambient temperature and humidity.
During acclimation, the ideal conditions for Coretec Flooring are a temperature range of 65-85°F and a relative humidity range of 35-55%. Maintaining these conditions helps ensure that the flooring adapts properly before installation.
| Duration | Ideal Conditions |
|---|---|
| At least 48 hours | Temperature: 65-85°F Relative Humidity: 35-55% |
By adhering to the acclimation guidelines, you can minimize the risk of issues with your Coretec Flooring and enjoy a beautiful and long-lasting installation.
Installing The First Row
When installing Coretec flooring, it is important to start with the first row. Here are some tips to help you get started:
- Begin by ensuring that the subfloor is clean, dry, and level. Any imperfections could affect the installation.
- Measure and cut the first plank to fit against the starting wall, leaving a 1/4 inch expansion gap.
- Apply Coretec adhesive to the back of the plank using a trowel or a recommended adhesive applicator.
- Press the first plank firmly into place, ensuring it is aligned straight with the starting wall.
- Continue this process, adding more planks to the first row. Remember to stagger the seams at least 6 inches from the previous plank.
- Use a tapping block and mallet to secure the planks together, ensuring a tight fit.
By following these tips, you can successfully install the first row of your Coretec flooring. Remember to apply adhesive, align the planks straight, and secure them tightly for a professional-looking installation.
Installing Subsequent Rows
When installing subsequent rows of Coretec flooring, it is crucial to interlock the planks correctly to achieve a seamless and professional finish. Start by aligning the short end of the plank with the previous row’s short end, ensuring a tight fit. Use a tapping block and rubber mallet to gently tap the planks into place, making sure all the edges are snugly connected. To achieve the desired length, you may need to cut the planks to fit the space using a circular saw or a jigsaw. Always measure twice and cut once to avoid any unnecessary mistakes. Remember to leave a small gap between the flooring and the wall to allow for expansion and contraction. Once complete, step back and admire your beautifully installed Coretec flooring.
Dealing With Obstacles And Irregularities
When installing Coretec flooring, you may come across obstacles and irregularities that need to be addressed. One common challenge is working around doorways and corners. It’s important to carefully measure and cut the flooring to fit properly, taking into account any angles or curves.
Addressing uneven walls can also be a concern. Before installing the flooring, make sure to properly prepare the walls by sanding down any high spots and filling in any low areas. This will help create a smooth and even surface for the flooring to adhere to.
In addition to standard square or rectangular rooms, you may also need to navigate irregular shapes. Whether it’s an L-shaped room or a unique layout, take your time to carefully measure and cut the flooring to fit snugly against the walls and any existing obstacles.
Installing Coretec Flooring On Stairs
Installing Coretec flooring on stairs requires some additional considerations compared to installing it on a flat surface. Firstly, ensure that the stairs are structurally sound and free from any damage or defects. Consider the height of the risers and the depth of the treads to determine if they meet local building codes. Additionally, measure the width of the stairs to determine the amount of Coretec flooring needed. It’s important to use the correct adhesive recommended by the manufacturer to secure the flooring to the stairs. Make sure to properly clean and prepare the stairs before installation, removing any existing flooring and leveling the surface if necessary. When installing, start from the bottom of the stairs and work your way up, ensuring a secure fit for each tread and riser. Finally, trim any excess flooring and apply a silicone caulk to fill any gaps between stairs and walls or other surfaces.
Finishing The Installation
When completing the final row of Coretec flooring installation, attention to detail is key. Here are some important steps to follow:
- Measure and cut the flooring planks to fit the remaining space. Ensure accurate measurements to avoid any gaps or overlaps.
- Apply adhesive or use the click-lock mechanism to secure the planks in place. Make sure each plank is tightly connected to the previous row.
- Use a tapping block and mallet to gently tap the planks into position. Avoid excessive force to prevent damage.
- Check the alignment frequently to ensure the rows are straight and parallel to the walls.
- Trim the excess flooring at doorways or edges. You can use a multi-tool or a jamb saw for precise cuts. Take your time and be careful to achieve a professional finish.
- Install transition pieces or baseboards to cover any gaps and provide a polished appearance.
By following these steps, you will be able to complete the installation of your Coretec flooring with precision and finesse. Remember to refer to the manufacturer’s guidelines for specific instructions and recommendations.
Maintenance And Care For Coretec Flooring
Proper cleaning and maintenance is vital for preserving the appearance and durability of your Coretec flooring. Here are some tips to help you prevent damage and keep your floor looking its best:
- Regular sweeping: Use a soft-bristle broom or a vacuum cleaner with a soft brush attachment to remove dirt, dust, and debris from the floor’s surface. This will prevent small particles from scratching the floor.
- Gentle mopping: Use a damp cloth or mop with a mild, pH-neutral cleaner specifically designed for vinyl flooring. Avoid using harsh chemicals, abrasive cleaners, or excessive water, as these can damage the floor’s protective layer.
- Wipe up spills immediately: Accidental spills should be promptly wiped up using a clean, damp cloth. Liquids left on the floor for an extended period can seep into the gaps between the planks and cause damage.
- Use furniture protectors: Place felt pads or furniture protectors under the legs of tables, chairs, and other heavy furniture to prevent scratches or indentations.
- Avoid excessive moisture: Coretec flooring is water-resistant, but excessive moisture can still lead to problems. Clean up any standing water immediately and use mats or rugs in high-moisture areas like entryways or bathrooms.
- Regular maintenance: Periodically check and tighten loose planks, and remove any stains or scuff marks using a gentle vinyl floor cleaner and a soft cloth or sponge.
By following these simple care and cleaning tips, you can prolong the lifespan and beauty of your Coretec flooring.
Troubleshooting And Common Issues
Installing Coretec flooring can be a smooth process, but it’s not uncommon to encounter some common issues during installation. By identifying and resolving these problems promptly, you can ensure a beautiful and durable flooring result. One common issue is buckling, where the flooring lifts or warps. This can occur due to improper acclimation or subfloor moisture, which can be resolved by following the manufacturer’s guidelines. Another common problem is gaps between the floor planks. These gaps can result from temperature and humidity fluctuations or incorrect installation techniques. Regularly monitoring and maintaining the indoor climate can help minimize these gaps. Lastly, if you notice any other issues during installation, it’s important to consult the manufacturer’s guidelines or seek professional assistance to address the problem.
Frequently Asked Questions For How To Lay Coretec Flooring
Does Coretec Flooring Need An Underlayment?
COREtec flooring does not require an underlayment. Its rigid core construction provides sufficient stability and eliminates the need for additional layers. Installers can directly lay COREtec flooring on the subfloor, saving time and money on underlayment materials and installation.
Is Coretec Flooring Easy To Install?
Yes, COREtec flooring is easy to install. It requires no special tools or adhesives. You can easily install it yourself.
Do You Glue Down Coretec Flooring?
COREtec flooring does not require gluing down. It has a floating installation system, allowing the planks to click together without the need for adhesive. This makes installation easier and allows for easy removal if needed.
What Not To Use On Coretec Flooring?
Avoid using harsh cleaning chemicals, abrasive scrubbers, and wax or polish on COREtec flooring to prevent damage. Additionally, do not expose the flooring to excessive moisture or high heat. Follow the manufacturer’s care instructions for best results.
Conclusion
Laying Coretec flooring requires careful preparation and attention to detail. By following the step-by-step instructions provided in this blog post, you can ensure a successful installation that will transform your space. Remember to use the proper tools, measure accurately, and take your time during the process.
With Coretec flooring, you can achieve a beautiful, durable, and waterproof floor that will stand the test of time. Happy flooring!


