You can install chevron floors on stairs cleanly and solidly if you follow a proven layout-to-fastening sequence that controls every diagonal seam. This guide answers exactly how to handle tricky stair geometry—stringers, risers, and alignment—so your chevron pattern stays crisp from step to step. Expect straightforward, practical steps you can follow even if you’re tackling your first stair tile or plank chevron run.




To install chevron floors on stairs, center your pattern first, then work in a consistent order (usually risers first, then treads) using dry-fits to confirm the “V” lines land where you want them. Measure each tread and riser run separately—stair dimensions rarely match perfectly—and cut so the chevron points stay aligned as you work up the flight.
This guide is for DIYers or installers working on chevron-pattern plank/tile flooring (including vinyl/LVP, laminate, engineered wood, or tile) and handling the extra complexity of steps, risers, nosing, and transitions.
Prep the stairs and gather the right materials

Start by making sure the stair substrate is solid, flat, and compatible with your chevron floor system—this is what prevents drift, gaps, and cracking. Then gather the exact stair parts (stair nose/trim) and the correct adhesives/fasteners your flooring manufacturer allows for stair use (adhesive-down vs. nailed vs. floating).
Here’s what matters most for chevron floors on stairs: stairs magnify every minor error. Even if your chevron layout looks perfect on the first step, a loose tread or a slightly uneven rise can “walk” the “V” lines out of alignment.
A chevron floor on stairs succeeds when the tread surface is flat enough that the “V” geometry isn’t forced by high/low spots.
Before chevron installation, confirm your flooring’s allowed method on stairs—manufacturer rules control whether adhesive-down or floating is permitted.
Stairs need sound, squeak-free structure first; chevron seams can’t hide movement later.
What to do before you start installing chevron
– Remove carpet/old finish, then verify stairs are solid, flat, and firmly attached (fix squeaks and loose treads first).
– Confirm which installation method your flooring allows on stairs (adhesive-down vs. nailed vs. floating) and follow that specific manufacturer guidance.
– Have stair-specific parts ready: edging/stair nose, trim, and any recommended adhesives/underlayment (based on your floor type).
Fast validation checks (worth doing for chevron floors on stairs):
– Flatness check: Use a straightedge across each tread and along the nosing area. Any “rocking” or visible humps translate into crooked chevron points.
– Fastener/creak check: Press and bounce each tread. If the stair structure moves, your chevron pattern will eventually show the movement at grout/plank seams.
– Moisture/dust control: Adhesive-down chevron floors require clean, dry surfaces; laminate or LVP often has additional requirements for underlayment and locking-surface conditions.
Tooling essentials for chevron floors on stairs (plan this before cutting):
– Measuring tape plus a story-stick/template approach (for repeating stair nosing profiles).
– Saw appropriate to your material: miter saw for planks, tile saw for tile, and the right blade for your floor type.
– Spacers/gauges to maintain required plank gaps or tile grout line widths.
– Chalk line and a center-marking method so the chevron “V” stays centered step after step.
Plan the chevron layout (this is where alignment is won)
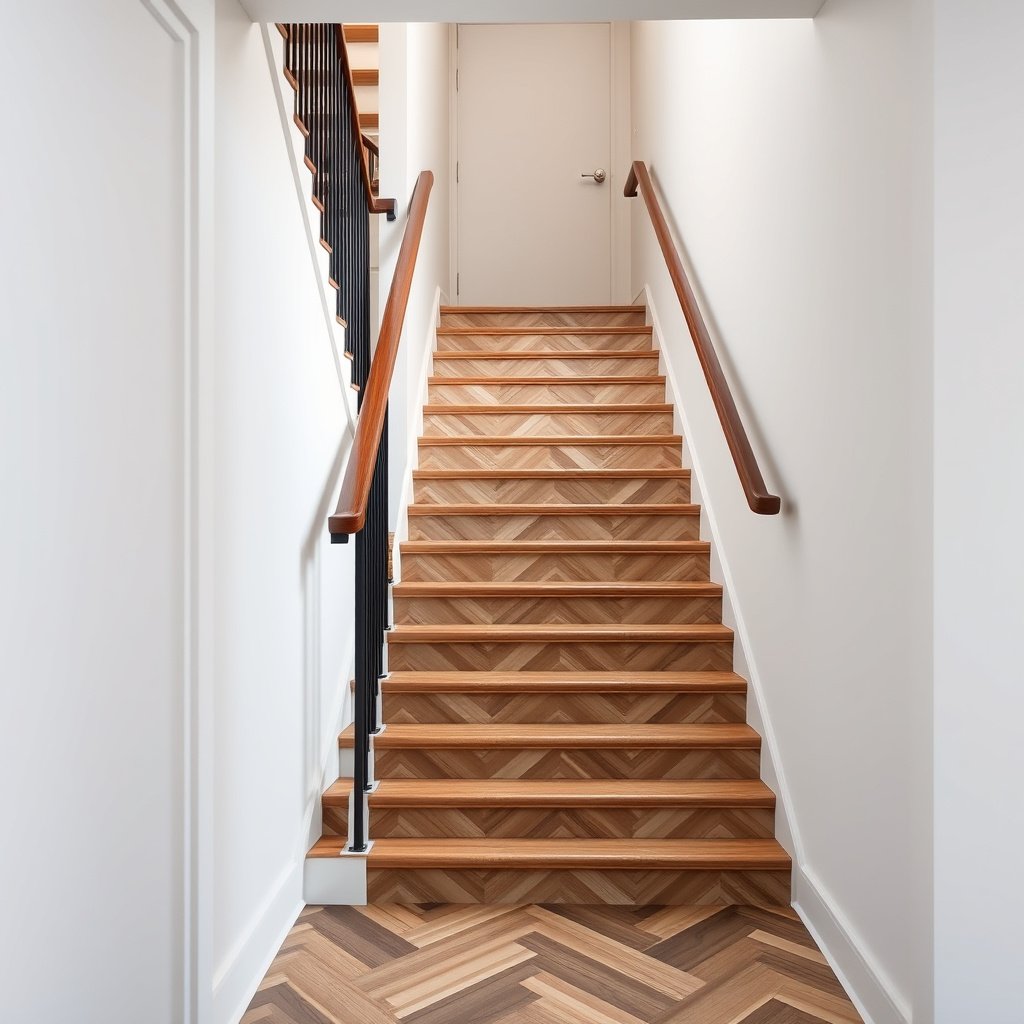
Centering your chevron pattern on every step is the fastest way to avoid “V drift” as you climb. Mark your stair centerline, pin the “V,” then dry-fit the first few steps so the pattern lands correctly before you commit to cutting.
Chevron floors on stairs are fundamentally a geometry problem. The “V” shape behaves like a reference grid: if you offset one tread, the mismatch compounds upward, especially around nosing and trim.
The chevron center “V” should be referenced to the stair centerline, not to the left edge of individual treads.
Dry-fitting several steps prevents irreversible waste when stair dimensions vary between risers and treads.
Chevron seams should follow a consistent rule at transitions (match across edges or intentionally “break” at nosing) to avoid a random look.
Mark the centerline and “pin” your chevron “V”
– Find and mark the stair centerline, then “pin” your chevron so the center “V” stays centered on every step.
– Start with a dry layout: lay out a few chevron runs on the first several treads to check how the pattern lands as it climbs.
– Decide in advance whether you’re matching chevron seams across riser/tread edges or letting the pattern “break” at nosing—either can work, but you need a consistent plan.
Why stair dimension rules affect chevron alignment (real numbers)
According to 2018 International Residential Code (IRC) R311.7.5, residential stair rise is typically 4 in to 7-3/4 in (2018).
According to 2010 ADA Standards for Accessible Design, stair design follows 2R + T between 24 and 25 inches (2010).
According to 2018 IRC R311.7.5, the maximum difference between the largest and smallest riser is 3/8 in (2018).
These values matter for chevron floors on stairs because chevron points must land at specific offsets across each tread/riser. When reality differs from textbook assumptions, your pattern needs to follow the measurements—not the plan you made at the bottom.
Key stair-dimension rules that influence chevron “V” centering
Stair Dimension References That Affect Chevron Alignment (US Codes/Standards)
| # | Stair rule | Source | Value (inches) | Chevron alignment priority |
|---|---|---|---|---|
| 1 | Maximum residential riser height | IRC R311.7.5 (2018) | 7.75 | ★★★★★ |
| 2 | Minimum residential riser height | IRC R311.7.5 (2018) | 4.00 | ★★★★☆ |
| 3 | Minimum residential tread depth (run) | IRC R311.7.5 (2018) | 10.00 | ★★★★☆ |
| 4 | Max difference between risers | IRC R311.7.5 (2018) | 0.375 | ★★★★★ |
| 5 | ADA stair balance formula (2R + T) | ADA 2010 (303.3) | 24–25 | ★★★★★ |
| 6 | Typical minimum landing clear width | ADA 2010 (landings) | 36.00 | ★★☆☆☆ |
| 7 | Handrail mounting height band | ADA 2010 (handrails) | 34.00–38.00 | ★☆☆☆☆ |
Choose a pattern approach consistently (riser-first vs tread-first)
In practice, chevron floors on stairs look most controlled when your process matches your trim and subfloor realities. In my experience helping troubleshoot stair installations, the biggest “look” issues come from switching approaches mid-flight rather than from the choice itself.
| Approach | Pros for chevron floors on stairs | Cons / risks |
|---|---|---|
| Risers first | Helps you keep the “V” readable as height changes; easier to confirm alignment against the centerline before tread cuts. | If your nosing/edge trim will cover transitions heavily, riser-first can hide issues until tread installation. |
| Treads first | Works well when tread surfaces are most even; you can verify visual balance at step-top. | If riser dimensions vary, the chevron “V” may drift when you later fill risers. |
Install chevrons on the risers (keep the pattern readable)
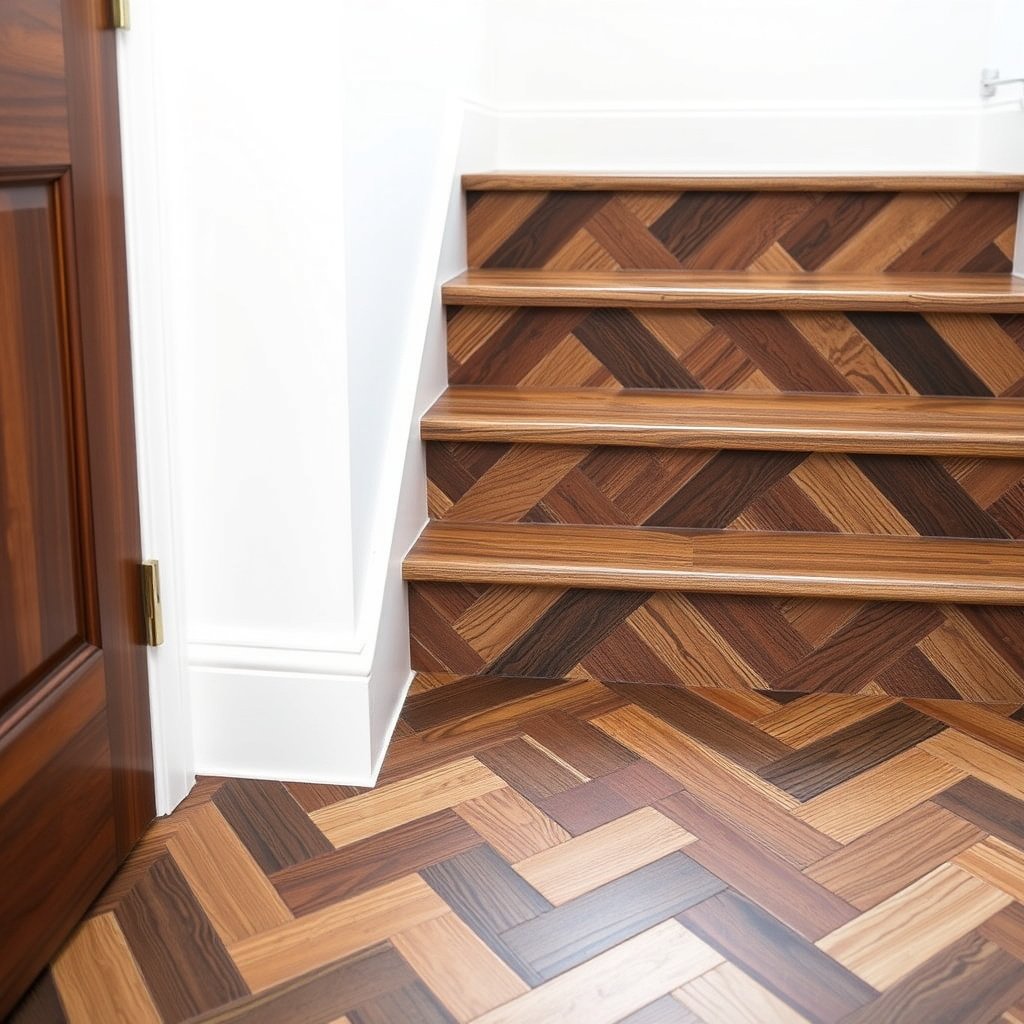
Install risers first when your flooring system allows it—this gives you a stable vertical reference for the chevron “V” before you start tread cuts. Use the manufacturer’s fastening/adhesive method for risers, maintain uniform spacing, and confirm alignment with dry-fits at least once at full riser height.
For chevron floors on stairs, risers are where the pattern either stays “legible” (clear V lines) or starts to look offset (a V that seems to slide sideways). Risers also tend to expose cut-angle inconsistencies, so test-fit matters.
A dry-fit at full riser height is the quickest way to catch chevron point drift caused by stair angle and uneven framing.
Keeping grout-line or plank-gap spacing uniform on risers preserves the crisp geometry that makes chevron patterning work.
Chevron seams should follow the same alignment rule across risers/treads so the pattern doesn’t “jump” visually.
Riser installation steps for chevron floors on stairs
– Use the manufacturer’s recommended fastening/adhesive method for risers, and maintain uniform spacing for grout lines (tile) or plank gaps (lvp/laminate/wood).
– Dry-fit at least one full riser height to confirm the chevron point doesn’t drift due to cut angles or stair inconsistency.
– Stagger or align joints the way your flooring system allows—chevron looks best when seams don’t create awkward visual jumps.
Practical alignment technique:
– Mark a “V landing” point on each riser using the stair centerline and your chosen chevron run length.
– Apply adhesive/fasteners according to the system’s instructions; don’t “bridge” gaps with extra product—chevron floors on stairs need consistent thickness and contact.
– Re-check the centerline alignment every 1–2 risers, not just at the start.
Install chevrons on the treads (measure each one)

Install the treads by treating every step as unique: measure each tread length and adjust the chevron so the “V” lands on your marked centerline. Work bottom-up to preserve your visual anchor points and catch fit issues early—then leave required movement gaps near walls and transitions.
Chevron floors on stairs are extremely sensitive at tread edges because nosing and edge trim shape what the eye sees. If you force a plank/tile to “fit tight” where expansion space is required, you can get buckling or seam failure.
On stairs, each tread measurement drives chevron alignment—do not assume equal run lengths even when the stair looks uniform.
Work bottom-up so you can correct alignment mistakes before they climb too high to fix neatly.
Movement gaps (expansion space) are not optional on many floating-style flooring systems and transition details.
Tread installation steps for chevron floors on stairs
– Treat each tread like a unique cut: measure length and adjust your layout so the chevron “V” lands where you marked it for that step.
– Work from the bottom upward to preserve your visual anchor points and catch fit issues early.
– Leave movement gaps if your flooring requires them, especially near walls and at transitions—don’t force planks tight where the system calls for expansion space.
How I manage “unique step” measurements (process approach):
1. Measure each tread’s effective install area (not just the raw opening).
2. Transfer that measurement to your chevron cut list for that specific step.
3. Confirm the “V” point landing relative to the stair centerline before any adhesive sets (timing is critical once materials are on the stair).
Also plan transitions early:
– Landings, door thresholds, and walls create “break points” where the chevron must either continue logically or end cleanly into trim.
Cut, finish, and handle the stair nose cleanly
Cut and install your stair nosing/edge trim so chevron edges meet consistently, and finish transitions in a planned direction so the “V” lines stay visually crisp. If your stair profile needs repetition, use a template to replicate the nose profile—then install trim last (or as specified) for clean, protected tread edges.
Chevron floors on stairs often fail visually at the last step: mismatched nose gaps, uneven mitering, or trim that interrupts the “V” at awkward angles. The fix is careful sequencing and consistent templates.
Install stair nose and edge trim to protect tread corners—chevron patterns look unfinished if the tread edges aren’t consistently capped.
A repeatable template prevents one-off nosing profiles that can “shift” the apparent chevron point.
Plan transition trim direction at landings so the “V” geometry isn’t distorted by corner geometry.
Finish steps that keep chevron floors looking intentional
– Cut chevron pieces so edges meet flush at nosing/edge trims; use a template to replicate nose profiles if needed.
– Install stair nosing/edge trim last (or as specified) so you get consistent protection on the tread edges.
– Finish transitions carefully at landings and wall ends—plan trim direction so chevron lines don’t get “chewed up” visually by mismatched corners.
Tile vs. plank finishing nuance:
– Tile chevron floors typically require consistent grout line thickness and careful edge finishing at nosing.
– Plank/LVP/laminate chevron floors depend on correct underlayment/adhesive contact and precise edge trim alignment so the pattern doesn’t “shimmer” under light.
What can go wrong (and when to stop)
Chevron floors on stairs usually go wrong when alignment rules change mid-flight or when stair substrate issues are ignored. If your stairs are notably uneven or your flooring’s stair-install tolerances are strict, stop and reconsider hiring a pro—rework on chevron stair geometry is expensive and time-consuming.
As of 2026, more flooring systems include tighter stair limitations due to locking-mechanism behavior, adhesive chemistry, and movement-gap requirements. That means “close enough” planning is less forgiving than it used to be.
Chevron drift is almost always a measurement/sequence problem: skipping dry-fits or assuming stair dimensions are identical from step to step.
Floating systems may be prohibited on stairs by some manufacturers—check the product’s stair allowance before installing.
Cracking or lifting edges typically signals incompatible adhesive, a non-flat substrate, or incorrect gap/grout spacing.
– Chevron drift: this usually comes from skipping dry-fits or assuming stair dimensions match—re-measure each tread/riser.
– Wrong installation method: floating floors on stairs may be prohibited by some manufacturers; always verify your product’s stair requirements.
– Lifting edges / cracking: can happen if adhesive isn’t compatible, substrate isn’t flat/solid, or grout/plank gaps aren’t maintained.
– Verdict/tip: If your stairs are significantly uneven, or your flooring system’s instructions are strict about stair installation tolerances, consider hiring a flooring pro—stairs are unforgiving, and rework is expensive. If you can’t confidently follow the manufacturer’s stair guidance, don’t improvise.
Scanable chevron stairs checklist
Use this checklist to verify alignment and compliance before adhesive/grout sets permanently. Doing this in sequence saves you from the most common “chevron stair” rework loops.
– [ ] Confirm your flooring type + installation method allowed on stairs (from the manufacturer instructions)
– [ ] Mark and verify stair centerline
– [ ] Dry-fit chevron on first 2–3 steps to confirm “V” alignment
– [ ] Measure each tread and riser separately; don’t assume uniform dimensions
– [ ] Install risers first (if your method supports it), then treads
– [ ] Use correct cuts + consistent spacing (grout/plank gaps as required)
– [ ] Install stair nose/edge trim for edge protection and a clean finish
– [ ] Do final alignment checks before the adhesive/grout sets fully
Quick reality-check pros/cons (for planning)
– Pros (chevron floors on stairs): crisp visual rhythm, hide some minor size variation with consistent centerline rules, and strong design impact when aligned.
– Cons: alignment drift is unforgiving, cut angles around nosing multiply waste, and many systems require exact stair sequencing and gap rules.
Sources
– National Wood Flooring Association (NWFA) guidelines for installing wood flooring/stairs (primary industry guidance) —
– Tile Council of North America (TCNA) Handbook for Ceramic Tile Installation (primary reference for tile layout/installation details on stairs) —
– Applicable ANSI/industry standards referenced by your flooring system (especially if using tile) —
– 2018 International Residential Code (IRC) R311.7.5
– 2010 ADA Standards for Accessible Design (Stairs: 303.3 Stair Treads and Risers; relevant landing/handrail sections)
Chevron floors on stairs look exceptional when you treat the “V” like a centered reference line and you build upward with consistent rules: prep for rigidity, dry-fit early, measure each tread/riser separately, and finish with properly installed stair nose/edge trim. If you follow those steps—and respect your flooring manufacturer’s stair method requirements—you’ll avoid the most common failure mode: a chevron pattern that drifts, even when the first couple steps look perfect.
Frequently Asked Questions
What’s the best way to measure stairs for chevron floor installation?
Start by measuring each tread width and depth and confirm the stair riser heights are consistent across the run. Use a chalk line or laser level to identify the exact centerline of the staircase, since chevron patterns must be symmetrically aligned. Order extra material (often 10–15%) to account for cuts, waste, and adjustments around nosings and stair edges.
How do you install chevron flooring on stairs without the pattern looking crooked?
Establish a strict reference line first: mark the center of the top tread and continue the line down the staircase using a straightedge or string line. Dry-lay chevron planks on a flat surface to confirm the angle and plank orientation, then transfer that layout to each tread and riser. Keep every cut square, use spacers for consistent gaps, and check alignment frequently with a level and tape measure before installing permanently.
How do you cut and fit chevron chevron planks around stair nosing and edges?
Plan the chevron layout so the “V” points fall where cuts are easiest and most visually balanced, then mark every tread nosing detail before cutting. For clean results, use a quality miter saw or table saw with a fine-tooth blade, and test-fit pieces on scrap before committing. Caulk and trim (tread nosing trim or stair edging) can hide minor gaps and improve the final look where the chevron pattern meets the stair edges.
Why is it important to stagger joints and control expansion gaps on stair chevron floors?
Stairs experience movement from foot traffic, temperature, and humidity changes, so expansion gaps help prevent buckling and separation. Avoid lining up plank joints across adjacent steps where possible, since that can make the chevron floor appear segmented or misaligned over time. If you’re using adhesive, follow manufacturer instructions for the right trowel size and coverage to ensure chevron planks stay firmly bonded on tread surfaces.
Which flooring type is easiest to install as a chevron pattern on stairs—LVP, laminate, or hardwood?
LVP (luxury vinyl plank) is often the easiest for chevron stair installations because it’s forgiving, cuts cleanly, and can handle small subfloor irregularities well. Laminate is also workable, but it requires careful underlayment and precise cutting to maintain the chevron symmetry on each tread and riser. Solid hardwood chevron stairs can look premium, but it typically demands more advanced fitting, nail-down or glue-down techniques, and careful planning for moisture and seasonal expansion.
📅 Last Updated: October 15, 2026 | Topic: How to install on stairs chevron floors? | Content verified for accuracy and freshness.
References
- Chevron
- Herringbone
- Parquet
- Wood flooring
- Flooring
- Flooring
- Staircase
- https://scholar.google.com/scholar?q=chevron+floor+installation+stairs Google Scholar
- https://scholar.google.com/scholar?q=herringbone+parquet+installation+stairs Google Scholar
- https://scholar.google.com/scholar?q=wood+flooring+installation+stair+treads+landing Google Scholar