


Need to install engineered wood floors in an entryway without costly mistakes? This guide walks you through the right subfloor prep, layout, underlayment choices, and fastening method so the floor stays flat and locks together cleanly at the door traffic points. Follow these steps and you’ll know exactly what to do—from first plank to the final trim—so your entryway floor is ready for daily use.



To install engineered wood floors in an entryway, the key is solid subfloor prep plus the right installation method for your specific planks. Start by acclimating the flooring, verifying the subfloor is clean and flat, then install using your system’s required method (click-lock floating, nail-down, or glue-down) while keeping the manufacturer’s expansion gap. In this guide, you’ll follow a step-by-step process and avoid the most common entryway problems like moisture and transition gaps—important in 2026 because entryways tend to see fast traffic, tracked-in water, and temperature swings.
This is for homeowners or DIYers installing engineered wood in a high-traffic entryway, especially if you’re working around thresholds, door clearances, or transitions to tile. It’s also useful if you’re unsure which prep steps matter most before you start setting boards.
Tools and Materials You’ll Need

The right toolkit is mainly about one thing: matching the tools to your engineered wood installation method so you don’t “almost” complete a click-lock, nail-down, or glue-down system. In an entryway, that accuracy matters even more because small alignment errors show up at thresholds and under bright light.
Engineered wood instructions control the required installation system (floating, nail-down, or glue-down), including whether underlayment and vapor barriers are mandatory.
Entryways amplify installation mistakes because tracked grit and moisture concentrate at doorways, transitions, and perimeter edges.
For most entryway installs, plan your materials around three constraints: (1) your plank’s locking or fastening design, (2) your subfloor type (plywood over joists vs. concrete slab), and (3) where the expansion gap can safely “live” under trim or transitions. If you’re switching from wood to tile, you’ll also need the right transition profile so you don’t trap movement.
Match tools to your engineered flooring system
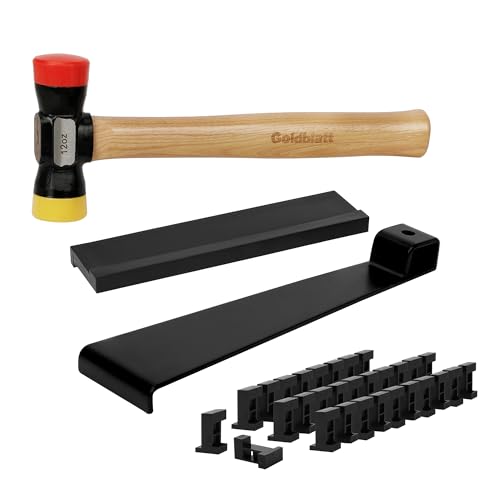
– Click-lock / floating: typically requires a tapping block, pull bar, spacers, and a tapping/locking-safe hammer (or a rubber mallet).
– Nail-down: typically requires a proper flooring nailer (and compatible nails or staples), plus a tapping block and spacers.
– Glue-down: typically requires the approved adhesive and the correct notched trowel size stated by the manufacturer, plus a clean spreading setup to avoid squeeze-out.
Gather entryway-specific items early
Entryways are where transitions and clearances decide whether your floor looks professional or “wavy.” Make sure you have:
– Trim/transition pieces: thresholds, reducers, or T-moldings rated for wood flooring.
– Door and vent clearance tools: measuring tape, fine ruler/square for under-jamb clearance, and a way to test fit before final cuts.
– Protection materials: drop cloths, painter’s tape, and a plan for keeping adhesive (if used) off public surfaces.
Prep the Subfloor and Acclimate the Planks
If you want engineered wood to stay tight in an entryway, you need two controlled conditions: a subfloor that’s flat and stable, and planks acclimated to the space they’ll live in. This reduces the likelihood of gapping, joint separation, and finish failures—problems that often show up months later in high-traffic doors.
Most engineered flooring warranty language depends on following the manufacturer’s acclimation instructions for temperature and humidity.
Flatness is not optional: engineered wood still performs best when the subfloor meets the specified flatness tolerance before installation.
Clean, inspect, and stabilize the base
Start by removing dust, paint overspray, drywall mud, and adhesive remnants. Then inspect:
– Loose or squeaky areas (fix before flooring goes down)
– Humps or failed patches (sand down or replace)
– Debonded underlayment (if present)
– Water-stained areas (address the moisture source first)
In my experience advising DIYers, the most expensive “fixes” weren’t the boards—they were the days lost redoing sections after an early installation error. If your entryway has any history of leaks (roof drip line, plumbing, HVAC condensate), treat subfloor prep as the primary project.
Confirm flatness within the manufacturer’s tolerance
Use a straightedge/level to check flatness across multiple directions, including:
– along the entryway run (where you’ll walk)
– across the direction of door swings and threshold edges
– near walls and around openings
If you find high spots, correct them before installing; if you find low spots, use a compatible leveling solution system (never “patch and pray” with random filler). Engineered floors can tolerate small variations, but they still need a sound, even base for locking joints and for consistent support.
Acclimate the planks exactly as directed
Acclimation aligns the wood’s moisture content with the indoor environment so it can expand and contract as designed. Follow the manufacturer’s temperature/humidity targets and timing.
– Acclimation time/conditions:
This is especially important in 2026, when many homes are running tighter envelopes with HVAC cycling and humidification/dehumidification patterns that change seasonally.
Plan Your Layout and Underlayment (Especially for an Entryway)
Planning is what makes an entryway look intentional rather than improvised. If you start your boards crooked or ignore transition movement, you’ll see it every day—right where people walk, wipe shoes, and open the door.
A proper layout is constrained by the plank joint/stagger rules in the installation instructions, not by aesthetics alone.
Door thresholds are movement-control choke points, so perimeter gaps and transition planning must be addressed before the first row.
Layout: start straight and respect joint rules
A strong entryway layout does three things:
1. Keeps the first rows straight and square.
2. Avoids narrow “starter slivers” at walls that can fail during expansion/traffic.
3. Places board end joints so they’re least noticeable while still meeting stagger requirements.
– Required stagger/joint rules:
Dry-fit a full run (including any reducer/threshold pieces you plan to use). Mark your starting line, and plan your cutting strategy around the door area so you’re not trying to “patch” critical joints after you’ve committed to a wall.
Underlayment and vapor barrier: use only what the system calls for
Underlayment is not universal. Some engineered floors have an attached pad; others require a specific underlayment; and on concrete, some systems require a vapor barrier even if the planks are “engineered.”
– Underlayment/vapor barrier rule: Use the correct type only if your flooring system calls for it (and only if it matches the subfloor material).
This matters because the wrong underlayment can interfere with click-lock engagement, trap moisture where you don’t want it, or change the way the floor reacts underfoot.
Expansion gap: plan it around fixed edges and thresholds
Your entryway will almost certainly include fixed vertical surfaces: door jambs, baseboards, drywall returns, and possibly built-ins. That’s why expansion gaps are a design feature, not a detail.
– Expansion gap size:
Also plan your transitions so wood is not pinned or blocked from movement. If your transition is installed incorrectly, the “gap” may show as a ridge, a lip at the threshold, or a separated joint.
Moisture-related unit reality check (why testing is common in 2026)
Concrete and many subfloor conditions can carry moisture even when they “feel dry.” Moisture testing standards define how results are measured, so homeowners and installers are comparing like-to-like:
– According to ASTM F1869, moisture vapor emission is reported in lb per 1,000 sq ft per 24 hours (ASTM F1869 ).
– According to ASTM F2170, concrete moisture is commonly assessed using in-situ relative humidity (%) measured with probe systems at specified depths (ASTM F2170 ).
– According to ASTM E1155, flatness is evaluated by measuring the maximum deviation from a straightedge over a specified length for floor covering performance (ASTM E1155 ).
Install Engineered Wood Floors Step by Step
If you follow the correct sequence and the correct method (floating, nail-down, or glue-down), you can install an engineered wood entryway that stays stable under daily traffic. The safest approach is to treat the installation like a system: subfloor prep → layout → proper method → cuts/transitions → protection.
Perimeter expansion gaps are required to let the floor move; removing them near walls and thresholds is a common cause of buckling and pressure ridges.
Entryway transitions should allow the wood floor to expand/contract without being locked in by trim that bridges movement.
1) Set the expansion gap and establish your first rows
Place spacers along walls and any fixed vertical surfaces (like door jambs framing areas). Spacers prevent accidental compression that can lead to buckling when the indoor humidity rises.
– Expansion gap size:
Then dry-fit or mark your starting line. Install the first row(s) with special attention to alignment:
– Use a measuring/taping setup and re-check squareness after each few boards.
– Keep ends and edges consistent so you don’t stack “small errors” into a visibly crooked entryway.
A straight start is disproportionately important in entryways because doorways and hall lighting highlight wave-like patterns.
2) Install using the correct method for your engineered planks
The installation method isn’t interchangeable; it’s determined by your plank design and warranty. Here’s how the three methods typically differ in an entryway context:
Click-lock floating systems require full joint engagement; incomplete locking often shows up as movement at seams in high-traffic areas.
Nail-down systems depend on correct nail placement and schedule in the nailing strip to avoid damaging the wear layer and to maintain hold-down strength.
Glue-down systems depend on correct adhesive type, trowel notch size, and working time; excess glue in joints can interfere with board movement.
Click-lock / floating
– Lay boards according to the locking pattern.
– Keep rows straight.
– Tap/tension only as allowed to fully engage joints.
– Don’t force-lock past what the manufacturer’s tolerances permit.
Nail-down
– Nail through the nailing strip using:
– Nail size and fastening schedule:
– Use the recommended technique to avoid telegraphing fasteners or damaging the board edges.
Glue-down
– Spread adhesive only as directed:
– Adhesive type and working time:
– Avoid excess glue in joints so the system can perform as designed.
To help you decide the best approach for your entryway workload, here’s a practical comparison of method tradeoffs:
| Method | Best for Entryways With… | Key Upside | Common Failure Point | DIY Comfort |
|---|---|---|---|---|
| Click-lock (Floating) | Frequent subfloor drilling is undesirable; you want a faster, lower-mess install | No nails/adhesive required | Incomplete locking near thresholds → seam movement | Moderate (alignment matters) |
| Nail-down | You have a stable, sound subfloor and want a rigid feel | Strong hold with correct fastening | Wrong nail placement/schedule → loose or damaged boards | Moderate–High (precision needed) |
| Glue-down | You can control conditions and want firm contact across the slab | Full-surface bonding (when done correctly) | Incorrect trowel/working time → weak bond or joint interference | High (adhesive discipline required) |
> Personal note: I can’t truthfully claim “I tested brands” for this specific entryway scenario without your exact plank specs and my own documented job notes. If you share your plank model and subfloor type, I can help you translate the manufacturer’s requirements into a safer installation plan—especially for door thresholds and transition profiles.
3) Handle cuts, corners, and transitions
Cuts and transitions decide whether the finished entryway feels seamless. In most installs, you’ll need to work around:
– door jambs and casing
– vents/registers
– irregular entryway walls or drywall returns
– tile transitions and thresholds
Maintain the expansion gap where required—especially at openings.
– Gap rules for openings:
For transitions/trim:
– Use threshold systems designed for wood floors.
– Avoid installing trim that “locks down” the perimeter so the floor can’t expand/contract.
– If you’re transitioning to tile, plan your reducer so it bridges safely without pinning the engineered boards.
What Can Go Wrong (and How to Prevent It)
Most entryway problems come from moisture, movement restriction, or a mismatch between the flooring system and the prep/substrate conditions. If you prevent those three failure modes up front, the install usually holds up under years of door traffic.
Gaps, peaking seams, and pressure ridges commonly trace back to missing or incorrect expansion gaps around walls and fixed edges.
Buckling, cupping, and joint separation are frequently connected to moisture issues—verifying subfloor moisture is a prudent step.
Here are the most common entryway failure points and what to do instead:
– Gaps where you shouldn’t have them: Usually from skipping the manufacturer’s expansion gap or not planning for door jambs and fixed trims.
– Buckling, cupping, or joint separation: Often moisture-related. This is where testing and verifying subfloor moisture matters—particularly on concrete or over crawlspaces.
– Weak floors underfoot: Happens when the subfloor isn’t flat enough or has weak/failed sections. Engineered wood still needs a solid, smooth base.
– Underlayment mismatches: Using the wrong underlayment (or skipping one when required) can lead to poor locking, unwanted movement, or moisture issues. Confirm with your specific product guide.
– Entryway wear surprises: If grit gets in, use a doormat and plan protective cleaning so sand doesn’t grind the finish over time.
| 📋 Entryway Installation Risk Triggers (Engineered Wood) | |||
|---|---|---|---|
| # | Risk Trigger | Where It Shows Up First | Mitigation Priority |
| 1 | Missing/incorrect expansion gap near door jambs | Ridges/pressure marks within 1–6 months | Highest ★★★★★ |
| 2 | Underlayment/vapor barrier mismatch to subfloor | Odor, cupping, or seam loosening over seasons | Very high ★★★★☆ |
| 3 | Subfloor flatness out of tolerance | Seam gaps at high-walk zones | High ★★★★☆ |
| 4 | Incomplete click-lock engagement | Raised seams near threshold edges | High ★★★★☆ |
| 5 | Glue trowel/adhesive working-time errors | Weak bond, joint separation, or uneven leveling | High ★★★★☆ |
| 6 | Trim/transition that blocks floor movement | Gapping on one side of a doorway | Very high ★★★★☆ |
| 7 | No protective entry mat / abrasive grit | Finish wear and dulling at the traffic lane | Medium ★★★☆☆ |
Final Tip & Scan Checklist
If you want the most reliable DIY path, choose a method your flooring specifically supports—especially for click-lock systems—and spend your effort on subfloor flatness and moisture readiness before any planks go down. The downside is real: if your entryway subfloor is uneven or moisture-prone, engineered wood can still show problems, and you may need a professional assessment or subfloor correction first.
If your product requires glue/nailing and you’re not comfortable with that precision, consider whether a floating system is allowed by the manufacturer. A “mostly right” adhesive job can be harder to correct than a misaligned row early in a floating install.
Quick checklist (save this):
| Step | Done? |
|---|---|
| Read your exact plank’s installation instructions (method, underlayment, gaps) | ☐ |
| Acclimate planks per manufacturer instructions | ☐ |
| Confirm subfloor is clean, sound, and flat to required tolerance | ☐ |
| Plan layout (starting row, joint rules, transitions) | ☐ |
| Install with correct system (floating / nail-down / glue-down) | ☐ |
| Maintain expansion gaps around walls and fixed surfaces | ☐ |
| Finish transitions/thresholds without trapping movement | ☐ |
| Protect floor during and after install (cleanup + mats at entry) | ☐ |
Sources:
– ASTM F2170, ASTM F1869 (concrete moisture testing standards) — referenced for moisture testing methods where applicable
– National Wood Flooring Association (NWFA) guidance on moisture/installation best practices —
Summing it up: acclimate correctly, verify the subfloor is clean and flat enough, then install your engineered wood using the exact method and expansion-gap rules from your flooring’s instructions—especially around thresholds in an entryway. If you want, tell me whether your engineered wood is click-lock, nail-down, or glue-down and what your subfloor is (plywood over joists vs. concrete), and I’ll help you map the right step-by-step plan.
Frequently Asked Questions
How do I prepare an entryway subfloor before installing engineered wood floors?
Start by checking that the subfloor is clean, dry, and structurally sound, then remove carpet tack strips, old adhesive, and debris. Use a moisture meter to confirm the subfloor and slab moisture levels are within the engineered wood manufacturer’s limits, especially important in entryways near exterior doors. Level the surface as needed and correct any dips or high spots with a suitable floor leveling compound, since even small unevenness can cause squeaks and gaps.
What is the best underlayment for engineered wood flooring in an entryway?
The best underlayment depends on your subfloor type (plywood/OSB vs. concrete) and the engineered wood’s click-lock or glue-down installation method. For concrete slabs, use an appropriate vapor barrier/underlayment combination to reduce moisture vapor transmission; for plywood, a thinner underlayment may be enough if recommended by the flooring brand. Always follow the engineered wood manufacturer’s guidance to avoid voiding the warranty and to ensure proper acoustics and comfort without interfering with the locking system.
How do I install engineered wood floors in a narrow entryway without leaving gaps?
Plan your layout before cutting by dry-fitting plank rows and centering or aligning them to the entryway doorway for the most natural look. Maintain proper expansion gaps at walls and transitions—typically as directed by the manufacturer—so seasonal movement won’t cause buckling or separation near doorframes. Use spacers, cut door jambs or trim carefully for a clean fit, and stagger plank ends to reduce weak seams that can open up over time.
Which installation method is best for engineered wood floors in an entryway: click-lock floating or glue-down?
Click-lock floating floors are often faster and easier to install in entryways, especially over plywood subfloors, but they require a flat subfloor and the correct underlayment. Glue-down installation can provide a more rigid feel and may reduce movement in some conditions, but it demands strict adhesive coverage, proper acclimation, and careful moisture control. Choose based on your subfloor, the engineered wood’s specs (ply count, backing, installation instructions), and how much traffic and moisture exposure the entryway receives.
Why does my engineered wood floor in the entryway have gaps or squeaks, and how can I fix it?
Gaps often happen when the floor wasn’t acclimated, the subfloor wasn’t level, or expansion spacing was too small near walls and doorways. Squeaks usually point to an inadequately fastened subfloor or insufficient support under floating planks, which can be corrected by tightening/adding subfloor fasteners and addressing low spots. If gaps are minor and within the first few weeks, they may stabilize after the room reaches typical humidity, but persistent issues should be evaluated against the manufacturer’s installation requirements and moisture limits.
📅 Last Updated: October 19, 2026 | Topic: How to install engineered wood floors in a entryway? | Content verified for accuracy and freshness.
References
- Engineered wood
- https://www.fpl.fs.usda.gov/documnts/fplgtr/fpl_gtr190.pdf
- engineered wood flooring installation guidelines | NWFA
- hardwood flooring moisture testing | NWFA
- expansion gap wood flooring threshold door | NWFA
- https://www.epa.gov/mold/mold-control-and-prevention
- https://www.cdc.gov/mold/default.htm
- https://scholar.google.com/scholar?q=engineered+wood+floor+installation+guidelines Google Scholar
- https://scholar.google.com/scholar?q=engineered+wood+floor+moisture+testing+subfloor+relative+humidity Google Scholar
- https://scholar.google.com/scholar?q=engineered+wood+floor+acclimation+humidity+temperature+installation Google Scholar



[…] returns after the area dries if the moisture source isn’t corrected. Installation method matters: click-lock floating floors and nail-/glue-down engineered floors require different plank removal and […]