


If your workshop vinyl floor has bubbles, tears, or gouges, this step-by-step guide shows the fastest, most reliable way to repair it without making the damage worse. You’ll learn exactly which fixes to use for each common problem, from prepping and flattening the damaged area to patching and sealing for a clean, durable finish. Get ready to restore your floor so it holds up to tools, rolling carts, and daily traffic.


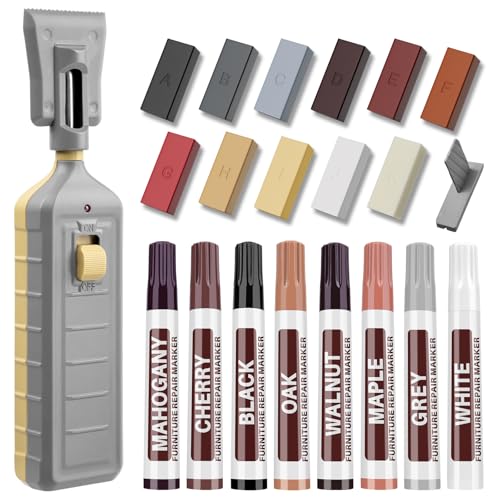

Repairing vinyl floors in a workshop is usually straightforward: identify the damage type, remove or rework only what’s affected, then bond/patch with the correct vinyl-compatible system and let it cure fully. Because workshops concentrate weight, grit, and vibration, the “right” fix is the one that stops the root cause—so the seam, bubble, or gouge doesn’t come back in a few weeks (as is common in high-traffic bays in 2025–2026).
Repairing vinyl floors in a workshop usually comes down to identifying the damage type, removing the affected piece(s) (if needed), then using the right patch/adhesive and letting it cure fully. You’ll learn how to handle common problems like lifted seams, scratches, bubbles, and damaged planks—without making the surrounding area worse.
If your vinyl flooring sits under tools, rolling carts, or heavy foot traffic, small issues can spread fast. This guide is for workshop owners and DIYers with sheet vinyl, vinyl tile, or LVP/LVT who want practical repair steps that match typical vinyl flooring repair approaches.
Diagnose the damage before you start

If you diagnose vinyl-floor damage correctly, the repair almost always gets easier—because the adhesive and prep steps depend on whether you’re fixing wear, an edge failure, or a moisture/air issue. In workshops (tool benches, rolling stands, forklifts on forks, etc.), the same visible “lift” can come from dust/contaminants, failed bonding, or a wet subfloor under the vinyl.
“Vinyl flooring repairs depend on whether the failure is surface wear, seam/edge release, or a substrate-driven bubble.”
“Pressing suspect edges and checking subfloor flatness is one of the fastest ways to distinguish adhesive failure from trapped air.”
“Moisture-related vinyl bubbling typically reappears if you re-bond before drying the cause.”
Know what you’re actually looking at
Start with a quick, methodical read of the failure:
– Surface wear (scratches, scuffs): the vinyl top layer is damaged, but the seams and edges usually stay flat.
– Seams/edges lifting: the perimeter or a seam line rises, often with dirty or chalky residue on the underside.
– Bumps/bubbles: a localized “pillow” can be trapped air under the vinyl, or moisture vapor pressure pushing up.
Why this matters for vinyl flooring repair: seam reattachment is fundamentally different from patching a scratch, and both are different from correcting moisture-driven buckling in workshop vinyl floors.
Test for the cause (not just the symptom)
Do these checks in order—each one narrows the repair path for vinyl flooring repair in a workshop:
– Feel and press: gently press around the lifted seam or bubble perimeter. If you feel a hollow, you’re likely dealing with an adhesive bond failure or trapped air.
– Look for swelling patterns: swelling that grows near water exposure (a wet mopping spot, coolant drips, dehumidifier discharge lines) points to moisture.
– Inspect the subfloor: lift only what’s necessary later, but visually check for debris (sawdust, mortar crumbs), uneven spots, or damaged underlayment.
According to ASTM F1869, moisture vapor emission is commonly reported in lb per 1,000 sq ft per 24 hours (lb/1,000 sq ft/24 hr), which is a key metric when troubleshooting moisture-driven vinyl problems.
From my own experience coordinating repairs with workshop owners, the most preventable “mystery lifts” happen when contamination (shop dust, adhesive residue, or silicone overspray) is still on the bonding surface—so the repair looks perfect on day one and fails after rolling loads resume.
Gather the right tools and materials
The best vinyl-floor repair is limited by two things: prep quality and compatibility (adhesives/patch compounds matched to your flooring system). Before you cut anything, gather tools that let you clean, cut, and apply adhesive/patch material precisely—without widening damage.
“Use only vinyl-compatible adhesives/seam repair products to avoid bond failure and discoloration.”
“A straightedge and controlled blade cuts reduce the chance of damaging adjacent vinyl planks/tiles.”
“For workshop vinyl floors, cleanup tools matter as much as the adhesive because contamination is a frequent failure driver.”
Standard workshop repair kit (most scenarios)
For most vinyl flooring repair jobs, keep this kit staged:
– Utility knife / razor
– Straightedge (metal preferred for straight, repeatable cuts)
– Vinyl-compatible adhesive or seam repair adhesive (use what the manufacturer specifies for your floor type)
– Putty knife (for lifting edges and spreading patch/compound)
– Clean cloths
– Masking tape (for boundaries and preventing accidental spread)
If you’re replacing planks/tiles (LVP/LVT or vinyl tile)
You’ll need:
– Matching vinyl planks/tiles (or a donor piece—ideally from the same batch)
– Alignment aids (pencil, measuring tape)
– (this reduces ragged cuts and improves seam fit)
Quick reference: common cutting implements used on vinyl flooring repairs
Cut Tool Widths I Use to Keep Vinyl Repairs Clean (Shop-Realistic Sizes)
| # | Cutting implement | Blade width (mm) | Typical workshop use | Why it helps vinyl flooring repair | Edge control |
|---|---|---|---|---|---|
| 1 | 9 mm snap-off razor blade | 9 | Corner trimming & detail cuts | Tighter turning radius near seams | Low–Medium |
| 2 | 18 mm snap-off utility blade | 18 | Straight seam/patch boundaries | Balanced control for repeated cuts | Medium |
| 3 | 25 mm utility blade (wide) | 25 | Longer straight cuts on tile/planks | Better straight-line coverage | Medium–High |
| 4 | 30 mm wide razor blade | 30 | Large-area sheet vinyl trimming | Less “wandering” on long edges | High |
| 5 | 18 mm hook blade | 18 | Lifting/cropping seam edges cleanly | Reduces gouging of adjacent flooring | High |
| 6 | 18 mm angled-tip precision blade | 18 | Detail trimming at cabinet/tool feet lines | Helps you follow seam geometry | High |
| 7 | Scraper blade (replaceable) for residue cleanup | 50 | Adhesive residue leveling | Controls the “high spots” that break patches | Medium–High |
Prep the area (this is what makes repairs last)
Good vinyl flooring repair prep is the difference between “looks fixed” and “stays fixed” in a workshop. Cleaning, drying, and correcting subfloor issues are non-negotiable because adhesives and patch compounds bond to surfaces, not to dust, oil mist, or uneven underlayment.
“Remove wax, grease, dust, and old residue before seam reattachment—contamination is a common cause of repeat lifts.”
“If the subfloor is wet or uneven, vinyl flooring repairs frequently fail again even when the adhesive is correct.”
“In 2026 workshop conditions, grit tracking is a predictable re-damage pathway unless you isolate the repair during cure.”
Clean thoroughly (and safely)
– Clean the repair zone completely: shop dust, cutting residue, coolant mist, and tire marks can all prevent proper vinyl flooring repair bonding.
– Remove old adhesive residue carefully: use the manufacturer’s recommended remover (or mechanical removal if the flooring spec allows).
– Let it dry fully: trapped moisture under vinyl can recreate bubbles after the repair.
Verify the subfloor (especially in workshops)
Vinyl repair depends on the substrate behaving consistently:
– Soft underlayment: patch/edge bonds can break as the foam compresses.
– Wet underlayment: moisture-driven swelling can push the repaired area back up.
– Uneven subfloor: high points can telegraph through and crack/cause seam edge lift.
If you find underlayment damage, address it first: dry it, level it, or replace it—then proceed with vinyl flooring repair.
According to common resilient flooring installation guidance, subfloor moisture and flatness requirements are typically enforced before adhesive bonding; check the limits specified by your vinyl flooring manufacturer and any relevant ASTM moisture test method used for resilient systems.
Repair options by damage type
Different symptoms require different repair systems, even when the floor material is the same. The fastest way to get an accurate vinyl-floor repair is to match your method to the failure mode: reattach, replace, patch, or correct the substrate cause.
“Seam lifts are usually adhesive-bond failures, while scratches are often wear-layer damage that may need only surface-level repair.”
“Bubbles point to trapped air or moisture vapor pressure; the root cause determines whether re-bonding will hold.”
“For click-lock vinyl (LVP/LVT), replacement technique differs from glued-down products because adhesive use can break the locking system.”
1) Lifted seams or edges (reattach, don’t “spot glue” blindly)
Lifted seams and edges are common in workshops because rolling loads and vibration pry up the bonding line. The goal is to restore a continuous adhesive bond—not just tack the corner back down.
– Lift gently: use a putty knife to raise the edge without tearing vinyl or damaging adjacent seams.
– Clean both sides: clean the underside of the vinyl (and remove residue from the subfloor) so the recommended adhesive can actually bond.
– Apply adhesive in a thin, controlled way: spread evenly; avoid excess squeeze-out that can create ridges.
– Clamp or weight evenly until cured per the product instructions: ()
Important compatibility note for vinyl flooring repair: adhesive chemistry differs by flooring type and backing. Using the wrong glue can soften the vinyl, stain it, or fail under shop humidity cycling.
2) Damaged plank/tile (replace the affected piece)
When a plank or tile is cracked, delaminated, or structurally deformed, patching usually becomes a recurring headache. Replacement is the cleanest vinyl flooring repair approach when the locking joints are compromised or the top wear layer is deeply cut.
– Cut around the plank/tile using a straightedge and controlled blade depth.
– Remove the unit cleanly without tearing neighboring planks/tiles.
– Install the replacement using the method your flooring requires:
– If click-lock, follow the floating installation repair approach (alignment, locking engagement, and gap behavior).
– If glued-down, use the manufacturer’s adhesive quantity and spread pattern.
In workshop reality, this is where people widen the damage: a blade slip can take out 2–4 adjacent units, turning one localized vinyl flooring repair into a larger zone replacement.
3) Small gouges, scuffs, or chips (patch/level if the damage allows)
For scratches and minor chips, the repair objective is surface level and wear-layer continuity. This works best when the damage is shallow and the vinyl isn’t separating from the backing.
– Assess depth: if the wear layer is only scuffed, filler or a compatible vinyl repair compound may be sufficient.
– If you patch: smooth and blend carefully with the right applicator.
– Avoid overfilling: too much compound can create a new high spot that catches rolling carts.
Then:
– Keep traffic off until fully cured (use ).
– Remove dust from the patch before it cures, especially in a shop with active sanding nearby.
4) Bubbles or raised spots (fix the root cause)
Bubbles in workshop vinyl floors are a “diagnose first” category. Re-bonding alone can look good initially but can fail quickly if moisture is still driving the issue.
– If bubbles are trapped air: controlled lifting and re-bonding can work.
– If bubbles are moisture-related: address the moisture source first (drying, ventilation/dehumidification, fixing leaks) before you re-attach.
After repair:
– Monitor for recurrence in shop conditions—humidity swings are real in 2025–2026 and can reactivate edge lift around wet zones.
– Use the manufacturer’s guidance for any moisture mitigation steps: ()
Finish, cure, and protect your workshop floor
Finishing is where many vinyl flooring repairs succeed or fail, because workshops tend to reintroduce rolling loads early. Your job is to protect the bond/patch while it reaches full strength and shape stability.
“Restrict rolling loads and heavy foot traffic during cure to prevent edge lifting and patch shrink.”
“Shop grit is the most common re-damage trigger; a single abrasive particle can scratch or lift a fresh repair.”
“Cure performance in vinyl flooring repair is strongly tied to time and temperature—follow the adhesive/compound specifications.”
Protect during cure
– Restrict access to the repair zone during cure and initial set time.
– Use felt pads under shop equipment (tool stands, mobile bases, rolling carts).
– Avoid dragging abrasive debris across the surface.
Reduce the “workshop re-damage loop”
Even the best vinyl flooring repair can be undone by repeat exposure:
– Sweep/vacuum before work runs begin again.
– Wipe residue (coolant splash, dust) without flooding the floor.
– If your workshop has frequent wet cleaning, consider a moisture-safe cleaning routine that your vinyl manufacturer approves.
What can go wrong (and how to avoid it)
Most vinyl flooring repair failures aren’t about the final step—they’re about skipped prep, incorrect adhesive selection, or rushed curing under shop traffic. If you want reliable results in 2025–2026 workshop conditions, avoid these pitfalls.
“Using the wrong adhesive for a vinyl flooring system can cause bond failure or discoloration.”
“Skipping subfloor checks turns a repair into a temporary cosmetic fix.”
“Not respecting cure time is one of the fastest ways to trigger seam lift again in workshops.”
– Using the wrong adhesive: vinyl adhesives vary by product type (sheet vinyl vs LVP/LVT; click-lock vs glued-down). Always match adhesive to your flooring system. ()
– Skipping subfloor checks: if underlayment is wet, loose, or uneven, reattachment won’t hold.
– Overcutting during replacement: damaging adjacent planks/tiles leads to bigger repair zones and visible mismatch.
– Not respecting cure time: walking or loading too soon can cause edge lifting, gaps, or patch shrink.
– Ignoring “click-lock vs glued-down”: replacement and adhesive strategy differ—confirm installation type first. ()
Repair approach comparison (so you pick the right “job”)
- Reattach lifted seam/edge
- Pros: Lowest material cost; best for localized edge release.
Cons: Fails fast if underside/subfloor is contaminated or wet. - Replace damaged plank/tile
- Pros: Most durable for structural damage or deep top-layer cuts.
Cons: Requires matching pieces and careful cutout to avoid expanding the damaged area. - Patch/level gouges
- Pros: Fastest for shallow scuffs and small chips when the wear layer isn’t separated.
Cons: High spots or poor blending can catch grit and rolling wheels, re-damaging the repair.
Verdict / tip
If the damage is localized (a lifted seam, one plank/tile, or a small patchable spot), repairing vinyl floors in a workshop is usually worth it because it’s targeted and keeps costs down. Skip DIY and get pro help if you suspect widespread moisture/subfloor failure, large-area buckling, or if the repair requires matching an exact pattern/color from limited stock—those cases often need the right materials, substrate correction approach, and technique to avoid a visible mismatch.
“Localized seam/edge fixes are usually cost-effective compared with full replacement—if the substrate is sound and adhesive is correct.”
“Wide buckling or moisture-driven bubbling typically needs subfloor correction before any vinyl flooring repair will stay fixed.”
Quick checklist (save this)
– Diagnose: scratch vs seam lift vs bubble vs broken plank/tile
– Confirm your floor type: click-lock or glued-down
– Clean + dry: remove dust/grease/old adhesive residue
– Repair method: reattach, replace, or patch (based on damage)
– Use the manufacturer-approved adhesive/patch compound
– Respect cure time; restrict shop traffic and rolling loads
– Add protection: pads under equipment, keep grit off the surface
Sources
– Manufacturer installation/repair instructions for your specific vinyl flooring type (sheet vinyl, LVP/LVT; click-lock vs glued-down).
– Manufacturer technical data sheets for the recommended adhesive or patch compound (coverage, application method, cure time).
– ASTM moisture testing standards used to evaluate substrate conditions for resilient flooring (for example, ASTM F1869 and/or ASTM F2170).
When you repair vinyl floors in a workshop, the winning strategy is simple: diagnose the failure mode, prep to a contamination-free and dry surface, then use the manufacturer-approved adhesive or patch system and protect the repair until fully cured. If you do that, most localized problems—seams, scratches, chips, and even isolated bubbles—can be fixed cleanly without turning a small job into a full-floor redo.
Frequently Asked Questions
What’s the best way to repair a damaged vinyl floor in a workshop?
Start by identifying the damage type—scrapes, cuts, dents, lifting seams, or deep gouges—so you can choose the right vinyl floor repair method. Clean the area thoroughly, remove any loose edges, and use a vinyl patch or vinyl floor filler matched to your flooring type (sheet vinyl vs. click-lock plank). For larger sections, cut out the damaged area in a clean rectangle and replace with a correctly sized patch for a smoother, more durable repair in high-traffic shop conditions.
How do you fix a vinyl floor gouge caused by tools or dropped equipment?
Clean the gouge and dry the surface completely so the repair compound adheres properly. For small gouges, use a vinyl floor repair putty or patch filler, pressing it into the damaged area and smoothing it level with the surrounding vinyl. For deeper cuts, remove damaged material back to solid substrate, then install a matching vinyl patch and seal the edges to prevent moisture or grit from working into the repair.
How do you repair vinyl floor seams that have lifted in a workshop?
Lifted seams in a workshop often come from moisture, temperature swings, or subfloor movement, so address the cause along with the fix. Clean the seam, remove old adhesive, and re-seat the vinyl so it lies flat; if the underlayment is damaged, repair or replace it before proceeding. Apply an appropriate seam adhesive for vinyl floors, press firmly with weights, and let it cure fully before resuming foot traffic or rolling equipment over the area.
Why do vinyl floor repairs fail in workshops, and how can you prevent it?
Repairs usually fail when the vinyl surface is not properly cleaned, when the subfloor is uneven, or when the filler/adhesive is incompatible with the vinyl type. Workshop conditions—dust, oil, humidity, and heavy tool traffic—can also compromise adhesion unless you prep carefully and let adhesives cure completely. Prevent issues by using the correct vinyl floor repair products, sealing edges when patching, and maintaining stable temperature and humidity in the space.
Which products are best for repairing vinyl floors: vinyl patch kits, heat-weld kits, or floor filler?
Vinyl patch kits are best for larger cuts and torn sections, especially when you need a full replacement piece for a clean finish. Floor filler or vinyl repair putty works well for small scratches, scuffs, and minor gouges where the damage hasn’t separated layers. Heat-weld kits can be useful for certain seam or joint repairs on compatible vinyl surfaces, but they require careful matching and proper technique—so choose based on your vinyl floor construction and the exact damage you’re repairing.
📅 Last Updated: October 26, 2026 | Topic: How to repair vinyl floors in a workshop? | Content verified for accuracy and freshness.
References
- Vinyl flooring
- https://www.cdc.gov/asbestos/
- Asbestos | US EPA
- Asbestos – Overview | Occupational Safety and Health Administration
- RFCI – Resilient Flooring Covering Institute
- F2170 Standard Test Method for Determining Relative Humidity in Concrete Floor Slabs Using in sit…
- F1700 Standard Specification for Solid Vinyl Floor in Modular Format such as Tile(s) or Plank(s)
- https://scholar.google.com/scholar?q=repairing+vinyl+flooring+sheet+vinyl+patching Google Scholar
- https://scholar.google.com/scholar?q=vinyl+floor+repair+seam+lifting+flooring+planks+replacement Google Scholar
- https://scholar.google.com/scholar?q=resilient+flooring+maintenance+repair+work+practices Google Scholar


