To fix slope in a shower floor, you need to remove the existing flooring and re-install it with a proper slope for effective drainage. The slope in a shower floor is an important consideration to ensure proper drainage and avoid water pooling.
If you notice that your shower floor is not sloped correctly and water is not draining efficiently, it is crucial to address this issue as soon as possible. A flat or improperly sloped shower floor can result in stagnant water, leading to potential water damage, mold growth, and slippery conditions.
To fix the slope in your shower floor, you will need to remove the existing flooring and re-install it with the correct slope to allow water to flow towards the drain. This is a crucial step in maintaining a functional and safe showering environment.
Ensuring Efficient Drainage
Sloping the shower floor properly is crucial for efficient drainage and preventing water buildup and mold. This ensures a safe and comfortable showering experience while minimizing the risk of slip and fall accidents. To fix the slope in your shower floor, follow these steps:
1. Assess the current slope: Use a level to determine if the existing slope is sufficient. Ideally, the shower floor should have a ¼-inch slope per foot towards the drain.
2. Remove existing flooring: If the slope is inadequate, you may need to remove the current flooring to access the subfloor and make the necessary adjustments.
3. Fix the floor joists: If the subfloor is uneven or damaged, reinforce or replace the floor joists to create a level surface.
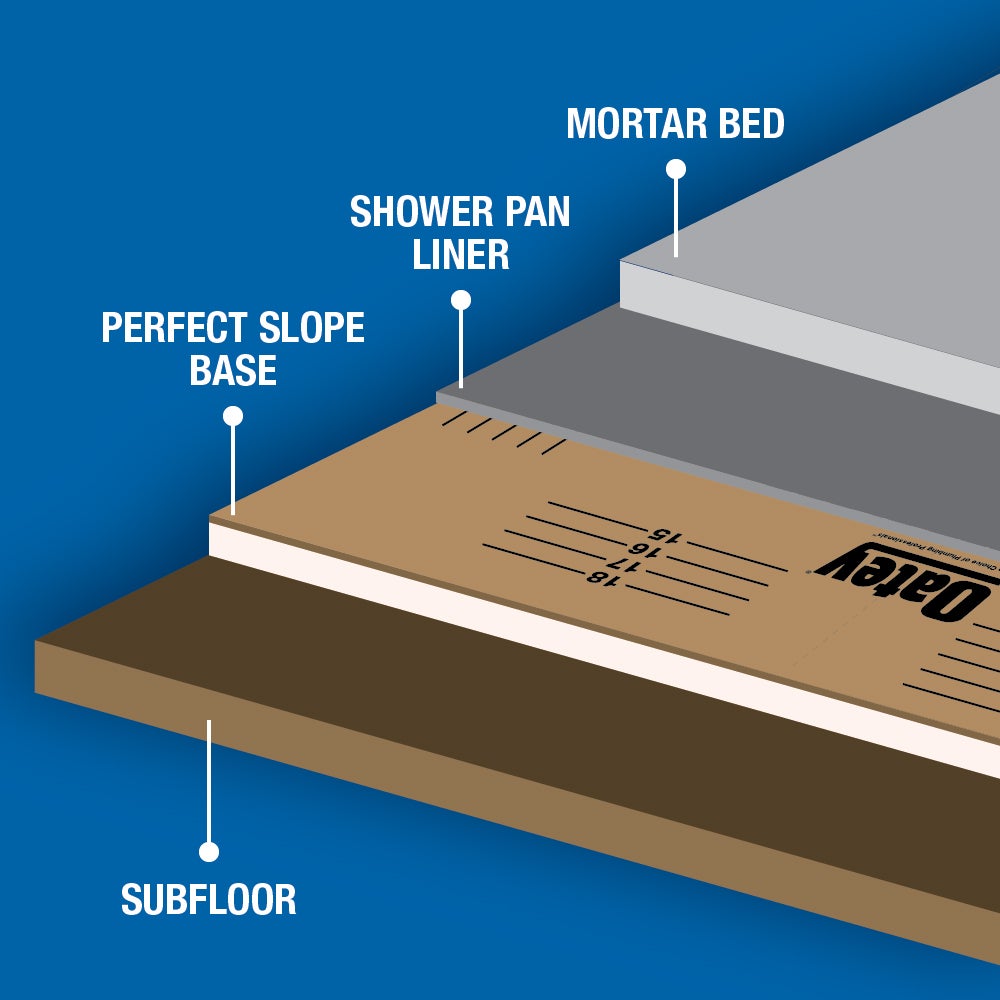
4. Install backer board: Use a waterproof backer board and secure it to the subfloor. This will provide a stable and waterproof base for the new shower floor.
5. Apply a sloping mortar bed: Mix and apply a sloping mortar bed on top of the backer board. Ensure the slope is gradual and uniform towards the drain.
6. Lay the new floor: Install the new shower floor material, such as tiles or a shower pan, over the sloping mortar bed using an appropriate adhesive or mortar.
7. Seal and grout: After the floor installation, seal the grout lines to prevent water penetration and further protect against mold growth.
8. Test the drainage: Finally, test the efficiency of the slope by running water in the shower and observing if the water flows freely towards the drain.
By following these steps, you can effectively fix the slope in your shower floor, ensuring efficient drainage, preventing water buildup and mold growth, as well as reducing the risk of slip and fall accidents.
Age And Wear
This blog post focuses on how to fix slope in a shower floor, specifically addressing the issue of age and wear. Over time, the original slope of a shower floor can depreciate, resulting in water pooling or not draining properly. This can occur due to wear and tear on the floor surface, causing a loss of structural integrity and slope. Addressing this issue is crucial in order to prevent water damage, mold, and mildew growth.
One method to fix the slope in a shower floor is by using specialized materials designed for this purpose. These materials help to build up the low points in the floor, restoring the proper slope for effective drainage. Additionally, resealing the shower floor with waterproof coatings can help prevent further depreciation and maintain a consistent slope.
Regular maintenance and cleaning are also important to prevent future slope issues. Inspecting the shower floor for any signs of damage or depreciation and promptly addressing them can help avoid costly repairs down the line. Overall, fixing the slope in a shower floor is essential for maintaining the functionality and longevity of the shower area.
Poor Initial Installation
A commonly encountered issue with shower floors is an uneven slope. This can cause water to accumulate in certain areas, leading to potential water damage and mold growth. The problem often stems from a poor initial installation, specifically the improper application of mortar and inaccurate measurements.
When the mortar is not mixed correctly or applied evenly, it can result in an uneven surface. Similarly, inaccurate measurements during the installation process can lead to an inconsistent slope. Both of these issues can disrupt the proper drainage of water towards the drain, causing puddles or standing water on the shower floor.
To fix the slope in a shower floor, it is important to carefully assess the situation and address the root causes. This may involve removing the existing tile and mortar, reapplying a level layer of mortar, and ensuring accurate measurements for a properly sloped surface. Seeking the assistance of a professional contractor or tile installer can also be beneficial in achieving the desired results.
Structural Issues
If you notice a slope in your shower floor, it may be indicative of underlying structural issues that need to be addressed. One common cause of a sloping shower floor is foundation settling. Over time, the foundation of a building can shift or sink, leading to an uneven surface in various parts of the house, including the bathroom. Shifting tiles or grout can also contribute to an uneven shower floor. These issues not only affect the aesthetic appeal of your bathroom but can also lead to drainage problems and water pooling. To fix a sloping shower floor, it is essential to identify the root cause of the problem first. If the issue is related to foundation settling, consulting with a professional contractor or engineer is advised to assess the extent of the damage and determine the appropriate solution. The repair process may involve leveling the foundation or installing additional support structures. In the case of shifting tiles or grout, removing and replacing the affected areas can help restore the evenness of the shower floor.
Inspecting The Floor Surface
When examining the shower floor, it is crucial to carefully assess the floor surface. First, search for any noticeable water pooling in particular areas. This could indicate either low spots, where water accumulates, or high spots, where water is unable to drain properly. Use your hands to feel for any irregularities or unevenness on the floor surface.
By observing any low spots, you can identify areas that require attention. These can be fixed by adding a specialized mortar mix to level the floor. On the other hand, high spots would require sanding or grinding to lower the surface and create a more even slope.
Regularly inspecting and addressing these issues will not only prevent water pooling and drainage problems but also ensure the longevity and functionality of your shower floor.
Essential Tools And Materials
- Level
- Trowel
- Mortar mix
- Water
- Tile adhesive
When fixing a slope in a shower floor, it is important to have the right tools and materials at your disposal. The first essential tool is a level, which will help you accurately measure and determine the slope of the floor. A trowel is necessary for applying the mortar mix, which is a key component in fixing the slope. To mix the mortar, you will need water to achieve the right consistency. Lastly, the tile adhesive is used to securely attach the tiles to the sloped floor, providing a durable and waterproof finish.
Removing Existing Tiles And Grout
To fix the slope in your shower floor, the first step is to remove the existing tiles and grout. Start by scraping off the old mortar using a tile scraper or chisel. Be careful not to damage the shower pan or the waterproofing membrane underneath. Once the mortar is removed, clean the surface thoroughly to ensure proper adhesion for the new tiles. Use a cleaning solution and scrub the area with a stiff brush to remove any dirt, mildew, or residue. Rinse the surface afterwards to remove any cleaning solution or debris. Once the surface is clean and dry, it’s ready for the next steps in fixing the slope in your shower floor.
Adjusting The Drain Height
Adjusting the drain height is an important step in fixing the slope in a shower floor. If the drain is too high, water will not flow properly towards it, causing pooling and slow drainage. On the other hand, if the drain is too low, water may not be able to drain effectively and may create a buildup.
If the existing drain is not at the right height, it may be necessary to install a new drain. This can involve removing the old drain and replacing it with a new one that is adjusted to the correct height. This ensures that the water flows towards the drain properly.
Creating a slope towards the drain is another crucial element in fixing the shower floor slope. This can be done by carefully adjusting the shower pan or using a leveling compound to achieve the desired slope. The slope should be consistent and lead towards the drain to ensure proper drainage.
Mixing And Applying Mortar
Mixing and applying mortar is an essential step in fixing the slope in a shower floor. To begin, spread a thin layer of mortar evenly across the shower pan using a trowel. This ensures a strong and stable base for the tiles. Use the notched side of the trowel to create ridges in the mortar, which will help with tile adhesion.
Next, place the tiles firmly in position, pressing them down into the mortar. Use a level to ensure they are properly aligned and adjust as necessary. Be sure to leave space for grout lines between each tile. Continuously check for any unevenness or gaps, making adjustments as needed.
When all the tiles are in place, allow the mortar to dry completely before proceeding with grouting. This typically takes around 24 hours. Properly fixing the slope in the shower floor will prevent water pooling and ensure efficient drainage, keeping your shower clean and safe.
Using A Level To Verify Slope
Making sure that the slope in your shower floor is properly fixed is essential to prevent water pooling and potential damage. One effective way to verify the slope and make any necessary adjustments is by using a level. Start by placing the level horizontally across the floor, perpendicular to the slope. Ensure that it is positioned accurately to accurately measure the slope angle.
If the level indicates an uneven slope, it is crucial to make the necessary adjustments. This can be done by modifying the floor surface to ensure evenness. For gently sloping floors, adding a layer of mortar or self-leveling compound can help create a more even surface. However, for more significant slope correction, it might be necessary to remove the existing floor and start fresh.
After making the necessary adjustments, it is important to ensure that the slope is even across the entire shower floor. Use the level to verify the consistency of the slope from one end to the other. This will help guarantee proper drainage and prevent any water-related issues in the future.
Applying Grout Between Tiles
To fix the slope in a shower floor, applying grout between tiles is crucial. Properly sealing the grout lines and adding finishing touches are important for achieving a polished look. Grout helps to fill the gaps between tiles, preventing water from seeping through and causing damage. It also helps to keep the tiles in place and maintain the integrity of the shower floor. When applying grout, it is essential to ensure that the grout lines are properly sealed to provide maximum protection against water and moisture. This can be done by using a high-quality grout sealer that is easy to apply and provides long-lasting protection. Once the grout is applied and sealed, adding the finishing touches such as cleaning the tiles and applying a grout haze remover can help to enhance the overall appearance of the shower floor.
Regular Cleaning And Inspection
Regular cleaning and inspection are essential in order to fix slope issues in a shower floor. One of the first steps is removing soap scum and grime, which can accumulate over time and cause drainage problems. Cleaning products specifically designed for bathrooms can be used to effectively remove these deposits.
In addition, it is important to regularly check for any signs of slope issues. Look for water pooling or slow drainage after each use and inspect the shower floor for any cracks or gaps. These signs can indicate a problem with the slope of the floor, which may require professional attention.
By staying proactive with regular cleaning and inspection, homeowners can prevent and address slope issues in their shower floors before they become larger and more costly problems. Trusting professionals to fix these issues can ensure a safe and functional shower experience.
Prompt Repair Of Any Slope Problems
Prompt repair of any slope problems is essential in maintaining a functional and safe shower floor. To address any early signs of water accumulation, it is crucial to conduct a thorough inspection. Look for indications such as water pooling in certain areas or draining slowly. If any issues are detected, fixing tiles or grout that may affect the slope is necessary. You can start by removing any loose or damaged tiles and replacing them with new ones. Additionally, ensure that the grout lines are clean and free from any debris or mold. If the slope problem persists, consider hiring a professional to relevel the shower floor. Regular maintenance is key in preventing further damage and avoiding costly repairs in the long run.
Proper Ventilation And Drying
Proper ventilation and drying are essential for fixing the slope in a shower floor. Encouraging airflow in the bathroom can help prevent excessive moisture buildup, which can lead to a variety of issues such as mold and mildew growth. One effective way to promote airflow is by using bathmats and towels to absorb excess moisture after each use. These absorbent materials can help prevent water from accumulating on the shower floor and encourage faster drying. Additionally, it’s important to keep the bathroom well-ventilated by opening windows or using exhaust fans during and after showering. This allows humid air to escape and fresh air to circulate, minimizing the chances of moisture-related problems. By implementing these simple yet important practices, you can ensure a dry and level shower floor.
Frequently Asked Questions On How To Fix Slope In Shower Floor
How Do I Fix The Slope In My Bathroom Floor Without Removing Tiles?
To fix the slope in your bathroom floor without removing tiles, you can use self-leveling compound. First, clean the floor thoroughly. Then, mix the compound according to the manufacturer’s instructions and pour it on the sloped area. Use a trowel to spread and level the compound.
Allow it to dry as per the instructions.
What Is The Correct Slope For A Shower Floor?
The correct slope for a shower floor is typically 1/4 inch per foot. This ensures proper drainage and helps prevent water pooling and potential leaks.
How Do You Fix A Shower With No Slope?
To fix a shower with no slope, you can install a pre-sloped shower pan or create a slope by adding mortar mix under the tile. It’s important to ensure proper water drainage to prevent standing water and mold growth. Seek professional assistance if needed for best results.
How Much Slope Is Too Much For A Shower?
A shower slope should not exceed a quarter inch per foot.
Conclusion
Fixing the slope in a shower floor is vital to prevent water pooling and potential damage. By following the steps outlined in this guide, you can ensure a properly leveled and functional shower. From assessing the slope to using the right materials, each step plays a crucial role in achieving a safe and effective solution.
Remember, a properly sloped shower floor is key to maintaining a dry and durable bathing area. Say goodbye to showering inconveniences and hello to a smoother, hassle-free experience.


