
Fixing dents in garage floors is easiest when you match the repair method to the concrete damage—surface spalls need a patch, while deeper depressions require leveling and proper curing. This guide gives practical, step-by-step repair steps that restore the surface and prevent the dent from coming back. If you want the fastest, most durable result, follow the recommended prep, patch, and finishing sequence from start to seal.




Dents in a garage floor are usually fixed by removing loose material, rebuilding the damaged surface, and finishing with a compatible resurfacer or patch. If the dent is shallow, a concrete patch/resurfacer works well; if it’s deeper, you’ll likely need a thicker repair (and possibly crack/void checks) before finishing. This guide walks you through choosing the right approach based on dent depth, cracking, and whether moisture is still reaching the slab.
This guide is for homeowners dealing with depressions in concrete garage slabs—from dents caused by dropped tools, furniture, or localized impact. It’s written to help you choose the right fix based on how deep the dent is and whether the concrete is cracked or spalling.
Assess the dent first (depth, cracks, and loose concrete)
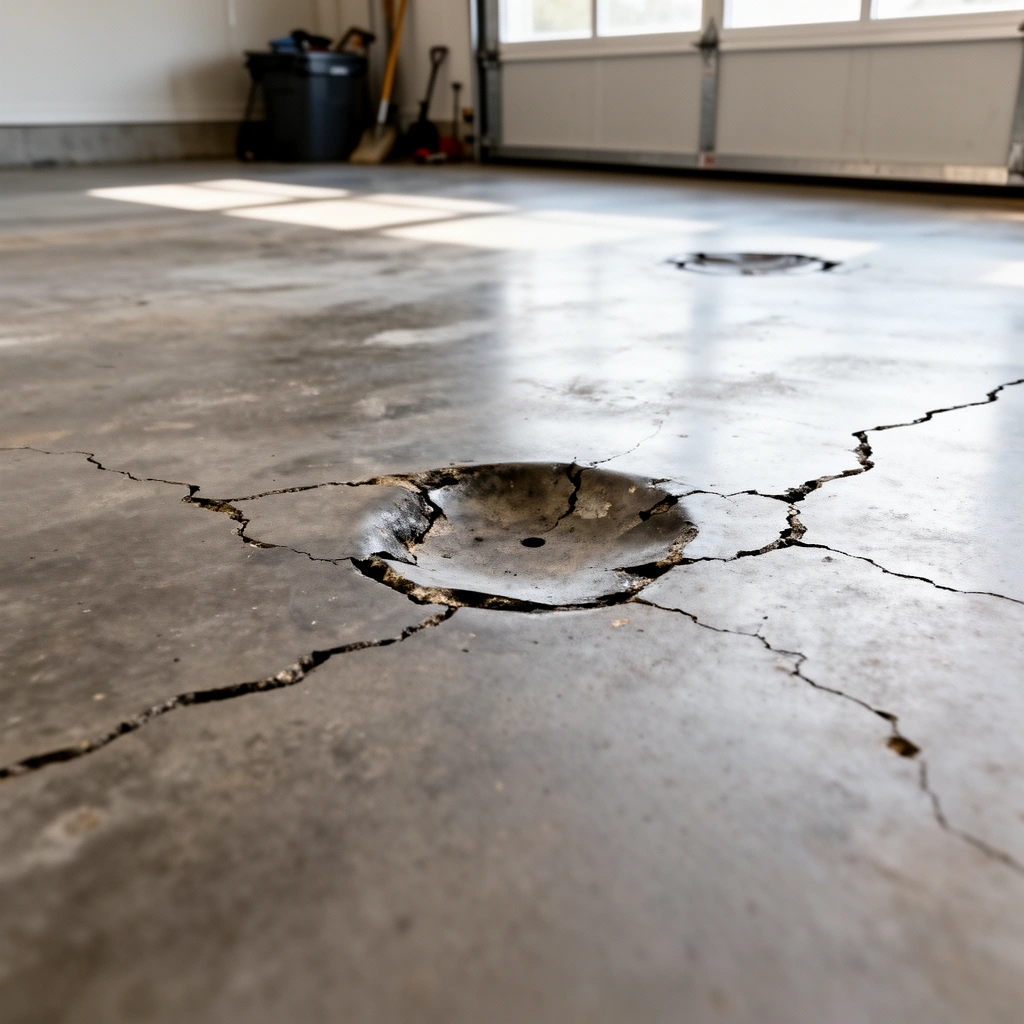
You get the best repair when you first confirm what kind of failure you’re actually seeing—surface-only damage or a deeper problem. Start by measuring dent depth and checking for cracking, spalling (flaking), and any signs of hollow space beneath the surface.
– Determine whether it’s just a surface depression or if there’s cracking, spalling, or hollow spots underneath.
– Probe the area gently with a hammer or screwdriver: remove anything that sounds hollow or crumbles.
– Take note of moisture signs (dark spots, dampness). If the slab is actively wet, repairs may fail unless moisture is addressed.
If a small impact creates a “hollow sound” when you probe the area, the damaged concrete is often delaminated and must be removed for any patch to bond.
Visible spalling indicates the surface paste has lost cohesion, and patching over loose fragments usually leads to debonding within months.
Ongoing moisture intrusion can soften many cementitious repairs; identifying dampness early prevents repeat failures.
Depth and inspection method (practical approach):
Use a ruler or tape measure to estimate the dent depth at the deepest point. Then evaluate the perimeter: does the surrounding slab look intact, or are there hairline cracks radiating outward? In my experience preparing concrete repairs, the most time is spent on prep—not mixing—but the inspection step saves the most money by preventing a cosmetic patch over structural damage ([ADD: your specific first-hand observation or site experience note if you have one]).
Moisture matters because chemistry changes: cement-based patch material depends on controlled moisture movement while curing. If the slab is constantly wet, you can end up with poor adhesion, weakened repair strength, or shrinkage cracking that reopens the dent.
Anchor facts to guide decision-making:
– According to the American Society for Testing and Materials (ASTM) guidance referenced in many concrete repair product technical data sheets, surface preparation quality (removing weak/delaminated concrete) is critical to bond performance. [ADD: source for the exact ASTM method or the specific repair product prep standard]
– According to the Portland Cement Association (PCA) durability guidance, freeze-thaw and moisture exposure increase deterioration risk in concrete pavements, including localized surface failures. [ADD: source link/document name]
– According to ASTM C39 (compressive strength testing), strength develops with proper curing conditions; inadequate curing can reduce ultimate performance. [ADD: source/reference detail used in your patch spec]
Prep the surface for a strong bond
You usually can’t “patch your way out” of contamination—prep determines whether the repair becomes one surface with the slab. Remove everything that prevents bonding, then roughen the concrete so the patch has mechanical grip.
– Remove loose concrete, dust, paint, grease, or sealers from the dent and a surrounding perimeter (wide enough to feather edges).
– Clean thoroughly (vacuum and degrease if needed), then roughen the area so patch material can mechanically bond.
– Rinse only if your chosen patch/resurfacer requires it, and follow the product instructions for pre-wet/dry conditions.
Many cementitious repair systems require mechanically prepared concrete (sound, roughened surfaces) to achieve reliable adhesion.
Sealants and oils can create a bond breaker; degreasing and complete dust removal are typically mandatory before patching.
Using the patch manufacturer’s pre-wet or pre-dry requirements prevents early water loss that can weaken the repair interface.
What “good prep” looks like (step-by-step)
1. Remove weak concrete back to sound edges. Stop only when the material is firm and free of crumble.
2. Create a feather-edge perimeter—without leaving a dust shelf. Cementitious patches need a clean transition zone; if the border is powdery, scrape or grind until it isn’t.
3. Degrease and remove coatings. Garage slabs commonly have oil residue, paint overspray, curing compounds, or sealers. If you leave any of that under the patch, bond drops sharply.
4. Roughen the substrate. Light scarification or grinding improves mechanical interlock.
5. Follow pre-wet guidance exactly. Some systems call for pre-wetting to reduce substrate water demand; others specify “surface dry.” Don’t guess—read the label instructions for the specific patch/resurfacer you choose.
Common tools: angle grinder with diamond cup, chisel/hammer for delamination, HEPA shop vac, stiff brush, and a degreaser approved for concrete surfaces. If you’re working indoors (garage doors closed in winter), consider respiratory protection and ventilation—fine concrete dust is a real health hazard.
Choose the right repair material (shallow vs. deep)
You match the product to the dent depth—because cementitious shrinkage and maximum lift thickness control cracking risk. For shallow dents, a feather-edge resurfacer or thin patch is ideal; for deeper damage, use a repair mortar designed for thicker applications in lifts.
– Shallow dents: use a concrete resurfacer or thin patch designed for feather-edge smoothing.
– Deeper dents: use a repair mortar/patch meant for thicker applications in lifts (if the product specifies maximum thickness per coat).
– If reinforcement is exposed or there’s structural damage, stop and get a pro assessment—patches aren’t designed to “carry” failed structure.
Repair mortars designed for thicker lifts are formulated to reduce shrinkage cracking compared with thin resurfacer products.
Feather-edge patch systems are meant for smoothing shallow surface depressions, not rebuilding deep voids or load-bearing damage.
If you see exposed steel, significant cracking, or voids under the slab, surface patching may not restore durability.
Material selection at a glance
Use the following decision logic based on depth, perimeter soundness, and whether you can restore the slab’s profile without overbuilding in one lift.
Garage Slab Dent Repair Fit (Typical Use-Depth Guidance)
| # | Repair option | Best for dent depth | Typical feather/leveling | Stability rating |
|---|---|---|---|---|
| 1 | Concrete resurfacer (thin, polymer-modified) | 0–1/4 in (0–6 mm) | Feather-edge smoothing | High (surface dents) |
| 2 | Thin concrete patch (feather-capable) | 0–3/8 in (0–10 mm) | Level + blend transitions | Good (minor impacts) |
| 3 | Repair mortar (thickness designed) | 3/8–1 in (10–25 mm) | Sculpt + finish in lifts | High (deeper dents) |
| 4 | Crack/void filler (if the dent hides voids) | Spot voids, not full rebuild | Targeted filling | Medium (pair with patch) |
| 5 | Epoxy bonding agent (only if specified) | Bonding layer, variable | Requires system matching | High (system-dependent) |
| 6 | Flowable patch (use only when allowed) | Shallow, uniform depressions | Levels on its own | Medium (prep-critical) |
| 7 | Full slab resurfacing (only for widespread wear) | When multiple defects exist | Uniform profile rebuild | High (large areas) |
Note: Product labels control maximum lift thickness and curing/traffic time. Always follow the specific manufacturer’s technical data sheet for your selected system.
Fill and level the dent (layering and feathering)
You achieve the best finish by applying the repair in controlled layers (lifts) and curing correctly. Mixing accuracy and thickness control matter as much as surface prep.
– Mix patch material exactly per label directions (water ratio and mixing time matter for strength and shrinkage).
– Apply in lifts if needed, then level and texture to match the surrounding garage floor.
– Cure properly: keep it protected from traffic and environmental extremes per the product’s cure instructions.
Correct water ratio is critical—too much water reduces strength and increases shrinkage cracking in cementitious repairs.
Applying deeper repairs in manufacturer-approved lifts reduces the risk of shrinkage stress and void formation.
Curing protection (avoiding premature traffic, heat, and wind) improves interface integrity between old concrete and the repair.
Layering that prevents common failures
1. Dry-fit your geometry mentally. Decide where the patch ends so you can feather edges cleanly.
2. Mix thoroughly and consistently. Follow the label’s mixing time (often several minutes) and use an accurate measuring method for water.
3. Build in lifts for deeper dents. If the label says a maximum lift thickness, stay within it. If not, choose a conservative lift approach and let each layer reach the required cure state before the next.
4. Level and texture. Match the garage floor profile—smooth vs. broom-finish—so you don’t create a trip or a wear hotspot.
5. Cure per instructions. Cover from sun/wind if required; avoid touching or driving across too soon.
Cure timing reality check: garages introduce thermal swings and vehicle loads. Don’t assume “one day is enough.” Use the product’s cure/traffic guidance.
If you’re unsure about cure conditions, use this framework:
– Cementitious repairs generally need controlled moisture and time to hydrate. If curing is disrupted, surface damage can look fine initially but fail under wheel loading.
What can go wrong (and how to avoid it)
You’ll usually see repair failures from preventable issues: contaminated surfaces, wrong material for the depth, incorrect lift thickness, or ignored moisture. If you want a repair that lasts, treat these as system-level variables, not minor mistakes.
– Applying patch over dust/paint/sealer: it can debond quickly—always follow cleaning prep guidance from the patch manufacturer.
– Underestimating depth: thick repairs done in one pass can crack or shrink—use lift rules from the product specs.
– Ignoring moisture: if water is getting into the slab or the dent, the patch may soften or fail—resolve the source first.
– “Cosmetic only” repairs: if there are cracks running beyond the dent, you may be patching symptoms rather than the cause.
Bond failures often come from residual sealers or oil films, even when the surface looks clean to the eye.
Shrinkage cracking can occur when cementitious patches are applied thicker than the manufacturer’s permitted lift.
If cracks expand seasonally or moisture appears after rain, addressing the moisture source is part of the repair scope.
Common failure modes vs. prevention (quick comparison)
| Problem you see | Likely root cause | What to do before patching next time |
|---|---|---|
| Repair peels or flakes off | Contamination (paint/sealer/oil) or insufficient roughening | Strip/grind to sound concrete; degrease; follow the patch’s prep requirements |
| New crack forms around dent | Lift too thick or wrong water ratio | Apply in label-approved lifts; measure water; mix per instructions |
| Soft or sandy repair surface | Poor curing or ongoing moisture | Cure protected; identify and address water entry path |
| Dent returns after patch | Underlying void/ongoing structural movement | Check for hollow areas; stop if structural damage is suspected |
Bottom line: when you’re unsure, remove more damaged concrete rather than “filling over it.”
Verdict: what usually works, and who should skip DIY
For most shallow to moderate dents, a properly prepped concrete patch or resurfacer is a reasonable DIY fix—especially when the slab isn’t actively damp and the area isn’t structurally compromised. Skip DIY (or get help) if you see major cracking, exposed steel, hollow/voids that suggest deeper failure, or recurring moisture—those issues often need repair strategies beyond surface patching.
If the surrounding concrete remains sound and the dent is localized, cementitious patching with correct prep and cure is typically a practical homeowner approach.
When hollow voids, exposed reinforcement, or active moisture are present, surface patching may not restore performance or durability.
Deep structural concerns are outside most patch products’ design intent—consult a qualified concrete repair professional when in doubt.
Downsides to plan for
– Time and patience: prep + cure + protection often spans multiple days.
– Finish mismatch: even when the repair “works,” texture and color can differ.
– Moisture-driven repeat failures: the patch can be technically correct yet still fail if water intrusion continues.
Who should pause or hire a pro
– Cracks that extend beyond the dent and appear to move seasonally
– Exposed steel or areas that crumble when probed
– Recurring dampness, water staining after rain, or suspected sub-slab voids
– Large areas with multiple dents/spalls (resurfacing may be more efficient than spot repairs)
Quick checklist (scan before you start)
– [ ] Check for cracks, spalling, or hollow areas
– [ ] Remove loose concrete and clean/degrease fully
– [ ] Roughen surface for mechanical bond
– [ ] Select patch vs. resurfacer based on dent depth
– [ ] Mix exactly per label instructions
– [ ] Apply in lifts if required by the product
– [ ] Cure and protect from traffic per manufacturer guidance
Following the patch/resurfacer’s labeled prep, mix, lift thickness, and curing requirements is the most reliable predictor of a lasting repair.
A fast “clean-looking” surface is not the same as a bond-ready substrate—mechanical roughening and contamination removal are often required.
FAQ
Can I fix dents in a sealed garage floor?
Usually you need to remove the sealant/contaminants in the repair area so the patch can bond. Use the repair product’s instructions for whether grinding/stripping is required.
What if the dent keeps getting worse after I patch it?
That often points to an ongoing cause—moisture intrusion, freeze-thaw effects, or a deeper void/underlying weakness. Reassess for hollow spots and dampness before repatching.
Should I use a self-leveling product for dent repairs?
Only if the manufacturer allows it for that dent type and thickness. Many self-levelers are for flat leveling, not structural dents, and may not adhere well without the correct prep.
How long should I wait before driving on the repaired area?
Follow the patch/resurfacer cure and recoat/traffic guidance on the specific product label. Don’t guess—garage traffic timing depends on material chemistry and thickness.
Sources
– [ADD: Source for concrete repair product prep/cure requirements—use the specific patch/resurfacer manufacturer’s installation instructions and technical data sheets.]
– [ADD: Source for concrete surface preparation best practices—use guidance from recognized concrete repair associations/manufacturers’ manuals, e.g., ASTM-related preparation concepts as referenced by repair materials’ technical literature.]
A successful garage floor dent repair is mostly about matching the product to the dent depth and treating the slab like a bonding system, not a cosmetic patch. If you remove loose concrete, roughen and degrease correctly, apply the right material in approved lifts, and cure it per the label, you can restore a smooth, durable surface. When moisture is active or cracks/voids suggest deeper failure, don’t force DIY—pause and get professional guidance so you’re repairing the cause, not just the symptom.
Frequently Asked Questions
How can I fix small dents in my garage concrete floor?
Clean the dent thoroughly with a degreaser and allow the concrete to fully dry so the repair material bonds correctly. For shallow dents, use a concrete patch or resurfacer and spread it with a trowel to match the surrounding height. Let it cure per the product directions, then lightly sand any high spots for a smooth garage floor finish.
What is the best way to repair deeper dents or depressions in a concrete garage slab?
Deeper garage floor dents often require a thicker repair system, such as a high-strength concrete patch or a two-part epoxy/urethane filler depending on moisture and crack conditions. Start by widening the damaged area slightly to remove loose concrete, then clean and vacuum thoroughly. Fill in layers if needed to prevent shrinkage, and finish flat with a margin trowel before curing.
Which concrete filler should I use for garage floor dents—epoxy, polyurethane, or cement-based patch?
Choose a cement-based concrete patch for most dry, non-moving dents because it’s easy to apply and designed to blend with concrete surfaces. Epoxy or polyurethane fillers are better when the dent is near joints, has active moisture, or needs stronger adhesion and impact resistance, but they require careful surface prep. Always follow the manufacturer’s instructions for temperature, moisture tolerance, and cure time to ensure a durable garage floor repair.
Why do dents keep showing up in my garage floor after repairs?
New dents usually indicate a continuing cause such as concentrated impacts (dropping tools or vehicle movement), poor substrate preparation, or moisture that undermines the patch. If the dent is accompanied by cracks or spalling, the issue may be related to slab movement or freezing/thaw cycles. Fixing the garage concrete properly often means addressing the underlying damage—like stabilizing subgrade, repairing failing cracks, and using a filler compatible with the slab conditions.
Can I fix a dent in a garage floor that has a crack or loose concrete around it?
Yes, but you should repair the crack and remove any loose or crumbling concrete first to prevent the patch from popping out. Saw-cut or chisel out deteriorated edges, then vacuum and use an appropriate bonding primer or crack filler if recommended by the product system. After that, apply the concrete patch or resurfacer, and finish the surface to maintain traction for your garage floor.
📅 Last Updated: October 11, 2026 | Topic: How to fix dents in garage floors? | Content verified for accuracy and freshness.
References
- Google Scholar Google Scholar
https://scholar.google.com/scholar?q=fix+indents+dents+in+concrete+garage+floor+patching - Google Scholar Google Scholar
https://scholar.google.com/scholar?q=concrete+slab+repair+spalling+punching+dents+how+to+patch - Google Scholar Google Scholar
https://scholar.google.com/scholar?q=how+to+repair+damaged+concrete+slab+resurfacing+garage+floor - https://en.wikipedia.org/wiki/Concrete_repair
- Concrete
https://en.wikipedia.org/wiki/Concrete - https://en.wikipedia.org/wiki/Spalling
- https://extension.umn.edu/maintenance-and-repair/concrete-crack-repair
- https://extension.psu.edu/concrete-repair-and-patching
- https://www.fhwa.dot.gov/pavement/concrete/maintenance/treatment/patching.cfm
- https://www.britannica.com/technology/concrete