Fixing dents in basement floors is usually a DIY job when you identify the cause and match the repair method to the damage. This guide walks you through practical steps to remove loose material, rebuild low spots with the right patching compound, and restore a flat, durable surface before it worsens. You’ll get clear instructions on what to do first—and what to avoid—so the repair holds under basement moisture and traffic.



If you want dents in a basement floor to stay repaired, fix the cause first (impact vs. moisture vs. settling), then prep the concrete thoroughly and level with the right cementitious product. For small, shallow dents on stable slabs, proper cleaning, drying, and patch/leveling usually works; for dents tied to ongoing movement or dampness, you must correct that underlying issue or the dent will return.
If you’re dealing with a concrete basement slab that looks “sunken,” a floor finish that’s been compressed (like during moisture/weight changes), or visible settling cracks around the dent, these steps will help you decide what to do next. This is especially useful when you don’t want to replace the entire slab but you want the repair to last.
Inspect the dent and find the cause first
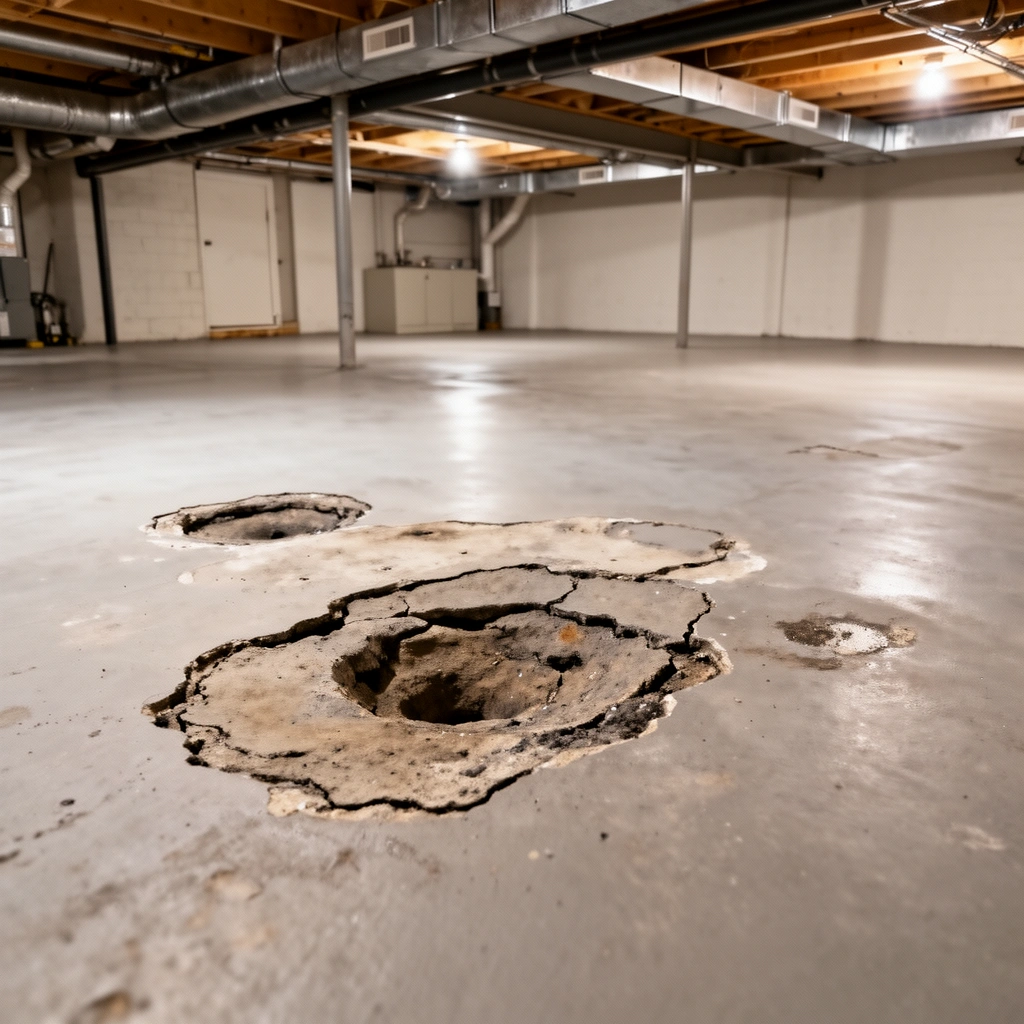
The fastest way to avoid a repeat dent is to identify whether the slab is being damaged by something ongoing—especially moisture or foundation movement—before you add any filler. A patch that’s applied over wet or still-moving concrete often cracks, debonds, or settles again.
Start by inspecting the dent with the basics in mind: dents that follow an impact (like a dropped tool, furniture, or formwork contact) are usually localized and don’t come with persistent dampness. In contrast, denting or a “low spot” that appears alongside flaking, rust staining, or dark patches can indicate moisture migration or corrosion of embedded items. Also note whether the dent is isolated or part of a pattern—near plumbing, along wall lines, or in areas that have stayed wet before. According to ASTM F2170 guidance commonly referenced in flooring systems, indoor slabs are often evaluated for internal relative humidity because moisture drives surface deterioration and bond failures.
A concrete patch only performs as well as the surface it bonds to; if the slab remains damp or unstable, the repair is likely to fail early.
Moisture-driven slab problems often show up as dark staining, flaking, or rust marks—not just a visible depression.
Settlement-related dents tend to correlate with cracking patterns and recurring low spots rather than a single isolated impact event.
As of 2026, many flooring and slab moisture standards still use practical thresholds to decide whether a slab is ready for durable cementitious overlays. For example, many flooring manufacturers target slab internal RH values at or below 75% when tested by ASTM F2170, and use calcium chloride limits around 3–4 lb/1000 sq ft/24 hr for ASTM F1869. (Your patch/leveler may not require the same thresholds as finish flooring, but these targets demonstrate why moisture matters for bonding and long-term integrity.) Finally, look for settling clues: cracks that are wider near the dent, cracks that follow a diagonal or step pattern, or cracks that appear to increase over time.
Common “cause clues” to document on-site
Make a quick note (or take photos) of:
– Edge condition: does the dent have sharp, clean “walled” edges (more impact-like) or feathered, degraded edges (more moisture/weak surface)?
– Surrounding cracks: are there hairline cracks only, or visible movement features like offsets?
– Surface change: is the area softer, powdery, or chalky when lightly brushed?
– Local history: has the basement had seepage, a leak from plumbing, or prior water intrusion?
Decide what you’re fixing: shallow dent vs. settlement
The right repair method depends on whether you’re correcting a surface defect or responding to ongoing settlement. If the dent is shallow and the slab isn’t moving, patching and leveling are usually appropriate; if the dent returns or you see expanding cracks, you need to address the movement first.
Shallow dents typically mean the top layer of concrete has been displaced but the slab beneath remains stable. In that case, a cement-based patch or floor leveling compound can restore height and provide a durable finish—if you prep properly and use a product rated for your thickness range. Settlement, by contrast, is structural behavior. When settlement is present, filling the visible low spot without stabilizing the underlying soil/subgrade or improving drainage can turn the dent repair into a recurring maintenance task.
If cracks widen over time or the dent reappears after patching, the issue is likely movement (settlement) rather than just damaged surface concrete.
Surface-level dents are usually repairable with patch/leveler systems designed for feather-edge or controlled thickness applications.
Settlement repair typically requires addressing drainage and load-support issues; patching alone is rarely a long-term fix.
To distinguish the two, use a simple observation rule:
– Shallow dent pattern: one isolated depression, stable crack lines, no recurring dampness.
– Settlement pattern: repeated sinking, a broader depression that gradually deepens, widening cracks, or a low spot aligned with plumbing penetrations or a known weak zone.
Here’s a quick comparison you can use to decide how far to go with DIY:
– Patch/level DIY is most reasonable when the slab is dry, cracks are not expanding, and the dent depth fits within the patcher’s allowable thickness.
– Stop and reassess when cracks appear active, dampness keeps returning, or the dent is tied to a wider area that behaves like a sagging zone.
| Decision Factor | Best First Choice | Why it matters |
|---|---|---|
| Dent is small and isolated | Patch + level | Product bond strength usually holds on stable slabs |
| Dent returns after repair | Investigate settlement/drainage | Recurrence indicates ongoing movement or moisture |
| Dent is near frequent dampness | Correct moisture source first | Wet concrete weakens bonding and accelerates breakdown |
| Cracks show offsets or widening | Professional evaluation | Movement can make any patch crack again |
Prepare the concrete (or subfloor) for a durable fill
The biggest reason repairs fail is insufficient prep, not a bad product. Clean and profile the concrete (and correct moisture) so the patch can mechanically bond and—just as importantly—so it can dry and cure properly.
Begin by removing loose debris, paint overspray, dust, adhesives, or any weak surface material. For cement-based patching, the surrounding concrete needs a reliable bond plane. That typically means:
1. Mechanical cleaning (scrape, wire brush, or light grinding as needed)
2. Edge definition (you should be able to see a clear perimeter between the dent and sound concrete)
3. Full drying (do not patch over lingering dampness)
If the dent area shows persistent dampness, don’t treat it as a cosmetic problem. Address drainage, fix leaks, and eliminate sources of water intrusion first. Even the best cementitious compound can’t permanently bond to a continuously wet or pressurized slab.
Surface prep that removes dust, paint, sealers, and weak laitance is essential for reliable patch bonding.
Drying the repair zone before applying cementitious patch reduces the risk of debonding and premature cracking.
If moisture is ongoing, repairs can fail even when the patch is installed correctly.
From a documentation perspective, many patch/leveler manufacturers specify bonding and substrate conditions (often including cleanliness, soundness, and moisture limits). Because those requirements vary by brand and whether the product is polymer-modified, always follow the specific datasheet. If you can’t find the datasheet for your product, use the label on the bag to determine:
– allowable thickness per lift
– cure time before foot traffic
– whether a primer or bonding agent is required
– whether the compound is designed for exterior-grade or interior slabs
What to check before you mix anything
– Is there standing water, active seepage, or recurring dark staining?
– Is the concrete powdery when scratched with a coin or key?
– Does the dent surface show chalking or spalling (flaking)?
– Are there sealants/paint layers that need removal to reach bare concrete?
Fill and level correctly (step-by-step)
The most durable dent repair comes from matching the compound to dent depth, then applying in thicknesses the product can handle. Use a cement-based patch or floor leveling compound for stable, dry slabs, and build larger low spots in lifts if the manufacturer allows it.
For small dents:
1. Clean and prep the dent edges.
2. If the product requires it, apply the manufacturer’s primer/bonding agent.
3. Mix patch material to the specified water ratio.
4. Apply enough to reach the surrounding slab height (and slightly over, if the product shrinks during cure).
5. Smooth and feather edges to prevent ridges.
For deeper depressions or larger low areas:
– Many leveling products allow only certain maximum thickness per lift. In those cases, you apply in layers and let each lift reach the required stage before the next. That reduces shrink stress and improves overall performance.
Patch/leveling compounds perform best when applied within the thickness limits specified by the manufacturer.
Layered leveling over larger low spots helps prevent excessive shrinkage and reduces the chance of cracking.
Feathering the edges reduces the “step” that can cause future wear and failure at the perimeter of the patch.
A quick “what thickness can I use?” guide
The most reliable answer is in your chosen product’s datasheet. To make that easier, here’s a data table you can use during planning: it maps typical basement-slab dent situations to repair materials and what installers usually look for in product specifications (bonding, thickness per lift, and cure expectations). Always confirm with your exact product label.
Basement Dent Repairs: Material Fit vs. Spec Checks
| # | Dent scenario | Best-fit material type | Spec to verify (what matters) | Likelihood of lasting repair |
|---|---|---|---|---|
| 1 | Small, isolated shallow dent | Cementitious patch | Bonding method + feather-edge capability | ★★★★★ |
| 2 | Shallow dent, powdery edges | Bonding-primer + patch | Substrate soundness + primer requirement | ★★★★☆ |
| 3 | Medium low spot (larger footprint) | Floor leveling compound | Max thickness per lift + working time | ★★★★☆ |
| 4 | Deep dent (needs build-up) | Patch or leveler applied in lifts | Layer schedule + recoat window | ★★★☆☆ |
| 5 | Dent with active seepage nearby | Moisture correction first | Moisture source + drying/conditions before patch | ★☆☆☆☆ |
| 6 | Dent near expanding cracks | Evaluate settlement before filling | Movement monitoring + structural assessment | ★☆☆☆☆ |
| 7 | Dent after surface coating/paint failure | Concrete removal + new patch system | Mechanical profiling + coating incompatibility | ★★★★☆ |
Note: This table is a planning tool, not a substitute for manufacturer installation requirements. For the exact bonding and cure conditions, use your specific patch/leveler datasheet.
Let it cure, then protect the repaired area
The repair only “locks in” once it cures fully—so treating the patch like it’s done right after it hardens is a common mistake. After the correct cure time, you can protect the repaired zone from abrasion and humidity-driven wear.
Cure time depends on the product and environmental conditions (temperature, airflow, and basement humidity). Follow the label for:
– initial set vs. full cure
– time before foot traffic
– time before placing storage items or rolling equipment
– whether the area needs protection from rapid drying
Even when a patch feels firm, full cure time controls long-term strength and crack resistance.
Humid basements can accelerate surface breakdown; compatible sealing/protection can extend patch longevity.
Protecting the repair during the early cure window reduces edge chipping and perimeter debonding.
Protection is not only about cosmetics. If your basement frequently runs humid, surface wear can expose the repaired material to moisture cycling. A compatible sealer (one that is allowed over cementitious repairs) can reduce dusting and improve cleanability. That said, if you’re planning to install flooring, confirm whether you must avoid sealing prior to installation—many floor systems require specific surface conditions.
Practical protection steps
– Keep heavy traffic off until the datasheet’s full cure is complete.
– Avoid dragging objects across the patch.
– Consider a breathable, compatible sealer if the surrounding slab is already sealed—or if your environment is persistently damp.
What can go wrong (and how to prevent it)
The most common failures happen when the root cause isn’t corrected or when the repair is installed outside the product’s performance limits. If the dent is driven by moisture migration or settlement, patching alone rarely stays perfect for long.
Here are the high-risk failure modes and how to prevent them:
– Ignoring moisture: patching a damp slab can cause debonding and cracking.
– Wrong product for depth: using a thin-repair patch in a deeper depression creates weak layers.
– Skipping bonding steps: missing primer/bonding requirements can lead to perimeter lifting.
– Improper thickness: applying too thick in one coat can increase shrinkage stress and cracking.
– Incomplete cleaning: dust, paint, sealers, and laitance reduce bond strength.
For a structured view, here’s a pros/cons comparison for DIY dent repairs:
| Pros (when done right) | Cons / risks | |
|---|---|---|
| + | Restores flatness for most basement uses (storage, finishing, flooring). | Fails quickly if slab remains wet or if settlement continues. |
| + | Can be targeted and cheaper than slab replacement. | Using the wrong thickness per lift can create cracks. |
| + | Fast improvement when defects are purely surface-level. | Poor prep (paint/sealer/dust) reduces bond strength. |
Cracks that reappear soon after patching usually indicate unresolved moisture or movement beneath the slab.
Following maximum thickness-per-lift guidance helps control shrinkage and reduces cracking risk.
A patch’s bonding strength depends on concrete being clean, sound, and correctly profiled.
If you’re tempted to “just fill it,” pause first. Basement slabs often suffer from chronic dampness, and the dent can be a symptom. [ADD: If you’ve noticed recurring wetness, reference the specific leak/drainage investigation you’ve done (or what you still need to do).]
Verdict: when DIY repair makes sense vs. when to stop
DIY patching is a good option for small, shallow dents where the floor is otherwise stable, dry, and the crack pattern isn’t actively widening. If the dent is tied to recurring dampness, expanding cracks, or noticeable movement, skip quick patch fixes and address the cause—or consult a professional—because the dent may come back.
The practical downside of DIY is that it’s easy to misdiagnose the cause. A surface-level patch can look fine initially but fail once moisture cycling and movement stresses resume. In real basement conditions—especially as of 2025–2026, when many homes experience seasonal humidity swings—bond durability depends on both substrate stability and installation discipline.
When settlement is active, filling the depression without addressing movement often leads to repeat sinking.
When moisture is ongoing, patching alone can’t prevent recurring debonding or surface deterioration.
DIY works best when you can verify the slab is stable and the dent fits within the patch/leveler’s thickness and cure specifications.
If you’re not sure whether it’s impact damage versus settlement, your best next step is to confirm first rather than waste materials on a repair that won’t hold. [ADD: Include your preferred verification step—e.g., “track crack width over 30–60 days” or “check for active seepage after rainfall.”]
Quick checklist for fixing basement floor dents
– [ ] Inspect for moisture, cracking, and signs of movement
– [ ] Clean and remove loose/weak surface material
– [ ] Fully dry the area before patching
– [ ] Use a patch/leveling compound appropriate for depth and surface type
– [ ] Apply to the right thickness and smooth to level
– [ ] Cure fully before heavy use
– [ ] Protect/consider sealing if your basement stays humid
FAQ
Can I fix basement floor dents without drilling or breaking the slab?
Often, yes—if the dent is shallow and the slab is stable. You’ll still need proper cleaning, drying, and a patch/leveler that matches the dent depth and the product’s thickness limits.
Why does my patched dent crack or pop back?
Most commonly it’s moisture, weak surface prep, or ongoing settlement beneath the slab. If cracks reappear quickly, treat the underlying cause rather than adding more compound.
What if the dent is caused by water or humidity?
Fixing the dent alone won’t usually work if moisture is ongoing. Address drainage/water intrusion first, then proceed with a repair only after the area is dry and meets the repair system’s installation conditions.
Do I need to seal after patching?
Not always, but sealing can help if your basement environment is humid or if the surrounding slab is already sealed. Use a sealer compatible with cementitious repairs and follow the manufacturer directions.
Sources
– [ADD: manufacturer specifications for your chosen concrete patch/leveling compound—bonding requirements, application thickness limits, and curing time]
– [ADD: concrete surface preparation guidance from the patch/leveler manufacturer (or relevant ASTM standard referenced by the product datasheet)]
– ASTM F2170: Standard Test Method for Field Measurement of Relative Humidity in Concrete Floor Slabs Using in situ probes (commonly referenced in moisture readiness criteria).
– ASTM F1869: Standard Test Method for Measuring Moisture Vapor Emission Rate of Concrete Subfloor Using Anhydrous Calcium Chloride (commonly referenced in moisture readiness criteria).
– [ADD: primary guidance for moisture-related concrete repair/indoor slab moisture control from a recognized building authority (e.g., a concrete institute or government housing guidance)]
When you treat basement dents as a cause-and-effect problem—inspect carefully, correct moisture or movement when present, and install patch/level materials within their specified limits—you can restore flatness without replacing the entire slab. Start with diagnosis, prep thoroughly, follow datasheet cure and thickness guidance, and protect the repair during the early cure window; that combination is what most reliably turns a dent repair into a lasting one.
Frequently Asked Questions
What are the safest ways to assess and fix dents in basement floors?
Start by identifying what caused the dent—water leaks, settlement, or a failing concrete slab—because the repair method depends on the root issue. Check for moisture, cracks widening over time, and soft spots by pressing with a screwdriver or small tool. If you find ongoing dampness or structural cracking, fix the water source first or consult a professional before patching the concrete.
How do you repair shallow dents in concrete basement floors?
Clean the area thoroughly by removing dust, loose concrete, and any paint or sealer using a wire brush and vacuum. For shallow dents, use a concrete patch or resurfacing compound designed for floors, then apply it with a trowel to match the surrounding surface. Allow proper curing time per the product label, and avoid foot traffic until it reaches the recommended hardness.
Why do basement floor dents keep coming back after patching?
Dents often return when the underlying issue—moisture intrusion, poor soil support, or freeze-thaw movement—has not been resolved. If the slab is moving due to settlement or hydrostatic pressure from groundwater, a patch will only be a temporary fix. Recheck for leaks, test drainage around the foundation, and consider leveling or stabilization solutions if the damage is caused by structural movement.
Which concrete repair products work best for dents in basements?
Look for products specifically labeled for concrete floor patching, self-leveling resurfacer (for broader depressions), or epoxy-based concrete repair (for stronger bonding in some cases). Choose a material that’s rated for interior use, moisture exposure, and the thickness you need to fill. Always follow surface prep requirements—proper bonding is usually more important than the brand of filler.
What’s the best way to prevent dents in basement floors during and after repairs?
After repairs, control moisture by fixing gutters, improving exterior drainage, and addressing any foundation leaks to reduce concrete deterioration. Place a vapor barrier or moisture-resistant coating if your basement is prone to humidity, and use rugs or protective mats where heavy items are stored to limit impact damage. For long-term durability, keep the patched area sealed or coated only with products compatible with basement conditions and the specific patch material.
📅 Last Updated: October 11, 2026 | Topic: How to fix dents in basement floors? | Content verified for accuracy and freshness.
References
- Concrete
https://en.wikipedia.org/wiki/Concrete - https://en.wikipedia.org/wiki/Crack_(structural
- https://en.wikipedia.org/wiki/Concrete_spalling
- Google Scholar Google Scholar
https://scholar.google.com/scholar?q=basement+floor+dent+concrete+repair - Google Scholar Google Scholar
https://scholar.google.com/scholar?q=concrete+slab+patch+repair+procedure - Google Scholar Google Scholar
https://scholar.google.com/scholar?q=concrete+pavement+repair+depression+void+settlement - https://pubmed.ncbi.nlm.nih.gov/?term=concrete+repair+patching+technique
- https://pubmed.ncbi.nlm.nih.gov/?term=concrete+pavement+repair+patch
- https://www.sciencedirect.com/search?qs=concrete+slab+repair+patching
- https://www.sciencedirect.com/search?qs=concrete+crack+repair+and+spalling+repair+methods