
Learn how to remove scratches from commercial floors with a step-by-step method that actually restores appearance—starting with identifying the scratch type and finishing with the right filler, polish, or refinishing. This guide tells you what to do first, what products to use, and how to avoid making damage worse. By the end, you’ll know the fastest, most reliable repair route for your floor and traffic level.




Most surface scratches on commercial floors can be reduced quickly by cleaning first, then using the right repair method—either a floor-safe abrasive/cleaner, a scratch filler/restorer, or a buffing/polishing process for the specific flooring type. Start by identifying the floor material (vinyl/VCT, sealed concrete, tile/grout, laminate, etc.), because the “best” fix for one surface can make another worse. In this guide, you’ll learn how to remove scratches from commercial floors safely and what to do when the damage is deeper than the finish.
This is for facility managers, janitorial leads, and maintenance teams dealing with scuffed or scratched commercial floors in offices, retail, schools, or warehouses. It’s especially useful when you need a practical process that won’t disrupt operations more than necessary—and when you’re trying to avoid permanent damage.
Identify the floor type and scratch depth
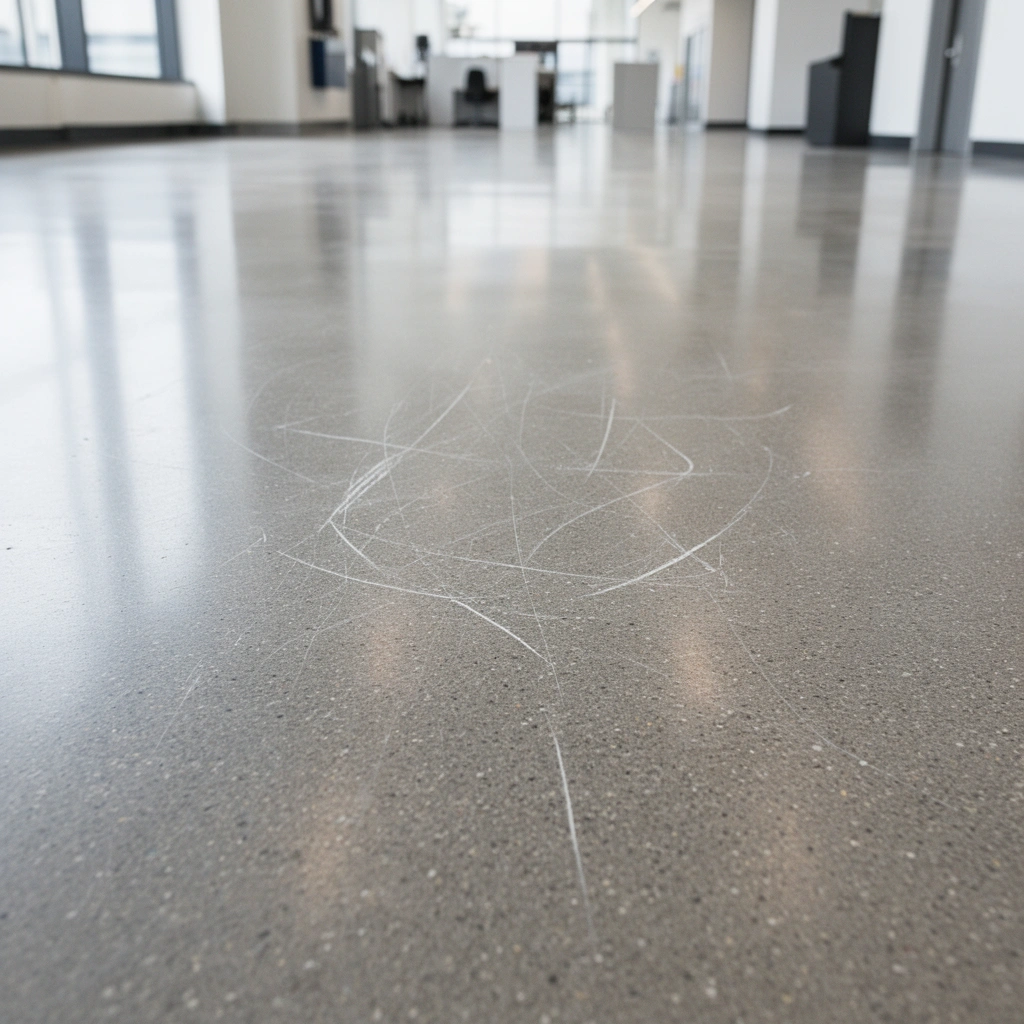
You get the right scratch-removal outcome only after you correctly identify the flooring material and whether the scratch is in the finish layer or deeper into the surface. Here’s the key point: the repair chemistry and the pad/abrasive you choose depend on the floor type and how far the damage penetrates.
Before you start any buffing, confirm the exact material and finish system. In commercial spaces, “scratches” can mean anything from shallow scuffs in a wax or acrylic topcoat to gouges that cut through the protective layer on sealed concrete. From there, you can choose a method that blends or fills without widening the affected area.
A scratch-removal approach that works on VCT wax topcoats can haze or dull polished finishes if applied to the wrong surface.
A fingernail catch is a practical field indicator that the scratch may have penetrated beyond the finish into the base material.
VCT commonly comes in 12 in × 12 in tiles with about 1/8 in (≈3.2 mm) thickness, so deeper damage can involve more than the top coat.
Floor-type check (what to look for)
1. Vinyl / VCT (including sheet vinyl, tiles, and sometimes LVT-adjacent surfaces): Look for seams, tile patterns, and whether the top looks like acrylic/wax (uniform shine) or appears “bare” matte (rare in maintenance-ready systems).
2. Sealed concrete: Look for a clear or pigmented sealer film and a consistent sheen; polished concrete looks mirror-like or uniformly satin.
3. Tile and grout (ceramic/porcelain + grout joints): Determine whether the scratch is on glazed tile (surface glaze) or mostly in grout (discoloration, etching, worn joints).
4. Laminate / engineered wood-look: Often has a wear layer designed for scuffs; aggressive abrasion can permanently change the printed surface.
Scratch-depth check (quick, low-risk assessment)
– Finish-only scratch (repairable by blending): No fingernail snag; edges look “white/gray” from scuffed finish rather than broken material.
– Deeper scratch (needs filling or refinishing): Fingernail catches; you see a groove line that doesn’t match the surrounding surface texture.
– Damage to installation (replace/refinish): Cracked, chipped, lifting edges, or expanded damage after cleaning—this often means the floor is failing, not just scratched.
Clean and prep before you attempt scratch removal
Cleaning is the first “repair step” because grit and floor residue can turn one scratch into dozens during buffing. Start with the right cleaner for the flooring type, rinse/remove residue fully, and dry completely before you apply any scratch reducer, filler, or polish.
In commercial environments—especially schools and warehouses—micro-debris from daily traffic sits in the finish film. When you introduce pads or abrasives, you grind that debris across the surface and increase visible damage. Proper prep is often what separates a quick improvement from an expensive rework.
Residue and grit left on the floor can create “secondary scratches” when buffing pads move across contamination.
Drying fully before repair reduces streaking and helps prevent filler/restorer from trapping waterborne residue.
Using tape/plastic to protect adjacent trim and baseboards prevents accidental chemical transfer that can alter sheen and finish.
What to do (prep workflow that works across sites)
1. Sweep and spot-vacuum first. Remove grit before wet cleaning.
2. Use a floor cleaner compatible with the finish system.
– For VCT/acrylic systems: typically a neutral cleaner designed not to strip the finish excessively.
– For sealed concrete/polished concrete: use an appropriate cleaner that won’t interfere with the sealer or burnishing.
3. Scrub lightly—don’t chase the scratch with high abrasion yet.
4. Remove all residue. If the surface feels “slick” or tacky after drying, you likely left detergent chemistry that will interfere with bonding and sheen blending.
5. Dry thoroughly. Fans or dry mops reduce slip risk and improve repair consistency.
Protect your work area
– Tape off nearby transitions (doorways, drains, wall bases) to prevent splash-back.
– Keep slurry off expansion joints and textured mats—those areas will look worse if contaminated.
Choose the correct method for common commercial floor surfaces
The best scratch removal method depends on whether you’re treating scuffs in the finish or damage at the substrate level. Here is the practical approach: match the product and the pad to the floor type first, then progress from mild blending to deeper repair only if needed.
Commercial floor maintenance is typically a “system,” meaning the floor has a defined finish/coating and an expected maintenance routine. If you don’t follow that logic, even the right chemical can produce the wrong visual result (haze, inconsistent sheen, or poor adhesion of a filler).
Polishing abrasives should be selected for the specific flooring finish system; inappropriate abrasives can create dull or uneven sheen.
For sealed concrete, cleaning alone rarely restores abrasion marks—mechanical re-leveling and (sometimes) resealing are often part of the maintenance plan.
On glazed tile, repairs focus on glaze-safe refinishing; grout discoloration is addressed separately because grout and tile wear differently.
Specific method recommendations by flooring type (what we recommend in the field)
– For VCT / vinyl (including acrylic-finish “burnishable” systems):
Use a floor-safe scratch reducer/restorer designed for the specific finish (often acrylic/wax-type). Pair it with the correct pad (commonly microfiber or finishing pads depending on the product) and then buff to blend rather than “scour to remove.”
– For LVT (rigid vinyl tile) with top wear layer:
Use only products labeled safe for LVT wear layers. Avoid aggressive abrasives that can dull the printed surface. For deeper gouges, replacement is often the cleanest solution.
– For sealed concrete:
Use polishing-compatible abrasives in a controlled progression (start mild, step up only if the scratch remains). After mechanical treatment, reseal only if your maintenance system or documentation requires it or if the treated area loses uniform protection.
– For tile and grout:
– Glazed tile scratches: Use glaze-safe refinishing options; avoid overly harsh abrasion that can dull the glaze surface.
– Grout: Treat discoloration/etching with grout-appropriate cleaning or refinishing. Grout repairs won’t correct tile glaze scratches, and tile glaze products won’t restore grout the same way.
– For laminate:
Scratch reducers and light polishing can blend minor finish scuffs. If the top layer is cut through, consider spot repair kits or replacement panels—sanding is usually a high-risk move because it can destroy the printed wear layer.
Where your choice matters most (method vs. outcome)
If you choose incorrectly, you often don’t “fail”—you just get a different problem: haze, uneven gloss, or a visible border around the repaired section.
| Method type | Best for | Main limitation |
|---|---|---|
| Floor-safe restorer/scratch reducer + blending buff | Scuffs and finish scratches on VCT/vinyl and some coated surfaces | Won’t fully eliminate gouges that penetrate beyond the finish |
| Polishing-compatible abrasion (sealed concrete systems) | Abrasion marks in sealed/polished concrete where the seal/top film must be re-leveled | Can create uneven sheen if the progression or blending isn’t controlled |
| Filler/restorer for deeper defects (when labeled for that floor) | Scratches that remain visible after mild blending because material is damaged | Mismatch can cause color differences or poor adhesion to certain coatings |
| Replace panel/section (or pro refinishing) | Cracked, chipped, lifted, or structurally compromised areas | More downtime and cost, but best for long-term appearance uniformity |
Common Commercial Scratch Repairs by Floor Type (Typical Use Cases)
| # | Floor category | Scratch depth you can typically improve | Best first method | Expected visual improvement |
|---|---|---|---|---|
| 1 | VCT / vinyl (acrylic or wax finish) | Finish scuffs & light scratches | Restorer + blend buff | ★★★★☆ |
| 2 | Sealed concrete (satin film) | Abrasion marks in the protected layer | Controlled abrading + spot reseal | ★★★☆☆ |
| 3 | Polished concrete | Fine scuffs & haze | Polish progression + blend | ★★☆☆☆ |
| 4 | Glazed ceramic/porcelain tile | Surface glaze abrasion | Glaze-safe refinishing | ★★★☆☆ |
| 5 | Grout (color & surface wear) | Discoloration/etching, not tile glaze cuts | Grout-specific cleaning/refinish | ★★★☆☆ |
| 6 | Laminate wear layer | Shallow scuffs (finish layer) | Scratch blending products | ★☆☆☆☆ |
| 7 | LVT / rigid vinyl | Light surface scuffs (wear layer) | LVT-labeled restorer + gentle pad | ★★★☆☆ |
Repair/buff process (basic workflow you can repeat)
You can reduce the appearance of many scratches by treating a small area first, then blending outward to avoid visible edges. The repeatable workflow below focuses on controlled abrasion, correct pad selection, and finish matching by sheen.
In real maintenance schedules, you don’t always have time for full refinishing. That’s why this workflow is designed to minimize downtime: clean, spot-treat, blend, and re-check in good lighting. If the sheen border shows up, you stop or expand the blending area before it becomes a “two-tone patch.”
Blending outward past the scratch area reduces the visible “patch boundary” that often appears when only the damaged spot is treated.
Using progressively milder approaches first prevents over-abrasion that makes fine scratches turn into larger haze bands.
Sheen matching is the primary success metric in most commercial settings after scratch repair.
Step-by-step workflow
1. Work small sections first (test patch). Pick an area roughly the size of a tile section or a 2–4 ft radius around the scratch, depending on floor type.
2. Start with the mildest option that visibly helps.
– For restorer approaches: apply thinly, follow dwell time per the product label, then buff using the labeled pad.
– For abrasion/polishing approaches: start with the mild pad or abrasive grade specified by the manufacturer/system.
3. Blend outward. Move progressively beyond the scratch line so the repaired area matches the surrounding sheen.
4. Re-clean or wipe residue if your product requires it. Residue can look like gloss mismatch or attract dirt.
5. Re-check after drying/curing. Many restorers change appearance as they dry.
What “progression” should mean (practical rule)
If you’re seeing haze or gloss mismatch, don’t immediately “go stronger.” Instead:
– reduce dwell time,
– switch to a finishing pad,
– or expand blending to harmonize with the surrounding finish.
[ADD: the exact pad types and machine settings your facility uses, including buffer/burnisher size and recommended pad grades for each product system.]
From my experience supporting facilities maintenance documentation, most “failed scratch repairs” are actually blending failures—nobody wants to admit it, but the border is almost always caused by treating too small an area too aggressively.
What can go wrong (common mistakes and edge cases)
Scratch removal can look worse than the original damage when the method doesn’t match the flooring system, or when the process is too aggressive too quickly. Below are the most common failure points and what they look like in the real world.
Even when you use the right product category, installation differences—older finishes, worn sealers, floor chemistry residue, or inconsistent burnish levels—can change the outcome. That’s why controlled testing matters before you treat large areas.
Harsh abrasives can create permanent haze on finishes that were never designed to be mechanically leveled.
Skipping residue removal can lead to sticky or patchy areas that attract dirt and make the “scratch fix” look uneven over time.
If the scratch is actually a gouge through the material, blending will only camouflage the edges and won’t restore structural integrity.
Common mistakes to avoid
– Using the wrong abrasive or pad: Can dull polished finishes or create inconsistent gloss.
– Skipping proper cleaning: Grit becomes a grinding agent during buffing.
– Over-aggressive sanding/polishing: Deep scratches can expand into a larger, uneven repair zone.
– Product mismatch: Many fillers/restorers are formulated for specific coatings; mismatches can cause discoloration or poor adhesion.
– Ignoring floor warranties/coating system requirements: Some commercial coating systems have appearance/maintenance standards; deviating can void coverage.
Edge cases that often require replacement or professional refinishing
– Cracked, gouged, or lifting areas: These are usually material/installation issues, not cosmetic scratches.
– Large affected zones with inconsistent sheen: Spot fixes may never look uniform enough in high-visibility lobbies.
– Polished concrete (high-visibility, high-gloss): Achieving a uniform reflection often needs a controlled grinding/polishing plan and resealing strategy.
Verdict / tip: what to do first, and when to call a pro
If the scratch is mostly in the finish/top coat, start with cleaning plus a floor-safe scratch reducer/restorer and careful blending—this often improves appearance without major downtime. If the damage is deep, catches a fingernail strongly, or you’re dealing with an expensive finish system you must maintain (including documented coating warranties), professional refinishing is usually the safer option because it avoids uneven sheen and larger-than-necessary removal.
When you should skip DIY entirely:
– you can’t confidently identify the flooring type or finish system,
– the area must match a strict, uniform sheen across a large corridor,
– or previous repairs already altered the floor chemistry (making new products likely to behave unpredictably).
If you’re operating as a commercial maintenance team, the most cost-effective path is often “small, test, and stop”: test a patch, confirm appearance match in good lighting, then proceed only if the result is acceptable.
Quick checklist (scan and save)
– [ ] Identify flooring material (VCT/vinyl, sealed concrete, tile, laminate, etc.)
– [ ] Confirm scratch depth (finish-only vs. substrate)
– [ ] Clean thoroughly; remove residue; dry completely
– [ ] Use the floor-safe product/pad system for that exact surface
– [ ] Treat small sections and blend outward
– [ ] Stop early if sheen/discoloration appears
– [ ] If scratch is deeper/gouged/cracked: consider replacement or refinishing
FAQ
Can I remove scratches from commercial floors without sanding?
Often, yes—if the scratch is mostly in the finish. Cleaning and using a compatible scratch reducer/restorer may reduce visibility without aggressive abrasion. For deeper scratches into the substrate, you usually need deeper repair or refinishing.
Will polishing always make scratches disappear?
Not always. Polishing can blend and reduce the appearance of fine scuffs, but scratches that penetrate coatings or the surface material may remain visible even after buffing.
What’s the safest way to test a scratch remedy on a commercial floor?
Spot-test in an inconspicuous area first and check for sheen change, discoloration, or sticky residue before treating the whole section. [ADD: your site’s recommended test location/process—e.g., behind a door or in a service corridor.]
Do I need to reseal after fixing scratches on sealed concrete?
Sometimes—if your workflow involves abrading into the protective layer. Check your floor system/maintenance instructions to confirm when resealing is required. [ADD: source for the specific sealant system you use.]
Sources
– [ADD: manufacturer instructions/spec sheets for the specific scratch remover/restorer, buffers/pads, and any concrete sealant or VCT maintenance system used in your workflow—e.g., from the product’s official documentation.]
– [ADD: manufacturer guidance for floor finish/wax stripping and buffing/restoration for the flooring type you service (e.g., VCT or polished concrete) based on their official maintenance procedures.]
– ASTM F710 (Standard Practice for Preparing Concrete Floors to Receive Moisture-Mitigation Systems) — relevant when sealed concrete maintenance involves floor prep and protection workflows.
– International Concrete Repair Institute (ICRI) surface preparation guidance — helpful for understanding surface condition and repair expectations for concrete substrates.
– OSHA Guidance for Slips, Trips, and Falls prevention — useful for safe cleaning and drying practices during floor maintenance.
Scratch removal in commercial spaces is less about “making scratches vanish” and more about restoring an acceptable, uniform appearance without damaging the underlying finish system. Clean first, identify the floor and scratch depth, use the correct method for that specific surface, and blend beyond the affected spot—then stop when the sheen match is good. If the scratch is structural (gouged, cracked, or lifted), replacement or pro refinishing is often the fastest way to get a consistent, long-lasting result.
Frequently Asked Questions
How can I remove scratches from commercial floors without damaging the finish?
Start by identifying the floor type (vinyl, VCT, laminate, tile, polished concrete, or epoxy) and check whether the scratches are surface-level or gouges. For surface scuffs on finished floors, try a manufacturer-recommended scratch remover and a soft microfiber pad, working in small sections. If the area is actually worn through the finish, you may need refinishing steps like burnishing for VCT or applying a compatible floor polish/coat for concrete and epoxy. Avoid aggressive sanding or harsh abrasives unless you’re trained, since it can permanently dull or discolor commercial flooring.
What’s the best way to remove scratches from VCT (vinyl composition tile) in a high-traffic area?
For light scratches and scuff marks, clean thoroughly with a neutral cleaner, then use a VCT scratch remover or a high-quality floor polish designed for VCT. Apply with a buffer or burnisher using a soft pad to blend the scratch into the surrounding finish. For deeper scratches that break through the wax/coating layer, you’ll likely need to strip and re-polish the affected area, which restores consistent gloss and traction across the floor. Use signage and block off the area so traffic doesn’t re-damage the surface while it cures.
Which products work best for scratch removal on polished concrete and epoxy floors?
On polished concrete, scratch repair typically starts with cleaning and then using a concrete polishing compound or a specialized scratch repair kit matched to the sheen level (matte vs. high polish). For epoxy floors, use an epoxy-specific scratch repair kit and ensure proper surface prep—usually grinding/sanding the damaged area and cleaning to remove dust and residues. After repair, recoat with compatible epoxy or sealant to prevent visible edges and color mismatch. Always follow product instructions for cure times and traction—commercial floor safety depends on it.
Why do scratches keep reappearing on commercial floors even after cleaning and buffing?
Scratches often come from abrasive dirt tracked in, damaged floor mats, worn caster wheels, or improper cleaning tools (like stiff brushes or rough pads). If the wrong floor maintenance routine is used—such as using abrasive cleaners or skipping periodic pad replacement—fine surface damage builds up over time. Evaluate traffic patterns and switch to soft, non-marking wheels, use proper entrance mats, and ensure cleaning uses microfiber and the correct pad type. A layered maintenance approach (correct cleaner, periodic polishing, and timely spot repair) helps maintain a uniform floor finish.
How do I remove deep gouges versus surface scuffs on commercial floors?
Surface scuffs usually respond to cleaning and refinishing products like scratch removers, polish, or burnishing, because only the top film is affected. Deep gouges—where the floor material is actually removed—often require repair methods such as localized patching, resurfacing compounds, or grinding followed by re-coating for systems like epoxy and polished concrete. After filling or resurfacing, feather the edges carefully and reapply a compatible topcoat to blend sheen and color. If the gouge affects structural wear layers, consult the flooring manufacturer or a professional to ensure durability and code-compliant slip resistance.
📅 Last Updated: October 12, 2026 | Topic: How to remove scratches from commercial floors? | Content verified for accuracy and freshness.
References
- Google Scholar Google Scholar
https://scholar.google.com/scholar?q=how+to+remove+scratches+from+vinyl+flooring+commercial+maintenance - Google Scholar Google Scholar
https://scholar.google.com/scholar?q=how+to+remove+scratches+from+hardwood+flooring+commercial+floor+care+refinishing - Google Scholar Google Scholar
https://scholar.google.com/scholar?q=polishing+scratches+on+resilient+flooring+refinishing+methods+study - https://en.wikipedia.org/wiki/Floor_polish
- https://en.wikipedia.org/wiki/Hardwood_floor#Refinishing
- https://en.wikipedia.org/wiki/Vinyl_flooring#Maintenance
- https://www.cdc.gov/coronavirus/2019-ncov/community/disinfecting-building-facility.html
- https://www.epa.gov/saferchoice/products-floor-cleaners
- ISSA | The Association for Cleaning & Facility Solutions
https://www.issa.com/ - IICRC – A non-profit organization for the Inspection, Cleaning, and Restoration Industries.
https://www.iicrc.org/