
Fix discoloration on bathroom floors with a clear, step-by-step approach that identifies the cause and applies the right treatment the first time. This guide walks you through what to check, the fastest safe cleaners and refinishing options, and how to prevent stains from returning. You’ll leave with a practical repair plan tailored to the type of discoloration—without guessing or damaging the surface.


If your bathroom floor is discolored, the fastest fix is to identify the stain source first—then use the right chemistry and the least-aggressive method that matches your flooring. Most “mystery discoloration” is either mineral haze, mildew/organic staining, rust transfer, or moisture-driven darkening, and using the wrong cleaner (especially the wrong bleach/acid combination) can make the floor look worse.
If you’re dealing with discoloration from moisture, leaks, or everyday cleaning—and you want a practical plan you can follow without damaging your floor—this is for you. It’s especially useful if you have vinyl, tile/ceramic, grout, laminate, or sealed wood-look floors and you’re not sure where to begin.
Identify the type of discoloration first
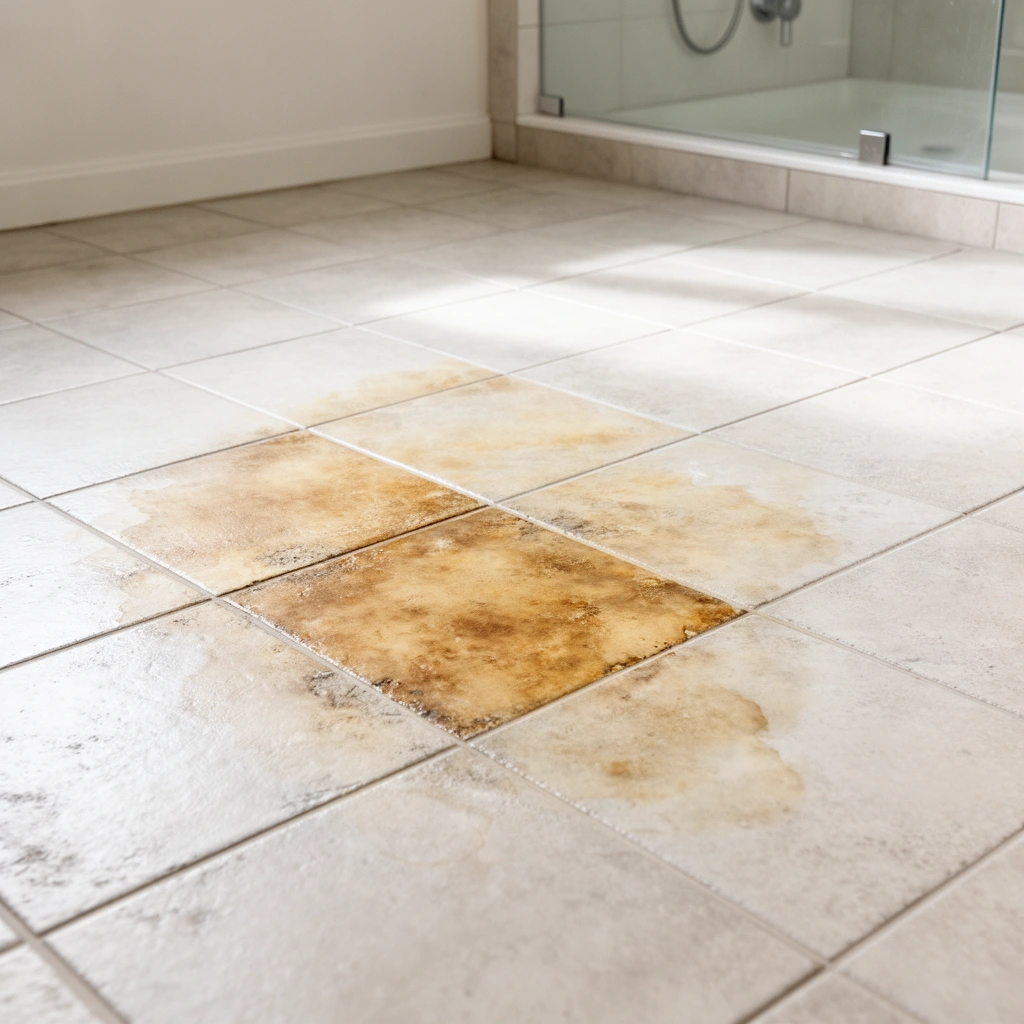
The quickest path to cleaner, more uniform flooring starts with visual diagnosis—because each discoloration category responds to different ingredients. The goal is to match what you see (color + pattern) to a likely cause before you scrub or apply any chemical.
White haze that looks like “film” is commonly mineral scale (hard water deposits), not biological staining.
Black or dark green specks in grout lines are often mildew or mold growth that benefits from bathroom-focused disinfecting cleaners.
Orange, rust-brown spots typically come from iron or steel transfer (hardware, nail heads, drain parts) and usually need rust-specific removers.
Start by scanning from a few angles—your eyes are better than guesswork. Look for these high-signal clues:
– Look for visual clues
– White haze / chalky film: Mineral buildup from hard water, soap residue, or evaporative deposits.
– Black/green specks or fuzzy spotting: Mildew/organic growth in damp grout or seam areas.
– Orange/brown pinpoints: Rust transfer from metal objects, fasteners, drain components, or corroding fixtures.
– Dark patching: Often moisture seepage, poor drying, or water trapped under/near edges.
– Check the pattern
– Isolated spots usually indicate a specific contaminant (rust, cleaner residue, or a localized spill).
– Broad fading/darkening often indicates moisture intrusion, repeated wetting, or inadequate ventilation.
– Do a quick “spot test”
Even “bathroom-safe” products can react with finishes or sealers. If your floor has a protective coating or sealant, test in an inconspicuous area first.
A quick reality check (why pattern matters)
According to the U.S. Environmental Protection Agency (EPA), mold can begin growing on damp indoor materials within 24–48 hours of moisture exposure (EPA guidance on mold and moisture control). That’s why broad darkening or recurring discoloration is often a moisture-management problem—not just a cleaning problem.
Clean safely based on flooring and stain cause
The right cleaner depends on the cause: minerals need descaling, mildew needs disinfecting chemistry, and general grime needs a pH-neutral approach. A safe process prevents residue buildup, finish dulling, and discoloration “ringing” around treated zones.
Using pH-neutral cleaners first is the safest way to remove everyday grime without attacking most sealers and coatings.
Descalers formulated for tile/grout are designed to dissolve mineral deposits rather than just masking them.
Disinfectants require correct dwell time (contact time) to work; wiping too soon reduces effectiveness.
Before you apply anything, clear the area and remove loose grit—sand acts like an abrasive and can spread staining. Then follow this cause-to-action logic:
Mineral haze or hard-water residue
If you see white haze, chalkiness, or film, start with a bathroom-safe descaler designed for your surface (tile/grout, stone, or specific finishes). Apply per label instructions and keep the dwell time controlled—overexposure can dull some grout colors or compromise certain sealers.
Mildew/organic staining
For black/green growth, use a bathroom cleaner/disinfectant appropriate for mildew and follow dwell time listed on the product. Avoid mixing chemicals. The U.S. Centers for Disease Control and Prevention (CDC) warns that disinfectants must be used according to the label and that mixing products can be hazardous (CDC guidance on cleaning and disinfecting).
Also note: for bleach-based disinfecting, CDC commonly references 0.1% sodium hypochlorite as a target concentration for disinfection (CDC disinfection guidance). Household bleach often starts around 5–6% sodium hypochlorite, so dilution matters (and label directions should control how you dilute).
General grime
If the floor looks dull or dirty but not clearly “growing” or “rusting,” start with warm water + a pH-neutral cleaner. Only step up to stronger chemistry if the problem persists after proper rinsing and drying.
Which approach is best—minimize risk first?
From a practical standpoint, your best strategy is iterative: gentle cleaning first, then escalate only when you have confirmed the stain category. If you can’t confidently identify mineral vs. mildew vs. rust, neutral cleaning plus drying is usually the lowest-risk starting point.
Bathroom Floor Discoloration: Most Common Causes & Best-Match Chemistry
| # | Discoloration pattern | Likely cause | Primary chemistry match | Use risk (to finishes) | Fit score |
|---|---|---|---|---|---|
| 1 | White haze / chalky film | Mineral scale | Tile/grout descaler (acid-based) | Medium | ★ ★ ★ ★ ★ |
| 2 | Black/green specks in grout | Mildew/biological growth | Bathroom disinfectant (label-based) | Low–Medium | ★ ★ ★ ★ ★ |
| 3 | Orange/brown dots or streaks | Rust transfer | Rust remover (often oxalic/citric) | Medium | ★ ★ ★ ★ ☆ |
| 4 | Dark patches after wetting | Moisture-driven discoloration | Cleaner + full drying; address moisture | Low | ★ ★ ★ ★ ☆ |
| 5 | Dull gray film everywhere | General grime/soap residue | pH-neutral cleaner + rinse | Low | ★ ★ ★ ★ ★ |
| 6 | Spots with “ghost” edges | Cleaner residue or uneven wetting | Rinse + neutral clean; avoid repeat over-application | Low | ★ ★ ★ ★ ☆ |
| 7 | Persistent staining near seams | Moisture wicking | Fix moisture path; localized repair if needed | Low (cleaning) / High (if ignored) | ★ ★ ★ ☆ ☆ |
Grout discoloration: lift staining without eroding it
If discoloration is concentrated in grout, you’ll get the best results by working from gentle cleaning to controlled escalation. Grout is porous and can be etched or color-shifted if you scrub aggressively or use overly strong chemistry.
Grout discoloration often improves with proper cleaning and resealing rather than repeated “stripping” attempts.
Porous grout can trap residue; thorough rinsing and drying reduces re-staining cycles.
Soft brushes and sponges reduce the risk of scratching tile edges and changing grout surface appearance.
Here’s a safe grout workflow that avoids unnecessary damage:
– Use the gentlest agitation first
Start with a soft brush or sponge. Clean before you “scrub harder.” This prevents embedded grime from turning into a harder-to-remove stain.
– Apply the right chemistry for the cause
– For mineral haze on grout, use a tile/grout descaler intended for grout.
– For mildew, use a bathroom disinfectant and follow dwell time.
– For rust transfer, use a rust remover and keep it localized to the stained grout.
– If grout looks permanently stained, don’t endlessly strip
If discoloration doesn’t lift after appropriate cleaning, consider re-coloring/resealing instead of repeating harsh treatments. Repeated stripping can erode grout edges and change the finish around it.
– Rinse thoroughly and dry
After any grout treatment, rinse according to the product instructions and dry the area. Drying matters because ongoing dampness accelerates mildew return.
Pros/cons tradeoff: “clean vs. refinish”
- Deep cleaning
- Pros: Often restores original appearance with minimal long-term change.
Cons: May not restore grout that has absorbed pigments or mineral deposits. - Re-coloring/resealing
- Pros: Can correct persistent color shift and reduce future absorption.
Cons: Requires correct prep and compatible sealers; improper products can cause uneven sheen.
[ADD: If you want, paste the exact grout cleaner/disinfectant brand you used, and we can adapt the dwell time and safety notes to your label instructions.]
Vinyl, laminate, and wood-look surfaces: avoid finish damage
For resilient floors (vinyl, laminate, and many sealed wood-look products), the safest fix is to use label-approved cleaners and prevent moisture from reaching edges/seams. Once discoloration is linked to internal moisture wicking, cleaning alone won’t make it go away permanently.
Vinyl, laminate, and sealed wood-look floors can discolor or dull if cleaned with abrasive pads or incompatible chemicals.
If a spill wicks into seams or edges, discoloration may persist because the contaminant remains below the surface.
Recurring dark patches after cleaning usually signal an ongoing moisture pathway, not a surface-only issue.
Use these guardrails:
– Stick to cleaners labeled for your flooring type
Avoid abrasives that can dull or scratch the surface and make discoloration more visible. If your floor has a protective wear layer, you want to preserve it.
– Treat moisture path issues, not just the top layer
If discoloration is from a spill that soaked into seams/edges, you may need targeted repair or replacement of affected sections.
– Check baseboards and transitions
Dark patches near edges often reflect water migration beyond the floor surface. In that case, improving ventilation or repairing the leak is the real solution.
A note on steam and heat
Many flooring manufacturers restrict steam cleaning for certain finishes because heat and moisture can compromise adhesives and underlayers. If you’re using steam, confirm compatibility in the manufacturer care instructions: [ADD: manufacturer care instructions for your flooring brand/model].
What can go wrong (and how to prevent it)
Most bathroom floor discoloration gets worse when the cleaning method doesn’t match the cause or when chemicals are misused. Prevention comes down to label-following, chemical compatibility, and fixing moisture sources.
Bleach can damage or lighten some sealers, grout finishes, and resilient flooring coatings if used improperly.
Mixing bleach with acids (or many “multi-surface” mixes) can create hazardous fumes and should be avoided.
Aggressive abrasives (steel wool, power scrubbing) can scratch finishes and create a “bigger” discoloration problem.Common mistakes to avoid:
– Overusing bleach
Bleach is not universally safe for every finish. Use only what the label specifies for your surface and grout type.
– Mixing cleaners
Never combine products. If a cleaner label doesn’t explicitly say it’s compatible, assume it isn’t.
– Scrubbing too aggressively
Steel wool, harsh abrasives, and power tools can scratch and create micro-channels that trap dirt and moisture.
– Ignoring leaks
If discoloration keeps reappearing, the moisture source is the real cure. According to EPA guidance, managing moisture is central to mold prevention because damp conditions drive growth (EPA mold and moisture guidance).
[ADD: Include a brief local observation—e.g., whether discoloration appears after showers or around a specific wall outlet—so you can guide readers toward likely leak locations.]
Verdict / tip: choose the gentlest correct method first
The best strategy is to start with the least aggressive method that matches the discoloration type: neutral cleaning for grime, descaler for mineral haze, and a bathroom mold/mildew cleaner for biological growth. This also reduces the chance of finish damage because you’re not jumping to harsh chemicals before confirming the cause.
A cause-matched cleaner reduces repeated treatments that can erode grout or dull protective coatings.
Drying and ventilation are critical because damp conditions can restart mildew growth.
If discoloration keeps spreading after surface cleaning, moisture intrusion is likely and requires source repair.
Important downsides and when to pause:
– If your floor is unsealed/unfinished wood, discoloration may indicate deeper saturation—pausing is often safer than escalating cleaners.
– If you suspect structural moisture (subfloor issues, chronic leaks, or persistent darkening), consider pausing cleaning and getting help from a flooring contractor.
Quick scan checklist (save this)
– [ ] What color is the stain? (white haze / black-green / rust-brown / dark patch)
– [ ] Is the discoloration spotty or widespread?
– [ ] What flooring type is it? (tile/grout, vinyl, laminate, wood-look, etc.)
– [ ] Did you spot test in an inconspicuous area?
– [ ] Did you use the cleaner labeled for your surface?
– [ ] Did you rinse and fully dry afterward?
– [ ] Does it keep coming back (possible leak/moisture issue)?
FAQ
Can discoloration on bathroom floors be fixed without damaging the surface?
Often yes—if you match the cleaner to the cause (minerals vs mildew vs rust) and use non-abrasive tools. Always spot test first, especially for vinyl/laminate and floors with sealers.
Why does the discoloration return after cleaning?
The most common reason is ongoing moisture from a leak, poor ventilation, or water trapped near edges/seams. If it keeps recurring, treat the moisture source before re-cleaning.
Is bleach the best option for bathroom floor discoloration?
Not always. Bleach can damage certain finishes and may not target mineral haze; it’s best reserved for specific mildew/organic staining when the label confirms it’s safe for your flooring and grout.
What’s the safest tool to scrub grout?
A soft brush or sponge is the safest starting point. Escalate only if needed, and avoid anything that can erode grout or scratch surrounding tile edges.
Conclusion
Fixing discoloration on bathroom floors is less about “stronger chemicals” and more about correct diagnosis: mineral haze, mildew, rust transfer, and moisture-driven darkening each call for a different method. Start gently, use the right product chemistry for the visible cause, rinse and fully dry, and—most importantly—address leaks or moisture wicking when discoloration keeps returning. If you follow that workflow, you can usually restore a cleaner look while protecting grout, seals, and resilient flooring finishes.
Sources
– [ADD: manufacturer care instructions for your specific flooring type—use the brand’s official “cleaning and maintenance” guidance]
– [ADD: grout/sealer product label instructions for dwell time, dilution, and surface compatibility]
– CDC guidance on cleaning and disinfecting practices and chemical mixing safety
– U.S. EPA mold and moisture control guidance (including moisture-related growth timing)
Frequently Asked Questions
What causes discoloration on bathroom floors?
Bathroom floor discoloration is usually caused by moisture trapped in grout, subfloor leaks, or poor ventilation that allows mold and mildew to grow. Common culprits include hard-water mineral deposits, soap scum, rust stains from metal fixtures, and detergent residue that builds up over time. Identifying whether the stain is from water, chemicals, or organic growth helps you choose the right cleaning method and prevents the stain from coming back.
How do I remove water stains and dark spots from bathroom tile or vinyl floors?
Start by cleaning the surface with a pH-neutral bathroom cleaner to remove surface grime, then dry the area completely. For water stains on tile or grout, try a grout-safe cleaner or a paste made from baking soda and hydrogen peroxide (test first in an inconspicuous spot). If the discoloration is caused by ongoing moisture, fix leaks and improve ventilation with an exhaust fan before you refinish or seal the floor.
How can I fix yellowing or fading on vinyl or laminate bathroom floors?
Yellowing on vinyl or laminate is often from UV exposure, chemical residue, or long-term dampness, so avoid harsh solvents and abrasive scrubs that can worsen discoloration. Clean with a manufacturer-approved vinyl or laminate cleaner, then use a gentle spot treatment with a diluted solution of mild detergent and water for stubborn marks. If stains persist or the finish is worn, replacing the affected sections and sealing edges can be the best long-term solution.
Which cleaning products work best for mold or mildew discoloration on bathroom floors?
For mold and mildew stains, use a bathroom disinfectant or cleaner labeled for mildew removal, and always follow label directions for dwell time and ventilation. Hydrogen peroxide-based cleaners can be effective for organic discoloration without as much residue as some bleach products, but test first to ensure compatibility with your flooring type. After treatment, thoroughly rinse if required, then dry completely to stop mold growth and prevent recurring discoloration.
What’s the best way to prevent bathroom floor discoloration after repairs or deep cleaning?
Prevention focuses on controlling moisture and protecting the finish: repair leaks promptly, use a bathroom exhaust fan, and dry wet areas after showers. Regularly clean with non-abrasive, bathroom-safe products to reduce soap scum and mineral buildup, and consider sealing grout for easier maintenance. A consistent cleaning routine and proper ventilation can significantly reduce future staining, discoloration, and grout darkening.
📅 Last Updated: October 11, 2026 | Topic: How to fix discoloration on bathroom floors? | Content verified for accuracy and freshness.
References
- Google Scholar Google Scholar
https://scholar.google.com/scholar?q=bathroom+floor+discoloration+mold+removal - Google Scholar Google Scholar
https://scholar.google.com/scholar?q=efflorescence+concrete+floor+cleaning+mineral+deposits - Google Scholar Google Scholar
https://scholar.google.com/scholar?q=tile+grout+stain+discoloration+cleaning+methods - https://www.cdc.gov/mold/faqs.htm
- Mold | US EPA
https://www.epa.gov/mold - Mold
https://en.wikipedia.org/wiki/Mold - Mildew
https://en.wikipedia.org/wiki/Mildew - Efflorescence
https://en.wikipedia.org/wiki/Efflorescence - Limescale
https://en.wikipedia.org/wiki/Limescale - Grout
https://en.wikipedia.org/wiki/Grout