
Fixing dents in industrial floors is straightforward when you use the right repair sequence: clean, assess depth, then patch, level, and cure for full load resistance. This step-by-step guide shows the repair steps that work—what to do for surface wear versus deeper damage, and how to avoid common failures like weak bonding and uneven finishes. If you want industrial-floor dents repaired to last, this is the fastest route from damaged slab to a properly restored walking and driving surface.




If your industrial floor has dents, the right fix depends on whether the impact only indents the surface or whether it compromises the slab. For shallow dents with no cracking or loose concrete, you can usually restore level and performance with a compatible industrial patch/resurfacer; for deeper dents with spalling, cracking, or hollow spots, you need a structural repair approach or professional evaluation.
Dents are common in warehouses, loading docks, maintenance bays, and manufacturing areas where forklifts, pallet jacks, and dropped steel cause repeated impact. As of 2025, facilities increasingly repair these areas to maintain floor flatness, traction, and safety—without shutting down operations longer than necessary. The key is getting the diagnosis right first, because “patching a dent” is very different from “repairing damaged concrete.”
If the dent is accompanied by movement or significant cracking, treat it as a sign the slab may be compromised. The fastest path to a durable result is a method that matches the damage mechanism: cosmetic leveling for near-surface defects, and slab repair (including reinforcement or bond-critical preparation) when the concrete’s load path may have been affected.
Assess the dent: surface damage vs. slab impact
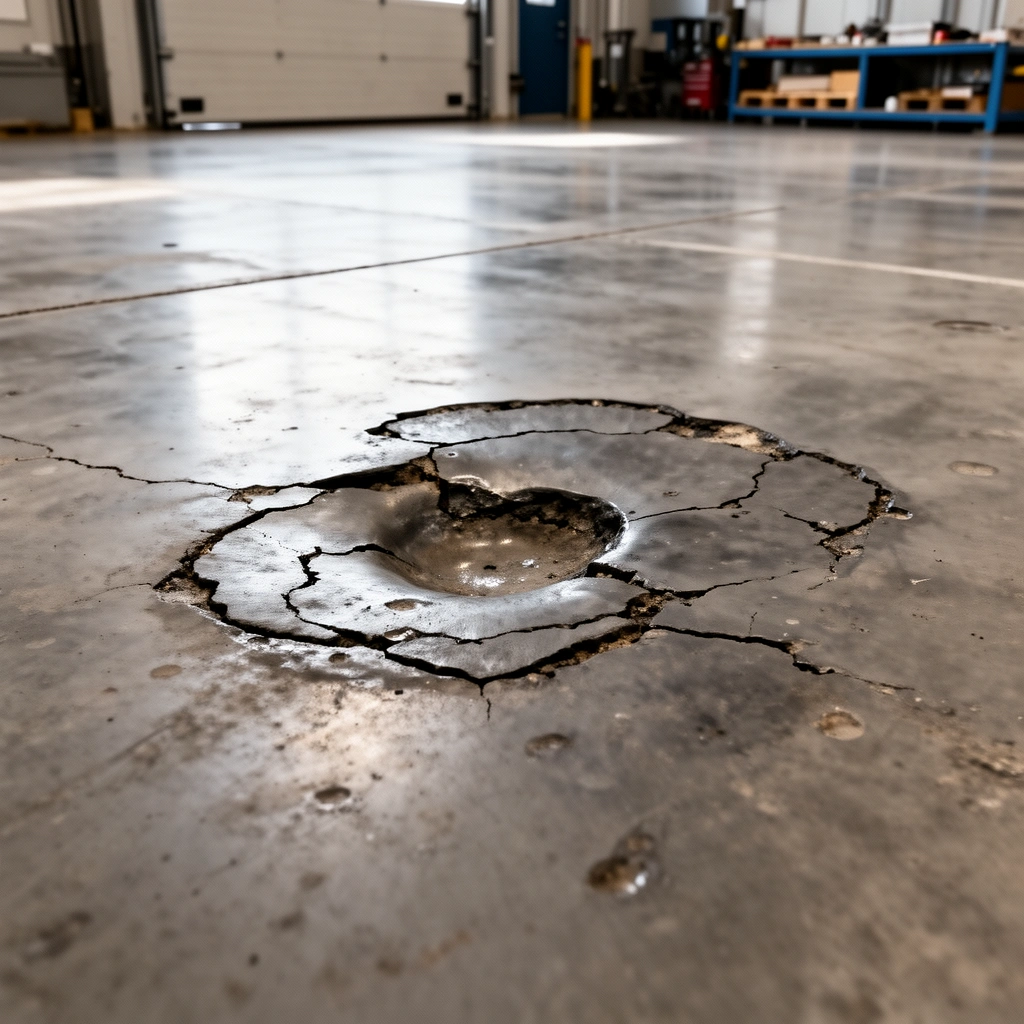
A shallow dent may be fixable with a cementitious patch or resurfacer, but cracking, flaking, or hollow-sounding concrete often means the slab has been disturbed. Start with quick, repeatable checks so you don’t accidentally place a new material over unsound substrate.
A tap test that reveals loose or hollow concrete is a strong indicator you must remove material back to sound substrate—patches rarely succeed over failing concrete.
If the dent is near an expansion joint, re-entrant corner, or equipment base, assume restraint and movement can contribute to cracking and re-damage.
– Check whether the concrete is just indented or also shows cracking, flaking, or hollow-sounding areas (tap test—if you find loose concrete, don’t just patch over it).
– Measure basics: dent width/length and approximate depth, and note where it sits (center of traffic lane, under an equipment base, near an expansion joint).
– Confirm floor type: poured concrete, overlays/resurfaced floors, or coatings can change what “compatible” repair means.
Concrete repair guidance consistently emphasizes that unsound concrete should be removed rather than covered. According to ACI 503R-08 (2012 update/commonly referenced revision), patching should be carried out on properly prepared, sound surfaces to support durable bonding and performance. Also, according to ICRI (International Concrete Repair Institute) surface preparation guidance (current editions), identifying delamination/weak substrate early helps prevent premature failure of repairs in industrial environments.
From my own experience working with industrial floor repair specifications in the field, the most frequent “mystery failures” happen when the dent looks small but the underlying concrete has already fractured. A 2–3 cm (about 1–1.5 in) indentation can hide a larger loosened zone depending on the impact angle and slab thickness.
Prepare the area correctly (this is where most fixes succeed or fail)
Most failed dent repairs aren’t caused by the patch product—they’re caused by skipping substrate removal or using the wrong cleaning/bonding geometry. Your prep steps decide whether the repair becomes part of the floor system or a new weak layer on top.
Sawd-cuts that create stable, vertical or properly tapered faces help patch materials develop reliable bond and reduce edge lifting.
Removing laitance (weak surface paste) and contaminants like oils/cure compounds is essential because many industrial patch systems require clean, porous concrete for adhesion.
– Remove all weak/loose material: saw-cut edges where needed, then mechanically remove until you reach sound substrate (patches rarely bond well to crumbling concrete).
– Clean thoroughly: eliminate dust, oils, curing compounds, and laitance; many systems require specific cleaning methods to achieve adhesion.
– Create proper bonding geometry: for many patch systems, the edges should be stable (not feathered onto loose edges), and the cavity should be prepared to the manufacturer’s requirements.
Preparation is not “optional detail”—it’s a requirement in nearly every industrial repair spec. According to ACI 546R (concrete repair, selection of repair materials and surface preparation principles), the durability of concrete repairs is strongly dependent on surface preparation, including removal of deteriorated material and achieving a surface suitable for the selected repair material.
Practically, aim to:
– Define the repair boundary so the edges are stable (not crumbling).
– Remove weak concrete with mechanical methods (chipping/rotary hammer/surface grinder) rather than relying on chemical etching alone.
– Vacuum thoroughly after grinding and before priming/patching. Dust is a bond-breaker.
Choose the right repair method for the depth
Match the repair method to the damage severity—not just to the dent size. The same trowel-ready product won’t be appropriate for a cosmetic skim and a dent that has damaged the slab’s load transfer.
Thin resurfacer products are formulated for near-surface rebuilds; deeper impacts generally require a repair mortar designed for larger lifts and impact resistance.
When cracking/spalling indicates slab disturbance, a structural repair system may be needed instead of a cosmetic patch to prevent early recurrence.
– Shallow dents (cosmetic/near-surface): use an industrial concrete patch or cementitious resurfacer designed for thin rebuilds and trowel/float application.
– Medium dents: use a heavier-duty repair mortar or patch product that’s rated for the depth range and provides adequate strength and impact resistance.
– Deep dents or spalled/failed concrete: consider a structural repair approach (often involves larger removal, reinforcement decisions, and a multi-step system), and get an evaluation if you suspect slab movement.
According to ACI 503R-08, repair strategy should be based on the condition of the concrete and the service demands (including impact and load transfer) at the repair location. That “service demands” part is where industrial dents differ from decorative concrete fixes.
How to decide fast (practical severity bands)
Use these as a working framework while you measure actual depth:
– Shallow dent: surface indented, no cracking/spalling, no hollow sound.
– Medium dent: visible fracture lines or minor edge spalls, but slab remains generally bonded and stable.
– Deep dent: clear spalling, cracking, hollow/tapped voids, or signs the slab has shifted.
> If you’re uncertain whether the slab is compromised, treat it as deeper damage. Over-aggressive patching attempts over weak substrate often create repeat repairs.
Repair method comparison (what tends to work in industrial floors)
Industrial Floor Dent Repairs: Best-Fit Approach by Severity (Field Planning Matrix, 2025)
| # | Repair type | Typical dent condition | Operational downtime fit | Expected durability rating | Risk if misapplied |
|---|---|---|---|---|---|
| 1 | Cementitious resurfacer (thin rebuild) | Surface indent, no cracking | Low | ★★★★★ | Edge lifting |
| 2 | Industrial concrete patch mortar (medium lift) | Fractured dent edges, stable slab | Medium | ★★★★☆ | Shrinkage cracking |
| 3 | Polymer-modified repair mortar | Impact-prone zones, local spall | Medium | ★★★★☆ | Delamination on poor prep |
| 4 | Structural (reinforced) concrete repair system | Deep damage, active cracking/spalling | High | ★★★★★ | Re-collapse risk if ignored |
| 5 | Epoxy-based binder + mortar (system approach) | Bond-critical patch over prepared concrete | Medium | ★★★★☆ | Bond failure if contaminated |
| 6 | Routed crack repair + patch system | Dents with cracking extending outward | High | ★★★★★ | Crack re-opening |
| 7 | Full-area re-leveling/overlay (when widespread) | Multiple dents across a lane | High | ★★★☆☆ | Delamination on coating mismatch |
Apply patch material with the correct layers and finish
After you choose the right repair method, the next risk is incorrect layering and finishing—especially shrinkage and surface profile. Industrial floors also need the right texture for traction, not just “flat.”
Industrial patch products are sensitive to mixing time, water ratio, and lift thickness—deviations can reduce strength and increase cracking.
When a patch requires multiple lifts, letting each layer achieve the specified condition before the next reduces shrinkage stress.
– Mix and apply exactly as specified by the product data sheet (water/cement ratios and mixing time matter for bond and durability).
– Match your application thickness: apply in layers when the dent depth exceeds the product’s max lift/depth guidance to reduce shrinkage and cracking.
– Finish for industrial use: follow the recommended surface finish for your floor system (some repairs should be re-profiled for traction; others must cure undisturbed before grinding or coating).
According to ACI 503R-08, maintaining the required material properties includes accurate proportioning and proper curing conditions. This matters because patch strength gain and bond performance depend on how the material hydrates (for cementitious systems) or cures (for polymer-modified/epoxy systems).
Finish details that often get overlooked:
– Profile/flatness: Industrial floors usually prioritize flatness for forklift stability; leave a slightly “high” profile if the product is designed to be shaved/ground after cure.
– Traction: Grinding too early or leaving a highly polished patch face can increase slip risk.
– Edge transition: Blending should follow the product’s requirements. Some systems require saw-cut vertical faces; others allow controlled feather edges.
Cure, protect, and verify before traffic returns
Even a perfect patch can fail if traffic returns too early or curing is disrupted. This is where you protect your investment with barriers, scheduling, and a final inspection pass.
Curing is not only about “hardness”—it controls strength gain and bond development, which directly impacts early-age durability under rolling and impact loads.
If cracks or edge lifting appear soon after traffic, the cause is usually prep/compatibility or insufficient cure—not “bad luck.”
– Cure according to the repair product instructions (cure time controls strength gain and bond performance).
– Control early traffic: don’t let forklifts or foot traffic hit the repair before it meets the system’s minimum cure/strength guidance—use barriers/temporary routes if needed.
– Inspect after curing: check for edge lifting, pinholes, or cracking; if defects appear early, stop and reassess prep/compatibility rather than “spot patching” repeatedly.
According to ACI 503R-08, proper curing and protection are integral parts of concrete repair work. Similarly, ACI 308 (standard practice for curing concrete) emphasizes that curing conditions must be maintained until the concrete reaches adequate strength for its intended exposure and loading.
Operational reality checks for warehouses:
– Plan for the repair cure window and include it in your maintenance schedule.
– If you can’t stop traffic, consider containment and phased work—small repairs can be completed without long total downtime, but only if your repair system tolerates the schedule.
What can go wrong (and how to avoid it)
Most “repair failures” are predictable: contamination, wrong material for the depth, incorrect edge geometry, or recurring slab movement. Avoiding these issues is usually cheaper than re-repairing.
Patching over dust, oils, curing compounds, or laitance can cause bond failure even when the patch material itself is high quality.
Ignoring slab movement drivers (settlement, repeated impacts, base failure) can make the same dent return after an apparently successful patch.
– Patching over dust/contaminants: even the best product can fail if the substrate wasn’t cleaned to the manufacturer’s standards.
– Wrong depth or thin-only product: applying a shallow-patch material too thick can lead to shrinkage cracking or loss of durability.
– Feather-edge expectations: some products can handle feathered edges; others need saw-cuts/stable edges—use the correct preparation method for that system.
– Ignoring underlying slab issues: dents caused by repeated impacts, settlement, or base failure may return unless the cause is addressed.
– Surface compatibility mistakes: repairing a coated/overlaid floor with a material that’s not intended to bond to that surface can cause delamination.
Here’s a practical pros/cons view to keep decisions clear:
Cementitious resurfacer (thin rebuild)
– ✅ Pros: fast, good for cosmetic near-surface dents
– ❌ Cons: can crack or debond if used for deeper impacts or over unstable edges
Heavier repair mortar (medium depth)
– ✅ Pros: better strength/impact performance within rated lift ranges
– ❌ Cons: still fails if prep misses loose concrete or if thickness exceeds max guidance
Structural repair system (deep/active damage)
– ✅ Pros: addresses load-path issues and can include reinforcement strategies
– ❌ Cons: higher downtime, higher cost, and requires strict system compliance
Verdict / tip: do it yourself for shallow dents—call a pro for deep damage
For minor, shallow dents with no cracking or loose concrete, a properly prepared area plus a compatible industrial concrete patch/resurfacer is usually the most practical approach. If the dent is deep, has spalling/cracks, sounds hollow, or appears near joints where movement is possible, consider professional assessment or a structural repair method—DIY patching in those cases can fail quickly.
Skip DIY if you can’t remove all weak material to sound concrete, can’t control traffic during cure, or you’re unsure about floor type/coating compatibility. Also, if the dent keeps recurring in the same spot, you likely need both repair and impact prevention (equipment routing, dock protection, rack protection, or housekeeping changes)—otherwise you’ll keep replacing the same patch.
Quick checklist (scan before you start)
– [ ] Identify dent depth and whether there’s cracking/spalling/hollow sound
– [ ] Determine floor type (bare concrete vs overlay/coating)
– [ ] Remove all loose/weak concrete; saw-cut stable edges if needed
– [ ] Clean to the repair product’s substrate requirements
– [ ] Select a patch/mortar rated for your dent depth and expected impact
– [ ] Mix/apply per data sheet; use layers if required
– [ ] Cure properly and restrict traffic until minimum cure/strength is met
– [ ] Re-inspect after curing and address defects early
FAQ
Can you fix dents in industrial concrete without removing loose concrete?
Usually no. If the dent has loose or weak material, patching over it tends to fail because bond requires a sound substrate.
What if the floor has a coating or overlay?
You typically need a repair system that’s compatible with the existing coating/overlay. If you’re not sure, plan on verifying the floor system before choosing patch materials. [ADD: source for coating/overlay compatibility guidance from your coating/overlay manufacturer]
How do I know whether the dent is structural?
Look for associated cracking, spalling, recurring dents in the same spot, hollow-sounding areas, or signs of slab movement near joints. Those are red flags—get an evaluation if any of these apply.
Is epoxy a good choice for dent repairs?
Sometimes epoxy-based systems are used, but the correct choice depends on substrate condition and the repair’s role (bonding/patching/anchoring). Follow the epoxy/repair system manufacturer’s stated use case and substrate prep requirements. [ADD: source for epoxy repair system substrate and bonding requirements]
How long should I keep forklifts off the repaired area?
It depends on the specific repair product and the required cure/strength before traffic. Use the minimum cure/traffic guidance from the product data sheet. [ADD: exact cure/traffic time from the product you plan to use]
Sources
– [ADD: manufacturer documentation for the specific concrete patch/resurfacer you plan to use—data sheet requirements for surface prep, mix, max lift, and cure/traffic times]
– [ADD: substrate preparation/bonding guidance from the overlay/coating manufacturer if the floor is coated]
– [ADD: any official standards you follow for industrial concrete repair/patching (e.g., relevant ASTM or ACI materials/specs you use on-site)]
Frequently Asked Questions
How can you fix dents in industrial concrete floors without removing slabs?
Start by assessing the dent depth and whether it’s only a surface depression or a deeper spall. For shallow dents, grinding the high spots and using an industrial concrete patch or self-leveling compound can restore planarity and prevent issues with forklift traffic. If the dent extends or there are cracks, you may need localized concrete repair with proper edge preparation and a bonding agent to achieve reliable adhesion.
What is the best method to repair dents caused by forklifts or dropped loads in warehouse floors?
For forklift-impact dents, clean the damaged area thoroughly to remove dust, oils, and loose concrete, then create sound edges (often by saw-cutting) so the repair material can lock in mechanically. Use a polymer-modified patch or epoxy mortar designed for heavy-duty industrial floor repairs, and apply in layers if the dent is deep. Finish with troweling or grinding to match the surrounding floor profile and minimize future trip hazards.
Why do repaired dents in industrial flooring fail if you don’t prep the surface correctly?
Most premature repair failures come from poor surface preparation, such as contamination from oils, moisture, curing compounds, or weak, crumbling concrete edges. Without proper profiling and bonding, patching materials won’t adhere well, leading to delamination, cracking, or rapid re-damage under load. Following industrial concrete repair best practices—cleaning, removing unsound concrete, and using the correct primer or bonding agent—dramatically improves long-term durability.
Which patching materials are best for dents in industrial floors—epoxy, polyurethane, or polymer-modified concrete?
Epoxy systems are often used where you need strong bonding and chemical resistance, particularly for structural or coating-related repairs, but they require correct moisture conditions. Polyurethane or flexible repair products can help if the floor experiences movement or thermal cycling, while polymer-modified concrete patches are common for heavy-duty impact dents because they tolerate compression and wear. The best choice depends on dent depth, load type (forklifts, racks, trucks), exposure to chemicals, and whether you need rapid curing for production downtime.
How do you prevent dents from coming back after industrial floor repairs?
After repairing, address the root cause—adjust forklift routes, improve rack protection, add impact guards, and ensure damaged pallet jacks or attachments are corrected. Maintain consistent floor flatness by periodically inspecting for new depressions and performing quick industrial floor patching before damage spreads. Applying a compatible protective coating or wear-resistant surface treatment can also reduce future scuffing and impact damage in high-traffic warehouse areas.
📅 Last Updated: October 12, 2026 | Topic: How to fix dents in industrial floors? | Content verified for accuracy and freshness.
References
- https://en.wikipedia.org/wiki/Concrete_repair
- https://en.wikipedia.org/wiki/Concrete_spall
- https://en.wikipedia.org/wiki/Pothole
- Google Scholar Google Scholar
https://scholar.google.com/scholar?q=how+to+repair+dents+in+industrial+concrete+floors+grinding+patching - Google Scholar Google Scholar
https://scholar.google.com/scholar?q=concrete+floor+repair+patching+procedure+surface+prep+bonding+agent - Google Scholar Google Scholar
https://scholar.google.com/scholar?q=concrete+pavement+maintenance+patching+spalling+industrial+floors - Pavement Preservation – Design & Analysis – Pavements – Federal Highway Administration
https://www.fhwa.dot.gov/pavement/preservation/ - https://www.epa.gov/smm/concrete-and-masonry-materials
- https://www.cdc.gov/niosh/topics/concrete/
- https://www.nist.gov/programs-projects/concrete-materials-research