

Choose rubber floors that actually fit your space by focusing on three deciding factors: intended use, slip and wear needs, and installation method. This practical buyer guide tells you exactly how to choose rubber floors—what to buy, which specs to prioritize, and what to avoid—so you don’t pay for the wrong type. Get the clear recommendations you can use on your next showroom or online order.



If you want rubber floors that hold up, choose the product based on the room’s traffic and moisture conditions first, then match the thickness and wear layer to that use case. After that, make sure your chosen installation method (glue-down, interlocking, or loose lay) is compatible with your subfloor and that the product’s safety/odor guidance fits your indoor-air expectations.
If you’re comparing rubber flooring options for a garage, basement, workout space, classroom, daycare, or workplace, this is for you—especially if you’re trying to avoid the common problem of buying for looks instead of performance.
Start with the space: what will the floor handle?
The fastest way to choose rubber floors is to start with how the space behaves day-to-day—traffic intensity and moisture risk drive the right build and system choice. If you get this part wrong, even “premium” rubber can scuff early, lift at edges, or become unsafe when wet.
Rubber flooring performance depends on both its wear layer (surface durability) and its installation system (especially at seams and edges), not thickness alone.
Moisture risk is managed as a system: subfloor condition + moisture testing + approved installation method + seam/edge details.
Slip resistance varies by rubber formulation and finish, so you should follow the manufacturer’s traction/slip spec for wet or high-dirt areas.
Decide the environment first: dry, humid, wet, and heavy-caster
Different rooms “stress” floors differently, so you should treat them like separate design problems:
– Indoor dry areas (bedrooms, offices): Favor comfort, sound dampening, and everyday durability.
– Humid basements (occasional dampness, seasonal swings): Prioritize moisture-compatible installation guidance and subfloor prep requirements.
– Wet-entry zones (mudrooms, garage-to-house transitions): Focus on traction and water exposure limits for your specific product and install method.
– Gyms and workout spaces: Plan for impact comfort, rolling loads (sometimes), and cleaning chemistry resilience.
– Commercial corridors/classrooms/daycare: Emphasize resilience under sustained foot traffic, scuff control, and safety specs suitable for occupied spaces.
A key point: rubber is flexible, but that doesn’t mean “forgiving by default.” A floor can be comfortable and still fail if the wear layer is mismatched to abrasion or if the subfloor isn’t flat enough.
Match product type to comfort vs. durability needs
Rubber flooring is often marketed broadly, but the best-buy approach is to align product design to stress:
– If you need impact absorption (exercise equipment, standing comfort), look for products described for cushioning/impact performance and a system thickness that matches the manufacturer’s intended use.
– If you need abrasion and long-term appearance (hallways, retail, busy workplaces), focus on the wear layer and the manufacturer’s stated traffic category or performance claims.
In my experience helping teams spec flooring for occupied spaces, the most reliable upgrades come from reading the spec sheet for the wear layer and the installation limitations—not from comparing raw thickness numbers.
If you need slip resistance, prioritize traction specs
Rubber can be a strong safety choice, but the “truth” lives in the traction measurements and guidance:
– If the room sees water, tracked grime, or frequent mopping, do not assume rubber is automatically slip-proof.
– Instead, look for the manufacturer’s slip resistance testing and recommendations for the intended maintenance routine.
Quick spec framing: ask yourself whether your cleaning method will change the surface (for example, leaving residue) and whether the product is rated for those conditions.
Pick the right thickness and performance layer
The practical rule is simple: use thickness to predict comfort and cushioning, but use the manufacturer’s performance specs to predict durability. The wear layer is the part that protects the surface from scuffing and premature cosmetic wear.
Thickness affects feel and cushioning, but the wear layer (surface protection) is what typically determines resistance to scuffs and daily abrasion.
Edge durability matters: thin or poorly terminated installs can reveal subfloor unevenness sooner and experience lifting near transitions.
Use thickness as a comfort/impact guide (not a durability promise)
Thickness commonly influences:
– Comfort underfoot
– How much impact you feel from drops and weights
– How tolerant the system is to minor subfloor irregularities
If you’re comparing thicknesses, convert units while you shop:
– 1/8 in = 3.2 mm
– 3/16 in = 4.8 mm
– 1/4 in = 6.35 mm
Those conversions help you stay consistent when specs use different units on different product pages.
Choose the wear layer for your traffic level
Wear layer design is where “garage rubber” and “commercial rubber” can diverge even when both are marketed as rubber flooring. The wear layer should match:
– Light household: expect higher flexibility and easier cleaning routines, but still needs abrasion resistance for grit.
– Medium household + occasional equipment: needs better scuff control.
– Heavy commercial / daily school or daycare traffic: needs the best balance of durability, cleanability, and sustained appearance.
When you read product literature, verify what the manufacturer actually says the wear layer supports (traffic type, expected lifespan category, and care requirements).
Don’t ignore edge durability and transitions
Edges are where installations fail in the real world:
– Furniture moves.
– Doorways create stress points.
– Thresholds and floor junctions create uneven “steps” if the subfloor transitions aren’t prepared.
If your room has frequent transitions (carpet to tile, tile to rubber, steps, thresholds), treat trimming, edging, and transition strips as part of the flooring purchase—not an afterthought.
Practical guidance table: match build to common room types
Rubber Flooring Build Targets by Space (Use-Case Fit)
| # | Space type | Traffic level | Moisture exposure | Thickness focus | Wear layer focus | Fit rating |
|---|---|---|---|---|---|---|
| 1 | Home office / bedroom | Light | Dry | Comfort > impact | Everyday scuff control | ★★★★☆ |
| 2 | Garage | Medium–Heavy | Occasional wet | Balance comfort + resilience | High abrasion protection | ★★★★☆ |
| 3 | Basement (humid) | Medium | Humid / seasonal swings | System stability focus | Surface durability + careability | ★★★☆☆ |
| 4 | Gym / training room | Heavy | Dry to occasional wet | Impact comfort | Resistance to scuffs/marking | ★★★★★ |
| 5 | Classroom | Heavy | Dry (with spills) | Comfort for standing | Consistent appearance under abuse | ★★★★☆ |
| 6 | Daycare / play area | Heavy | Spill-prone | Comfort + cleanability | Scratch and scuff protection | ★★★★☆ |
| 7 | Workplace / lobby | Heavy | Dry to occasional wet | Comfort under long standing | High wear + maintenance stability | ★★★★☆ |
> Note: This table is a selection framework (what to prioritize). You still need to confirm the exact thickness, wear-layer target, and moisture/traction limits in the specific product’s installation instructions.
Choose the installation method (and check your subfloor)
The best installation method is the one that matches both your subfloor condition and your tolerance for permanence. Glue-down tends to be more permanent and can lock in feel; interlocking and loose lay can offer easier upgrades—when the subfloor is ready.
Resilient flooring longevity is strongly tied to subfloor flatness and cleanliness before installation, as stated in most manufacturer instructions.
Glue-down systems typically require specific moisture/adhesive compatibility, while floating/interlocking systems still depend on subfloor preparation for performance.
Select glue-down vs. interlocking vs. sheet/roll
Here’s how to decide practically:
– Glue-down rubber: Often favored when you want a stable feel and are prepared for adhesive requirements, surface prep, and (in many cases) more careful moisture management.
– Interlocking tiles/boards: Common for DIY friendliness, but they can reveal subfloor unevenness through gaps, edges, or “click” feel if your base isn’t properly prepared.
– Sheet/roll systems: Can provide fewer seams (helpful in some environments) but still depend on proper preparation and installation technique.
Plan for surface prep (this is not optional)
For rubber flooring, prep determines results. Subfloor issues show up as:
– Uneven feel
– Edges lifting or separating
– Seam stress and premature wear
Follow the manufacturer’s requirements on:
– Flatness tolerances
– Surface cleanliness (dust, sealers, curing compounds)
– Approved underlayments (if any)
Confirm system guidance for humidity changes
Basements and seasonal rooms aren’t just “slightly damp”—they cycle. If the space has frequent humidity changes, you must:
– Use the moisture testing method the manufacturer specifies (for example, ASTM moisture tests are commonly referenced in flooring docs)
– Ensure the installation method is explicitly approved for that moisture condition
According to the Resilient Floor Covering Institute (RFCI), resilient floor systems should be installed per manufacturer requirements with attention to subfloor preparation and moisture conditions. [ADD: cite RFCI guidance document name/version]
Evaluate safety, comfort, and indoor air considerations
The safest rubber floor for occupied spaces is the one that matches traction needs and indoor-air guidance. You shouldn’t only check “looks good”—you should confirm slip performance, ventilation/odor instructions, and cleaning compatibility.
Rubber products may emit odor when new; reputable manufacturers provide ventilation/curing guidance for indoor use.
Slip resistance outcomes vary with surface finish, so you should rely on manufacturer test data for wet or high-dirt use cases.
Odor and ventilation: follow the product instructions
If you’re installing in a home, classroom, or daycare, odor and indoor air guidance matters:
– Look for a manufacturer statement about ventilation during and after installation.
– Confirm whether the product is explicitly intended for indoor occupied use.
In practice, this means you plan for:
– Air changes during the curing/initial period
– Temporary occupancy limits when specified by the manufacturer
Confirm slip resistance where provided
Slip resistance isn’t universal across rubber lines. Some products are designed to perform better under wet conditions, while others prioritize general traction.
If your environment includes:
– Water tracking
– Spills and mopping
– Wet-clean routines
…then verify traction specs and cleaning compatibility together. A cleaner that leaves residue can reduce effective slip resistance.
Sound and comfort: treat acoustics as a claim that must be supported
Rubber often improves standing comfort and can dampen some impact sounds, but acoustic performance varies widely. If you care about noise:
– Look for stated acoustic or impact performance claims from the manufacturer.
– If there’s no claim, don’t assume the floor will meet your sound reduction target.
What can go wrong (and how to avoid it)
Most rubber flooring problems aren’t “defects”—they’re mismatches between product, subfloor, installation method, and real-world conditions. The good news is that the common failure points are predictable.
Premature wear frequently comes from choosing a wear layer intended for lighter traffic than the space actually receives.
Subfloor flatness issues are a leading cause of installation outcomes like edge lifting and uneven feel, especially with interlocking products.
Moisture exposure can damage resilient flooring at seams if the installation system isn’t approved for that condition.
Common failure modes to watch
– Buying “general rubber” for the wrong traffic level: You’ll see scuffing, marking, or early cosmetic fade in gyms and workplace areas with heavy abrasion.
– Skipping flatness checks: This is especially risky with interlocking tiles, where base irregularities telegraph into gaps or lift-prone edges.
– Ignoring moisture and water-exposure guidance: What happens at seams and edges matters as much as what happens in the center of the room.
– Underestimating transitions: Doorways, thresholds, steps, and junctions create stress. If the rubber meets other materials without a proper transition, you can create trip hazards or mechanical damage.
A quick comparison of “fixable vs. hard to fix” issues
| Issue type | What usually causes it | Typical outcome | Fix difficulty |
|---|---|---|---|
| Early scuffing | Wear layer mismatch to abrasion | Visible markings; faster cosmetic aging | Moderate (replace panel/section rarely helps) |
| Edge lifting/gaps | Subfloor flatness + improper termination | Trip risk; seam stress; debris infiltration | High (often requires rework) |
| Odor complaints | Insufficient ventilation vs. manufacturer guidance | Tenant/occupant dissatisfaction; delayed occupancy | Low (usually remedied with ventilation plan) |
Verdict / tip: a straightforward way to decide
If you want the safest choice for most people, start by identifying the room’s traffic and moisture conditions, then pick the installation method that your subfloor supports (and follow the manufacturer’s prep steps). The downside: choosing strictly by thickness or price can backfire—rubber performance depends heavily on the specific product build (wear layer, backing, and surface finish), plus correct installation. Skip this approach if you can’t get your subfloor flat and clean to the manufacturer’s requirements, or if you’re unable to follow their installation guidance for your chosen system.
The most reliable selection workflow is: space conditions → product specifications → approved installation method → subfloor readiness → safety/odor checks.
Quick checklist (save this)
– Space type: home / gym / commercial / basement / entry area
– Traffic level: light, medium, heavy
– Moisture/water exposure: dry, humid, occasional wet, frequent wet
– Rubber type: match the product to comfort vs. durability needs
– Thickness + wear layer: confirm with manufacturer specs
– Installation method: glue-down vs. interlocking vs. sheet/roll
– Subfloor readiness: flatness and cleanliness per manufacturer
– Safety/traction: use manufacturer slip-resistance info if available
– Indoor air/odor guidance: follow manufacturer ventilation notes
FAQ
How thick should rubber floors be?
It depends on how much comfort/impact absorption you need and how heavy the traffic is. The best practice is to match your thickness choice to the manufacturer’s stated performance for your use case (rather than thickness alone). [ADD: source for recommended thickness ranges for your specific product category]
Are rubber floors safe for basements and moisture?
Some rubber floors are designed to handle humid conditions, but the risk level depends on installation method, subfloor moisture, and seam/edge exposure. Check the manufacturer’s guidance for moisture and installation, and treat frequent wet exposure with extra caution. [ADD: manufacturer moisture guidance you’re referencing]
What’s better: interlocking tiles or glue-down rubber?
Interlocking can be easier for DIY in some settings, while glue-down can provide a more permanent, sealed feel—when installed correctly. The right choice depends mainly on your subfloor condition and whether the environment matches the manufacturer’s recommended system. [ADD: source comparing installation requirements for your chosen type]
Will rubber floors smell strongly?
Rubber products can have an odor, especially when new, and how long it lasts varies by formulation and ventilation. Follow the manufacturer’s indoor-use and ventilation instructions rather than relying on how it seems immediately after installation. [ADD: source for the specific product’s odor/ventilation guidance]
How do I maintain rubber floors?
Maintenance typically includes regular cleaning with methods approved by the manufacturer (to avoid damaging the surface), plus prompt attention to spills if the area is prone to moisture. Use the manufacturer’s care instructions for cleaning agents and tools. [ADD: source for cleaning/care recommendations]
Sources
– Manufacturer installation instructions and product spec sheets for rubber flooring thickness, wear layer/performance claims, moisture guidance, and recommended subfloor prep. [ADD: names/links to the exact brands/models you’re referencing]
– Manufacturer guidance on indoor air/odor and recommended ventilation during and after installation. [ADD: manufacturer docs]
– Manufacturer care and maintenance instructions (recommended cleaners, tools, and do/don’t lists). [ADD: manufacturer docs]
– RFCI guidance on resilient flooring installation practices and subfloor/moisture considerations. [ADD: exact RFCI document name/version]
– Relevant ASTM test methods commonly referenced in flooring moisture and installation guidance (used to interpret “what the manufacturer expects” for subfloor conditions). [ADD: exact ASTM methods named in your references]
Rubber flooring can be a long-lasting, practical solution—if you treat it as a system (product specs + installation method + subfloor readiness + safety/odor requirements) rather than a style choice. Use traffic and moisture to steer the wear layer and build, confirm that your subfloor can support the installation type, and verify traction and ventilation guidance for occupied spaces. If you follow that sequence, you’ll avoid the most common “it looked great for a few months” outcomes and end up with a floor that performs the way you need.
Frequently Asked Questions
What thickness of rubber flooring should I choose for home or commercial use?
For light residential areas like bedrooms or home gyms, 6–8 mm rubber flooring is often enough for comfortable cushioning and minor impact protection. For higher-traffic commercial spaces, kitchens, garages, or entryways, consider 9–12 mm to improve durability and comfort under heavy use. If you’re installing over uneven subfloors, a thicker rubber floor can help reduce the feel of imperfections.
How do I choose between rubber flooring rolls and rubber tiles?
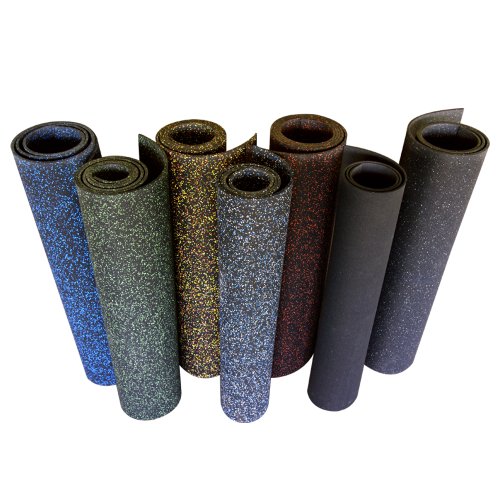
Rubber rolls are typically best for large areas because they install in fewer seams and can provide a more continuous surface, which helps with water resistance and maintenance. Rubber tiles are often easier to handle for small spaces, DIY projects, or when you want the flexibility to replace damaged sections. Consider your layout, installation method, and how much seam coverage you need when choosing between rolls vs tiles.
Why does the type of rubber—recycled vs virgin—matter when choosing rubber floors?
The rubber composition affects smell, consistency, and long-term performance. Virgin rubber often provides a more uniform feel, stronger resilience, and cleaner appearance for premium installations, while recycled rubber can be more cost-effective and environmentally friendly. For odor-sensitive spaces like nurseries or offices, look for low-VOC rubber flooring and verify odor and emissions claims before buying.
Which rubber flooring is best for gyms or heavy equipment?
For a gym, choose high-density rubber flooring designed for impact absorption and traction, especially if you’ll drop weights or use machines. Look for products that specify thickness, compression resistance, and compatibility with free weights or cardio—6–8 mm can work for many home gym setups, while 10–12 mm is better for heavy lifting areas. If you need extra noise reduction, prioritize rubber flooring with good shock absorption and consider a proper subfloor moisture barrier if needed.
How do I select the right rubber floor finish for safety, cleaning, and traction?
The finish determines how grippy the surface feels, how it handles spills, and how easy it is to clean. For wet areas like bathrooms, pool surrounds, or commercial entrances, choose textured or non-slip rubber flooring to reduce slip risk while still supporting daily maintenance. For kitchens or areas with regular cleaning, ensure the rubber floor you choose is compatible with your cleaning chemicals and use a recommended mop routine to keep the surface in good condition.
📅 Last Updated: October 11, 2026 | Topic: How to choose rubber floors? | Content verified for accuracy and freshness.
References
- Google Scholar Google Scholar
https://scholar.google.com/scholar?q=rubber+flooring+selection+criteria+durability+installation - Google Scholar Google Scholar
https://scholar.google.com/scholar?q=rubber+crumb+playground+surface+health+risk+assessment - Google Scholar Google Scholar
https://scholar.google.com/scholar?q=resilient+flooring+slip+resistance+choice+guidance - https://pubmed.ncbi.nlm.nih.gov/?term=rubber+flooring+volatile+organic+compounds
- https://pubmed.ncbi.nlm.nih.gov/?term=rubber+crumb+playground+surface+health
- Volatile Organic Compounds’ Impact on Indoor Air Quality | US EPA
https://www.epa.gov/indoor-air-quality-iaq/volatile-organic-compounds-impact-indoor-air-quality - https://www.who.int/publications/i/item/9789289002737
- Mold in the Workplace | Mold | CDC
https://www.cdc.gov/niosh/topics/indoorenv/ - https://en.wikipedia.org/wiki/Rubber_flooring
- https://www.cdc.gov/nceh/hsb/mold/index.html


