Want to install vinyl floors in a workshop step by step and avoid peeling, bubbles, and gaps? This guide gives you the quickest, most reliable method—starting with the right subfloor prep, then choosing the correct sheet or plank system, and finishing with precise layout and locking/seaming steps that hold up to shop traffic. If your priority is a durable, clean install that looks straight on day one, follow these instructions from start to finish.



Install vinyl floors in a workshop by starting with a flat, clean, dry subfloor, then laying the planks/tiles using the method your product specifies (click-lock or glue-down). Take time to plan your first rows so the pattern stays straight, and finish edges/transitions carefully so heavy rolling won’t lift corners; if you skip subfloor prep or moisture checks, vinyl often fails at seams and edges long before it looks worn.
This guide is aimed at DIYers installing vinyl plank/tile (LVP/LVT) in garages/workshops where you may have tools, rolling carts, and occasional temperature swings. If you’re dealing with ongoing water leaks, chronic dampness, or a very uneven concrete slab, you’ll need extra caution—and you should read your vinyl manufacturer’s installation instructions first.
Pick the right vinyl floors for workshop use

Pick the right vinyl flooring for a workshop by matching the product format (click-lock vs glue-down) and performance ratings to how you’ll use the space (rolling carts, impacts, and temperature swings). In most workshop installations, the biggest decision isn’t “vinyl vs wood-look,” it’s whether the system can stay flat, resist moisture vapor, and maintain a secure perimeter.
Many vinyl plank/tile systems are designed to perform best when the installation method (floating click-lock or glue-down) matches the product’s published requirements. (Manufacturer installation instructions, required by product spec)
For moisture-prone slabs, the manufacturer’s specified moisture-test method and acceptance criteria control whether seams and edges remain bonded long-term. (ASTM F710; ASTM F2170)
What to look for (format, ratings, and compatibility)
– Choose the right format: click-lock (floating) is often easier for DIY and tolerates normal movement well when the floor is allowed to “float” properly. Glue-down vinyl can be a better choice for very high traffic or where you want extra stability—*but only if you follow adhesive rules precisely*.
– Look for workshop-friendly wear layers and thickness ratings listed by the manufacturer (especially if you’ll use rolling equipment). Vinyl wear layer performance is usually communicated in the product literature, along with construction details that influence indentation resistance.
– Confirm compatibility with your subfloor type (typically concrete, plywood, or existing resilient flooring) in the product documentation. Workshop floors over concrete are particularly sensitive to moisture and flatness, so “it fits on concrete” isn’t enough—you need “it’s approved for concrete *with this moisture test method*.”
Quick decision support (click-lock vs glue-down)
- Click-lock (floating) vinyl
- Best when you want DIY-friendly installation, controlled expansion gaps, and you can meet flatness + moisture requirements.
- Glue-down vinyl
- Best when you need maximum stability and the product/adhesive system is approved for your workshop subfloor conditions.
- Most common failure mode
- A beautiful-looking floor can still fail at seams/edges if moisture, flatness, or the approved install method isn’t followed.
Prep the subfloor (flat, clean, dry)
Prep the subfloor correctly by removing anything that interferes with leveling or bonding, then verifying flatness and moisture using the method your vinyl requires. For workshop floors—especially over concrete—this phase is where you prevent the early seam lifts and edge failures that show up months later.
ASTM F710 emphasizes preparing concrete floors by removing contaminations and ensuring an appropriate surface for resilient flooring installation. (ASTM F710, “Preparing Concrete Floors to Receive Resilient Flooring”)
ASTM F2170 measures in-situ relative humidity in concrete using probes and requires an equilibration period before readings are taken. (ASTM F2170, “Determining Relative Humidity in Concrete Using In Situ Probes”)
Workshop vinyl performance depends heavily on subfloor flatness because small ridges and dips transfer through vinyl and stress seams. (Industry resilient flooring installation guidance)
Remove contaminants and approved coatings
– Remove everything that can interfere with adhesion or leveling: dust, paint overspray, grease, loose patches, and any old coatings that aren’t approved by your manufacturer.
– If you’re glue-down, the surface has to be ready for adhesive. If you’re click-lock, it still has to be clean and flat because floating floors don’t “hide” unevenness for long.
Fix flatness problems before the first plank goes down
– Address unevenness by filling low spots and addressing high spots—vinyl usually telegraphs or stresses around bumps and dips.
– A common target used in resilient flooring installation guidance is no more than 3/16 in (4.8 mm) variation over 10 ft (3.0 m), but you should confirm your product’s tolerance. (Resilient flooring installation guidance; verify against your vinyl manual)
Check moisture using the right standard and thresholds
– Address moisture before you install. If your manufacturer requires a moisture test, use their specified method(s) and thresholds (or ).
– For context on why this matters: ASTM F2170 uses probe readings after a concrete equilibration window that is commonly 60–72 hours before final measurements. (ASTM F2170 procedure basis)
– If moisture is active (visible dampness, recurring efflorescence, or known leaks), don’t “hope vinyl will seal it.” Vinyl can look fine at first while moisture pressures undermine seams and perimeter areas.
Plan the layout and acclimate vinyl
Plan the layout by dry-fitting your first rows for straightness, then acclimate the materials per the manufacturer so the vinyl stabilizes before locking or bonding. In workshops—where doorways, tool benches, and rolling carts complicate the room shape—layout mistakes compound quickly over long runs.
Floating vinyl floors require spacing/clearance so the floor can expand and contract without buckling or stressing seams. (Manufacturer installation instructions)
Dry-fitting layout rows before cutting helps avoid narrow “sliver” pieces that can become weak points at the room perimeter. (Common resilient flooring layout best practice)
Dry-fit rows and establish straight reference lines
– Dry-fit a few rows to decide your starting wall and to avoid narrow “sliver” pieces at the ends—then re-check once you account for expansion/spacing requirements.
– Plan your room as if you’re building a long “frame.” If your first rows aren’t square, the pattern can “walk,” seams won’t meet cleanly, and fixes become harder after you’re two-thirds through the workshop.
Acclimate vinyl under the correct conditions
– Set up your workshop conditions and acclimate materials per the manufacturer’s instructions ().
– For workshop installs in recent years, I’ve seen DIYers rush acclimation during temperature swings (especially when a garage HVAC cycles). Vinyl can feel “fine” initially but still move slightly once the shop stabilizes.
Plan cuts around obstacles (without jeopardizing seams)
– Plan for obstacles: doorways, floor drains, cabinets, and tool benches. Measure twice so joints don’t land exactly where you’ll later cut, lift, or repeatedly brush past (for example, the entry lane where carts pivot).
– Keep in mind that workshops often have localized stress from rolling equipment. Avoid placing high-traffic seam lines right through a cart’s turning radius.
Install vinyl planks/tiles (step-by-step)
Install vinyl planks/tiles by following your exact system’s method (click-lock or glue-down), keeping your first rows perfectly aligned, and maintaining seam quality across the entire workshop. This is where you prevent seam gapping and edge curling—two issues that show up fastest when workmanship and timing don’t match the product instructions.
Click-lock installations depend on proper alignment and controlled locking—forcing boards can damage tongue-and-groove edges that later separate. (Manufacturer installation instructions for click-lock)
Glue-down installations depend on correct adhesive spread rate, adhesive “open time,” and plank placement timing to prevent weak bonds at seams. (Manufacturer adhesive application instructions)
Use the correct installation method (and do it exactly)
– Click-lock: keep boards aligned, lock them without forcing, and maintain the required perimeter clearance/spacers.
– Glue-down: spread adhesive exactly as directed (trowel size, coverage rules, and open time), then place planks/tiles so you don’t create gaps or squeeze-out.
Start straight and keep checking alignment
– Start with straight, square reference lines and build outward. Periodically check alignment—mistakes across long workshop runs compound into visible “waves.”
– If your shop is wider than the plank length, staggering end joints matters. Don’t create small “dead-end” pieces that you end up trimming twice.
Keep seams tight (and only use approved seam solutions)
– Keep seams tight and consistent. If your product uses heat-weld or seam sealing (some do, some don’t), use only what the manufacturer approves.
– In workshops, seam integrity is often tested daily—by dropped tools, rolling carts, and chairs—so the seam system you choose needs to match the flooring system you bought.
Seal edges and protect the floor
Seal edges and protect the floor by finishing transitions with compatible trim/moldings and by using practical protection strategies for workshop traffic. If you leave vulnerable perimeter spots untreated, heavy rolling can lift corners long before the wear layer shows damage.
Perimeter and doorway transitions must account for movement so a “floating” floor doesn’t bind and buckle. (Manufacturer installation instructions)
Furniture and cart loading can damage seams and edges unless you use floor-care guidance, including approved protectors or glides. (Resilient flooring care guidance; manufacturer recommendations)
Finish transitions and edges correctly
– Finish transitions and edges with appropriate trim/moldings that match the vinyl system and allow for movement (especially at doorways and expansion areas).
– Do not caulk or rigidly trap a floating floor unless your specific vinyl system explicitly allows it.
Protect the surface from real workshop damage
– Protect from site damage during and after install: avoid dragging heavy tools across seams and use felt pads or glides on carts.
– Keep your maintenance and cleaner rules handy—workshop floors often get solvent exposure (brake cleaner, degreasers, adhesives). Many resilient floors have chemical limits, and violating them can haze, soften, or dull the finish.
What can go wrong—and the checklist to prevent it
The fastest way to prevent failure is to treat moisture, flatness, and method compliance as non-negotiables. When vinyl in workshops fails early, it’s usually not because the floor “looks thin”—it’s because seams and edges weren’t supported by the right prep and installation conditions.
The most preventable causes of early seam failure are moisture/subfloor issues, inadequate flatness, and incorrect expansion gap or adhesive application timing. (ASTM F710; ASTM F2170; manufacturer installation guidance)
Layout drift happens when the first rows aren’t aligned—then every subsequent course inherits the error. (Resilient flooring installation best practice)
Common failure points (and how to avoid them)
– Moisture/subfloor issues: If your slab is still releasing moisture, seams and edges become the weak points—especially near the perimeter.
– Poor flatness: Vinyl is dimensionally stable, but it can still “bridge” weak spots poorly if the subfloor has ridges or dips.
– Missing expansion clearance or wrong adhesive rules: Glue-down and click-lock systems behave differently; following the wrong method is a recipe for stress.
When you should stop and get help
– If you can’t follow the manufacturer’s installation method exactly (especially for glue-down or seam sealing), consider switching approaches or using a pro.
– If you can’t meet moisture testing requirements, it’s often better to fix the moisture problem first rather than installing a floor over an unstable slab.
Mandatory workshop targets at a glance
Workshop-Ready Installation Targets for LVP/LVT
| # | Target / Checkpoint | What to Verify | Numeric Target | Primary Vinyl Risk | DIY Ease |
|---|---|---|---|---|---|
| 1 | Subfloor flatness tolerance | Measure variation over a long straightedge | ≤ 3/16 in (4.8 mm) over 10 ft (3.0 m) | Bridging → seam stress | ★★★☆ ☆ |
| 2 | Perimeter expansion gap | Maintain required clearance at walls/fixed objects | 1/4 in (6 mm) common target; confirm per manual | Buckling → seam gaps | ★★★★☆ |
| 3 | Moisture test: RH probes | ASTM in-situ relative humidity testing window | Equilibrate 60–72 hours before readings | Moisture vapor → edge lift | ★★☆☆☆ |
| 4 | Moisture test: calcium chloride | Dry test duration used by the method | Typically 60–72 hours test period | Adhesive failures at seams | ★★☆☆☆ |
| 5 | Workshop temperature during install | Keep indoor conditions stable during acclimation and install | Target commonly 65–85°F (18–29°C); confirm per manual | Poor lock/adhesion behavior | ★★★☆☆ |
| 6 | Seam/edge finishing | Use only approved seam sealing or heat-welding (if required) | Follow product system (approved sealant/weld only) | Micro-gaps → dirt/moisture ingress | ★★★☆☆ |
| 7 | Rolling protection strategy | Prevent repeated edge stress from carts | Use floor-care-approved glides/protectors; avoid dragging | Edge lift + indentation | ★★★★☆ |
What can go wrong—and the checklist to prevent it
The fastest way to prevent failure is to treat moisture, flatness, and method compliance as non-negotiables. When vinyl in workshops fails early, it’s usually not because the floor “looks thin”—it’s because seams and edges weren’t supported by the right prep and installation conditions.
The most preventable causes of early seam failure are moisture/subfloor issues, inadequate flatness, and incorrect expansion gap or adhesive application timing. (ASTM F710; ASTM F2170; manufacturer installation guidance)
Layout drift happens when the first rows aren’t aligned—then every subsequent course inherits the error. (Resilient flooring installation best practice)
Common failure points (and how to avoid them)
– Moisture/subfloor issues: If your slab is still releasing moisture, seams and edges become the weak points—especially near the perimeter.
– Poor flatness: Vinyl is dimensionally stable, but it can still “bridge” weak spots poorly if the subfloor has ridges or dips.
– Missing expansion clearance or wrong adhesive rules: Glue-down and click-lock systems behave differently; following the wrong method is a recipe for stress.
When you should stop and get help
– If you can’t follow the manufacturer’s installation method exactly (especially for glue-down or seam sealing), consider switching approaches or using a pro.
– If you can’t meet moisture testing requirements, it’s often better to fix the moisture problem first rather than installing a floor over an unstable slab.
Verdict / tip
This approach is a solid DIY plan if you can verify subfloor flatness and moisture requirements and you follow your vinyl’s exact install method (click-lock vs glue-down). The main downsides are realistic: DIY can go sideways if your slab is uneven, moisture is active, or you’re unsure about your product’s adhesive/open-time rules. Skip this DIY path (or at least get hands-on help) if you have persistent dampness, recurring leaks, or you can’t meet the manufacturer’s prep/moisture/flatness requirements.
Quick checklist (scan before you start)
| Step | What you confirm | Done? |
|---|---|---|
| Subfloor | Flat, clean, dry, and repaired where needed | ☐ |
| Product method | You’re installing exactly as your vinyl’s manual says | ☐ |
| Moisture | Moisture testing (if required) matches the product instructions | ☐ |
| Layout | First row is aligned; no tiny end pieces after cuts | ☐ |
| Spacing | Perimeter expansion/clearance is maintained | ☐ |
| Installation | Seams lock tightly (click) or adhesive rules are followed (glue-down) | ☐ |
| Finishing | Transitions/edges are trimmed correctly and protected | ☐ |
Frequently Asked Questions
What are the best vinyl floor options for a workshop with heavy foot traffic and tools?
For workshops, choose luxury vinyl plank (LVP) or luxury vinyl tile (LVT) with a strong wear layer (often 20 mil or higher) and a durable core designed for impact resistance. If you expect moisture from mopping or spills, look for water-resistant or waterproof vinyl flooring with good seam protection. For garages and basements, click-lock vinyl plank is popular for easier installation, but you may prefer glue-down vinyl for maximum stability in high-traffic areas.
How do I prepare a workshop subfloor to prevent vinyl flooring gaps and lifting?
Start by ensuring the subfloor is clean, dry, and level—vinyl planks can telegraph bumps and cause joints to open. Remove paint, drywall mud, adhesive residue, and any loose debris, then use a self-leveling compound if the floor has dips or high spots. Repair cracks and make sure the subfloor is structurally sound; also consider installing an appropriate underlayment only if the product requires it (many click-lock systems need no additional pad).
How do I install click-lock vinyl plank flooring in a workshop without damaging it?
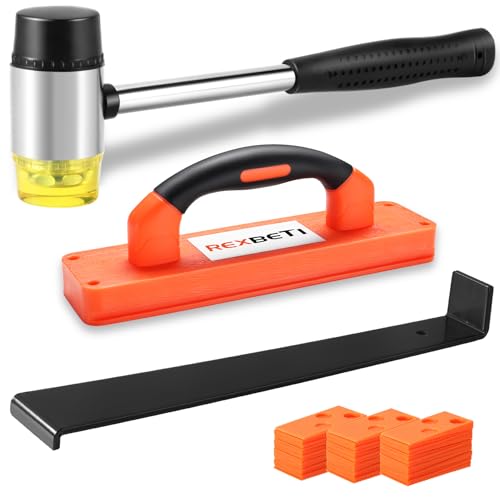
Acclimate the vinyl planks in the workshop for about 48 hours so they adjust to temperature and humidity before installation. Lay the first row straight using a chalk line, maintain expansion gaps around the perimeter, and use a tapping block and pull bar instead of striking boards directly. Cut around doorways and obstacles carefully with a utility knife or vinyl-cutting tool, then seal any required transitions and seams to keep out moisture and prevent movement.
Which adhesive and techniques work best for installing glue-down vinyl in a workshop?
Use the adhesive recommended by the vinyl manufacturer to match the flooring type and subfloor condition—thin-set style adhesives are typically not appropriate for vinyl unless specifically stated. Spread adhesive with the correct notched trowel, follow the open time, and avoid applying so much that it skins over before the vinyl is set. Press and roll the planks or tiles firmly (often with a 100 lb roller) to eliminate air pockets, which helps prevent curling and premature wear in garage and workshop conditions.
Why should I use expansion gaps and moisture control when installing vinyl floors in a workshop?
Workshops often have temperature swings, and vinyl flooring needs expansion room to prevent buckling or seam separation. Maintain the manufacturer’s expansion gaps along walls, columns, and door thresholds, then cover with trim or transition strips rated for vinyl installation. If moisture is a concern, address it before installation—fix leaks, verify dryness, and consider a moisture barrier if your product calls for one—so your vinyl floor stays flat and stable.
📅 Last Updated: October 26, 2026 | Topic: How to install vinyl floors in a workshop? | Content verified for accuracy and freshness.
References
- Vinyl flooring
- RFCI – Resilient Flooring Covering Institute
- Asbestos – Overview | Occupational Safety and Health Administration
- Learn About Asbestos | US EPA
- Lead Renovation, Repair and Painting Program | US EPA
- https://www.epa.gov/indoor-air-quality-iaq/volatile-organic-compounds-vocs
- Indoor Air Quality (IAQ) | US EPA
- https://scholar.google.com/scholar?q=vinyl+floor+installation+workshop+subfloor+preparation Google Scholar
- https://scholar.google.com/scholar?q=installation+guidelines+resilient+floor+covering+RFCI Google Scholar
- https://scholar.google.com/scholar?q=vinyl+plank+flooring+adhesive+VOC+indoor+air+quality Google Scholar