To apply polyurea garage floor coating, thoroughly clean the surface, repair any damages, apply a primer if necessary, and then apply the polyurea coating using a roller or sprayer. Applying polyurea garage floor coating involves a few simple steps that will ensure a durable and long-lasting finish.
First, make sure to thoroughly clean the garage floor surface, removing any dirt, dust, or grease. Next, inspect the floor for any cracks or damages and repair them accordingly. If required, apply a primer to ensure better adhesion. Finally, apply the polyurea coating using a roller or sprayer, making sure to follow the manufacturer’s instructions for the appropriate drying time between coats.
With these steps, your garage floor will be protected and aesthetically pleasing.
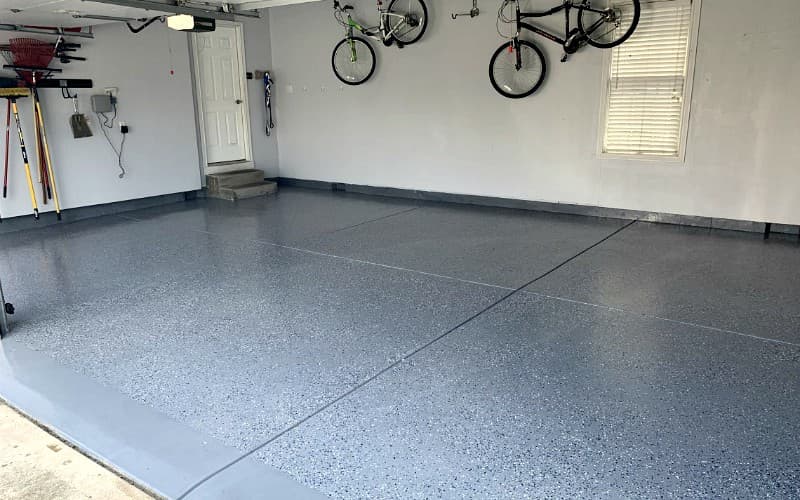
Understanding The Benefits Of Polyurea Coatings
The benefits of applying polyurea garage floor coating are numerous. One of the key advantages is its superior durability and resistance. Polyurea coatings are highly flexible and can withstand heavy loads, making them ideal for high-traffic areas like garages. They are extremely resistant to damage from impacts, chemicals, and abrasions, ensuring that your garage floor stays in excellent condition for years to come. In addition to their durability, polyurea coatings offer a quick curing time, allowing you to use your garage again in no time. Unlike traditional epoxy coatings, which can take several days to cure, polyurea coatings can be ready for use within hours. Furthermore, polyurea coatings provide excellent chemical and abrasion resistance, making them highly suitable for automotive workshops and other industrial environments where spills and chemicals are common.

Evaluating Your Garage Floor Needs
When evaluating your garage floor needs, it is essential to assess the condition of your existing floor. Look out for cracks, stains, or uneven surfaces that may require repair before applying the polyurea garage floor coating. Identifying your desired finish and aesthetic is crucial in determining the type of coating you need. Do you prefer a glossy finish or a more matte appearance? Consider the overall look you want to achieve in your garage. Additionally, take into account the environmental factors that may impact the longevity of the coating. Factors such as temperature fluctuations and exposure to chemicals should be considered when selecting the right coating for your garage floor.
Removing Existing Coatings And Sealers
When applying a polyurea garage floor coating, it’s crucial to start with a clean slate. To ensure proper adhesion, you need to remove any existing coatings and sealers. Scrubbing the floor is the first step in the process and helps in removing dirt and debris. A clean surface is essential for the new coating to adhere effectively.
For tougher coatings, chemical strippers can be utilized. These powerful solutions penetrate the existing coatings, breaking them down for easier removal. Ensure that you wear protective gear and follow the instructions provided by the manufacturer when handling chemical strippers.
For complete removal of stubborn coatings and sealers, grinding or shot blasting methods can be used. Grinding involves using a mechanical grinder to remove the existing layer, while shot blasting utilizes small metal balls to blast away the coatings. These methods are ideal for completely stripping the floor, ensuring a fresh start for the application of the polyurea garage floor coating.
Repairing And Patching Imperfections
Filling cracks and pits with epoxy or polyurea filler is an essential step to prepare the garage floor for polyurea coating. Start by cleaning the cracks and pits thoroughly, removing any dirt or debris. Apply the filler using a putty knife, gently pressing it into the cracks and pits until they are completely filled. Allow the filler to dry according to the manufacturer’s instructions, ensuring a strong and durable repair.
The next step in repairing and patching imperfections is leveling uneven areas with self-leveling compound. Mix the compound as per the instructions, then pour it onto the low areas of the floor. Use a long-handled squeegee or a trowel to spread the compound evenly, ensuring it levels out the surface. Allow the compound to dry completely before moving on to the next step.
Smoothing out the surface is crucial for optimal coating adhesion. Use a floor grinder or a diamond cup wheel to remove any rough spots or high points on the floor. This will create a smooth and even surface that will promote better bonding between the coating and the concrete floor. Take extra care to smooth out the edges of filled cracks to blend them seamlessly with the rest of the floor.
Gathering The Necessary Tools And Equipment
To apply a polyurea garage floor coating, you will need the following tools and equipment:
- A roller or sprayer for applying the coating
- Brushes for cutting in edges and corners
- Safety equipment such as goggles and gloves
Using a roller or sprayer will allow you to efficiently and evenly spread the coating, ensuring a smooth finish. Brushes are essential for reaching tight corners and edges that may be difficult to cover with a roller or sprayer. Don’t forget to prioritize safety and protect your eyes and hands with goggles and gloves.
By gathering these necessary tools and equipment, you’ll be well-prepared to begin the application process and achieve a professional result. Remember to follow the manufacturer’s instructions for the specific polyurea coating you’re using, as they may provide additional guidance on the application process.
Mixing And Priming The Coating
When applying a polyurea garage floor coating, it is crucial to follow the manufacturer’s instructions for proper mixing ratios. Mixing the coating accurately ensures the desired consistency and effectiveness of the product. To enhance adhesion, it is advisable to apply an appropriate primer coat before the main coating. The primer creates a strong bond between the floor and the coating, extending the floor’s longevity. After applying the primer, it is essential to allow sufficient drying time. This ensures that the primer fully adheres to the floor, preventing any issues during the application of the main coating. Proper drying time before applying the main coating is essential for optimal results.
Applying The Main Polyurea Coating
To apply a polyurea garage floor coating, it is important to start from the back of the garage and work towards the exit. This ensures that you don’t paint yourself into a corner and have an easy path to exit once the coating is applied. Using an even, consistent application technique is essential to achieve a smooth and seamless finish. Make sure to apply the coating in thin, overlapping coats, allowing each coat to dry before applying the next one.
Before starting the application process, it is crucial to properly prepare the garage floor by cleaning it thoroughly and repairing any cracks or damages. This will ensure proper adhesion of the polyurea coating and a long-lasting result.
Once the floor is prepared, mix the polyurea coating according to the manufacturer’s instructions. It is important to work quickly and efficiently, as the coating tends to dry quickly.
When applying the coating, consider using a roller or a sprayer for larger areas and a brush for corners and edges. This will help achieve an even application and reach all the necessary areas.
After applying the main polyurea coating, allow it to dry completely before adding any additional topcoats or sealers. This will ensure a durable and high-quality finish for your garage floor.
Allowing Sufficient Curing Time
When applying a polyurea garage floor coating, allowing sufficient curing time is crucial for achieving optimal results. Understanding the recommended curing duration is essential to ensure the longevity and durability of the coating.
During the curing process, it is important to avoid foot and vehicle traffic on the coated surface. This prevents any potential damage or disturbances that may occur, leading to uneven curing or loss of adhesion.
Moreover, maintaining optimal temperature and humidity levels is key to successful curing. Extreme temperatures or high humidity can negatively affect the curing process, potentially resulting in defects or imperfections in the coating.
| Key Points |
|---|
| Allow sufficient curing time to ensure durability |
| Avoid foot and vehicle traffic during curing to prevent damage |
| Maintain optimal temperature and humidity levels for successful curing |
Implementing Proper Maintenance Practices
Applying a polyurea coating to your garage floor is a great way to protect it from wear and tear. However, proper maintenance practices are essential to ensure its longevity and appearance. Regular cleaning is the first step in maintaining your garage floor coating. Removing dirt and debris promptly will prevent them from scratching the surface. When cleaning, avoid using harsh chemicals and abrasive cleaners, as they can damage the coating. Instead, opt for mild detergents and warm water. Additionally, it’s important to periodically check for wear and tear on your garage floor coating. If you notice any areas where the coating has worn off, it’s best to reapply a topcoat to maintain its protective properties. By following these maintenance practices, you can keep your polyurea garage floor coating looking pristine for years to come.
Frequently Asked Questions For How To Apply Polyurea Garage Floor Coating
Can You Apply Polyurea Yourself?
Yes, you can apply polyurea yourself. It is a do-it-yourself product that provides long-lasting protection for various surfaces. Just follow the application instructions carefully for best results.
How Do You Apply Polyurea To Concrete?
To apply polyurea to concrete, follow these steps: Prepare the surface by cleaning and repairing any cracks. Apply a primer to enhance adhesion. Mix the polyurea correctly according to the manufacturer’s instructions. Use a spray gun to evenly distribute the polyurea over the concrete surface.
Allow it to cure as per the specified time.
How Do I Prepare My Garage Floor For Polyurea?
To prepare your garage floor for polyurea, follow these steps: Clean the surface thoroughly, removing all debris and stains. Repair any cracks or damage. Etch or grind the floor to create a rough surface for better adhesion. Apply a primer to enhance the bond between the floor and the polyurea coating.
Finally, apply the polyurea according to the manufacturer’s instructions.
How Is Polyurea Applied?
Polyurea is applied using a spraying technique. The material is mixed and heated, then sprayed onto the surface using specialized equipment. It cures quickly, forming a protective and durable coating.
Conclusion
Applying a polyurea garage floor coating is a smart and practical choice for protecting and enhancing the durability of your garage floor. By following the proper steps, you can achieve a smooth and long-lasting finish that will withstand heavy use and resist chemicals and stains.
Whether you’re a DIY enthusiast or hiring a professional, using polyurea is a cost-effective solution that will not only improve the appearance of your garage but also extend its lifespan. Don’t delay, give your garage floor the ultimate protection it deserves with polyurea coating today.


