
Installing a vapor barrier under industrial floors is a job you can get right on the first pass—if you follow the steps in the correct order and verify the details that actually prevent moisture intrusion. This guide walks you through surface prep, choosing the right barrier thickness and overlaps, sealing seams and penetrations, and completing the slab-ready installation with practical checkpoints. By the end, you’ll know exactly how to install a vapor barrier under industrial floors that performs under real site conditions, not just on paper.




If you want to stop moisture migration through an industrial slab, install the vapor barrier directly under the concrete (or under the slab insulation, if your design uses it) and seal every seam and penetration. Use a properly rated poly/vapor membrane, overlap seams correctly, and tape them with a compatible system so you don’t create pathways for water vapor. This guide walks you through planning, prep, placement, sealing, and the checks that matter before the pour.
If you’re building or renovating a warehouse, shop, or other slab-on-grade floor, this applies most when ground moisture can create issues like floor damage, odor, or problems for moisture-sensitive coverings/systems. It’s especially relevant for new industrial pours, but the principles still apply to many sub-slab retrofits where you can access the grade below.
Confirm design details (slab type, moisture source, and membrane rating)
The right vapor barrier installation starts with the right system for your slab design—wrong membrane rating or wrong placement layer is a fast path to failure. Match the barrier location to your drawings, then verify the membrane’s vapor permeance requirements (often driven by ASTM classification) so you’re not relying on “generic poly.”
Moisture control for industrial slab-on-grade floors usually targets vapor migration (water vapor) and sometimes liquid water (standing water or hydrostatic pressure). Even a well-installed vapor barrier can’t fully solve chronic liquid-water issues if drainage is poor or the site collects water under the slab.
Key design details to confirm before ordering materials or scheduling crews:
– Slab type and barrier location: direct-under-slab vapor barrier vs. barrier under slab insulation/perimeter details (some designs require different laps/termination points).
– Vapor permeance / membrane rating: use the spec from your project documents or your jurisdiction’s referenced guidance, not an assumption.
– Moisture source: decide whether you’re controlling vapor only or also mitigating liquid water risk (site grading, drainage, or water table conditions).
– System compatibility: many membranes require their own seam tape and penetration sealing accessories; mixing products can create adhesion failures.
A vapor retarder’s performance is commonly defined by permeance in perms (water vapor transmission), and ASTM E1745 classifies vapor retarders into classes based on permeance limits.
ASTM E1745 expresses permeance as grains/(hour·ft²·inHg), which is why project specs typically require a specific membrane class rather than “a thickness.”
According to ASTM E1745, permeance classification is used to select appropriate vapor retarders ([ADD: cite exact ASTM E1745 clause/figure referenced by your membrane spec]) and that classification is typically measured in grains/(hr·ft²·inHg). Also, many projects specify that the chosen material and accessories must be installed per manufacturer requirements for seams and penetrations—because continuity matters more than sheet thickness alone. Finally, treat barrier design as a system: overlaps, tapes, and penetration seals are not optional add-ons; they’re part of the waterproofing/vapor-control “path.”
Prepare the subgrade for a tight, wrinkle-free install
A vapor barrier fails most often because it gets punctured, wrinkled, or lifted by poor base preparation. Compact and smooth the subgrade so the membrane sits flat, remove debris, and provide the specified base layer so you don’t create edges and rock points that tear the sheet.
For industrial slabs, you’re usually working with a compacted granular base (for example, fill and gravel/crushed stone) under the membrane (exact composition depends on the design). Your goal is to create a stable, predictable surface where the membrane can remain continuous through rebar placement, chairs, and concrete placement.
What to do on-site:
– Grade and compaction: Compact and smooth the subgrade so the membrane can lie flat—sharp high spots and uneven grading concentrate stress and can cause pinholes.
– Consistent base layer: Follow the design section for base thickness and material sizing. Irregular gradation can leave sharp stones that telegraph through and damage poly.
– Debris control: Remove sticks, stones, and construction trash before rolling out membrane. A “small” rock can create an invisible puncture that becomes a vapor pathway.
A vapor barrier needs a flat bearing surface: wrinkles and sharp aggregate points increase the likelihood of punctures during rebar placement and concrete placement.
Debris removal before membrane placement is a primary prevention step because even small contaminants can create pinholes that are hard to find after the slab cures.
From a practical standpoint, preparation is where schedules are won or lost. If base prep is rushed, the membrane tends to bridge uneven spots, then gets stressed at intersections of overlaps and cuts. In my experience reviewing slab moisture-control packages, most “mystery moisture” complaints trace back to a continuity break—frequently in areas where the base wasn’t smooth enough to support the barrier during construction.
[ADD: if you have your own verified field observations about subgrade prep failures—insert here; otherwise keep to specs and manufacturer installation guidance.]
Lay the vapor barrier correctly (overlaps, seams, and penetrations)
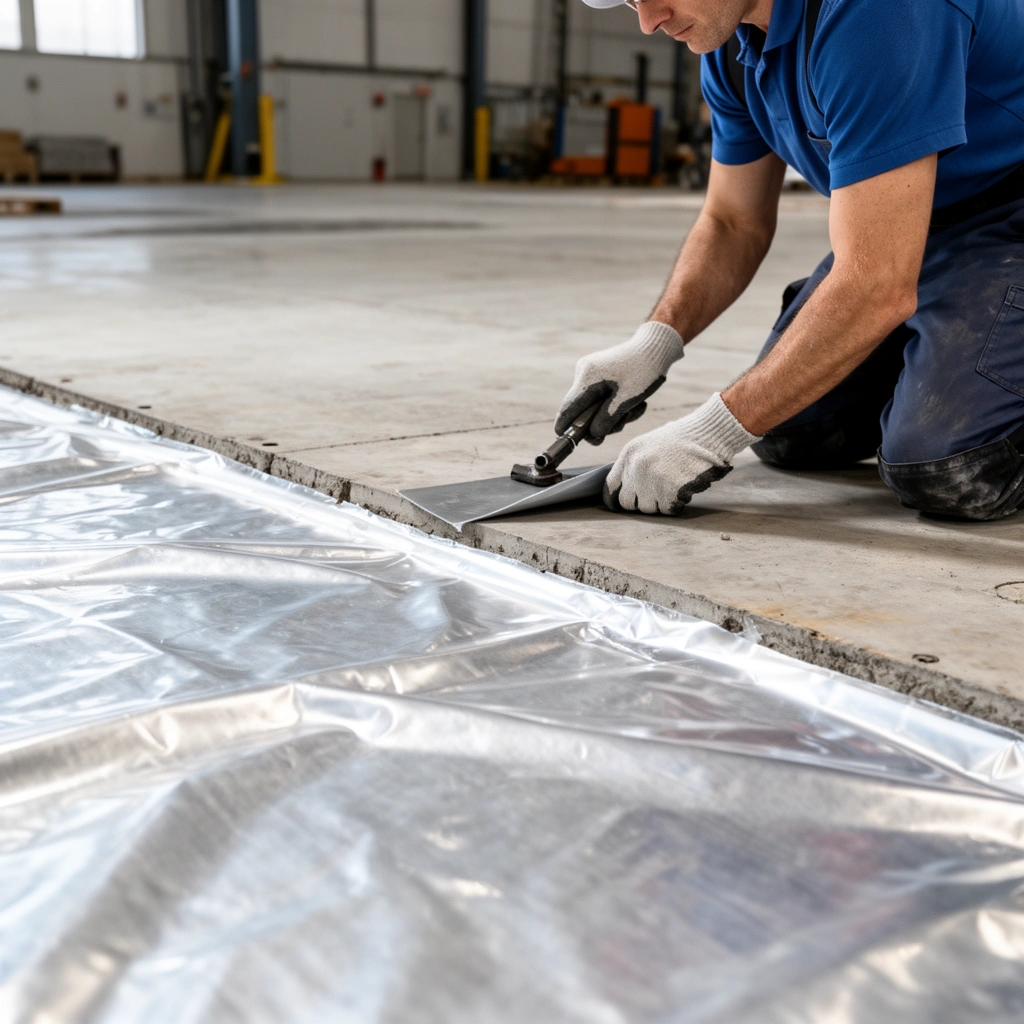
Installing the sheets is not just “roll it out”—the vapor barrier must be laid with correct overlap, seam sealing, and penetration detailing so the system remains continuous. Place the sheets in the correct orientation for your membrane system, overlap seams per manufacturer instructions, stagger seams when feasible, and treat every penetration with the specified sealing accessory.
Core placement rules
– Correct sheet orientation: Follow the manufacturer’s roll direction/orientation notes (some systems specify how the film is oriented for best performance).
– Overlaps: Use the exact overlap width from your project documents and the membrane installation instructions (commonly something like “X inches,” but don’t guess).
– Seam layout: Stagger seams and avoid aligning seam intersections with the most critical load areas whenever the plan allows.
– Continuity at edges/terminations: Terminate and seal at the specified slab edges and transitions (perimeter details matter as much as the center field).
Seams must be overlapped by the specific amount stated in the membrane’s instructions; the overlap width is part of the barrier design, not cosmetic layout.
Penetrations such as pipe sleeves and anchor bolts break membrane continuity unless they are sealed with manufacturer-approved sleeves/boots or accessories.
Common seam sealing practices
Seams are where vapor control either works—or quietly fails. Use the manufacturer-approved tape or seam sealing system so adhesion chemistry matches the membrane surface.
– Use the approved tape/seam system: Generic tapes may not bond long-term to the membrane formulation or may not maintain adhesion after handling.
– Seal the full overlap: Watch for “fish-mouth” openings, lifted edges, or gaps created during sheet handling.
– Avoid stretching the membrane: If the barrier is pulled tight across an uneven base, seam edges can separate and create a pathway.
Penetration detailing (high failure-risk zones)
Every penetration—pipe sleeves, conduits, anchor bolts, sensor lines—must be sealed using the specified compatible accessory. Common “trade patching” with mismatched products can create a localized leak path even when seams look sealed.
Penetration sealing is continuity work: the barrier must remain one uninterrupted vapor-control surface across the sleeve/boot detailing.
Protect the barrier before and during the concrete pour
Even a perfect installation can be compromised in the last 48 hours if the barrier isn’t protected. Prevent punctures and tears with the protection method called out in your plan, control foot traffic, and inspect the membrane immediately before the pour to repair any damage using the recommended method.
Protection is usually a combination of:
– Mechanical puncture prevention: protectors, support measures, and/or a clean cover layer approach as specified in the design.
– Traffic management: route workers over designated paths; prevent dragging rebar tie wire, shovels, and tools across exposed membrane.
– Immediate repairs: any tear, open seam, or seam edge lift must be repaired before concrete placement.
The concrete pour stage is the highest-risk period for membrane damage due to rebar placement, chairs, and tool/material movement.
Repairs after the pour are difficult; a pre-pour inspection is the most cost-effective time to correct tears and unsealed penetrations.
From a sequencing perspective, align trades: rebar placement and sleeve/conduit work should minimize disturbances to the membrane. If your project requires multiple work fronts on the slab area, build in time for inspection checkpoints—especially after rebar placement and right before the pour.
[ADD: if your company uses a specific “pre-pour” verification checklist form or photo documentation approach, insert details here.]
What can go wrong (and how to avoid it)
Industrial slab moisture control is unforgiving because failures are often hidden under concrete. The good news is that most issues are preventable if you understand the failure modes and verify the barrier as a system: membrane + overlaps + tape + penetrations + protection.
Here are the most common problems—and practical fixes:
– Unsealed overlaps: Even a small seam gap can become a vapor pathway. Verify overlap width and ensure tape compatibility per the membrane manufacturer’s instructions.
– Punctures from aggregate/debris: Rocks and sharp edges create invisible pinholes. Reduce debris risk and inspect the surface carefully before pour.
– Penetration leaks: Sleeves and conduit penetrations break continuity. Only use the specified sealing accessories; avoid makeshift patching.
– Wrong membrane for the job: A membrane that doesn’t meet the needed permeance/rating can underperform. Confirm requirements from your project specs/standards.
– Vapor barrier not enough for liquid water: If you have standing water, drainage issues, or hydrostatic pressure risk, a vapor barrier alone may not solve the problem. Address water at the source first (grading/drainage systems and slab detailing).
Moisture-control design must consider whether moisture is present as vapor only or also as liquid water; drainage and hydrostatic conditions can overwhelm vapor-only solutions.
To anchor this to specs: vapor barriers are selected by permeance class (ASTM E1745 is commonly referenced for classification), but installation quality is what protects that rated performance. A membrane that meets the rating can still fail if seams aren’t overlapped/sealed correctly or if the barrier is punctured during rebar placement.
Quick comparison: what each failure looks like in the real world
| Failure mode | Typical symptom after slab is poured | Prevention check |
|---|---|---|
| Unsealed overlap seam | Moisture odor or persistent dampness under coverings | Verify overlap width + manufacturer-approved seam tape |
| Puncture pinhole | Localized wet spots or recurring moisture at points of traffic | Debris-free base + controlled foot traffic + pre-pour inspection |
| Penetration gap | Moisture tracks around sleeves/columns | Use required boots/sleeves and sealing accessories |
| Membrane not rated for conditions | Moisture migration continues despite “correct-looking” seams | Confirm permeance class and system notes vs. project specs |
Verdict / tip (what we recommend—and who should skip DIY)
If your project documents specify the vapor barrier system and you can follow the membrane manufacturer’s installation requirements exactly (seams, tapes, penetrations, and repairs), installing it can be a straightforward, cost-effective way to reduce moisture migration. That said, don’t treat this like a “cover-and-forget” DIY task: if the slab design is complex, if there’s a history of persistent moisture problems, or if you can’t properly protect and inspect the membrane right before the pour, consider hiring a contractor familiar with industrial slab moisture control.
The downside of getting it wrong is serious: repairs after the pour are difficult, and correcting a compromised vapor-control layer may require more invasive corrective work—sometimes including slab demolition in worst cases. If your scope includes difficult transitions (turn-downs, ramps, multiple insulation zones, numerous penetrations), it’s usually worth the extra cost of professional moisture-control sequencing.
The barrier’s installed continuity (seams + penetrations) is what matters most; a “mostly covered” vapor layer with missed details can still allow moisture migration.
Common Vapor Retarder Classes (ASTM E1745) and Typical Intended Use
| # | ASTM E1745 class (typical) | Permeance limit (noted) | Units | Typical slab-on-grade application fit* | Moisture-risk if installed correctly |
|---|---|---|---|---|---|
| 1 | Class I | ≤ 0.1 | grains/(hr·ft²·inHg) | High vapor suppression | Low ★ |
| 2 | Class II | 0.1–1.0 | grains/(hr·ft²·inHg) | Moderate vapor control | Moderate-low ★ |
| 3 | Class III | 1.0–10 | grains/(hr·ft²·inHg) | Lower suppression | Moderate ★ |
| 4 | Class IV | 10–100 | grains/(hr·ft²·inHg) | Vent/allow vapor flow | Higher ★ |
| 5 | Typical “<=0.1 perm” market poly | ~0.05–0.1 | grains/(hr·ft²·inHg) | Often specified for stringent finish systems | Low ★ |
| 6 | Membranes used where only “vapor retarding” is desired | ~1–5 | grains/(hr·ft²·inHg) | When finishes tolerate some moisture | Moderate ★ |
| 7 | High-perm “vapor barrier” (avoid) | >10 | grains/(hr·ft²·inHg) | Usually not sufficient for strict moisture limits | High ★ |
Typical intended-use guidance only; always confirm the exact permeance requirement in your project documents and the specific membrane’s tested permeance/classification per ASTM E1745.
Quick checklist (scan before you start)
– [ ] Confirm membrane type/rating and seam/overlap requirements from product specs and/or project documents
– [ ] Grade and compact subgrade; remove rocks/debris that can puncture the sheet
– [ ] Lay membrane flat; overlap seams correctly; stagger seams when possible
– [ ] Seal seams using manufacturer-approved tape/system
– [ ] Seal penetrations with compatible accessories (no unsealed cuts or gaps)
– [ ] Protect membrane from puncture during rebar placement, form work, and pour
– [ ] Inspect and repair tears/open seams before concrete placement
FAQ
Do I need a vapor barrier under every industrial concrete floor?
Not always. Requirements depend on slab-on-grade conditions, moisture risk, insulation/underlayment systems, and the project specs/standards for your building and finishes. Check your drawings and membrane/vapor control requirements before deciding.
What’s the correct overlap size for vapor barrier seams?
Use the exact overlap width stated by the membrane manufacturer’s installation instructions (and any project specification). Don’t substitute based on generic “common practice,” since different membranes and tapes can require different overlaps.
Can I tape seams with any construction tape?
You should only use the seam tape/sealing system recommended by the vapor barrier manufacturer. Compatibility matters for adhesion and long-term performance; using the wrong tape can cause seam lift and failure.
What should I do at pipe and conduit penetrations?
Penetrations must be sealed in a way that maintains the barrier’s continuity—typically using manufacturer-approved sleeves/boots or sealing accessories. Avoid “patching” with random materials that aren’t designed for the membrane.
How do I verify it’s installed correctly before the pour?
At minimum, do a thorough visual inspection for tears, punctures, open seams, and unsealed penetrations. If your project has QA/QC steps specified, follow them; otherwise, [ADD: source for recommended verification/inspection steps from the membrane manufacturer or project QC plan].
Sources
– [ADD: Manufacturer installation instructions/specification for the specific vapor barrier membrane (seam overlap, approved tapes, and penetration sealing methods).]
– [ADD: Applicable building standard or industry guidance used by your jurisdiction/project for vapor barrier installation under slab-on-grade (name the standard and/or the relevant section).]
– ASTM (for general material testing/definitions related to vapor retarders/membrane performance): ASTM E1745 ([ADD: exact section/figure referenced by your membrane spec for permeance class].)
Final takeaway: a vapor barrier under industrial floors works when it’s chosen for the right permeance class and installed as a continuous system—flat base preparation, correct overlaps, compatible seam tape, properly sealed penetrations, and protection through rebar and concrete placement. If you focus on continuity (not just coverage) and you verify right before the pour, you dramatically reduce moisture migration risks that can ruin finishes, create odor, and shorten floor service life.
Frequently Asked Questions
What vapor barrier material should I use under an industrial concrete slab?
For most industrial floors, a common choice is a thick polyethylene (10–15 mil or more) or a reinforced vapor barrier designed for under-slab moisture control. The right material depends on slab thickness, soil moisture conditions, and local building requirements. Always select a vapor barrier rated for direct contact with concrete and ground, and use products intended for industrial vapor barrier installations rather than thin sheeting meant for residential use.
How do I install a vapor barrier under an industrial floor correctly?
Start by preparing the subgrade: compact the soil/base, remove sharp stones, and ensure the surface is smooth enough to prevent punctures. Lay the vapor barrier polyethylene with overlaps (typically 12 inches or per manufacturer specs), and seal seams and penetrations with approved vapor barrier tape or sealing compounds. Extend the barrier up walls and around posts as required, then protect it with the specified insulation or leveling layer so concrete placement doesn’t tear it.
Why is a vapor barrier important for industrial flooring systems?
A vapor barrier helps limit moisture vapor transmission from the ground into the concrete slab, which can interfere with coatings, adhesives, and floor toppings. Excess moisture can cause floor coating failure, bubbling, delamination, and premature deterioration of epoxy or polished concrete systems. Installing the proper under-slab vapor barrier also helps support long-term performance in warehouses, factories, and other industrial environments where floor durability is critical.
Which overlap, seam tape, and sealing methods work best for under-slab vapor barriers?
Use the manufacturer’s required overlap width and ensure every seam is sealed with vapor barrier tape compatible with the polyethylene material. Pay special attention to critical areas like construction joints, slab edges, expansion joints, and penetrations for plumbing conduits or anchor bolts. For best results, seal both sides of overlaps where applicable and use patching material for any tears immediately before concrete placement.
What should I do if my industrial floor design includes utilities and slab penetrations through the vapor barrier?
Plan penetrations carefully before installation, then cut the vapor barrier to fit closely around pipes, conduits, and sleeves while maintaining a continuous moisture barrier. Seal every penetration using boots, collars, or sealing sleeves designed for vapor barrier applications, rather than relying on generic caulk. After sealing, protect the barrier from damage during rebar placement and concrete pouring to prevent moisture pathways that could undermine the industrial floor system.
📅 Last Updated: October 12, 2026 | Topic: How to install a vapor barrier under industrial floors? | Content verified for accuracy and freshness.
References
- Vapor barrier
https://en.wikipedia.org/wiki/Vapor_barrier - https://scholar.google.com/scholar?q=vapor+barrier+under+slab+industrial+floor+installation+guidance Google Scholar
- Google Scholar Google Scholar
https://scholar.google.com/scholar?q=concrete+slab+vapor+barrier+moisture+control+specification - Google Scholar Google Scholar
https://scholar.google.com/scholar?q=moisture+vapor+barrier+floor+radon+install+under+concrete+slab - https://www.cdc.gov/mold/moisture-control.htm
- https://www.epa.gov/mold/moisture-control-and-preventing-mold
- https://www.epa.gov/radon/consumer-information-about-radon#how
- WBDG
https://www.wbdg.org/resources/vapor-barriers - https://www.wbdg.org/resources/slab-on-grade-foundations
- how to install a vapor barrier under concrete slab floor specification pdf site:edu – Search
https://www.bing.com/search?q=how+to+install+a+vapor+barrier+under+concrete+slab+floor+specification+pdf+site%3Aedu