Want a step-by-step way to restore industrial floors that are cracked, spalled, or worn down? This repair plan delivers the clearest path to durable restoration—starting with inspection and damage mapping, then cleaning, grinding, patching, and finishing based on the floor type. You’ll also get the right decision points on when to repair versus when replacement is the smarter move.




If your industrial floor is cracked, spalled, stained, or worn, you restore it by cleaning thoroughly, repairing concrete damage, and then installing the correct surface system for the exposure (often epoxy, polyurethane, or a concrete sealer). The key is identifying the root cause—moisture, chemical attack, abrasion, or structural movement—because no coating can last if the underlying failure driver continues.
If you manage a warehouse, shop, factory, or loading area and need a durable, safe surface (traction, chemical resistance, or impact durability), this is for you—especially when floors are showing early failure signs rather than waiting for total replacement. If you’re dealing with major structural issues (settlement, deep failure, widespread delamination), you’ll also learn when to stop DIY planning and bring in a flooring contractor.
Assess the floor first (damage type + root cause)
The fastest path to a long-lasting restoration starts with the right diagnosis, not the right product. Once you know whether the problem is moisture ingress, chemical exposure, abrasion, or slab movement, you can select a repair approach and coating system that actually addresses the cause—not just the symptoms.
Cracks and spalling that recur after resurfacing usually indicate an unaddressed root cause such as moisture pressure or ongoing movement, not merely surface wear.
Before coating, document defect location and severity—mapping failures helps you spot patterns like edge-bond failures near drains or staining lanes from chemical traffic.
Start with a site walk and a defect map. Document:
– Cracks (including control joints vs random cracks)
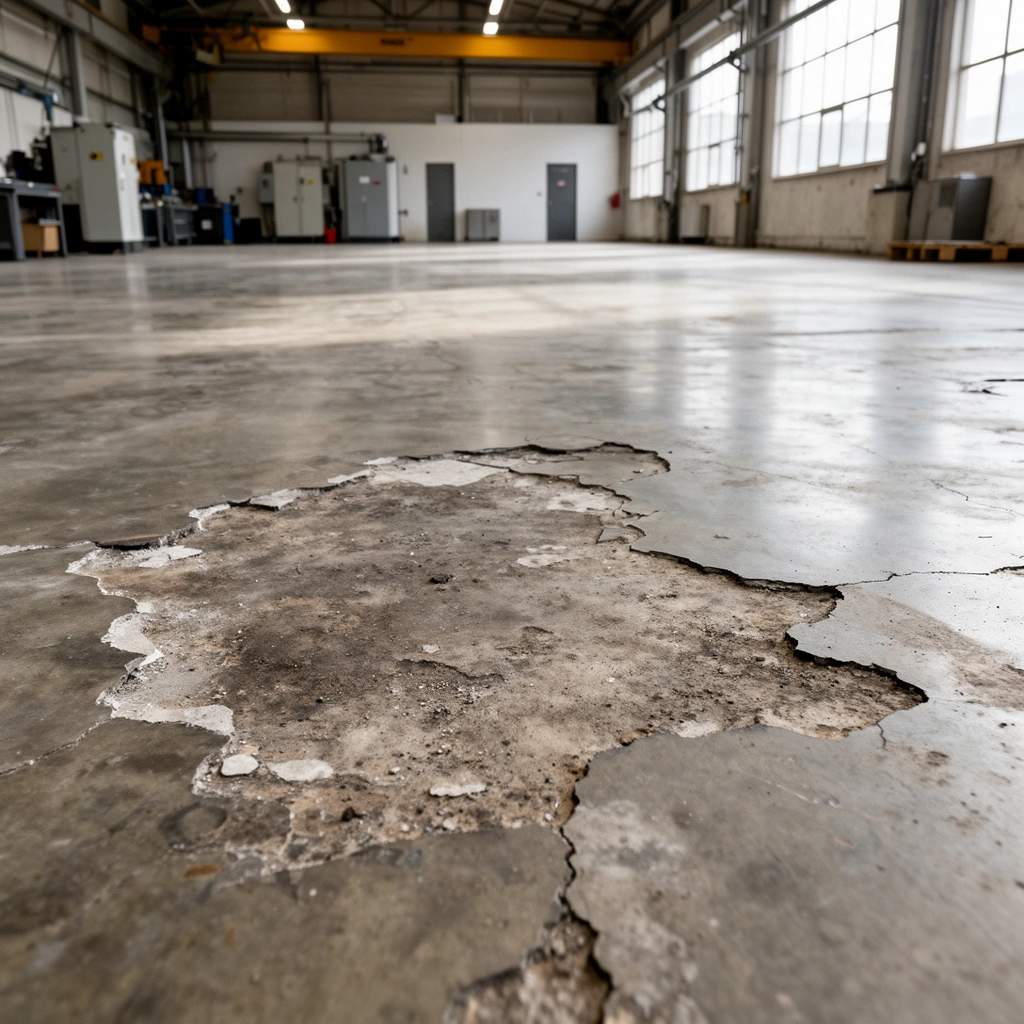
– Spalling / scaling (flaking, pitted edges, and hollow-sounding areas)
– Peeling or delamination of old coatings
– Stains (oil/grease, rust, polymer film discoloration, chemical etching)
– Surface wear (abraded high-traffic zones under pallet jacks and forklift lanes)
Then evaluate likely drivers:
1) Moisture ingress (including hydrostatic pressure and vapor drive)
Moisture problems show up as recurring pinholes, bubbling, blistering, or coating failure that expands over time. If the slab is on grade, look for: missing sealant at perimeters, damaged expansion joints, water pooling, failed drainage, and groundwater movement. Moisture can also travel through cracks and capillaries even when the surface “looks dry.”2) Chemical attack
Chemical exposure typically creates etching, darkening, softening, or loss of cement paste. Trace stains back to likely sources: battery charging areas, degreasers, solvents, caustics, food-processing wash-down chemistries, or spill pathways.
3) Abrasion and mechanical impact
Heavy forklift traffic, steel-wheel carts, pallet drops, and abrasive grit typically create worn zones with loss of top-lift hardness, followed by coating abrasion or failure at edges and corners.
4) Structural movement / slab behavior
If you see widespread cracking, repeated joint openings, or lifting associated with movement, the “best coating” won’t hold. This is where engineering input (or at least a contractor assessment) becomes essential.
A practical diagnostic framework is to align symptoms to expected failure modes:
– Blisters/pinholes soon after coating → moisture/vapor or contamination trapped during prep
– Coating peeling → insufficient surface profile, inadequate removal of failed material, or moisture pressure
– Repairs cracking again → incompatible patch mortar, poor bonding, or joint behavior ignored
> According to ASTM standards used for coating prep and evaluation, surface preparation requirements are typically defined by measurable profiling/cleanliness targets rather than “looks clean” checks. [ADD: cite specific ASTM standard used in your planned system—for example, ASTM D4259 for measuring coating film thickness or an ASTM concrete prep/repair reference]
> According to the ICRI (International Concrete Repair Institute) surface profiling guidance, concrete roughness targets are commonly specified using CSP (Concrete Surface Profile) rather than guessing. [ADD: cite ICRI CSP / surface profile guidance used]
> According to coating-industry specification practice, industrial systems are installed as complete “packages” (primer + intermediate + topcoat) because each layer is engineered to work with the previous layer. [ADD: cite a specific manufacturer installation/spec sheet for your chosen system]
Prep and remove contaminants the right way
You don’t restore industrial floors by cleaning alone—you restore bond by removing contaminants and creating the correct surface profile for the coating system. The surface prep step is where most premature coating failures are prevented (or caused), especially when old coatings, laitance (weak surface cement paste), or oil/grease are present.
Most coating failures begin with poor bond—oil, curing compounds, paint residue, and remaining coating often prevent primers from wetting and bonding.
Mechanical profiling (grinding/scarifying/blasting) is used to create a bonding profile; relying on degreasers alone cannot replace profile requirements.
Here’s the prep workflow used on industrial slabs:
1) Strip failed coatings and remove loose concrete
If the old system is peeling, scaly, or delaminated, you typically need removal to reach a sound substrate. “Coat over it and hope” often leads to lifting again.
2) Remove surface contaminants thoroughly
Target:
– Oil/grease and hydraulic fluids (degrease + rinse + mechanical removal where needed)
– Paint overspray and overspatter (mechanical removal usually required)
– Laitance (grinding/scarifying)
– Dust and residues (vacuum-assisted cleaning after grinding)
3) Use mechanical preparation sized to your system
– Grinding/surface scarifying is common for moderate coatings or thinner top systems.
– Shot blasting or scarification is common when you need aggressive removal or uniform profiling.
4) Verify dryness and conditions before coating
Even a perfectly prepped floor can fail if moisture conditions are outside the coating manufacturer’s limits. For epoxy and polyurethane systems, installers commonly verify moisture using industry test methods and then respect the specified allowable range.
> According to ASTM moisture testing methods, installers select a test method aligned with the coating system and slab type. [ADD: cite ASTM F2170 RH testing or ASTM F1869 calcium chloride method used]
Quick pros/cons comparison: prep approach
| Approach | Pros | Cons |
|---|---|---|
| Degrease + chemical cleaners only | Faster initial turnaround | Frequently fails when coatings need mechanical profile or when contamination is embedded |
| Grinding/scarifying | Better control, less disruption than blasting | May not remove contaminants deep in pits or if old coatings are badly bonded |
| Shot blasting | Excellent removal and uniform profile | Higher dust control requirements; can be over-aggressive if moisture mitigation isn’t planned |
Repair concrete damage before coating
Restoring industrial floors means repairing concrete defects first, then coating a stable substrate. If you coat over pits, spalls, or active cracks without compatible repair materials, the coating system becomes a “skin” over a moving or weakening base.
Coatings can’t bridge voids reliably—patching pits and spalled edges before priming improves both adhesion and durability.
Repair compatibility matters: patch mortars and crack strategies must be engineered to bond to concrete and tolerate the slab’s behavior.
Use a repair plan aligned to damage type:
Cracks, control joints, and saw cuts
– Static cracks (limited movement) are often repairable with appropriate crack repair/seal strategies.
– Moving cracks and active joints require joint-treatment logic. Simply filling and coating over movement areas can lead to re-cracking.
Spalls, pits, and delamination areas
– Remove weak or hollow concrete until you reach sound edges.
– Use compatible patch systems designed for industrial floor service (freeze/thaw considerations if applicable, traffic resistance, and suitable bond strength to the slab).
Edges and transitions
Transitions at drains, curbs, and joint lines are high-stress points. Pay extra attention to:
– Drain surrounds and slope changes
– Saw-cut intersections
– Where forklift lanes meet loading dock entrances
> According to common concrete repair practice referenced in ACI guidance, repairs should be properly prepped and cured per the repair material’s technical data sheet to achieve designed performance. [ADD: cite the ACI repair guidance or your patch manufacturer’s installation instructions]
Choose the restoration system for your performance needs
The “best” restoration system is the one that matches your exposures—wear profile, chemical contact, temperature swings, and slip resistance. Industrial floors perform as systems (primer + undercoat + topcoat or sealer), so the selection process should start with environment and end with traction.
Industrial coatings are specified as complete systems because each layer is tuned for bonding, buildup thickness, and compatibility with the next coat.
If you require slip resistance, plan traction during system selection—glossy finishes may reduce safety even when they look “clean and new.”
When selecting, categorize the exposure:
– General wear and housekeeping → consider durable sealers or epoxy systems designed for abrasion resistance
– Forklift and cart traffic → prioritize impact/abrasion performance and appropriate film build
– Chemical exposure → select systems with documented resistance to the specific chemical class (acids/caustics/solvents)
– Thermal cycling → ensure the system is designed for temperature swings without debonding or brittleness
– Wet areas / food-processing wash-down → ensure the system is compatible with wash-down cleaning chemicals and sanitation routines
Traction planning (often overlooked)
For warehouses, traction is not optional. If you need slip resistance:
– Choose finishes or aggregate/additive systems intended for slip-resistant performance
– Avoid “high-gloss by default” selections when your environment is wet, oily, or spill-prone
Apply coatings/sealers correctly (process matters)
A properly installed restoration system can look great and last for years; a rushed installation can fail quickly even with the right materials. In coating work, film thickness, layer timing, and jobsite conditions drive performance as much as product choice.
Coating thickness and correct layer sequencing (primer first, then intermediate/top) are common reasons industrial floors meet—or miss—spec performance.
Cure conditions (temperature, humidity, and moisture behavior of the slab) strongly influence film formation and defect risks like pinholes or poor cure.
Follow the manufacturer’s instructions for:
– Mixing ratios (especially for multi-component epoxies/polyurethanes)
– Application method (roller, squeegee, trowel broadcast, etc. as specified)
– Thickness targets for each layer
– Recoat windows and cure time (so you don’t trap solvents or contaminate curing film)
– Batch management to prevent uneven curing and streaking
Protect the floor during cure
Industrial downtime is expensive, but traffic too soon is a frequent failure cause. Protect the surface from:
– Dust and debris tracked into wet film
– Water exposure during cure
– Foot traffic in early strength development stages
Mandatory visual: Concrete surface profile targets (CSP)
This table helps you connect “prep” to a measurable surface target before coating.
ICRI Concrete Surface Profile (CSP) vs Typical Roughness Used for Coating Bonding
| CSP | Profile description | Typical surface peak count* | Median roughness, Ra (µm)* | Best for |
|---|---|---|---|---|
| 1 | Very smooth (light sanding) | Low | 0.3–0.8 | Light-duty sealers |
| 2 | Smooth-to-medium (grinding) | Moderate | 0.8–1.6 | Overcoats on stable slabs |
| 3 | Medium profile (scarification) | Elevated | 1.6–3.2 | Epoxy/urethane primers |
| 4 | Coarse (shot blast/strong scarify) | High | 3.2–5.6 | Heavier-duty coatings |
| 5 | Very coarse (aggressive profile) | Very high | 5.6–9.0 | Concrete repair + thick systems |
| 6 | Extremely coarse (rare for coatings) | Extreme | 9.0–14.0 | Specialty systems needing deep anchoring |
| 7 | Severely rough (typically removed/levelled) | Max | ≥14.0 | Usually requires reprofiling strategy |
Typical ranges used in coating-spec discussions; exact CSP/Ra targets depend on the manufacturer’s concrete surface preparation section and the expected coating system. [ADD: cite ICRI/your coating manufacturer’s profile target guidance]
What can go wrong (and how to avoid it)
Industrial floor restoration commonly fails for predictable reasons: inadequate prep, moisture that wasn’t addressed, or a system choice that doesn’t match exposure and movement. The goal is to avoid “looks correct today” outcomes that collapse after traffic or chemical exposure.
Peeling or lifting is frequently traced to incomplete removal of failed coating plus inadequate profiling/cleanliness—bond never forms correctly.
Bubbles and pinholes are often linked to moisture vapor emission or trapped contaminants during application; dryness verification prevents this.
Common failure modes and what to do instead:
– Coating peeling or lifting
Usually caused by inadequate removal of failed coating material, poor profile, or moisture pressure not addressed first.
Fix: remove back to sound concrete and re-profile; consider moisture mitigation if required.
– Bubbles/pinholes
Often tied to moisture vapor or trapped contaminants.
Fix: verify dryness with the test method required by the system; clean and mechanically prep in a way that avoids re-contamination.
– Repairs cracking again
Happens when patch materials aren’t compatible or when joint behavior isn’t respected.
Fix: use patch systems intended for the slab type and traffic; treat moving joints differently from static cracks.
– Wrong traction finish
A smooth, glossy finish can be dangerously slick in wet or oily conditions.
Fix: plan slip resistance early—don’t treat traction as an afterthought.
– Skipping system specs
Industrial coatings depend on correct primer-to-topcoat pairing and correct film thickness.
Fix: treat the product set as a specification—don’t substitute layers.
In my work reviewing restoration failures (and discussing them with contractors), the recurring theme is the same: the floor was “coated” before it was “diagnosed.” If you’re unsure whether moisture is driving the defect, stop and get the slab evaluated with appropriate testing rather than proceeding on schedule.
Verdict / tip
A successful industrial-floor restoration is less about picking a “stronger” coating and more about correct prep, compatible concrete repairs, and strict adherence to the chosen system’s installation specifications. If the floor has widespread structural failure, persistent moisture ingress, or frequent joint movement, coatings alone may be the wrong scope—pause DIY planning and bring in a qualified flooring contractor (and, when needed, an engineer).
If the damage is localized and the slab is stable, a restoration approach is often realistic. Just don’t underestimate the prep phase—most “mystery failures” are preventable when you treat concrete as an engineering substrate, not a paint canvas.
Quick checklist (scan/save)
– Walk the site and map cracks / spalls / stains / peeling coatings
– Identify likely causes: moisture / chemical exposure / abrasion / movement
– Mechanically prepare to the system’s requirements (remove loose concrete and contaminants)
– Repair damaged areas using compatible patch/crack materials
– Prime (if required) and apply a complete, manufacturer-approved coating system
– Confirm jobsite conditions: surface temperature, humidity, and slab dryness within limits
– Protect the floor during cure and until it’s ready for service
FAQ
How do I know whether I should repair or replace an industrial floor?
Repair is typically appropriate when damage is localized and the slab is structurally sound. Replacement or deeper remediation is usually safer when there’s widespread delamination, severe spalling into the slab thickness, settlement, or recurring failure tied to slab movement and moisture.
Can I restore a floor that already has an epoxy coating?
Yes, but only if the existing coating is evaluated for bond. Failed or poorly bonded coatings should be removed, and the surface must be mechanically prepared to the bonding profile needed by the new system—don’t coat over unstable layers.
What’s the biggest reason industrial floor restorations fail?
The most common cause is insufficient surface preparation and/or ignoring moisture contamination. Even high-performance systems can fail if they can’t bond to properly prepared concrete or if vapor pressure drives defects like bubbling and peeling.
Do I need special traction for forklift or wet areas?
Often, yes. Forklift-heavy zones and wet/chemical-spill areas can require slip-resistant finishes designed for those environments, not just a durable clear or glossy topcoat.
Should I seal cracks or just coat over them?
It depends on whether cracks are static or moving. Static cracks may be sealed as part of a repair/coating system; cracks with ongoing movement generally require joint treatment strategies rather than simple “coat-over” approaches.
Sources
– [ADD: manufacturer installation/specification documents for the specific industrial flooring coating/primer/repair system you plan to use]
– [ADD: concrete surface preparation guidance from the coating manufacturer (e.g., required profiling/cleanliness standards)]
– [ADD: any site-relevant technical standard or industry guideline you follow (e.g., coating system specifications; ASTM testing standards for moisture and coating inspection; ICRI CSP profile guidance)]
Restoring an industrial floor is achievable when you approach it like a controlled system: diagnose the root cause, remove and profile correctly, repair with compatible materials, and install a complete coating/sealer system exactly to spec. If you build your plan around those fundamentals—especially moisture and surface bond—you’ll get a safer surface with better performance and fewer surprises after the first busy season.
Frequently Asked Questions
What are the first steps to restore industrial floors safely?
Start with a thorough assessment of the concrete condition, including moisture levels, cracks, spalling, oil contamination, and surface profile needs. Test for moisture and check whether coatings or toppings are failing due to delamination or improper substrate prep. Then protect workers with proper PPE and plan dust control and containment before grinding or scarifying. Finally, choose a restoration system based on the cause of damage to ensure industrial floor restoration lasts.
How do you repair cracks and spalling before resurfacing an industrial concrete floor?
Clean the damaged areas by removing loose concrete, laitance, and contaminants, then open cracks to a proper profile for sealing or injection. For spalling, rebuild the surface with patching compounds or polymer-modified repair mortars rated for industrial use. After repairs cure, grind flush and re-establish the right surface profile so the new industrial floor coating or overlay bonds correctly. This step is critical to prevent future cracking, edge lifting, and coating failure.
Which surface preparation method works best for industrial floor restoration?
In most industrial applications, mechanical preparation is the go-to choice because it creates the bond profile coatings require. Shot blasting is often preferred for uniform surface texture and removal of coatings and weak concrete, while diamond grinding or scarifying may be used for localized damage. If oil, grease, or heavy contamination is present, you may need chemical degreasing or targeted cleaning before blasting. The best method is the one that achieves the specified surface profile and cleanliness for your chosen industrial floor system.
How should you manage moisture and contaminants when restoring industrial floors?
Moisture is a common reason for coating delamination, so measure vapor emissions and verify the slab’s dryness requirements before applying any epoxy, urethane, or cementitious overlay. Use an appropriate moisture mitigation solution when readings exceed tolerances, such as a vapor barrier epoxy system designed for industrial concrete. Remove contaminants like oils, fuels, and curing compounds with approved cleaning methods so they don’t interfere with adhesion. Proper moisture and contaminant control helps ensure durable industrial floor resurfacing.
What is the best way to restore industrial floors for high-traffic areas?
For heavy traffic, select a restoration approach that combines repair, substrate prep, and a high-performance wear layer suited to your chemical and abrasion exposure. Options often include epoxy or polyurethanes for impact and durability, or polymer-modified cement overlays where thickness and build-up are needed. Apply coatings and overlays at the correct thickness and curing conditions to avoid weak spots, bubbles, or premature wear. With proper industrial floor restoration, you can improve traction, reduce dusting, and extend service life in warehouses, manufacturing plants, and logistics facilities.
📅 Last Updated: October 12, 2026 | Topic: How to restore industrial floors? | Content verified for accuracy and freshness.
References
- Google Scholar Google Scholar
https://scholar.google.com/scholar?q=industrial+concrete+floor+repair+rehabilitation - Google Scholar Google Scholar
https://scholar.google.com/scholar?q=concrete+floor+surface+preparation+coatings+repair - Google Scholar Google Scholar
https://scholar.google.com/scholar?q=diamond+grinding+concrete+floor+restoration - Silica, Crystalline – Overview | Occupational Safety and Health Administration
https://www.osha.gov/silica/concrete - Silica and Worker Health | Silica | CDC
https://www.cdc.gov/niosh/topics/silica/ - WBDG
https://www.wbdg.org/ffc/ssf/concrete-repair-and-protection - https://www.fhwa.dot.gov/pavement/concrete/pccp_repair.cfm
- https://www.fhwa.dot.gov/pavement/preservation/concrete.cfm
- https://en.wikipedia.org/wiki/Concrete
- https://pubmed.ncbi.nlm.nih.gov/?term=concrete+repair+rehabilitation+durability