Repairing pet claw marks on wood floors is essential for preserving their charm. Start by evaluating the damage; light scratches can often be treated with wood markers or a coffee mop. For deeper gouges, use wood filler and sand it smooth before applying a matching stain. To clean up stains or odors, try a vinegar and water mix or baking soda paste. Don't forget to maintain your floors with regular cleaning and protective rugs. If scratches are extensive or you notice serious warping, consider professional help. There's plenty more to explore to keep your floors looking their best!
Understanding Pet-Related Floor Damage
When you've got pets, it's easy to overlook the toll they can take on your wood floors. However, understanding pet-related floor damage is key to maintaining your home's beauty. One of the most common issues you'll face is dog scratches on wood. These scratches can range from light surface scratches to deeper gouges, depending on your pet's activity and nail length.
Light surface scratches are a frequent occurrence, often caused by playful pups running and jumping around. On the other hand, deeper gouges can happen when your pet digs or chews at the floor, which can be more challenging to repair. Besides scratches, heavy impacts from pets can leave dents, further complicating your flooring's appearance.
Chemical damage is another concern, especially from pet urine. It can lead to permanent discoloration and lingering odors, affecting the overall aesthetics of your wood floors. To minimize these issues, consider regular maintenance practices. Trimming your pet's nails can greatly reduce the incidence of dog scratches on wood. Additionally, using protective rugs or mats in high-traffic areas can provide an extra layer of defense.
Assessing Damage Severity
To assess the severity of damage from your pet's claws, start with a thorough visual inspection of your wood floor. Look for scratches, stains, and any signs of warping, as these can indicate how deep the damage goes. Using a moisture meter and measuring the depth of scratches will help you determine if you need a simple fix or a more involved repair process.
Visual Inspection Techniques
A thorough visual inspection is essential for evaluating the severity of pet claw marks on your wood floors. Start by examining all affected areas for varying degrees of scratches, gouges, and potential stains. Pay close attention to the location and severity of each mark, as this helps you gauge the damage's extent.
Using a flashlight can be particularly helpful to identify shallow scratches that might be less visible in normal light. These minor imperfections can easily escape your notice during a routine check, but they're vital for an accurate assessment. Don't forget to look for signs of warping or discoloration, especially in spots where your pets frequently linger, as these may indicate underlying moisture issues.
To further assess the damage, measure the depth of the scratches with a ruler or caliper. This simple step can clarify whether you can manage repairs with touch-ups or if you'll need to take into account more extensive methods. Finally, document everything—take photographs or jot down notes on the extent of the damage. This record will be invaluable for future repairs or if you decide to call in a professional.
Moisture and Depth Testing
Moisture and depth testing are essential steps in evaluating the severity of damage caused by pet claw marks on wood floors. Addressing these factors can help you determine the best course of action for repairs. Here's what you should consider:
- Visual Inspection: Look for visible scratches, stains, or warping.
- Moisture Meter: Check for elevated moisture levels that could indicate water damage.
- Depth of Scratches: Measure how deep the scratches are to assess if they're superficial or require more extensive repairs.
- Movement or Gaps: Inspect for any loose boards that could signify underlying damage.
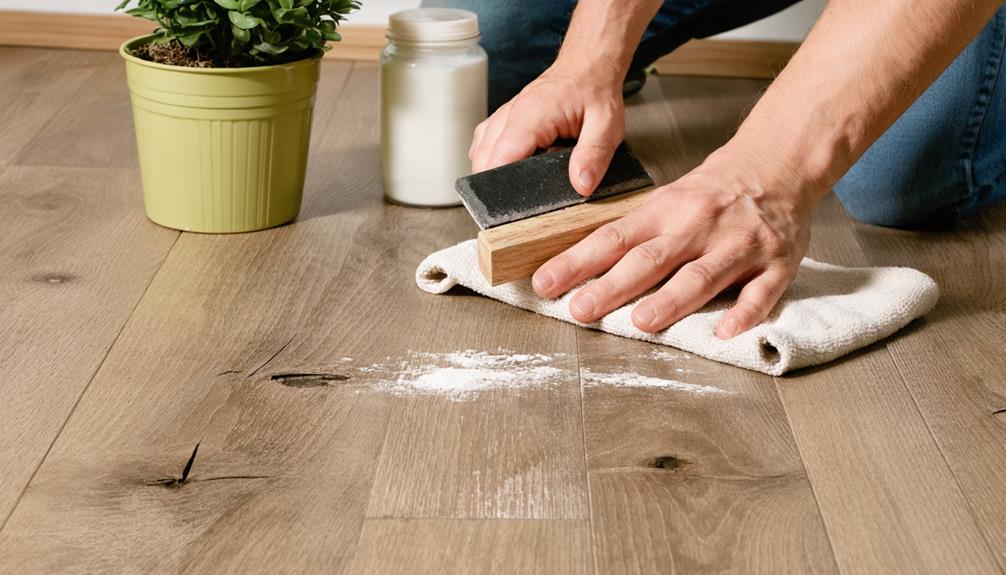
Essential Repair Tools
When tackling the task of repairing pet claw marks on wood floors, having the right tools at your disposal is fundamental for achieving a smooth, professional finish. Here's a breakdown of the fundamental items you'll need:
| Tool | Purpose | Significance |
|---|---|---|
| Clean Cloths | For initial cleaning and blotting | Guarantees the area is free from debris |
| Sandpaper (various grits) | Smooths surfaces after repairs | Prepares the area for finishing touches |
| Wood Filler | Fills deeper scratches and gouges | Restores the integrity of your floor |
| Stain Markers | Addresses minor surface scratches | Blends seamlessly with the existing finish |
| Putty Knife | Applies wood filler accurately | Guarantees a smooth, even application |
| Polyurethane Sealant | Provides a protective finish | Enhances durability and restores shine |
| Safety Gear | Protective gloves and goggles | Keeps you safe while working with tools |
When you're ready to begin, make certain you have clean cloths for initial cleanup. Sandpaper will help smooth out any rough areas after applying wood filler, which is essential for filling deeper scratches. For minor scratches, stain markers can work wonders. A putty knife allows for precise application of the filler for a seamless repair.
Lastly, don't forget safety gear! Protecting yourself while handling tools and chemicals is critical. With these fundamental tools, you'll be well on your way to restoring your wood floors and keeping them looking fabulous.
Techniques for Minor Repairs
When it comes to minor repairs on your wood floors, you've got a few quick fix solutions that can work wonders. Techniques like using wood markers, natural fillers, or even a walnut can seamlessly restore your floor's beauty. Plus, staying on top of preventative measures will keep those scratches at bay and save you time in the long run.
Quick Fix Solutions
Scratches on wood floors can be an eyesore, but don't worry—quick fixes are often just a few steps away. Here are some effective solutions for repairing scratches and restoring the beauty of your floors:
- Wood markers: Use stain-filled wood markers like Minwax to match the wood stain and conceal damage.
- Coffee mop: For shallow scratches, mop your floor with strong coffee to blend the coloration.
- Pecan rub: Rubbing the meat of a pecan over the scratches can revive the wood's color thanks to its natural oils.
- Baking soda paste: Mix two tablespoons of baking soda with warm water to create a paste that helps scrub away scuffs.
If you're looking for a bit more shine, consider using a floor buffer to smooth out light scratches, followed by a quality floor wax for protection. These quick fixes can help your wood floors look great without the need for extensive repairs. With these tips in your toolkit, you'll keep your floors looking fabulous and free from unsightly marks!
DIY Repair Techniques
How can you effectively tackle those minor scratches on your wood floors? You've got several DIY repair techniques at your disposal. For shallow scratches, start by cleaning the area with a hardwood cleaner. Then, grab a stain-filled wood marker that matches your floor color. Apply it carefully and let it dry completely. If deep scratches are the issue, fill them using wood filler and a putty knife, then sand the area gently once it's cured.
Another quick fix? Rubbing a shelled walnut or pecan on minor scratches can restore your wood's natural color thanks to the nut oils. A simple mixture of vinegar and olive oil (1 part vinegar to 2 parts olive oil) can be applied with a microfiber cloth to clean and minimize scratch visibility. Finally, finish up with a floor buffer after applying quality floor wax to blend in those minor scratches seamlessly.
Here's a quick overview:
| Scratch Type | Repair Technique |
|---|---|
| Minor Scratches | Stain-filled wood marker |
| Deep Scratches | Wood filler and sanding |
| Oil Restoration | Walnut/Pecan rub or vinegar mixture |
Preventative Measures
While DIY repair techniques can effectively address existing scratches, taking proactive steps can help you maintain your wood floors and prevent claw marks from becoming a problem in the first place. Here are some preventative measures you can easily implement:
- Regularly trim your dog's nails to a manageable length to greatly reduce scratches.
- Place area rugs or mats in high-traffic areas where your pet walks or plays, providing a protective barrier against damage.
- Use furniture pads under table and chair legs to prevent scratching when they're moved around.
- Train your pets to avoid running on hardwood surfaces to minimize the risk of claw marks.
Incorporating these strategies into your routine can go a long way in preserving the beauty of your wood floors. Plus, implementing a cleaning schedule to quickly address any minor scratches with appropriate wood floor cleaners and touch-up products will keep your floors looking great. By taking these simple steps, you can enjoy a scratch-free environment and extend the life of your wood floors, allowing you to live freely with your pets without the constant worry of damage.
Addressing Deep Scratches
Deep claw marks can be a frustrating sight on your beautiful wood floors, but tackling those deep scratches doesn't have to be a challenging task. You can restore your floors with a few simple steps. Start by cleaning the area with a hardwood cleaner to remove any debris. This guarantees the repair materials adhere properly.
Next, use a wood filler to fill in the deep scratches. Apply the filler with a putty knife, making sure to follow the manufacturer's cure time instructions for the best results. Once the wood filler has cured, gently sand the area with fine-grit sandpaper until you have a smooth surface that blends seamlessly with the surrounding wood.
After sanding, it's time to apply a matching wood stain to the filled area. Allow the stain to set, and then check if a second coat is necessary for color consistency. Finally, finish the repair by sealing the area with shellac or polyurethane. This step not only protects your repair but also restores the floor's sheen, giving it a durable and polished appearance.
Here's a quick reference table to guide you through the process:
| Step | Action | Tips |
|---|---|---|
| 1. Clean | Use hardwood cleaner | Guarantee no debris remains |
| 2. Fill | Apply wood filler with a putty knife | Check cure time instructions |
| 3. Sand | Gently sand with fine-grit paper | Achieve a smooth blend |
| 4. Stain & Seal | Apply matching stain & finish with seal | Assess for color consistency after stain |
With these steps, you can confidently repair those deep scratches and enjoy your floors once more!
Stain Removal Methods
Pet stains on wood floors can be a real headache, but there are effective methods to tackle them without causing further damage. You don't have to stress; just follow these tips to clean the area and restore your floors:
- Vinegar and Water Mix: Combine equal parts vinegar and water to neutralize odors and gently clean minor stains. It's a safe and natural solution!
- Baking Soda Paste: For tougher stains, make a paste with baking soda and warm water. Apply it to the stain, scrub gently, and wipe clean for a fresh finish.
- Commercial Cleaners: Consider using commercial wood floor cleaners designed for pet stains. These products often contain enzymes that break down organic messes and neutralize odors effectively.
- Wood Bleach: For deeper stains, wood bleach can lighten discoloration. Remember to test it on a small, inconspicuous area first to avoid affecting the surrounding wood.
Once you've succeeded in removing the stain, don't forget to apply a protective finish or sealant. This step helps prevent future stains and enhances the wood floor's durability. With these methods, you can take control of your wood floors and keep them looking their best. So, roll up your sleeves and get to work—freedom from pet stains is within your reach!
Preventative Care Strategies
Taking proactive steps can make a world of difference in maintaining the beauty of your wood floors. One of the most effective preventative care strategies is regularly trimming your dog's nails. Shorter nails can greatly reduce scratches, as they're less likely to inflict damage during your pet's daily activities.
Additionally, consider placing area rugs in high-traffic areas. These rugs act as a protective barrier, absorbing the impact of your pet's movements and minimizing direct contact with the wood surface. Another useful strategy is training your pets to avoid running indoors. By encouraging controlled movement, you can decrease the likelihood of claw marks from playful behavior.
To further protect your floors, applying a durable protective coating can enhance their resilience. This coating makes them more resistant to scratches, ensuring they stand up to the wear and tear of everyday life.
Lastly, utilizing pet nail caps can be a simple yet effective solution. These soft coverings reduce the risk of scratching while allowing your furry friends to move freely indoors. By integrating these preventative care strategies into your routine, you'll not only preserve the aesthetic appeal of your wood floors but also create a more harmonious living environment for both you and your pets. Embracing these tips will free you from the worry of claw marks and keep your home looking its best.
When to Seek Professional Help
Even with diligent preventative care, accidents can happen, and knowing when to seek professional help is key to maintaining your wood floors. Some damage is beyond what you can handle with DIY fixes, and recognizing those situations will save you time, effort, and frustration.
Here are some signs it's time to call in the experts:
- Deep gouges or extensive scratches affecting multiple planks
- Persistent odors or stains from pet urine that have penetrated the wood
- Significant warping or buckling due to moisture issues
- Need for refinishing or replacement of large sections of flooring
If your hardwood floor exhibits deep gouges or extensive scratches, a professional can guarantee proper repair and restoration. Persistent odors or stains often require specialized treatment to avoid permanent discoloration. Should you notice warping, it's important to get a professional assessment to prevent further damage, as improper drying techniques can exacerbate the issue. Finally, if repairs involve refinishing or replacing large sections, hiring a professional assures a more uniform finish and restores the floor's original beauty.
Additionally, if you're concerned about maintaining warranty coverage, a professional can confirm compliance with manufacturer guidelines, so those DIY repairs won't jeopardize your investment. In these scenarios, seeking professional help isn't just advisable; it's vital for the longevity and appearance of your hardwood floor.
Frequently Asked Questions
How to Fix Dog Claw Marks on Hardwood Floors?
To fix dog claw marks on hardwood floors, start by evaluating the damage. For shallow scratches, a wood marker can cover them up effectively. For deeper gouges, use wood filler and sand it down. Consider preventative measures like regular nail trimming and using area rugs in high-traffic zones to protect your flooring types. Additionally, training your dog to avoid running indoors can further reduce the chances of scratches occurring in the first place.
How to Remove Dog Claw Marks From Wood?
To remove dog claw marks from wood, you'll want to focus on both cleaning and prevention. Start by using a mixture of vinegar and olive oil to clean and condition the scratched area. For deeper scratches, try filling them with wood filler and matching stain. Regular floor maintenance, like trimming your dog's nails and placing area rugs in high-traffic spots, can greatly help with claw mark prevention and keep your floors looking stellar.
How Do You Fix Pet Stains on Hardwood Floors?
You might think fixing pet stains on hardwood floors is a hassle, but it's simpler than you'd expect. Start by cleaning the area with a hardwood cleaner. For light stains, a vinegar-water mix can work wonders. If you face deeper stains, wood bleach might be your best bet—just test it first! Remember, regular hardwood maintenance and pet stain prevention can save you time and effort in the long run, keeping your floors looking great.
How Do You Fix Cat Claw Marks on Wood?
When you're dealing with scratches, start by cleaning the area to remove any debris. For shallow marks, a wood marker can blend them away nicely. If you've got deeper scratches, a bit of wood filler will do the trick. Just remember to sand it smooth afterward. To prevent future damage, regular claw trimming is essential. It'll keep your cat's claws in check and save your floors from more scratches down the line.


