To frame a floor, start by planning your layout and selecting joist materials that meet load and code requirements. Measure and mark joist spacing consistently, typically 16 or 24 inches on center. Cut joists accurately, then secure them firmly to rim joists and ledger boards using approved fasteners. Install blocking or bridging to prevent joist twisting and distribute loads evenly. Finish by laying quality subflooring perpendicular to joists, securing it with nails or screws for a solid foundation. Continuing will show how to guarantee lasting floor stability and safety.
Planning and Preparing Your Floor Frame

Before you begin framing the floor, you’ll need to carefully assess the building plans and verify the layout dimensions on-site to confirm accuracy. This initial step guarantees your floor design aligns with structural requirements and intended use. Focus on material selection, choosing lumber or engineered wood that meets load specifications and local building codes. Prioritize durability and weight capacity without compromising on cost efficiency or ease of installation. Prepare the workspace by clearing debris and confirming a level subfloor, which is critical for a stable frame. Verify that all tools and materials are on hand to avoid interruptions. By meticulously planning and preparing, you maintain control over the project’s quality and timeline, giving you the freedom to execute the floor framing with confidence and precision.
Measuring and Marking Joist Layout
Once your workspace is prepared and materials are ready, you’ll need to accurately measure and mark the joist layout to guarantee proper structural support. Begin by selecting appropriate joist materials based on load requirements and span. Using layout tools like a tape measure, carpenter’s square, and chalk line, measure the total length of the floor frame. Mark your starting point clearly, then space joists at consistent intervals—typically 16 or 24 inches on center—to assure even load distribution. Snap chalk lines along the frame to provide visual guides for positioning each joist. Double-check measurements before proceeding to avoid costly errors. Precise layout and marking set the foundation for a level, durable floor that meets building codes and supports your freedom to create with confidence.
Cutting and Installing Floor Joists
You’ll start by measuring each joist length accurately to fit your layout. Maintain consistent spacing according to building codes, typically 16 or 24 inches on center. Then, secure the joists firmly using appropriate fasteners to guarantee structural stability.
Measuring Joist Lengths
Accurate measurement of joist lengths is critical to guarantee a level and stable floor frame. Before cutting, you’ll need to take into account the joist materials and perform load calculations to ascertain strength and durability. Measure from the inside edge of the rim joist to the opposite rim joist, accounting for the thickness of the rim joist itself. Use a tape measure with a locking feature to hold your measurement steady. Key points to focus on include:
- Confirming the exact span required for your specific joist materials
- Adding allowances for joist hangers or ledger boards
- Verifying measurements twice before cutting
- Adjusting lengths based on load calculations to prevent sagging
Precise measuring guarantees your floor system will support intended loads without compromising freedom in design.
Joist Spacing Standards
Proper joist spacing is essential to guarantee structural integrity and load distribution across your floor frame. Depending on the joist materials you select—typically dimensional lumber or engineered wood—spacing standards vary, generally ranging from 12 to 24 inches on center. Closer spacing, such as 12 or 16 inches, enhances load distribution and minimizes deflection, especially when using lighter or less rigid joist materials. Conversely, wider spacing may be acceptable with stronger engineered joists but requires precise calculations. Always consult local building codes and manufacturer specifications to determine appropriate spacing for your project. By adhering to these standards, you ascertain your floor can handle anticipated loads safely while maximizing material efficiency and maintaining the freedom to customize your framing approach as needed.
Securing Joists Properly
Three key steps define securing joists properly: measuring, cutting, and fastening. First, select quality joist materials suitable for your load requirements. Measure accurately to confirm each joist fits perfectly without gaps or overlaps. When cutting, use precise tools to maintain straight edges, which are essential for strong joist connections.
To secure joists effectively, focus on:
- Using galvanized joist hangers to prevent corrosion
- Double-checking alignment before fastening
- Applying appropriate fasteners (nails or screws) per local codes
- Reinforcing connections with blocking or bridging for stability
Properly executed, these steps guarantee a durable floor frame that offers structural freedom and safety. You’ll appreciate how precise installation maximizes performance while minimizing material waste.
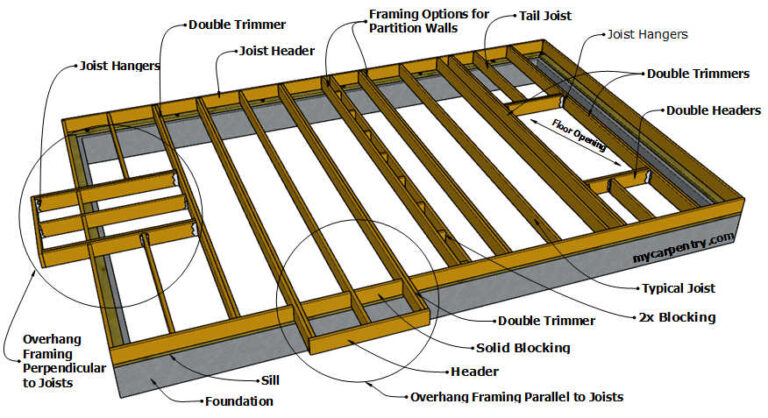
Securing Joists to the Rim Joist and Ledger Board

Before you can fully secure the joists, you’ll need to confirm the rim joist and ledger board are correctly positioned and firmly attached to the structure. Proper rim joist connections prevent lateral movement, while a strong ledger board attachment supports vertical loads. Use approved fasteners and hardware like joist hangers and structural screws to guarantee a solid, lasting connection.
| Aspect | Belang |
|---|---|
| Rim Joist Position | Maintains floor perimeter stability |
| Ledger Board Alignment | Ensures load transfer to foundation |
| Fastener Type | Affects strength and durability |
| Joist Hanger Usage | Prevents joist rotation and slipping |
| Inspectie | Confirms secure, code-compliant framing |
Installing Blocking and Bridging Between Joists
You’ll need to install blocking and bridging between joists to improve load distribution and prevent twisting. Blocking fills the gaps perpendicular to joists, while bridging usually consists of diagonal or cross braces. Proper installation techniques guarantee floor stability and reduce deflection under load.
Purpose of Blocking
Although joists provide the primary support for your floor, installing blocking and bridging between them is essential to prevent twisting, distribute loads evenly, and enhance overall stability. You’ll appreciate the blocking advantages, especially in maintaining structure integrity and reducing deflection.
When selecting blocking materials, choose sturdy, dimensionally stable wood or engineered lumber to guarantee longevity. Properly installed blocking:
- Prevents joist rotation and twisting under load
- Distributes weight more evenly, reducing stress on individual joists
- Enhances floor rigidity and limits bounce
- Provides a solid nailing surface for subfloor fastening
Types of Bridging
When reinforcing your floor framing, understanding the different types of bridging is essential for effective load distribution and joist stabilization. You’ll encounter two primary methods: cross bracing and diagonal bridging. Cross bracing involves installing pairs of boards in an X pattern between joists, creating lateral support that reduces joist twisting and increases rigidity. Diagonal bridging, on the other hand, uses single boards placed at an angle between joists, offering continuous load transfer and preventing joist deflection. Both types improve the structural integrity of your floor system by distributing loads evenly and limiting joist movement. Choosing between them depends on your project’s requirements and accessibility, but either method enhances freedom in design by ensuring a solid, stable floor frame that resists shifting under stress.
Installatietechnieken
Both cross bracing and diagonal bridging play key roles in stabilizing joists, but their effectiveness depends largely on proper installation. When installing blocking and bridging between joists during floor framing, you must prioritize installation safety and structural integrity. Start by measuring and cutting lumber precisely to fit snugly between joists. Use nails or screws recommended for structural framing to secure components firmly. Keep these points in mind:
- Install blocking perpendicular to joists at mid-span for load distribution
- Space diagonal bridging evenly, ensuring tight fit to prevent movement
- Wear appropriate protective gear to uphold installation safety standards
- Double-check alignment and secure fastenings to avoid squeaks or shifting
Adding Subflooring for a Stable Surface
Since a properly installed subfloor guarantees structural integrity and prevents future issues, you’ll need to carefully select and secure the right materials. Opt for quality subfloor materials like plywood or oriented strand board (OSB) with sufficient thickness—typically 3/4 inch—to guarantee rigidity and load distribution. Before installation, install a moisture barrier to protect against dampness, which can cause warping or mold. Lay the subfloor panels perpendicular to the joists, staggering seams to enhance stability. Secure panels with screws or nails every 6 to 8 inches along joists, and leave a small expansion gap around edges to accommodate wood movement. This precise approach guarantees a flat, durable surface that supports your vloeren choices and maintains the freedom to adapt your space without structural concerns.