Imagine transforming your space with a stunning tile floor that not only elevates the aesthetic but also adds value to your home. You might think laying tile is a daunting task reserved for professionals, but with the right guidance, it’s entirely within your reach.
If you’ve ever felt the thrill of creating something beautiful with your own hands, then you’re in the right place. This guide will walk you through each step of the process, ensuring you gain the confidence to tackle this project yourself.
You’ll discover the secrets to achieving a flawless finish and learn tips that will save you time and frustration. Ready to turn your flooring dreams into reality? Let’s dive in and explore how you can lay your own tile 床 with ease and precision.

Choosing The Right Tile
Ceramic tiles are very popular. They are strong and last long. Porcelain tiles are another option. They are even stronger than ceramic. Natural stone tiles, like marble, are beautiful but costly. Glass tiles add shine to floors. Each type has its own benefits.
Large tiles make rooms look bigger. Small tiles can make rooms look busy. Medium tiles are a safe choice. They fit most spaces well. Always measure your space first. This helps in picking the right size.
Light colors make rooms seem larger. Dark colors create a cozy feel. Smooth tiles are easy to clean. Textured tiles provide grip. This helps in wet areas. Choose a color and texture that match your home.

Gathering Essential Tools And Materials
You must have the right tools. First, get a tile cutter. This will help you cut tiles easily. Next, a ノッチ付きこて is needed. It spreads the glue evenly. A ゴムハンマー is also important. It helps press the tiles gently. Don’t forget a tape measure for accurate measurements. Finally, a level ensures your tiles are straight.
Start with the right tiles. Choose a style you like. Get tile adhesive. This will stick the tiles to the floor. Buy グラウト to fill the gaps between tiles. Water is needed to mix the grout. Make sure to have スペーサー. They help keep gaps even. Safety gear is also important. Wear gloves and goggles.
Preparing The Surface
First, スイープ the floor to remove dirt and debris. Use a mop with warm water to clean stains. Make sure the floor is dry before moving on. A clean floor helps tiles stick better.
Check the floor for ひび割れ または holes. These need fixing before tiling. Use a patching compound to fill holes. Smooth the surface with a sanding block. Ensure the floor is level.
Underlayment helps tiles stick and last longer. Roll out the 下敷き over the floor. Cut it to fit the room. Secure it with staples または 接着剤. Make sure it covers the entire area.
Planning The Layout
First, measure the room’s length and width. Use a tape measure for accuracy. Write down each measurement. Measurements help you buy the right amount of tiles. Calculate the square footage by multiplying length by width. This number tells you how many tiles you need. Extra tiles are good for cuts and mistakes. Buy 10% more tiles than needed.
Start by drawing the room’s shape on paper. Use graph paper for neat lines. Sketch where each tile will go. Decide on a pattern like straight or diagonal. This helps you see how the tiles fit together. Place the tiles in your drawing. Make adjustments if needed. Ensure your plan is clear before starting.
Lay tiles on the floor without glue. This is called dry fitting. チェック the fit and look of the tiles. This step finds issues before gluing tiles down. Adjust tiles to match your plan. Move them until they fit well. Once happy, mark the position. This makes laying easier later.
Mixing And Applying Adhesive
Picking the correct adhesive is very important. Different tiles need different adhesives. Check the tile packaging for instructions. Ceramic tiles often use a cement-based adhesive. Stone tiles might need a special type. Ask a store expert if unsure.
Follow the instructions on the adhesive bag. Use a clean bucket for mixing. Add water first, then adhesive powder. Mix with a paddle attached to a drill. Mix until smooth without lumps. Let it sit for a few minutes. Then, mix again briefly.
Use a notched trowel to spread the adhesive. Hold the trowel at a 45-degree angle. Spread adhesive evenly over the floor. Only spread a small area at a time. This prevents drying out before tile placement. Ensure full coverage for each tile.
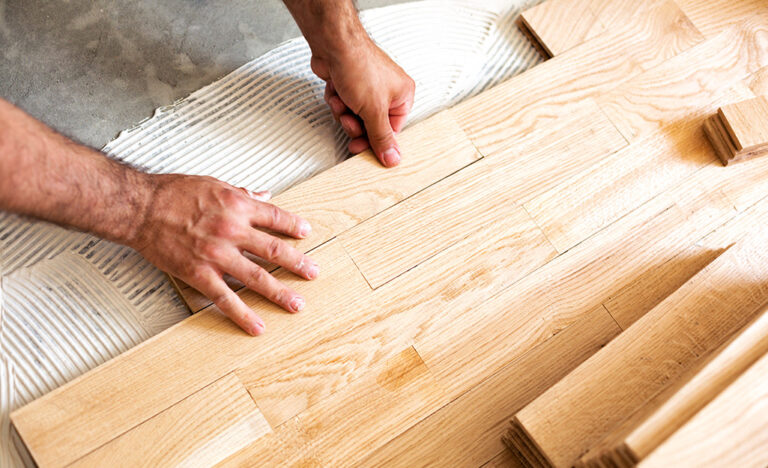
Laying The Tiles
Preparing the surface is key for laying tile floors successfully. Measure and cut tiles carefully to fit the space. Use adhesive to secure tiles, ensuring they are level and evenly spaced.
Placing The First Tile
Start by placing the first tile in the center. Use a chalk line to guide you. Press the tile firmly into the thin-set. Make sure it is level with the floor. Use a level tool for accuracy. Check the alignment with the chalk line.
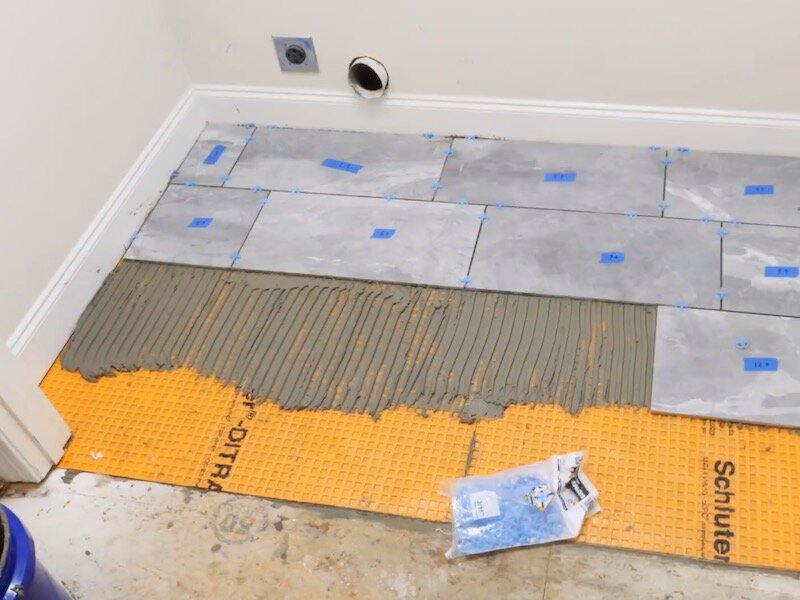
Using Tile Spacers
Tile spacers help keep tiles evenly spaced. Place spacers at each corner of the tile. This ensures consistent gaps between tiles. Spacers are easy to remove after the thin-set dries. They also help create neat grout lines.
Cutting Tiles For Edges And Corners
Use a tile cutter for edges and corners. Measure the space for the tile first. Mark the tile with a pencil. Place it on the cutter and press down. Use 安全ゴーグル while cutting. Check the fit before applying thin-set.
Grouting The Tiles
Grouting the tiles is a crucial step in laying a tile floor. It fills the gaps between tiles, ensuring a smooth surface. This process not only strengthens the floor but also enhances its overall appearance.
Mixing Grout
Mix grout with water in a clean bucket. Stir until smooth and thick. Use a stick or a drill mixer. Let it sit for 10 minutes. Stir again before using. The grout should not be runny. It should stay on your tool.
Applying Grout
Use a rubber float for applying grout. Spread grout over the tiles. Push it into the gaps between tiles. Hold the float at a 45-degree angle. Cover all gaps well. Work in small sections. This helps to manage the grout better.
Cleaning Excess Grout
Take a damp sponge. Wipe over the tiles gently. This removes extra grout. Rinse the sponge often. Be careful not to wash out the grout from the gaps. Let the grout dry for a while. Buff the tiles with a clean, dry cloth.
Sealing The Tiles
Picking the right tile sealer is crucial. Some sealers are for shiny tiles. Others work for rough surfaces. Check the label before buying. Sealers protect tiles from water and stains. This keeps them looking new. Also, choose a sealer for your tile type. Ceramic, porcelain, or stone tiles need different sealers. Always read the instructions on the bottle.
Clean tiles before applying sealer. Dust and dirt can block the sealer. Use a clean cloth for this. Next, pour the sealer on a clean sponge. Spread it evenly on the tile surface. Cover all areas well. Let the sealer dry for a few hours. A second coat might be needed for extra protection. Follow the drying time on the sealer bottle.
Regular cleaning keeps sealed tiles in good shape. Use a soft mop with mild soap. Avoid harsh chemicals. They can harm the sealer. Quickly wipe any spills. This stops stains from forming. Inspect tiles every few months. Reapply sealer if needed. It helps in keeping tiles strong and shiny.
よくある質問
What Are The Steps To Lay Tile Floor?
Begin by preparing the surface, ensuring it’s clean and level. Apply adhesive with a notched trowel, then place tiles carefully. Use spacers for even gaps and allow the adhesive to set. Grout the spaces between tiles, wiping away excess with a damp sponge.
Seal the grout for durability and finish.
How Long Does Tile Installation Take?
Tile installation typically takes a few days. Preparation and drying time are crucial and can extend the process. Surface preparation might take a day, while laying and grouting can take another. Drying and setting require additional time, especially for larger areas.
Plan accordingly for optimal results.
Can I Install Tile Over Existing Flooring?
Yes, you can install tiles over existing flooring if the surface is stable, clean, and level. Ensure the old flooring is securely attached and free from damage. Remove any debris, wax, or adhesive residue. Check that the new tile height doesn’t interfere with doors or thresholds before proceeding.
What Tools Are Needed For Tile Installation?
You’ll need a notched trowel, tile spacers, a tile cutter, and a rubber mallet. Additionally, use a grout float, sponge, and level for precision. Safety gear like gloves and goggles is essential. A tape measure ensures accurate spacing. These tools help achieve a professional-looking tile floor.
結論
Laying tile floors can transform any space. It’s a rewarding project. Start with a solid plan. Gather the right tools and materials. Prepare the surface well. Measure carefully to avoid mistakes. Follow each step methodically. Take your time with the installation.
Check your work frequently. Finish with proper cleaning and sealing. Enjoy your new tile floor. It adds beauty and value to your home. With patience and care, you can achieve great results. Happy tiling! Your space will look fresh and inviting.
Ready to impress anyone who visits.