Are you ready to tackle your next home improvement project? Framing a floor might sound daunting, but with the right guidance, you can master this essential skill.
Imagine transforming a bare space into a sturdy foundation that supports your dream home. As you delve into this guide, you’ll discover simple steps and insider tips to ensure your floor framing project is a success. Whether you’re revamping an existing space or starting from scratch, understanding how to frame a pavimento is crucial for any DIY enthusiast.
Stick around to learn techniques that will save you time, money, and stress, while empowering you to build with confidence.
Materials And Tools Needed
Building a floor needs specific materiali E tools. You will need legna beams and nails. A martello is essential. Nastro di misurazione helps to get accurate lengths. Matita for marking lines. Saw is used for cutting beams. Livello ensures the floor is straight. Safety glasses protect your eyes.
Utilizzo guanti to keep hands safe. A square helps with right angles. Trapano is useful for making holes. Viti are important to hold parts together. linea di gesso helps to draw straight lines. Caulking gun for sealing gaps. Work boots keep feet safe. Maschera antipolvere keeps dust away.
Preparing The Worksite
Clear the worksite for safety. Remove all furniture and debris. Check the ground for any bumps or holes. Smooth the surface with a shovel or rake. A clean area helps in easy work. Keep tools nearby but safe. Make sure there is enough light.
Use a tape measure for accuracy. Measure the width and length twice. Write down all numbers clearly. Mark the ground with chalk or tape. These lines guide you in framing. Ensure all marks are straight. Double-check to avoid mistakes. Ask for help if needed.
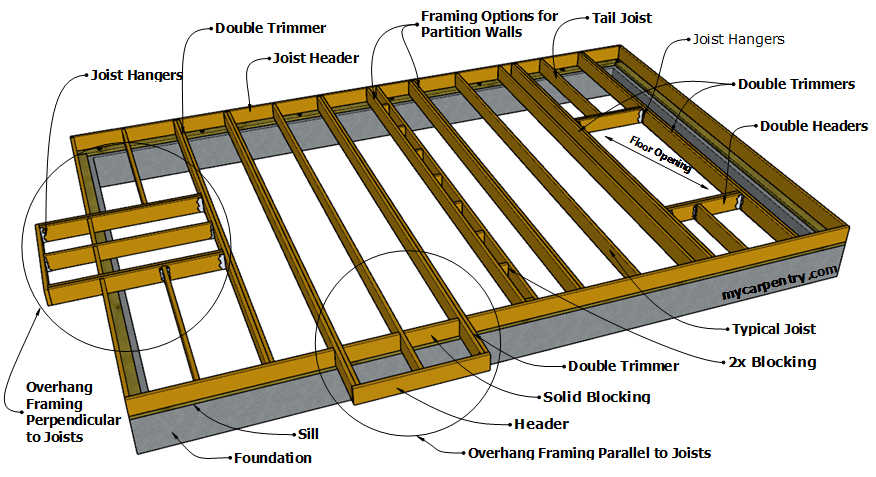
Laying Out The Floor Joists
Floor joists are important for a strong floor. They support the floor above. Choose joist spacing wisely. It affects floor strength. Common spacing is 16 inches apart. Measure carefully to ensure even spaces. Use a tape measure for accuracy. Avoid gaps and overlaps. Straight lines are best. This helps keep the floor level. Joists should fit snugly with the rim joists.
Rim joists go around the edge of the floor. They connect all the floor joists. Start by placing rim joists at the ends. Align them properly with the floor layout. Use nails to secure them. Check that they are straight. This prevents uneven floors. Rim joists should be strong and secure. They help hold the floor together.
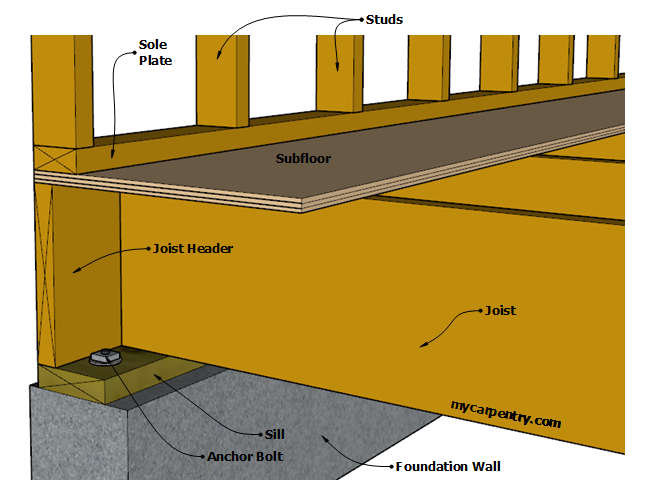
Attaching The Sill Plates
Begin by placing the sill plates on the foundation. Use anchor bolts for securing them. Ensure each plate aligns with the edges. This keeps them straight and firm. Tighten the nuts on the bolts snugly. Avoid over-tightening to prevent damage.
Use a spirit level to check sill plates. They must be even. Adjust them if they are not level. Add shims under uneven areas. This ensures a flat base for the floor. Double-check each plate before moving on. Keeping them level is crucial.
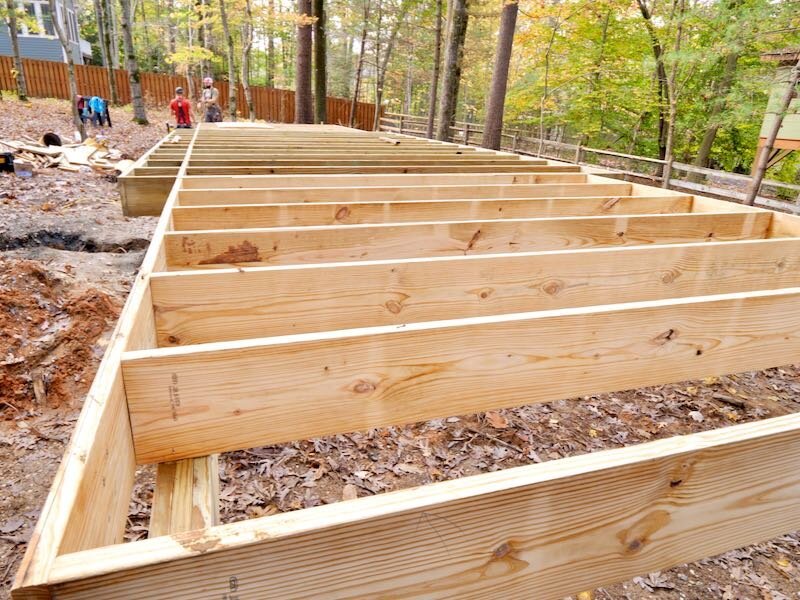
Installing The Floor Joists
Joists support the floor. Make sure they are straight and level. Use a tape measure. Space the joists evenly. Usually, 16 inches apart. Check each joist with a level tool. Adjust if needed. This keeps the floor strong. Double-check measurements. Accuracy is key. Every joist must be secure.
Nails hold the joists in place. Use the right size. Start at one end. Drive nails straight through. Use a hammer for this. Ensure nails are flush. Avoid bent nails. Check each nail for tightness. Secure every joist. This prevents movement. Strong nails mean a strong floor.

Bracing And Blocking
Cross bracing helps make floors strong. It stops floors from moving side to side. Cross bracing is like an X shape. It connects one joist to another. This makes the floor stable. Use nails to attach the bracing. Make sure they are tight and secure.
Incorporating blocking adds more stability. Blocks are small pieces of wood. They fit between joists. Blocks keep joists from twisting. They also help spread weight evenly. This makes the floor safe and firm. Use a hammer to put blocks in place. Check that they are level and even.
Laying The Subfloor
Picking the right subfloor material is important. compensato is popular. It is strong and lasts long. OSB is another choice. It is less expensive than plywood. Both work well in most homes. Make sure the material is thick enough. This helps the floor stay sturdy.
Unghia E screws can attach subfloor panels. Screws hold better. They keep the floor from squeaking. Use a drill to put screws in. Put screws in every corner. Also, place them in the middle. This keeps panels flat and tight. Check the floor. Make sure it feels smooth.
Inspecting The Floor Frame
Start by checking if the floor is livello. Use a long level tool. Place it on the floor. Look at the bubble in the middle. If the bubble is in the center, the floor is level. Next, ensure the floor is square. Measure from corner to corner. Both diagonal measurements should be the same. If not, adjust the frame.
Walk around the floor frame. Look for any weak spots or damages. Check all the joints and connections. They should be tight and secure. Use a hammer to tap on the floorboards. Listen for hollow sounds. Hollow sounds can mean weak spots. Fix any issues before continuing.
Domande frequenti
What Tools Are Needed For Framing A Floor?
To frame a floor, you’ll need a tape measure, circular saw, hammer, square, and a level. These tools help ensure accurate measurements, clean cuts, and proper alignment. Safety gear like gloves and goggles is also important for protection during the construction process.
How Do You Start Framing A Floor?
Begin by measuring and marking the layout on the subfloor. Cut the joists to fit the design, then position and secure them. Ensure they are level and evenly spaced. Double-check measurements to avoid errors and ensure stability.
What Is The Best Wood For Floor Framing?
The best wood for floor framing is typically pressure-treated lumber or engineered wood. These materials offer strength and durability. Ensure the wood is properly dried to prevent warping. Always choose high-quality lumber to ensure long-lasting floor integrity.
How Do You Ensure A Level Floor Frame?
Use a level to check each joist’s alignment. Adjust them as needed to ensure a flat surface. Regularly check throughout the process to maintain accuracy. Correcting any uneven areas early prevents future issues and ensures a solid foundation.
Conclusione
Framing a floor requires patience and precision. Start by gathering the right tools. Follow safety guidelines to prevent accidents. Measure everything twice before cutting. Secure joists firmly for stability. Use quality materials for durability. Align boards correctly to ensure a level surface.
Check for any misalignments throughout the process. A well-framed floor adds strength to your home structure. Practice makes perfect; don’t rush the task. With careful planning and execution, your floor will stand strong. Celebrate your achievement once the framing is complete.
Remember, every step builds towards a sturdy foundation. Keep learning, keep improving.