Do you dream of having extra space for your tools or outdoor gear? Building a shed is a fantastic way to get organized.
But before you dive in, laying a strong foundation is key. Enter the shed floor on skids—a method that’s both efficient and budget-friendly. Imagine having a sturdy, portable base that keeps your shed level and dry, even in tricky weather.
Curious about how to make this happen? In this guide, you’ll discover the simple steps to building a shed floor on skids, with tips that make the process hassle-free. Ready to transform your backyard space with confidence? Let’s get started!
Scegliere la posizione giusta
Pick a flat spot for your shed. This helps with stability. Avoid areas where water collects. Wet spots can damage the wood. Also, check for tree roots. They can make the floor uneven.
Ensure there’s enough sunlight. This keeps the shed dry. A dry shed lasts longer. Make sure the ground is firm. Soft ground can cause sinking. Distance from your house is also important. It should be close enough to reach easily.

Gathering Necessary Materials
Start with a list of all you need. Begin with wooden skids. They are the base of the floor. fogli di compensato are next. Choose thick and sturdy ones. Unghia E screws are also needed. They hold everything together. Martello E drill are the tools required. They help in fixing the wood. Nastro di misurazione ensures precision. Always measure twice and cut once. Level tool makes sure the floor is even. Equipaggiamento protettivo is a must. It keeps you safe while working.
Gather all materials before you start. This avoids delays later. Keep everything organized. It helps to work more efficiently. Clear the work area. You need space to move around. Now, you are ready to build.
Preparing The Ground
First, remove all debris and plants. Make sure the ground is clean. This helps to have a clear space. Rocks and roots might cause problems. So, take them out. A clean site makes work easier. It also ensures your shed sits well.
Next, ensure the ground is flat and even. Use a shovel to move dirt. A rake helps in smoothing the soil. A level tool is handy. It checks if the ground is even. An even ground keeps the shed stable. Always double-check the level. Doing this saves trouble later.
Selecting The Right Skids
Skids come in different types. Legna E metal are common choices. Wood skids are affordable E easy to work with. Metal skids last longer. They resist weather well. Choose based on your needs.
Size matters for skid strength. Bigger skids hold more weight. Width E length are important. Material affects durability. Pressure-treated wood resists rot. Steel withstands heavy loads. Pick materials wisely. Strong skids make a sturdy shed floor.
Laying Out The Skids
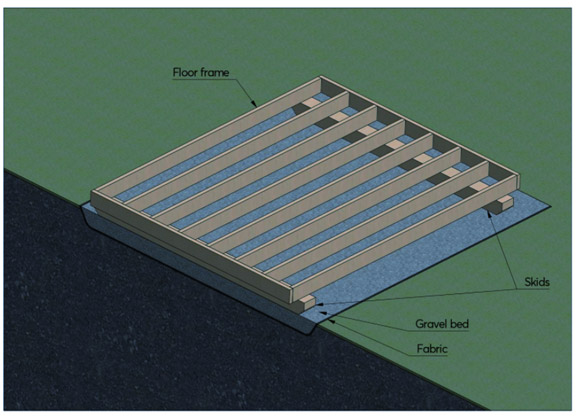
Place skids parallel to each other on the ground. Ensure there is enough space between them. This space is needed for the floor joists. Choose a flat area for your skids. This helps in keeping the shed floor even. Use a tape measure to check the distance. Keep each skid level for a strong base.
Align skids carefully. Use a string line for straightness. A straight skid line keeps the shed floor strong. Check each skid with a level tool. Adjust as needed to keep them even. This ensures a sturdy and balanced floor. Proper alignment helps avoid future problems. Make sure each skid stays in place.
Framing The Floor
Start by gathering all the materials. Use strong lumber for the frame. Measure the area where your shed will stand. Cut the wood to the right size. Arrange the pieces on the ground. Make sure they form a rectangle. Secure each corner with screws. Use a level to check if the frame is even. Adjust if needed. This step is very important.
Place the frame on the skids. Skids are long wooden beams. They help the shed stay off the ground. Align the frame with the skids. Use metal brackets to attach the frame to the skids. Drill holes and insert bolts. Tighten them well. Make sure the frame is sturdy. Test by applying pressure. It should not wobble. This ensures a strong base.
Installing Floor Joists
Joists need even spacing for strength. Place each joist 16 inches apart. This keeps the floor strong. Use a tape measure to check the distance. Mark the spots with a pencil. This helps to keep them straight. A straight floor is a strong floor.
Unghia E screws are the main tools. Nails are quicker to use. Use screws for a tighter hold. Drive each screw deep into the wood. This stops the joists from moving. A steady joist makes a safe floor. Controllo each joist after fastening. Make sure they do not wobble.
Adding Floor Sheathing
Picking the correct sheathing is crucial. It must be strong and durable. compensato E OSB are popular choices. Both have their benefits. compensato resists water well. OSB is often cheaper. Ensure it is at least 5/8 inch thick. This thickness supports the floor well. Always check for quality. No cracks or damage should be present.
Nailing the sheathing needs care and precision. Use galvanized nails for best results. Place nails every 6 inches along edges. In the middle, every 12 inches is enough. This ensures the sheathing stays firm. Align the edges carefully. Avoid gaps between sheets. Proper alignment keeps the floor strong. Double-check your work after nailing. Everything should be tightly secured.
Ensuring Stability And Durability
Strong floors need good support. Use pressure-treated wood for the skids. This wood fights rot. Skids should be spaced well. Gaps should be equal. Use sturdy screws for tight holds. Place cross beams at regular points. These beams add strength. Make sure beams are straight. Check with a level. Floors must not wobble. Wobble weakens the floor. Add metal brackets for extra hold. These brackets stop shifting. Every part matters for stability.
Protect the shed from rain. Use sigillante impermeabile on the wood. Sealant blocks water entry. Apply sealant in dry weather. Let it dry well. Paint adds a layer of protection. Use outdoor paint for best results. Choose paint that resists peeling. Cover edges with metal flashing. Flashing keeps water out. Check seals often. Replace worn seals quickly. Good weatherproofing extends shed life.
Final Inspection
Always ensure the shed floor is level and even. Use a long level tool for this check. Place it on different parts of the floor. Look for any uneven spots. Fix them as needed. A level floor is important. It makes the shed strong and stable.
Check that all connections are tight and secure. Look at the nails and screws. Make sure they are in place. Wiggle the floor a bit. It should not move or shift. Ensure the skids support the floor well. Strong support keeps the shed safe. It helps in holding heavy items inside.

Domande frequenti
What Are Skids In Shed Flooring?
Skids are wooden beams placed under a shed floor. They help distribute weight and provide stability. Skids allow easy movement of the shed and protect the floor from ground moisture. They are essential for sheds without permanent foundations.
How Do Skids Benefit A Shed Floor?
Skids elevate the shed floor above ground level. This prevents moisture damage and prolongs the shed’s lifespan. They also allow for easy relocation of the shed. Additionally, skids provide a stable base for uneven terrains.
What Materials Are Best For Shed Skids?
Pressure-treated lumber is ideal for shed skids. It resists rot and insect damage, ensuring durability. Other options include cedar and redwood, which naturally resist decay. Always choose materials that offer longevity and strength.
Can I Build A Shed Floor Without Skids?
Yes, but skids offer several advantages. Without skids, your shed may suffer from moisture damage. Skids also help in leveling the shed on uneven surfaces. They provide a more stable base and facilitate easier movement.
Conclusione
Building a shed floor on skids is a smart choice. It’s cost-effective and portable. With the right tools, it’s easy to construct. Follow the steps carefully for a sturdy foundation. Use quality materials for long-lasting results. Remember, planning is key to success.
Measure twice, cut once. This will prevent mistakes and save time. Enjoy your new shed with confidence. It’s ready to serve your storage needs. Keep learning and improving your skills. Building projects can be satisfying and rewarding. Now, you’re equipped to take on more DIY challenges.