Are you looking to breathe new life into your wood floors? Staining them is a fantastic way to enhance their beauty and protect them for years to come.
Whether you’re tackling this project for the first time or you’re a seasoned DIY enthusiast, knowing how to stain a wood floor can transform your space with stunning results. Imagine walking into a room where the floors gleam with rich color and warmth, inviting you to stay and enjoy the ambiance.
This article will guide you through each step of the process, ensuring you achieve a professional finish without the hassle. You’ll discover tips that can save you time, money, and frustration, all while boosting the value and appeal of your home. Ready to start? Let’s dive in and make your wood floors the centerpiece they deserve to be!
Choosing The Right Stain
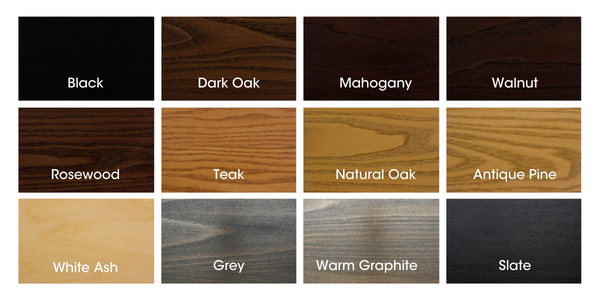
Wood stains come in various types. Oil-based stains are popular. They penetrate deeply into wood. Water-based stains dry faster. They are easy to clean. Gel stains provide a thick coat. They work well on vertical surfaces. Each type offers unique benefits.
Different woods need different stains. Oak absorbs oil stains well. Pine works with gel stains. Maple needs light stains. Mahogany looks great with darker stains. Always test the stain first. Check if it matches the wood.
Preparing The Floor
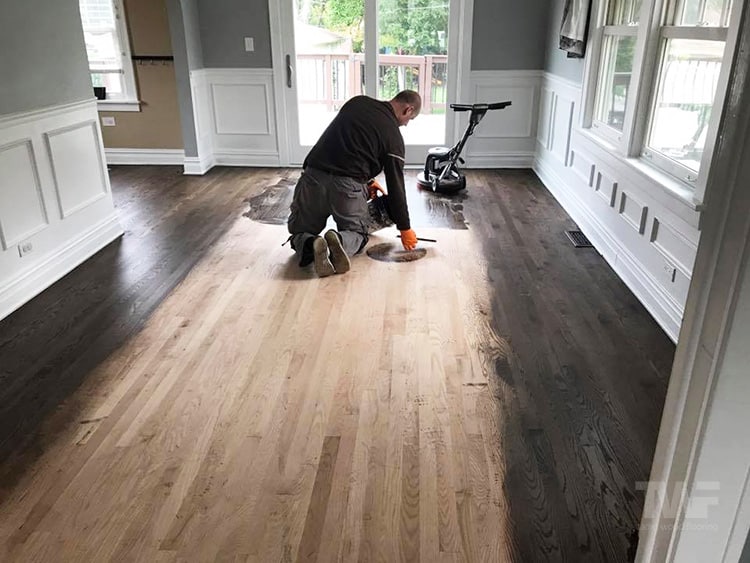
Start by sweeping the floor to remove dust and dirt. Use a vacuum for better results. Ensure every corner is clean. Next, get your sander ready. Sand the floor evenly. This helps the stain stick well. Wear a mask while sanding. It keeps dust away from your nose. After sanding, clean the floor again. Ensure no dust remains. The floor must be smooth and clean.
Check for any cracks or holes in the floor. Use wood filler to fix them. It makes the surface even. Let the filler dry completely. Sand the filled areas gently. This ensures a smooth finish. Remove any leftover dust. Inspect the floor once more. It should be ready for staining now. A well-prepared floor gives the best results.
Tools And Materials Needed
A good sander is very important. It helps smooth the wood. You also need a brush or a rag. These help apply the stain. A vacuum cleaner is useful too. It removes dust and dirt. Wear gloves to protect your hands. Use a mask for safety. It keeps dust away from your nose.
Choose the right wood stain. It should suit your floor. Look for good brands. They often work better. Buy enough sanding paper. You will need it for smoothing. Get clean rags. They help in applying the stain evenly. Use a protective finish. It keeps the floor shiny. Always check the label. It tells you about the quality.
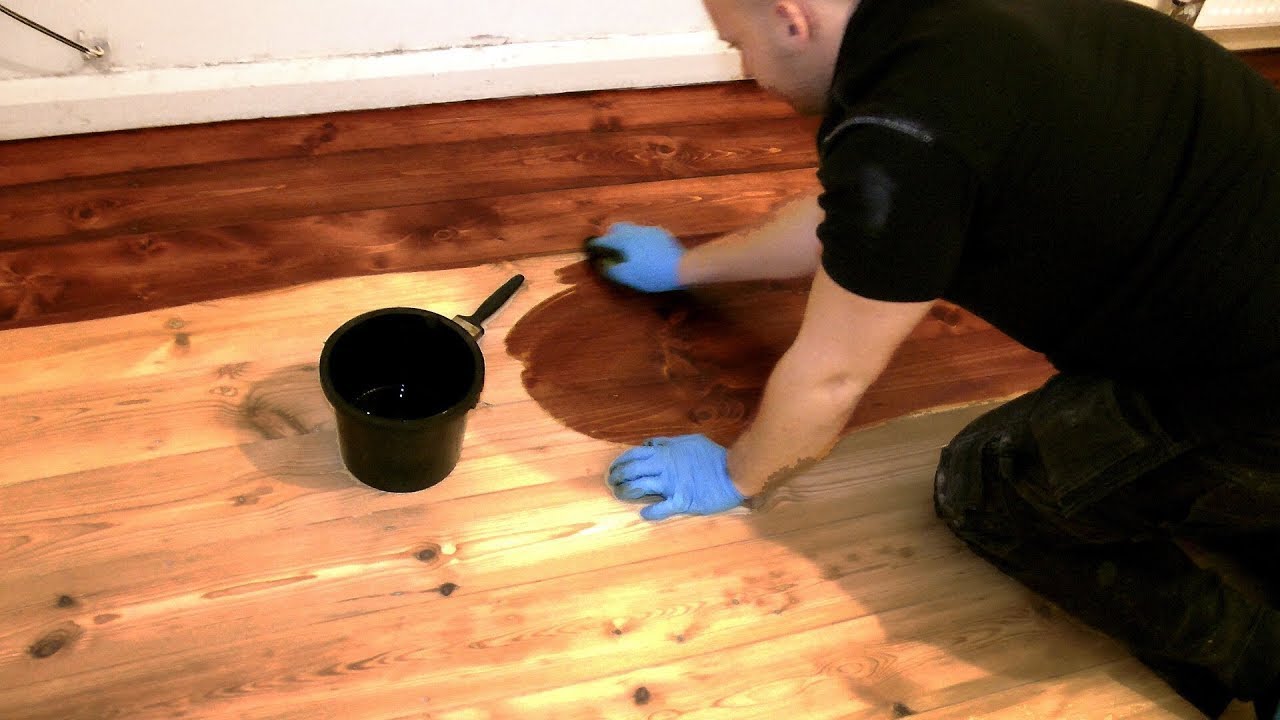
Applying The Stain
Techniques for Even Application are key to a good finish. Use a clean, soft cloth or a brush. Apply the stain in long, even strokes. This helps to avoid streaks. Work with the grain of the wood. This makes the stain look natural. Allow the stain to soak for a few minutes. This gives a deeper color. Wipe away excess stain with a clean cloth. This prevents blotches and uneven spots.
Layering for Desired Color is important. Test the stain on a small area first. This shows how the color turns out. Add more layers for a darker shade. Let each layer dry completely before adding the next. This ensures the layers bond well. For lighter shades, use fewer layers. Always wait for the stain to dry before applying another coat.
Drying And Curing Process
Drying and curing are crucial steps in staining a wood floor. Proper drying ensures the stain sets evenly. Curing allows the stain to fully harden, enhancing durability and finish.
Optimal Drying Conditions
Good airflow helps the stain dry faster. Open windows for fresh air. Use fans to move the air around. This keeps the room cool and helps drying. Temperature is also important. Keep it between 60-80°F. This is the best range for drying. Humidity should be low. High humidity slows drying. Use a dehumidifier if needed. It helps to lower the moisture in the air.
Avoiding Common Mistakes
Don’t rush the process. Let the stain dry fully. It takes time. Check the stain’s instructions for drying time. Thick coats are a mistake. Use thin coats for even drying. Thick layers take longer to dry. Overlapping strokes can cause uneven color. Apply stain evenly. Keep strokes smooth and consistent.
Sealing And Finishing
A good sealer makes wood floors last longer. It stops water and dirt. Some sealers are better for certain woods. Oil-based sealers are strong. They make the wood shine. Water-based sealers dry fast. They are safe and have no strong smell. Choose the right one for your wood type.
Coatings protect the wood floor. They make it look nice. Polyurethane is a popular choice. It is tough and clear. There are other options too. Wax gives a warm look. It needs more care. Varnish is shiny and hard. It resists scratches. Pick the coating that fits your needs.
Maintenance Tips
Keep your wood floor clean to make it last. Use a soft broom to sweep daily. This removes dirt and dust. Wipe spills right away with a damp cloth. Do not use lots of water. Water can harm the wood. Choose a floor cleaner that is safe for wood. Clean weekly to keep the floor shiny and bright.
Furniture pads protect the floor from scratches. Place them under chairs and tables. Keep pets’ nails trimmed to avoid marks. Sunlight can fade the wood. Use curtains or blinds to block the sun. Avoid wearing high heels on the floor. They can leave dents. Keep your floor dry. Dampness can cause damage over time.

Frequently Asked Questions
How Do I Prepare A Wood Floor For Staining?
Start by cleaning the floor thoroughly to remove dirt and dust. Sand the floor using a fine-grit sandpaper to ensure a smooth surface. Wipe down the floor with a damp cloth to remove any residue. Allow the floor to dry completely before applying the stain.
What Tools Do I Need To Stain A Wood Floor?
You’ll need a sanding machine, fine-grit sandpaper, a mop or cloth, and a high-quality stain. A brush or roller helps in applying the stain evenly. Don’t forget safety gear like gloves and a mask to protect yourself from fumes and dust.
Can I Stain A Previously Finished Wood Floor?
Yes, you can stain a previously finished wood floor. Begin by sanding the old finish to expose the bare wood. This ensures the new stain adheres properly. Clean the surface thoroughly to remove any dust or debris before applying the new stain for best results.
How Long Does Wood Floor Stain Take To Dry?
The drying time for wood floor stain typically ranges from 24 to 48 hours. This can vary based on the stain type and room conditions. Ensure proper ventilation to speed up drying. Always check the manufacturer’s instructions for specific drying times and follow them carefully.
Conclusion
Staining a wood floor can transform your space beautifully. Follow these steps carefully for a rewarding result. First, prepare the floor properly. Sand and clean it thoroughly. Next, choose the right stain for your wood type. Apply it evenly with a brush or cloth.
Let it dry completely before applying a protective finish. This will keep your floor looking great for years. Regular maintenance helps preserve its beauty. Remember, patience and precision are key. Enjoy your stunning new wood floor. It adds warmth and charm to your home effortlessly.
Happy staining!


