Imagine walking into a room and being greeted by gleaming hardwood floors that seem to whisper tales of elegance and charm. Your current floors might not have that sparkle anymore, but the good news is you can bring them back to life.
Refinishing hardwood floors might sound like a daunting task, but with the right guidance, you can transform them into stunning masterpieces. Picture the satisfaction of seeing your floors shine, reflecting the love and effort you’ve poured into them. This guide will show you how to make it happen, step by step, ensuring your floors become the centerpiece of your home again.
Let’s dive into the magic of refinishing hardwood floors, and discover how you can achieve a professional finish without breaking the bank or your back.
Assessing Floor Condition
Floors tell stories. Scratches and stains show wear. Look for deep gouges. These need fixing. Are boards loose? Secure them. Water damage can warp wood. Check for that. Shine a light on the floor. Does it sparkle? If it looks dull, it needs attention. Small cracks are common. Big cracks need help. Color fading is natural. But if it’s too pale, consider refinishing. Mold and mildew can hide. Check corners and edges for signs.
Feel the surface. Is it smooth? If rough, sanding is needed. Walk on it. Does it creak? Fix creaks before refinishing. Watch for nails sticking out. These can be dangerous. Clean the floor well. Dust hides problems. After cleaning, inspect again. Floors change over time. Regular checks are good.

Gathering Necessary Tools
Start with a sander. It’s the most important tool. Choose a drum sander or an orbital one. Sandpaper is also needed. Get different grits for smooth finishing. A vacuum is key for cleaning dust. A brush or roller helps in applying the finish. Don’t forget the finish itself. You can pick oil or water-based. Each has its pros and cons. Rags will help in cleaning spills. Gather all before you start. This saves time and effort.
Safety comes first. Wear goggles to protect your eyes. Earplugs are crucial for noise. Dust masks will keep dust away from your nose. Gloves protect your hands. Always use them. They prevent cuts and splinters. Knee pads help when kneeling. Floors can be hard. Safety gear ensures you work safely.
Preparing The Room
Start by removing all furniture from the room. Take out rugs, lamps, and decor items. This makes it easier to work. Store them in another room. Check for any small items left behind. Ensure the floor is clear and ready.
Cover the walls with plastic sheets. Use tape to secure them. Protect light fixtures with cloth. This keeps dust away. Mask any areas that need extra care. Keep everything safe and clean. Make sure nothing gets damaged during work.
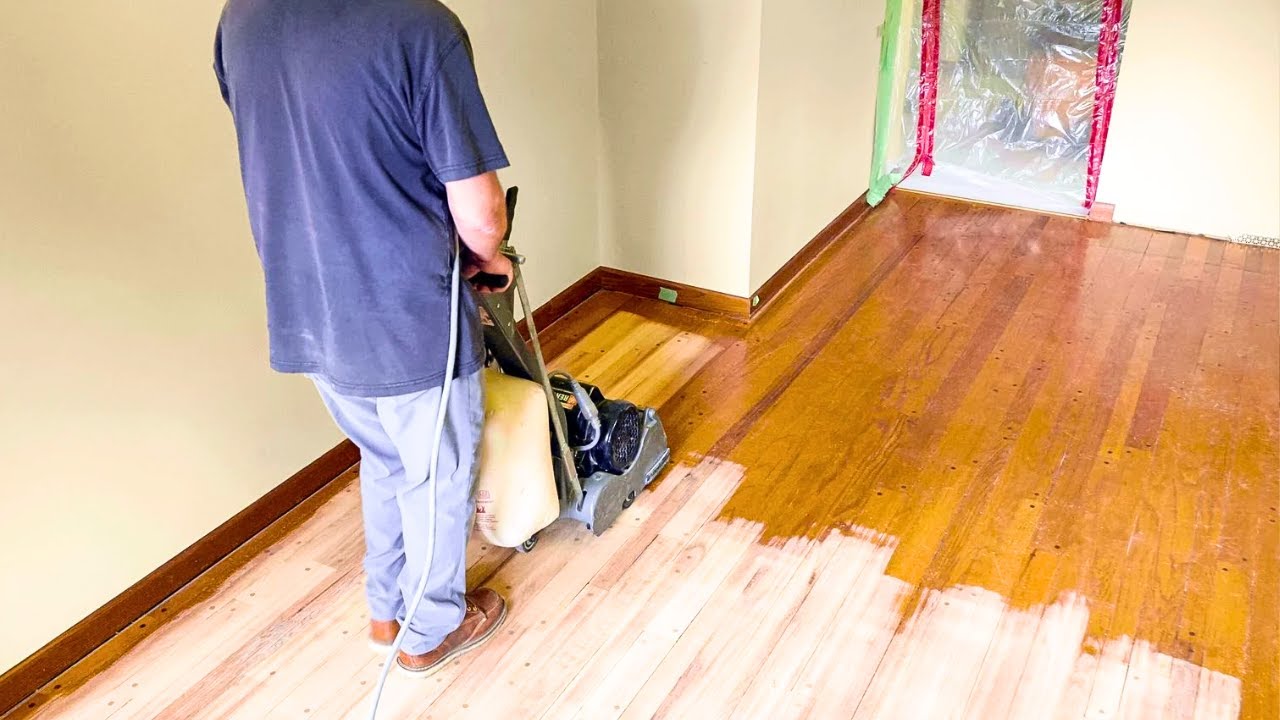
Sanding The Floors
Start with coarse sandpaper. It removes old finish and scratches. 60-grit is a good choice. Move to medium-grit sandpaper next. 80-grit works well here. Finish with fine sandpaper. 120-grit gives a smooth surface. Test on a small area first. Ensure the floor can handle it.
Drum sanders are powerful tools. Always hold it steady. Keep moving to avoid gouges. Start at one side of the room. Move in the direction of the wood grain. Overlap each pass slightly. Turn off before moving to a new spot. This prevents marks on the floor.
Edges need special care. Edge sanders help with corners and sides. Work slowly and carefully. Don’t rush this part. Use the same grit sequence as the main floor. Always sand with the wood grain. Vacuum dust after sanding. It keeps the floor clean and ready.
Cleaning And Vacuuming
Start by sweeping the floor gently. Use a soft-bristle broom for this task. Remove all loose dirt and dust. This keeps the floor surface safe from scratches. Next, use a vacuum to collect hidden dirt. Ensure the vacuum is set to a hardwood setting. This prevents any damage to the floor.
After vacuuming, take a damp mop. Wipe the floor carefully with it. Make sure the mop is not too wet. Excess water can harm hardwood floors. Dry the floor with a clean, soft cloth. This ensures no water marks are left behind.
Regular cleaning makes the refinishing process smoother. It also keeps your hardwood floors looking nice. Clean floors are less likely to have stubborn stains. This step is essential for a successful refinishing job.
Staining The Wood
Refinishing hardwood floors begins with staining the wood to enhance its natural beauty and color. This process involves carefully applying a wood stain to achieve the desired shade. Ensure even coverage and let it dry completely for a smooth finish.
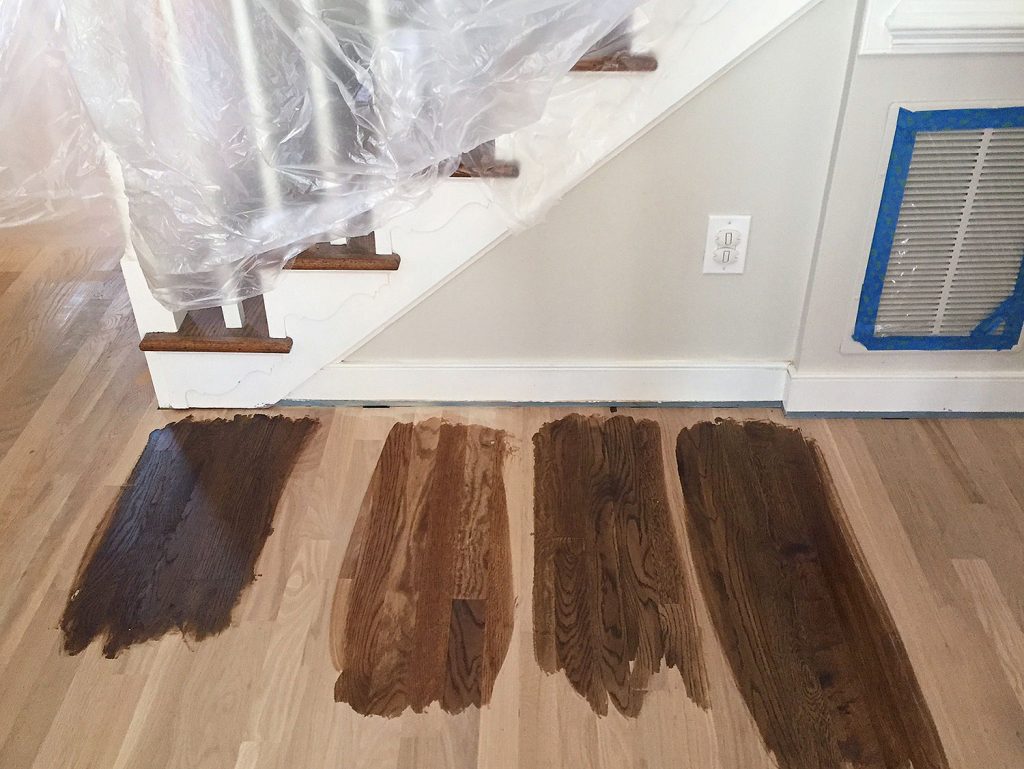
Selecting The Stain
Choose a stain that matches your style. Some stains are light. Others are dark. Test the stain on a small area first. This helps you see the color. Make sure you like it. Different woods absorb stains in different ways. Be sure to check how it looks.
Applying Evenly
Use a brush or rag to apply the stain. Apply in the direction of the wood grain. This helps it look smooth. Spread the stain evenly. Avoid leaving puddles. They make the floor look patchy. Wipe off extra stain with a clean cloth.
Drying Time Considerations
Let the stain dry fully. This might take a few hours. Check the label for drying times. It might need more time in cold places. Keep the room dust-free as it dries. This keeps the floor clean.
Applying The Finish
Applying the finish is crucial for refinishing hardwood floors. Choose a suitable finish to protect and shine. Even strokes ensure a smooth, consistent surface.
Types Of Finishes
There are many types of finishes for hardwood floors. Oil-based finishes are popular. They give a rich look. Water-based finishes dry faster. They have less smell. Polyurethane finishes are strong and durable. They are good for high-traffic areas. Wax finishes are traditional. They give a soft, warm glow.
Application Techniques
Use a brush or roller to apply the finish. A lambswool applicator is also good. Start at the edge of the room. Work towards the door. Apply thin, even coats. Let each coat dry before adding another. This helps prevent bubbles and streaks.
Curing And Drying
Let the finish dry for at least 24 hours. This time can vary based on finish type. Oil-based finishes take longer to cure. Water-based finishes cure faster. Keep the room well-ventilated. Avoid walking on the floor during curing. This keeps the finish smooth and even.
Final Touches
Achieving a smooth finish on hardwood floors involves careful sanding and applying the right stain. These final touches enhance the wood’s natural beauty. Proper sealing ensures durability and a lasting shine.
Inspecting For Imperfections
Check the floor for any scratches or uneven spots. Small cracks can be repaired with wood filler. Look for any dents or areas that need extra attention. Ensure the floor is smooth before moving on. Use a flashlight to spot hidden imperfections. Even tiny flaws can ruin the final look. Take time to fix all issues. This ensures a perfect finish.
Reinstalling Room Fixtures
After refinishing, put back all room fixtures. Furniture, rugs, and decor must be returned carefully. Ensure each item is clean. Protect the new floor from scratches. Use pads under heavy furniture. Arrange items as they were before. Make sure everything is secure. This keeps the room looking nice and tidy. Double-check all fixtures are in place.
Maintenance Tips
Sweep the floor every day. Use a soft broom. Vacuum weekly. Use a vacuum with a hardwood setting. Mop with a damp mop. Avoid too much water. Wipe spills right away. This keeps floors safe.
Place mats at doors. Mats catch dirt. Use felt pads under furniture. Felt pads prevent scratches. Avoid high heels on the floor. High heels can dent wood. Keep pet nails trimmed. Pet nails can cause scratches.

Frequently Asked Questions
How Do I Prepare Hardwood Floors For Refinishing?
To prepare hardwood floors for refinishing, start by clearing the room and cleaning the floor thoroughly. Remove dust and debris using a vacuum. Inspect the floor for any damage or stains, and repair them. Finally, ensure the floor is completely dry before proceeding with the refinishing process.
What Tools Are Needed To Refinish Hardwood Floors?
Essential tools for refinishing hardwood floors include a drum sander, edger, and sandpaper of various grits. You’ll also need a vacuum for cleaning dust, a mop for cleaning the floor, and a floor finish applicator. Safety gear like masks and goggles are crucial for protection during the process.
How Long Does Refinishing Hardwood Floors Take?
Refinishing hardwood floors typically takes three to five days. The time varies depending on the room size and floor condition. Sanding usually takes a day, followed by cleaning and applying the finish. The finish requires drying time, which can take up to two days for optimal results.
Can I Refinish Hardwood Floors Without Sanding?
Yes, you can refinish hardwood floors without sanding using a technique called “screen and recoat. ” This method involves lightly scuffing the existing finish to improve adhesion of a new topcoat. It’s suitable for floors in good condition that only need a cosmetic refresh, not deep repairs.
Conclusion
Refinishing hardwood floors transforms your space beautifully. It’s a hands-on project. First, assess the floor’s condition. Then, gather necessary tools and materials. Sand carefully to remove old finish. Apply stain to achieve desired color. Finally, protect the surface with a durable sealant.
This process requires patience and attention. The results enhance your home’s beauty and value. Follow steps closely for best results. Enjoy fresh, renewed floors that last. With effort, your floors can look stunning. It’s worth the time and dedication. You can do it!


