Are you thinking of giving your home a fresh look without the hassle of major renovations? Installing a floating floor might just be the perfect solution for you.
Imagine walking into a room that feels brand new, with sleek, modern flooring that can transform any space. And the best part? You can do it yourself, saving you time and money. Floating floors are not only stylish but also practical and easy to install.
They don’t require nails or glue, so you can avoid the mess and stress of traditional flooring methods. With the right guidance, you can achieve a professional look in no time. In this guide, you’ll discover the step-by-step process to put in a floating floor, ensuring you can tackle this project with confidence and ease. So, are you ready to roll up your sleeves and unleash your inner DIY enthusiast? Let’s dive in and get started on your flooring transformation journey!
Choosing The Right Floating Floor
Floating floors come in different types. Laminate floors are popular. They look like wood. Easy to clean. They snap together. Next is engineered wood. Real wood on top. Strong layers below. Feels like real wood. Vinyl planks are waterproof. Great for kitchens. Simple to install. Soft underfoot.
Choosing the right material is important. Think about room use. Water-resistant floors for wet areas. Check the budget. Vinyl is often cheaper. Consider durability. Kids and pets need strong floors. Look at the style. Match it with home decor. Color matters too.
:max_bytes(150000):strip_icc()/how-to-lay-laminate-flooring-1822250-08b-10f3572e10b14770b1e5da743da4226a.jpg)
Preparing The Subfloor
Start by sweeping the floor. Remove all dust and dirt. Make sure the surface is clean. Use a damp mop for sticky spots. Check the floor for bumps and holes. Fill holes with a floor patch. Sand down any high spots. The floor should be flat. This makes the floating floor last longer.
Lay down a moisture barrier. This keeps water away. Use plastic sheeting or special paper. Cut it to fit the floor size. Tape the edges together. Make sure there are no gaps. Overlap the edges by a few inches. This stops moisture from getting in. The barrier protects your new floor.
Gathering Necessary Tools
Before you start, gather all the necessary tools. You will need a tape measure for accurate sizing. A utility knife is crucial for cutting the flooring. Use spacers to create gaps for expansion. A tapping block helps in fitting the planks snugly. A rubber mallet will secure the planks in place. A level ensures the floor is even. Saw for trimming planks to size. A pencil to mark cuts and adjustments.
Safety is important. Always use safety goggles to protect your eyes. Wear gloves to protect your hands from cuts. Use knee pads to protect your knees while working on the floor. Ear protection can be useful if you use loud tools. Make sure you have a dust mask to avoid inhaling particles. Keep a first aid kit nearby for emergencies.

Acclimating The Flooring
Floating floors need time to adjust. Usually, 48 hours is enough. During this time, the floor sits in the room. It gets used to the room’s temperature and moisture. Both are very important.
The room should be the same temperature as outside. Keep the floor packs closed. This helps them acclimate better. Make sure the air in the room is dry. Wet air can cause problems. Light is okay, but not direct sunlight.
Check the room’s conditions. Use a thermometer and hygrometer. These tools help you know the air’s temperature and moisture. They help you make sure the room is ready. Follow these steps for a good start.
Laying The Underlayment
Underlayment is like a blanket for your floor. It adds comfort and protection. There are several kinds to choose from. Foam underlayment is soft and easy to use. Cork is great for quiet spaces. It absorbs sound well. Rubber underlayment is strong and lasts long. Choose the best one for your needs.
First, clean the floor. It must be free of dust. Next, roll out the underlayment. Make sure it covers the entire area. Cut the edges carefully. Use a sharp knife for clean cuts. Tape the seams together. This keeps it in place. Lastly, check for any gaps. Fill them before laying the floor.
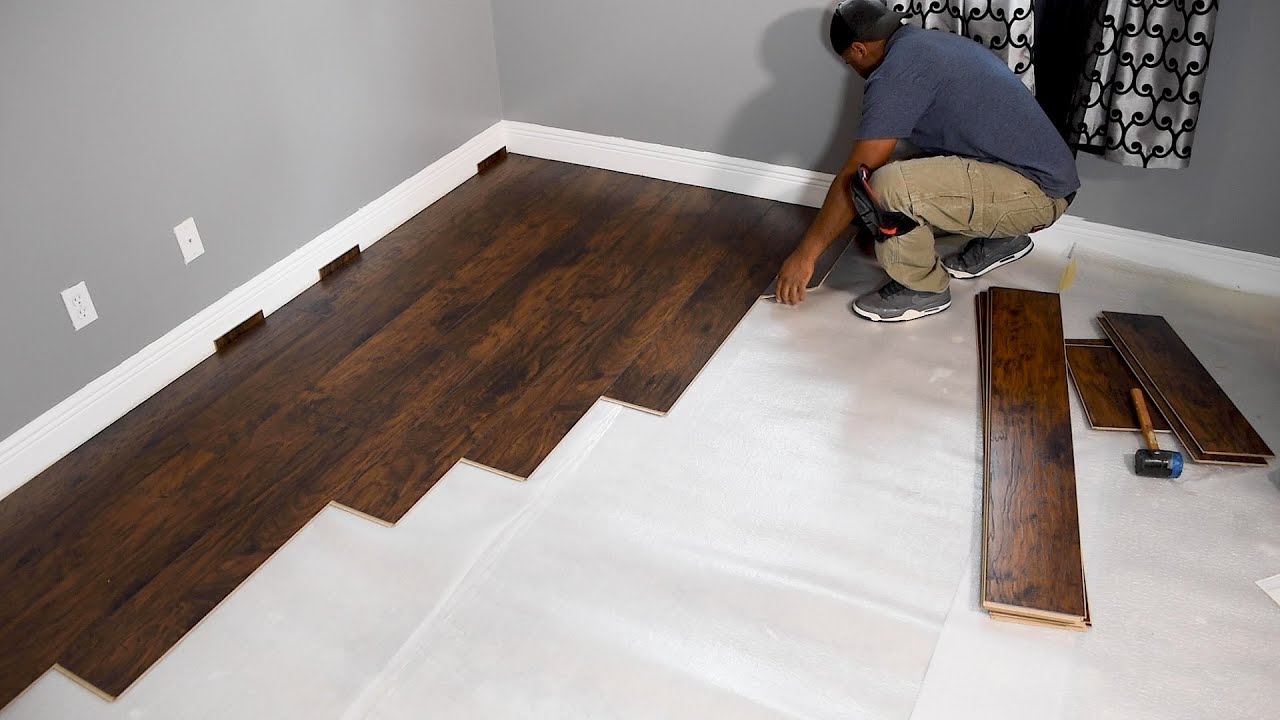
Installing The First Row
Begin by aligning the first row of flooring parallel to the longest wall. Ensure proper spacing from the wall using spacers to allow for expansion. Connect planks using the click-lock system, checking for evenness and stability as you proceed.
Aligning The Planks
Start by placing the first plank in the room’s corner. Make sure it is straight and aligned with the wall. Use a ruler for better alignment. Planks need to fit snugly against each other. Gaps between the planks can cause issues later. Always check that each plank is level. This prevents any unevenness in the floor.
Using Spacers For Expansion
Place spacers between the wall and the plank. This allows the floor to expand and contract. Wood changes size with weather. Spacers create a small gap. This gap helps in avoiding floor damage. Always ensure the spacers are evenly placed. Check the gap to keep it consistent.
Continuing With Subsequent Rows
Staggering plank joints makes your floor strong and nice. Start the next row with a shorter plank. This makes the joints not line up. This pattern is called staggering. It looks like a brick wall. Keep each joint at least 6 inches apart. This stops lines from showing on the floor. Use leftover planks for this. They fit well and save money.
Cutting planks to fit is important for good results. Measure the space before cutting. Make sure the plank fits snugly. Use a saw to cut the plank. Wear safety glasses when cutting. Place the plank carefully. Check if it fits perfectly. If it is too tight, trim a little more. Always check your work.

Fitting Around Obstacles
Trimming for Doorways can be tricky. First, measure the doorway space carefully. Mark the floor piece where it needs cutting. Use a saw for a precise trim. Ensure the piece fits snugly. Avoid gaps for a clean look.
Navigating Around Vents and Pipes requires patience. Begin by measuring the vent or pipe area. Mark the floor piece where it needs adjusting. Use a saw to cut the piece to size. Check if it fits around the vent or pipe. Adjust if needed for a perfect fit.
Finishing Touches
Baseboards and trim make the floor look neat. First, measure the walls. Cut the baseboards to fit. Use a saw for smooth cuts. Attach the baseboards with nails. Make sure they are tight. Then, put the trim around the edges. Trim hides gaps. It protects the floor edges. Use a hammer or nail gun. Check for gaps. Adjust if needed. Baseboards and trim complete the look. They add style to the room.
Cleaning keeps the floor shiny. Use a soft broom or vacuum. Remove all dirt and dust. Mop the floor gently. Avoid harsh cleaners. They can damage the floor. Inspect the floor closely. Look for scratches or cracks. Fix any issues quickly. Use a floor repair kit if needed. Regular cleaning helps the floor last long. It stays beautiful and strong.
Frequently Asked Questions
What Tools Are Needed For Installing A Floating Floor?
To install a floating floor, you’ll need a measuring tape, utility knife, spacers, tapping block, and a mallet. A saw may be needed for cutting planks to fit edges. Ensure the subfloor is clean and level for best results. Having these tools ensures a smooth installation process.
Can I Install Floating Floors Over Carpet?
Installing floating floors over carpet is not recommended. Carpet provides an uneven surface, affecting the stability of the floor. It’s best to remove carpet and ensure the subfloor is clean and level. This ensures the floating floor is secure and lasts longer, preventing potential issues with alignment.
How Do I Prepare The Subfloor?
Start by cleaning the subfloor thoroughly, removing debris and dust. Ensure it’s level; uneven areas can cause issues. Use a leveling compound if necessary. Check for moisture, especially for concrete subfloors, as it can damage the flooring. Proper preparation ensures the floor sits well and lasts longer.
Are Floating Floors Water-resistant?
Many floating floors are water-resistant, especially those made of vinyl or laminate. However, they’re not entirely waterproof. Spills should be cleaned promptly to prevent damage. Consider using water-resistant underlayment for added protection. This can help in areas prone to moisture, like kitchens or bathrooms.
Conclusion
Putting in a floating floor is easier than you think. Just follow the steps, and your room will transform. First, prepare the area and gather your tools. Next, start laying the planks carefully. Remember, measure twice, cut once. Pay attention to details like spacing and alignment.
Soon, you’ll have a stunning floor that enhances your home. It’s a great way to improve your space without hassle. With patience and effort, you’ll achieve a professional look. Enjoy your new floor and the satisfaction of doing it yourself.


