Creating a sturdy shed floor is the foundation for a long-lasting and functional outdoor space. If you’re looking to build a shed floor that stands the test of time, you’ve come to the right place.
Imagine having a shed where you can safely store tools, garden equipment, or even create a cozy hobby room. The floor is the first step, and getting it right is crucial. With a well-built shed floor, you can prevent moisture damage, ensure structural stability, and make the most out of your shed.
You’ll discover simple steps that guide you through the process, ensuring you feel confident and capable every step of the way. This isn’t just about laying down wood or concrete; it’s about crafting a reliable base that supports whatever you envision for your shed. Dive in and learn how to make a shed floor that meets your needs and surpasses your expectations. By the end of this article, you’ll have the knowledge to tackle this project with ease and expertise, transforming your outdoor space into something truly special.

Choosing The Right Location
Picking a good spot is very important. A flat area works best. It keeps the floor level and strong. Avoid wet spots. Water can damage the shed floor. Make sure there is enough space around the shed.
Check for any trees or roots nearby. They can harm the shed floor over time. Sunlight is also important. A sunny spot helps keep the shed dry. Think about the wind too. A windy spot might not be good.
The shed should be easy to reach. Think about the path to the shed. It should be clear and easy to walk. All these points help in choosing the best location for your shed floor.
Gathering Necessary Tools And Materials
Building a shed floor needs the right tools. Hammer, screwdriver, and measuring tape are a must. You also need a saw for cutting wood. Don’t forget a level to keep the floor straight. Wear safety glasses to protect your eyes.
Choose strong materials. Plywood is a good option. It holds weight well. Nails and screws keep everything together. Get enough to avoid running out. Wood glue can help with extra strength. Make sure to have a pencil for marking cuts.
Prepare your workspace. Keep it clean and organized. This makes the job easier. Have all tools and materials nearby. This saves time and effort.
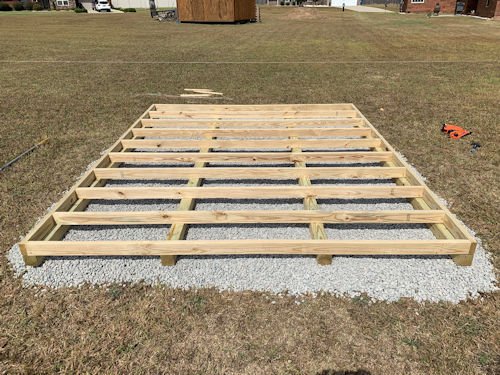
Preparing The Ground
First, pick a good spot for the shed. Remove all rocks and sticks. Clear the grass and bushes from the area. This makes the ground clean and ready. A clear area helps in building the shed.
Use a shovel to make the ground flat. A level surface is important. It keeps the shed strong. Check with a level tool. Make sure the ground is even. Uneven ground can cause problems later.
Start with the foundation for your shed. Place wooden beams or concrete blocks on the ground. This is the base of the shed floor. Make sure everything is straight and firm. This helps the shed to stay stable.
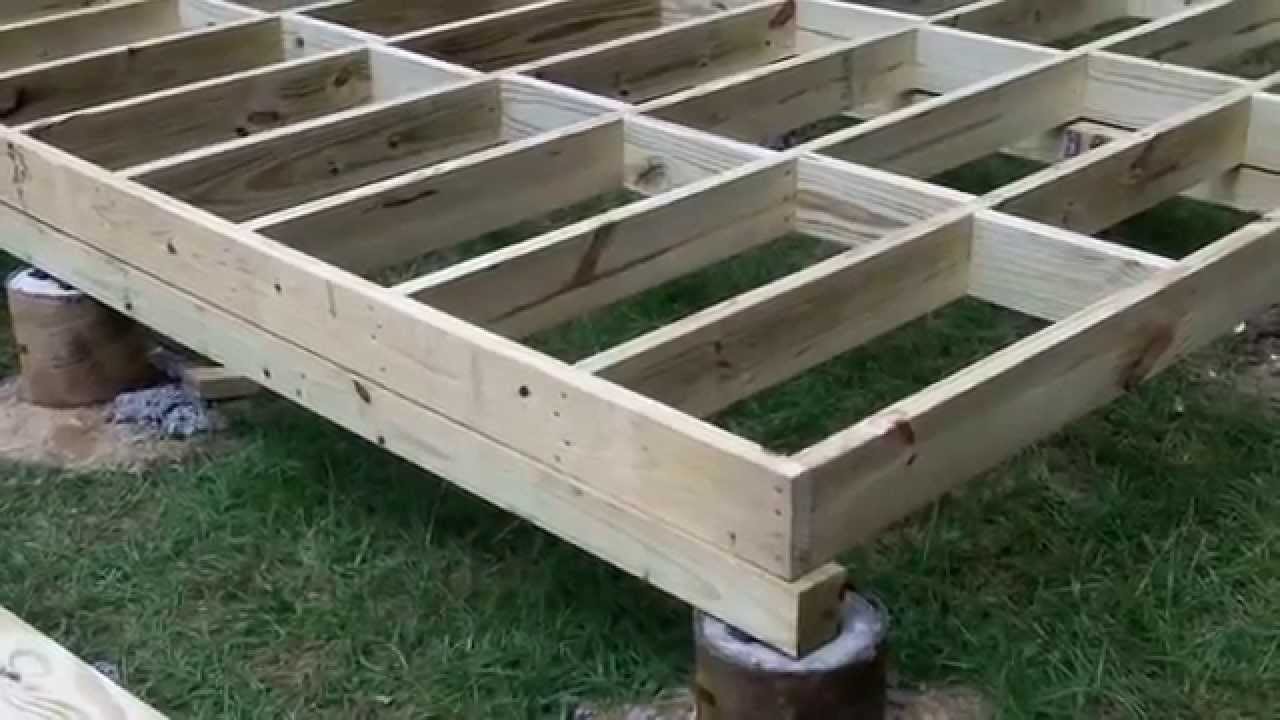
Building The Floor Frame
Measure your shed floor space. Choose strong wood for the frame. Use a saw to cut each piece to the right length. Always wear safety goggles when using tools. Ensure all pieces are cut straight. This helps in proper fitting later.
Lay the cut pieces on the ground. Arrange them into a rectangle shape. Check each corner for alignment. Use nails to connect the pieces. Hammer each nail carefully. Make sure the frame is sturdy. This keeps your shed floor strong.
Place joists inside the frame. Keep them evenly spaced. Ensure they are parallel. Use nails or screws to fix them. Secure each joist tightly. This adds support to the floor. Test the strength by pressing on the frame.
Installing The Floor Decking
Picking the right material is important. Plywood is a popular choice. It is strong and durable. Another option is OSB. It is often cheaper. Both work well for shed floors. Think about your budget and needs. This helps you decide.
Measure the boards first. Use a tape measure for accuracy. Mark where to cut with a pencil. Wear safety glasses when cutting. Use a saw to cut the boards. Make sure cuts are straight. Neat cuts fit better together.
Lay the boards on the frame. Align them well. Use screws to fix them in place. Start at one end. Work your way to the other. Make sure each board is tight. Check they do not move. This makes the floor solid.
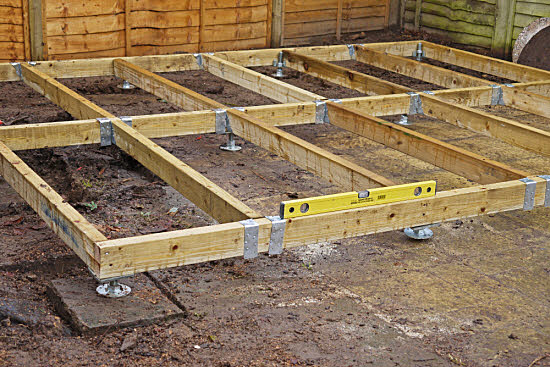
Ensuring Floor Stability
Cross bracing gives your shed floor extra strength. It stops the floor from moving. Use strong wood for cross bracing. Place it under the floor joists. This helps keep the floor steady. The bracing should form an “X” shape. It connects opposite corners. This setup stops wobbling. Make sure the wood is tightly secured. Use screws or nails for this job. Proper bracing keeps the floor strong for years.
A level floor is a must. Use a level tool to check. Place it on different spots of the floor. If the bubble is in the center, the floor is level. Also, check if the floor is square. Measure the diagonal lines from corner to corner. Both measurements should be the same. If not, adjust the corners. This ensures the floor is even and stable.
Applying Protective Finishes
Applying protective finishes to a shed floor keeps it durable and moisture-resistant. First, clean the surface thoroughly. Then, apply a sealant or waterproof coating evenly. This extends the lifespan and prevents damage. Regular maintenance ensures lasting protection.
Sealing The Floor
Seal the shed floor to keep it safe. Use a sealant to block moisture. This stops water from getting in. Choose a sealant that works well on wood. Apply the sealant using a brush. Make sure to cover the entire surface. Let the floor dry for a few hours. This keeps the floor strong and long-lasting. Proper sealing helps the floor stay clean and dry. It’s important for the shed’s health.
Painting Or Staining Options
Paint the floor for a colorful look. Choose a paint that suits outdoor use. Staining can give a natural wood look. Both paint and stain protect the floor. They add a layer of defense against damage. Pick a color that you like. Apply paint or stain with a brush or roller. Let it dry well before using the shed. This makes the shed look nice and clean.
Maintenance Tips
Building a sturdy shed floor requires careful planning and simple maintenance. Regularly check for water damage and ensure proper ventilation. A solid foundation prevents sagging and prolongs the shed’s life. Keep debris away from the base to avoid moisture buildup.
Regular Inspections
Shed floors need regular care. Look for cracks and loose boards often. This helps keep the shed safe and strong. Check for pests like ants or termites. They can damage wood quickly. Also, watch for water leaks. Water can ruin wood and cause mold. A clean floor lasts longer too. Sweep or vacuum dirt and leaves. Keep the floor dry and clean always.
Repairing Damages
Fix damages as soon as you see them. Replace broken boards quickly. This stops more damage. Use wood glue for small cracks. It helps hold wood together. For bigger cracks, nails or screws are better. They make the floor strong again. Seal gaps to stop water. Waterproof sealants work well for this. Always use the right tools for repairs. This keeps the shed floor safe and solid.
Frequently Asked Questions
What Materials Are Best For A Shed Floor?
Choosing the right materials is crucial for durability. Opt for pressure-treated plywood or concrete slabs. These materials resist moisture and provide a stable foundation. Additionally, consider using a vapor barrier to prevent dampness. This ensures longevity and maintains the structural integrity of your shed floor.
How Do I Level A Shed Floor?
Start by clearing the area of debris. Use a carpenter’s level to check for uneven spots. Adjust by adding or removing soil. Lay down gravel for stability. Install the floor joists and plywood, ensuring they are level. A level floor prevents structural issues and maintains the shed’s function.
Can I Insulate My Shed Floor?
Yes, insulating your shed floor is possible. Use rigid foam boards between joists for effective insulation. This reduces heat loss and prevents moisture buildup. Insulation enhances comfort for year-round use. Ensure the boards are tightly fitted to maximize efficiency and maintain the floor’s structural integrity.
How To Waterproof A Shed Floor?
Waterproofing a shed floor is essential for longevity. Apply a sealant or waterproof paint to the surface. Ensure all edges are covered for complete protection. Install a vapor barrier underneath for added security. This prevents moisture damage and keeps the shed dry and functional.
Conclusion
Building a shed floor is simple with the right steps. Gather your materials and tools first. Plan the layout carefully. Ensure the ground is level. Choose durable wood for a sturdy base. Secure the frame tightly. Attach plywood or flooring boards.
Check the floor for evenness. A well-made floor supports your shed. It protects against moisture and pests. Remember to maintain it regularly. Keep it clean and dry. With these steps, your shed floor will last. Enjoy your new space for storage or projects.
Now, start building your shed floor today!


