Are you dreaming of transforming your space with a stunning tile floor? Whether you’re sprucing up your kitchen, bathroom, or any other room, laying tile flooring can be a game-changer.
But where do you start? You might feel overwhelmed by the thought of tackling a DIY project like this. Don’t worry; you’re not alone. Many homeowners have faced the same challenge. Imagine the satisfaction of walking on a flawless, gleaming floor that you installed yourself.
It’s not just about aesthetics; it’s about achieving something remarkable with your own hands. In this guide, you’ll discover easy-to-follow steps and insider tips to help you lay tile flooring like a pro. Get ready to transform your home and enjoy the pride of a job well done. Keep reading to find out how you can make it happen!
Preparation
Gathering Materials is the first step. You need tiles, grout, and adhesive. A tile cutter is useful. Also, have a tape measure. Safety gear like gloves is important.
Measuring the Area is crucial. Measure the length and width of the room. Multiply them to get the square footage. This helps to know how many tiles you need. Always buy extra tiles.
Choosing the Right Tile makes a difference. Decide the color and size. Choose tiles that suit your room. Consider durability and style. Some tiles are better for wet areas.
Surface Preparation
First, remove all dust and dirt from the subfloor. A clean surface is important for tile work. Use a broom or vacuum for this task. Next, check for any sticky spots. Sticky spots can cause tiles to not stick well. Wipe them with a damp cloth.
Look for any cracks or holes in the subfloor. Fill them with patching compound. This makes the floor smooth. A smooth floor helps tiles last longer. Let the patch dry before moving on.
Place an underlayment over the subfloor. This provides a flat surface for tiles. Use a screwdriver to fix it in place. The underlayment stops tiles from breaking. Keep the underlayment level for best results.
Layout Planning
Start by sketching a simple floor plan. This helps visualize the tile arrangement. Use graph paper for precision. Mark any obstacles like doors or cabinets. Decide on a pattern such as straight or diagonal. This step ensures tiles fit well.
First, find the center of the room. Mark it with a chalk line. This line helps guide the tile placement. Next, draw lines parallel to walls. These lines keep tiles straight. Check measurements twice. Accuracy is key.
Lay tiles without adhesive to check fit. Start at the room’s center. Work towards the edges. Adjust tiles as needed. Leave space for grout lines. This step shows if tiles fit well or need cutting.
Mixing And Applying Adhesive
Pick an adhesive suitable for your tile type. Ceramic tiles need different adhesive than porcelain tiles. Read the label carefully. Check for indoor or outdoor use. This helps prevent future issues.
Follow instructions on the bag or box. Use a clean bucket for mixing. Add water slowly. Stir until smooth and lump-free. Check consistency. It should be like thick paste. This ensures tiles stick well.
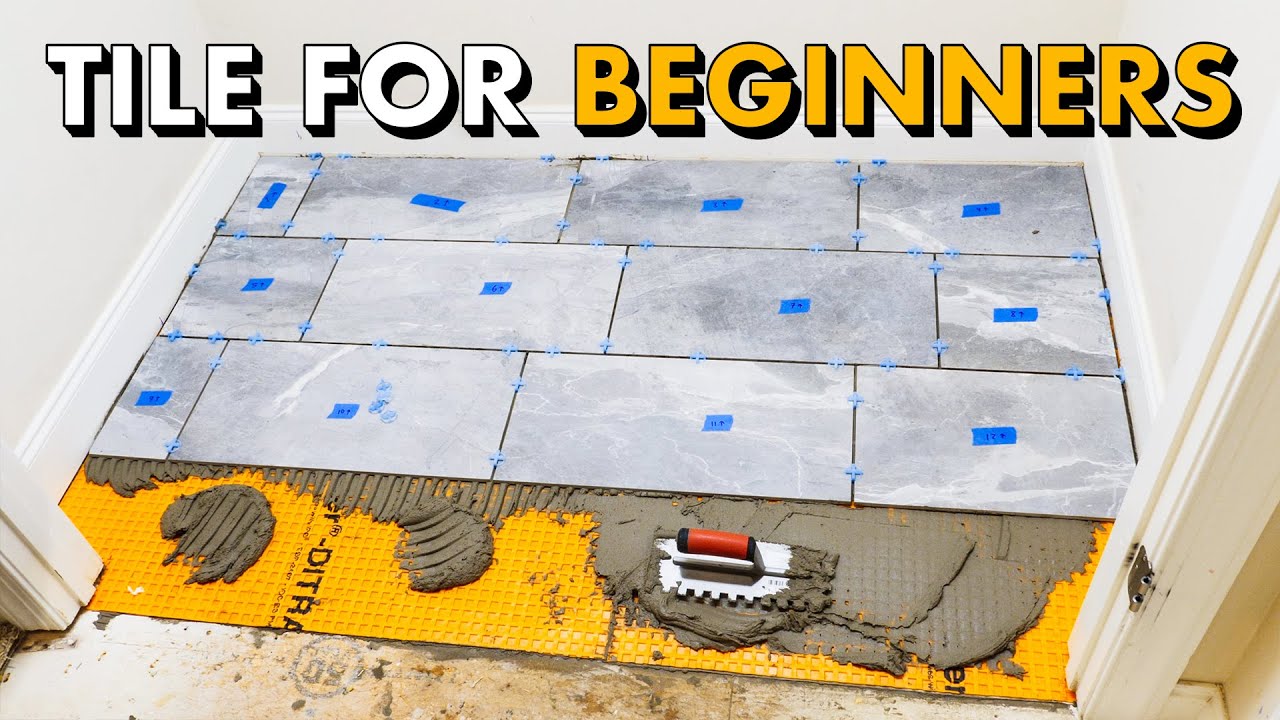
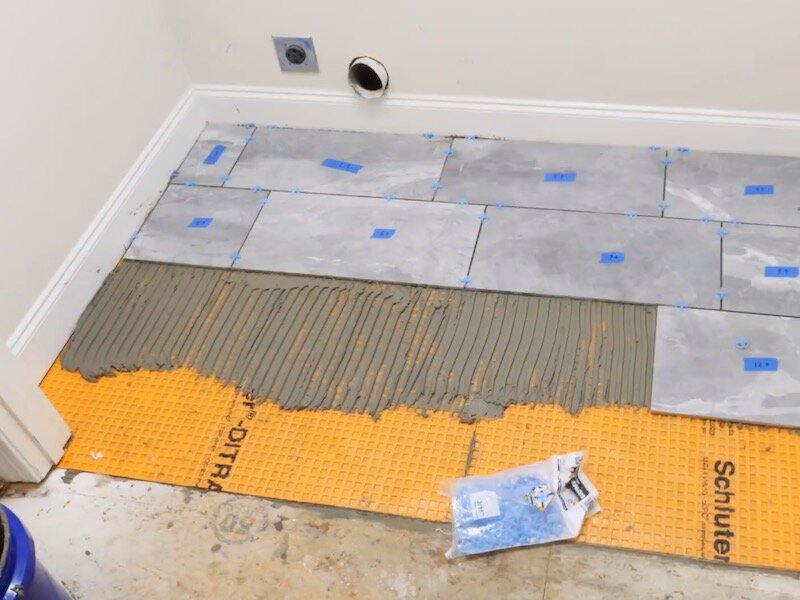
Apply adhesive using a notched trowel. Spread evenly across the floor. Cover small areas at a time. Press tiles firmly into adhesive. This helps them stay in place. Avoid gaps for better results.
Tile Installation
Start by cleaning the floor. Make sure it’s smooth and dry. Choose the center of the room. This is your starting point. Apply a thin layer of mortar. Use a notched trowel for even spread. Place the first tile gently. Press it firmly into the mortar. Make sure it’s level. Adjust as needed. This tile sets the direction for others.
Tile spacers keep tiles evenly apart. They ensure straight grout lines. Place them between tiles while laying. Use one at each corner. Check for alignment. Adjust if needed. Remove spacers once the mortar sets. This helps tiles stay in place.
Measure the gap for edge tiles. Use a tile cutter. Mark where to cut. Cut slowly and carefully. Use safety gear. Fit the cut tile into place. Check that it fits snugly. Apply mortar and press firmly. Make sure edges are aligned. This gives a clean finish.
Grouting Process
Grouting is essential in tile flooring. It fills gaps between tiles and secures them. Spread grout evenly using a rubber float, ensuring all spaces are filled. Clean excess grout with a damp sponge to avoid stains.
Mixing Grout
Start by pouring the grout powder into a bucket. Add water slowly. Stir the mix with a strong stick. Keep stirring until it’s smooth. The mix should look like thick paste. Let it sit for a few minutes. Stir again before using. Always follow the instructions on the grout bag. This helps the mix last longer.
Applying Grout
Use a rubber float to spread the grout. Hold the float at a 45-degree angle. Push the grout into the tile gaps. Cover all the spaces well. Wipe away any extra grout from the tiles. Work in small sections for best results. This keeps the grout even.
Cleaning Excess Grout
Use a damp sponge to clean the tiles. Wipe gently in a circular motion. Rinse the sponge often with clean water. Remove all grout haze from tile surfaces. Leave the grout in the gaps to dry. Keep checking for any leftover haze. Clean until tiles are clear and shiny.
Finishing Touches
Adding the final touches to tile flooring can transform a space. Align tiles carefully for a smooth look. Clean grout lines and remove excess adhesive for a polished finish.
Sealing The Grout
Sealing the grout keeps it clean and strong. First, let the grout dry fully. Use a small brush to apply the sealer. Work slowly to cover all grout lines. Make sure you don’t miss any spots. Let the sealer dry as per instructions. This step protects the grout from stains and dirt.
Inspecting The Floor
Check the floor for any loose tiles or grout. Tap each tile gently to ensure it’s secure. Look for cracks or gaps in the grout. Fix any issues you find. A well-inspected floor lasts longer and looks better. Pay attention to corners and edges. These areas need extra care.
Final Cleaning
After sealing and inspecting, clean the floor. Use a damp mop to remove dust and dirt. Avoid using harsh chemicals. They can damage the tiles. Dry the floor with a soft cloth. A clean floor shines and looks inviting. Regular cleaning keeps tiles in top shape.

Maintenance Tips
Laying tile flooring requires proper surface preparation and accurate measurements. Ensure tiles align perfectly and apply adhesive evenly. Clean excess grout promptly to maintain a polished look.
Routine Cleaning
Clean tile floors often. Use a soft broom or vacuum to remove dirt. Mop with warm water for a shiny finish. Avoid harsh chemicals. They can damage the tiles. A mild soap is enough. Rinse with clean water after mopping. Dry the floor with a towel to prevent water spots.
Dealing With Stains
Stains on tiles can be tricky. Use baking soda and water paste. Gently rub the paste on the stain. Let it sit for a few minutes. Wipe it off with a damp cloth. For tough stains, try vinegar. Always test on a small area first.
Periodic Sealing
Seal your tiles to protect them. Sealing helps prevent stains. Check the tiles yearly. If water no longer beads, it’s time to seal. Use a good quality sealer. Apply with a clean cloth or sponge. Follow the instructions on the sealer for best results.

Frequently Asked Questions
What Tools Are Needed For Tile Flooring?
To lay tile flooring, you’ll need a tile cutter, spacers, trowel, level, and grout float. A rubber mallet and tape measure are also essential. These tools help ensure precise measurements and secure tile placement, creating a durable and visually appealing floor.
How Do I Prepare The Surface?
Clean and level the surface before tile installation. Remove any debris, dirt, or old flooring materials. Check for uneven areas and use leveling compound if necessary. This preparation ensures tiles adhere properly and remain stable over time.
What Type Of Tile Is Best For Flooring?
Ceramic and porcelain tiles are popular choices for flooring. They’re durable, water-resistant, and available in various styles. Porcelain tiles are denser and less porous, making them ideal for high-traffic areas. Choose based on your design preference and room requirements.
How Long Does Tile Installation Take?
Tile installation generally takes 2 to 3 days, depending on the area size and complexity. Preparation, cutting, and setting tiles usually require the most time. Allow an additional day for grout application and drying to ensure a solid, finished surface.
Conclusion
Laying tile flooring transforms your space with style and durability. You now know the steps to achieve a beautiful finish. Gather your tools and materials. Take your time during installation. Ensure tiles align perfectly. Use spacers for even gaps. Apply grout carefully for a clean look.
Check for any uneven spots. Enjoy your new, refreshing floor. Impress with your hard work. Tile flooring adds value to your home. Remember to maintain your tiles regularly. Keep them clean and polished. With patience and care, your tile floor will last for years.
Share your experience with friends and family.


