Are you ready to transform your space with a fresh, stylish look? Laying plank flooring is a fantastic way to revitalize any room in your home, giving it a modern and polished feel.
But where do you start, and how can you ensure the process is smooth and hassle-free? This guide will walk you through the steps, simplifying the task and empowering you to tackle it like a pro. Imagine the satisfaction of walking across a floor you installed yourself, saving money while adding value to your home.
Keep reading to discover expert tips and tricks that make laying plank flooring a breeze, even if you’re a complete beginner. Your dream floor is just a few steps away!
Choosing The Right Plank Flooring
Wood planks offer a warm look. They feel natural underfoot. Vinyl planks resist water well. They’re easy to clean. Laminate planks mimic wood. They are budget-friendly. Bamboo planks are eco-friendly. They are strong and durable. Each type has unique qualities. Choose based on your needs.
Durability matters for long-lasting floors. High-traffic areas need strong planks. Think of scratches and wear. Wood can dent easily. Vinyl resists scratches well. Laminate is tough against wear. Bamboo is hard and durable. Consider the space you are flooring. Choose planks that last.
Set your budget first. Wood is often expensive. Vinyl is more affordable. Laminate is cost-effective. Bamboo can be pricey. Think about looks too. Wood offers classic beauty. Vinyl has many styles. Laminate can look like wood. Bamboo is unique and natural. Pick what you love and can afford.
Preparing The Room
Move all furniture out of the room. This makes space for work. Remove carpets and rugs if there are any. Check for any leftover nails or staples. These can hurt or damage the floor. Use a broom to clean the area. Make sure the floor is free from dirt and dust.
The subfloor must be flat and clean. Look for cracks or holes. Fix them before starting. Use a level tool to check the flatness. If the subfloor is uneven, use a patching compound. This helps make the surface smooth.
Gather all the necessary tools. You will need a tape measure, saw, and hammer. Don’t forget a flooring nailer and spacer wedges. A chalk line helps mark straight lines. Make sure to have safety goggles and gloves. Always keep tools within reach.
Acclimating The Planks
Wood changes with temperature and humidity. This is why acclimation matters. Planks need time to adjust to your home. This prevents them from bending or cracking later. Acclimation helps maintain the floor’s shape and quality. It is a simple but important step.
First, bring planks inside the home. Leave them in the room for 48 hours. Keep the room temperature stable. Ensure proper air circulation around the planks. Stack them flat, not upright. This helps them adjust evenly. After two days, they are ready for use.
Planning The Layout
Creating a plan for plank flooring layout is essential. Arrange the planks carefully to ensure a seamless fit. Consider the room’s shape and lighting to highlight the floor’s beauty.
Measuring The Room
Measure the room. Use a tape measure for accuracy. Calculate the total square footage. This helps estimate how much flooring you need. Divide the room into sections if necessary. Measuring twice avoids mistakes. Write down all measurements for reference.
Determining The Starting Point
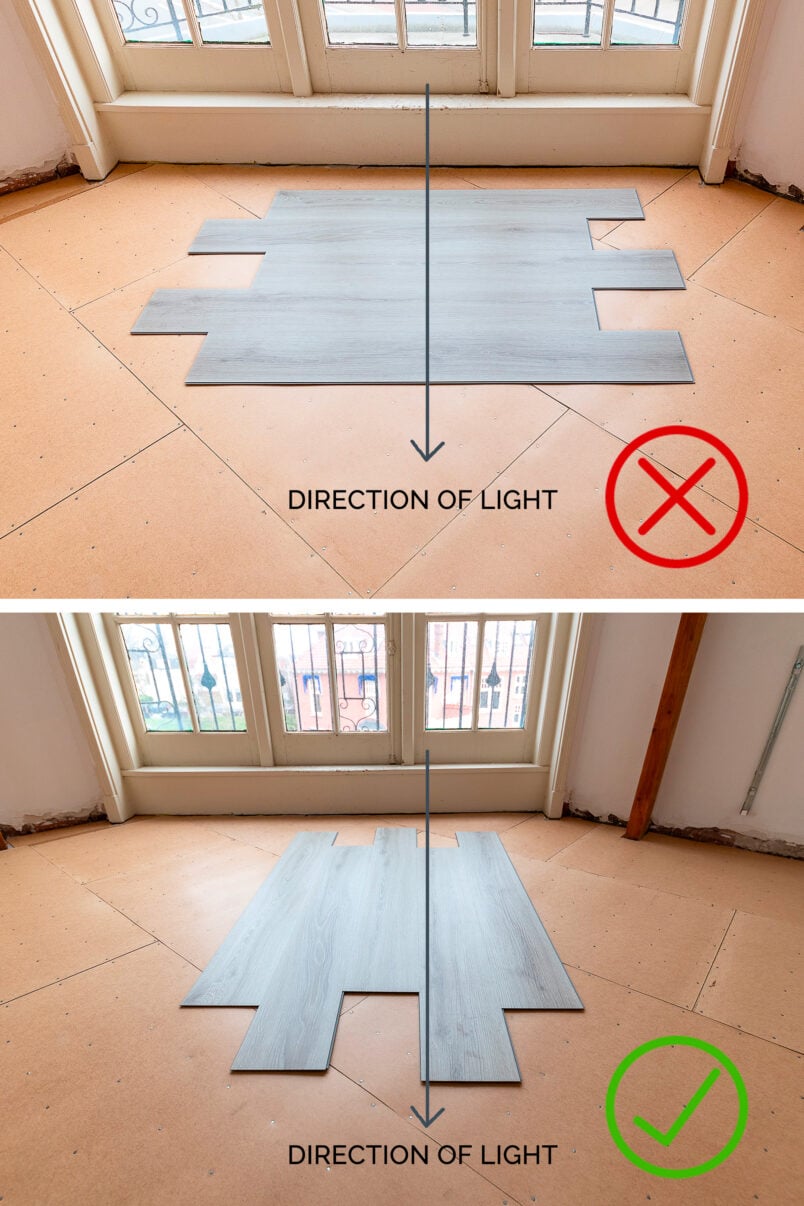
Find the best starting point. Choose a corner or a wall. This makes the flooring even. Plan to work from this point. Check for obstacles like doors. Consider how natural light hits the floor. This affects the appearance.
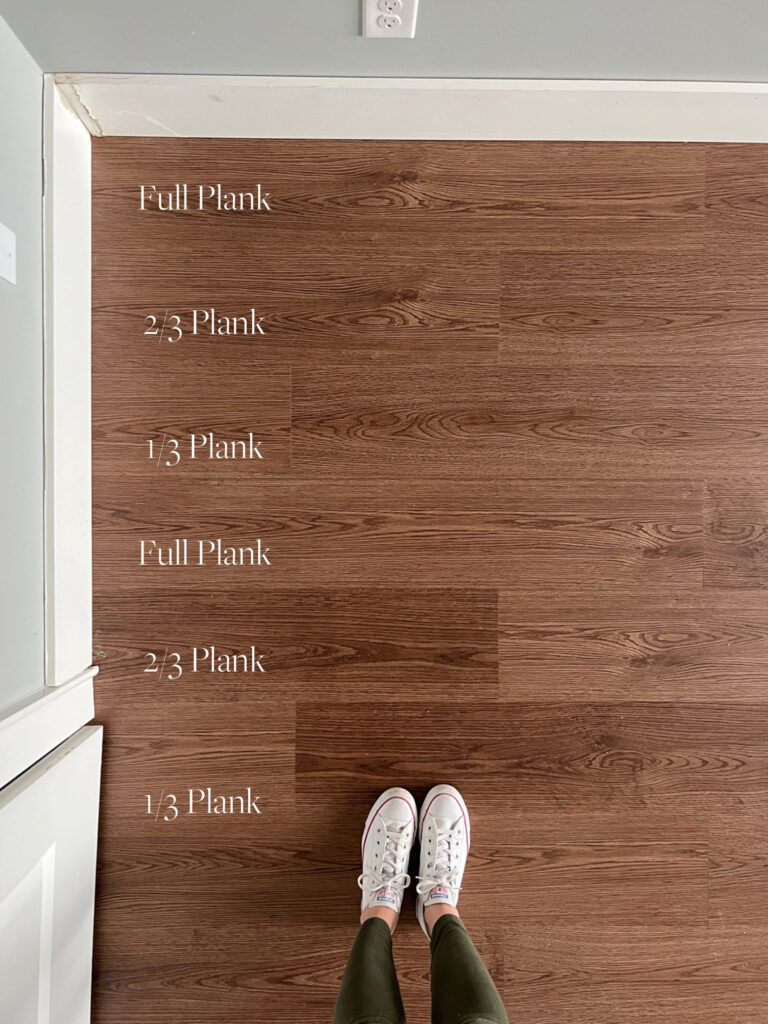
Avoiding Pattern Repetition
Patterns should look natural. Avoid repeating them too much. Mix different plank sizes. Change the direction occasionally. This gives a random look. Natural patterns make the floor look better. It’s more appealing and less predictable.
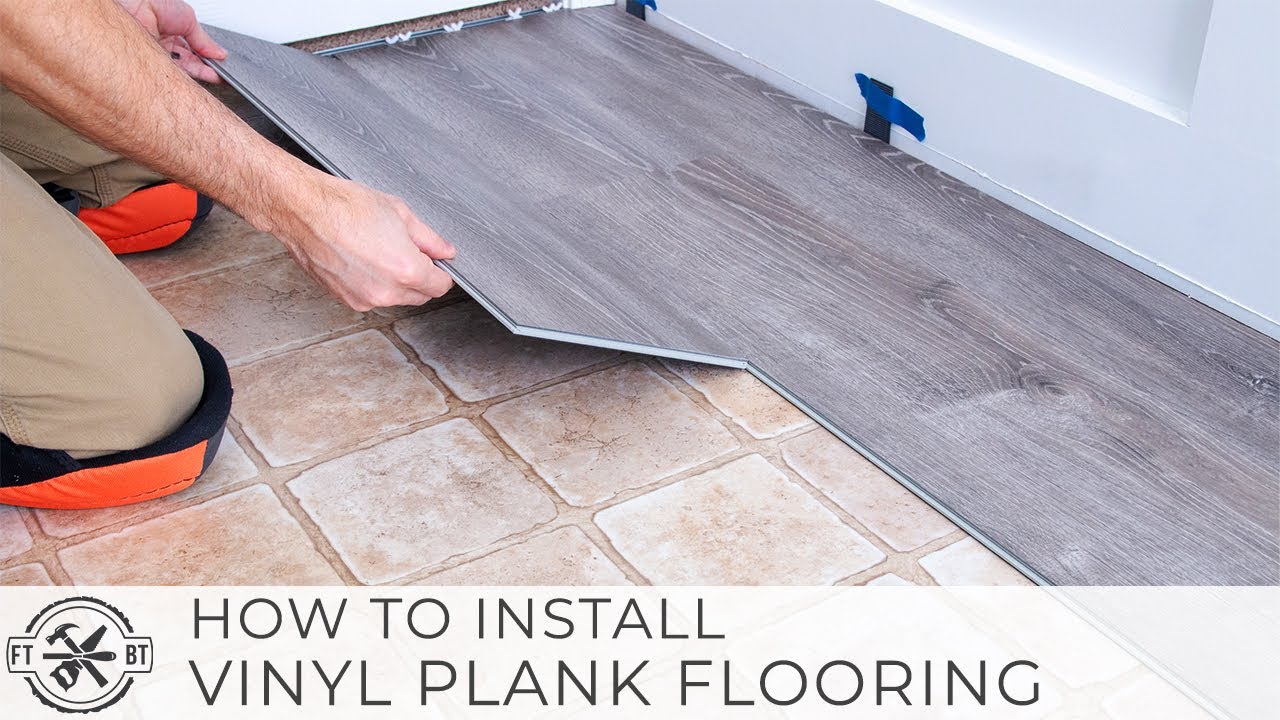
Installing The First Row
Start by placing the first plank along the longest wall. Ensure it is straight and even. Use a level to check. The plank should be close to the wall, but not touching. This will help maintain a straight line.
Always use spacers between the plank and the wall. This allows for expansion of the wood. Wood can expand when it gets warm. Spacers help keep the right gap. Keep the gap consistent along the whole wall. This ensures the floor stays flat and even.
Laying Subsequent Rows
It’s important to stagger the seams of your plank flooring. This means the seams should not line up. This gives the floor a more natural look. It also makes it stronger. Use a measuring tape to check the distance. Make sure the seams are at least 6 inches apart. This will help avoid weak spots in the floor. It also prevents the floor from creaking.
Cutting planks to fit is an essential step. Measure the space where the plank will go. Use a saw to cut the plank to the right size. Always cut the plank from the back. This stops the front from chipping. If a plank is too short, save it. It can be used to start a new row. This reduces waste and keeps costs low.
Handling Corners And Obstacles
Cutting planks for door frames needs care and precision. Use a small saw for this job. Measure the height and width of the door frame. Mark these measurements on the plank. Cut the plank with a saw to fit around the frame snugly. Double-check your cuts to ensure a good fit. This helps in avoiding gaps.
Pipes and vents are common obstacles. You will need a jigsaw for this task. Measure the space around the pipe or vent. Transfer these measurements to your plank. Cut carefully along the marked lines. Ensure the plank fits tightly around the pipe or vent. This keeps your floor looking neat.

Securing The Planks
Securing the planks ensures stability in your flooring project. Align each plank carefully and use spacers for even gaps. This method prevents shifting and maintains a smooth surface.
Using Adhesive Or Nails
Adhesive is a sticky substance. It helps hold things together. Spread it evenly on the floor. Place the plank on top. Press down firmly. This ensures good contact. Nails are thin metal pins. They go through the plank. They attach it to the floor. Use a hammer to drive the nails. Space them evenly. This makes the planks stable.
Ensuring Stability And Alignment
Check the planks. Make sure they are straight. They should line up perfectly. Use a ruler or tape measure. Adjust them if needed. Gaps can cause problems. They might trap dirt. Keep the planks close together. This helps avoid gaps. Stability is important. It prevents movement. Planks should stay in place. This makes the floor strong.
Finishing Touches
Laying plank flooring brings elegance to any space. Ensure edges are snug and corners are precise. A smooth finish ensures durability and visual appeal.
Installing Trim And Molding
Trim and molding give your plank flooring a neat look. Measure the walls carefully. Cut the trim pieces to fit perfectly. Use a nail gun to attach them securely. Make sure the nails go in straight. Check that the trim sits flush with the floor. This prevents gaps or uneven edges. Paint or stain the trim to match the floor color. This step completes the flooring look.
Cleaning The New Floor
Keep your new floor clean and shiny. Use a soft broom to sweep away dust. Mop the floor with a damp cloth. Avoid using too much water. This protects the wood from damage. Choose a mild cleaner that’s safe for wood. Regular cleaning keeps the floor looking new. Make sure to clean spills quickly. This prevents stains and damage.
Maintenance Tips
Keep your plank floor clean with regular sweeping. This removes dirt and dust. Use a damp mop with mild soap for deeper cleaning. Never soak the floor with water. It can damage the wood. Dry the floor quickly after mopping. This prevents water spots.
Protect the floor from scratches by using furniture pads. Place rugs in high traffic areas. This will reduce wear. Avoid dragging heavy objects across the floor. Lift them instead. Use a door mat to trap dirt and moisture. Keep pet nails trimmed to prevent scratches. Be careful with high heels. They can dent the floor.
Frequently Asked Questions
What Tools Do I Need For Plank Flooring?
You’ll need tools like a tape measure, utility knife, straight edge, spacers, and a rubber mallet. A saw might be necessary for cutting planks to fit. Ensure you have a clean and prepared subfloor. Safety gear, like gloves and goggles, is also recommended for protection during installation.
Can I Install Plank Flooring Over Tiles?
Yes, you can install plank flooring over tiles. Ensure the tiles are level and in good condition. Use an underlayment for added cushioning and soundproofing. Check for any loose tiles and fix them before laying the planks. This approach saves time and avoids the hassle of removing tiles.
How Long Does Plank Flooring Installation Take?
Plank flooring installation typically takes a day or two for an average-sized room. Preparation is key for a smooth process. Ensure the subfloor is clean and level. Depending on your skill level, the time may vary. Professional installation might be faster but could cost more.
Is Underlayment Necessary For Plank Flooring?
Underlayment is necessary for most plank flooring installations. It provides a moisture barrier, soundproofing, and cushioning. It also helps in smoothing out minor subfloor imperfections. Some plank flooring comes with pre-attached underlayment, so check your product specifications before purchasing additional materials.
Conclusion
Laying plank flooring can transform your space beautifully. Start with a solid plan. Gather your tools and measure carefully. Prepare the floor, ensuring it’s smooth and clean. Align each plank for a perfect fit. Use spacers for even gaps. Cut planks to fit corners and edges.
Secure each plank firmly. Check your progress often. Clean up any debris. Admire your finished floor. Remember, patience and precision are key. With practice, it gets easier. Enjoy your new flooring and the satisfaction of a job well done. Your room now has a fresh, new look!


