
Have you ever stepped into your shed on a chilly morning and felt the biting cold seeping up from the floor? You’re not alone.
Many shed owners face the same issue, and the solution is simpler than you might think. Insulating your shed floor can transform your space into a cozy, usable area all year round. Imagine turning that cold, uninviting floor into a warm foundation, making your shed not just a storage space but a comfortable extension of your home.
Whether you’re looking to create a workshop, a studio, or simply a more pleasant storage area, knowing how to insulate a shed floor is your first step. Ready to learn how this small upgrade can make a big difference? Let’s dive into the details and get your shed floor ready for all seasons!
Benefits Of Shed Floor Insulation
Insulating a shed floor keeps it warm. This is important for cold days. It helps to save energy. Less energy means lower bills. A warm shed protects tools and items. They won’t get rusty or damp. Insulation can stop noise. Loud sounds stay inside. Outside noise stays out.
The floor lasts longer with insulation. Less moisture means less damage. Your shed will feel more comfortable. It’s easier to work or relax inside. Insulation is easy to install. It’s a good way to upgrade your shed. You can do it yourself. It doesn’t cost much. A small effort gives big benefits.

Materials And Tools Needed
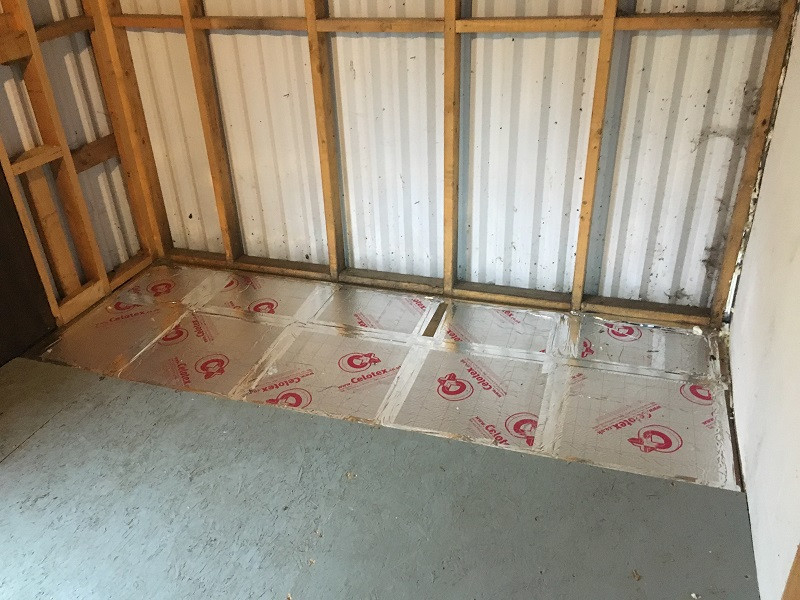
Fiberglass and foam boards are common for shed floors. Fiberglass is soft. It fits into spaces easily. Foam boards are strong. They give good support. Both keep your shed warm. Choose what fits your budget.
You need a measuring tape. This helps measure the floor. Utility knife is for cutting insulation. Hammer and nails are for fixing. Safety goggles protect your eyes. These tools are a must.
- Adhesive for sticking insulation.
- Caulk to seal gaps.
- Masking tape to secure edges.
- Gloves to protect your hands.
Preparing The Shed Floor
Begin by removing all debris from the shed floor. Sweep thoroughly to get rid of dirt. Use a vacuum for hard-to-reach places. Next, wipe the floor with a damp cloth. This helps remove dust and grime. Let the floor dry completely before moving on. A clean floor is important for effective insulation.
Check the floor for stability. Look for any gaps or cracks. Inspect the edges and corners carefully. Ensure the floor is level. Uneven floors might need adjustments. Make a note of any damages found. Fixing these is crucial for proper insulation.
Start by fixing any cracks in the floor. Use sealant for small cracks. Larger damages may need a patch. Ensure the patch matches the floor material. Apply wood filler for wooden floors. Let repairs dry completely. This ensures a solid base for insulation. Proper repair will make the shed more efficient.
Choosing The Right Insulation
Foam boards are light and easy to cut. They fit well in shed floors. These boards are great for keeping heat inside. They also stop moisture. Foam boards are strong and last a long time. They are a popular choice for many sheds.
Fiberglass batts are soft and fluffy. They are easy to place between joists. They work well to trap heat inside. These batts are affordable and easy to find. Remember to wear gloves when using them. They can make your skin itch.
Reflective foil is thin but powerful. It bounces heat back into the shed. This foil is great for hot or cold days. It is simple to install. Just roll it out and tape it down. Reflective foil is a smart choice for saving energy.
Measuring And Cutting Insulation
Use a tape measure for precise measurements. Measure the length and width of the shed floor. Write down these numbers. Double-check the measurements to avoid mistakes. A mistake can cost time and money. Use a ruler for small sections. Always measure twice.
Use a sharp utility knife for cutting. Make sure the knife is clean. Place the insulation on a flat surface. Hold it steady while cutting. Wear gloves to protect your hands. Keep fingers away from the blade. Cut slowly for a neat edge. Safety is most important.
Installing Insulation
Begin by choosing the right insulation material. You can use foam boards or rolls. Measure the shed floor accurately. Cut the insulation to fit the spaces. Place the pieces snugly between the floor joists. Make sure there are no gaps. Gaps can let in cold air.
After placing the insulation, secure it well. Use nails or staples to hold it. This keeps the insulation from moving. Loose insulation can be less effective. Check that every piece is tight. If it’s not tight, adjust it.
Seal the edges with caulk or tape. This stops drafts and moisture. Use a caulk gun for smooth application. Tape can also work well. Cover every edge and seam. This helps keep the shed warm and dry.
Adding A Vapor Barrier
A vapor barrier keeps moisture away from the shed floor. Moisture can cause wood to rot. It also keeps the shed warmer. A dry floor is a happy floor.
Start by cleaning the floor. Make sure it is dry and tidy. Cut the barrier to fit your shed. Lay it smoothly over the floor. Secure it with tape or nails. Ensure there are no gaps. Overlapping edges is a good idea. This prevents moisture from sneaking in. Check the barrier regularly. Fix any holes or tears quickly. This keeps your shed safe and sound.

Finishing Touches
Installing the Subfloor is an important step. Place the subfloor on top of insulation. Use screws to secure it well. This keeps the floor firm and stable. Choose a material like plywood for the subfloor. It is strong and durable. Make sure the edges align perfectly. This prevents gaps and ensures a smooth surface.
Testing Insulation Effectiveness is crucial. Check the floor for cold spots. This helps find weak areas. Use a thermometer for accurate readings. Compare different parts of the floor. Insulation should keep the floor warm. If cold spots exist, add more insulation. This improves warmth and comfort. Repeat tests for best results.
Maintenance Tips
Insulating a shed floor keeps it warm and energy-efficient. Start with a moisture barrier to protect against dampness. Then, fit insulation boards snugly between the joists. Seal any gaps to prevent drafts. Finish with a durable floor covering for added protection and comfort.
Regular Inspections
Regular checks keep your shed floor in top shape. Look for any signs of damage. Watch out for cracks or soft spots. These could mean moisture is sneaking in. Keep an eye on the insulation. Make sure it stays dry and intact. If you spot any problems, fix them quickly. This stops bigger issues from forming. A well-maintained floor keeps your shed cozy and dry.
Addressing Wear And Tear
Heavy use can wear down your shed floor. Check for loose boards or nails. They can pose a risk. Tighten them to keep everything secure. Replace worn-out parts to avoid accidents. Use weatherproof paint to protect the floor. It adds a shield against the elements. With these steps, your shed floor stays strong and safe.
Frequently Asked Questions
What Materials Are Best For Shed Floor Insulation?
The best materials for shed floor insulation include rigid foam boards, fiberglass batts, and spray foam. Rigid foam boards provide excellent thermal resistance. Fiberglass batts are cost-effective and easy to install. Spray foam offers superior insulation and air sealing. Choose based on budget, climate, and shed usage.
How Do I Prepare The Shed Floor For Insulation?
First, clean and dry the shed floor thoroughly. Remove any debris, dirt, or moisture. Inspect for damage or rot and repair if necessary. Measure the floor area to determine the amount of insulation needed. Prepare tools and materials for a smooth installation process.
Can I Insulate A Shed Floor Myself?
Yes, insulating a shed floor yourself is possible with proper preparation and tools. Ensure you have the right materials and follow installation instructions carefully. It involves measuring, cutting, and fitting insulation materials. Always prioritize safety, wear protective gear, and follow manufacturer guidelines for best results.
How Much Does It Cost To Insulate A Shed Floor?
The cost to insulate a shed floor varies based on material and size. Rigid foam boards and fiberglass batts are generally affordable. Spray foam insulation is more expensive but offers superior performance. Expect to spend between $100 and $500, depending on insulation type and shed size.
Conclusion
Insulating your shed floor makes a huge difference. Keeps it warm. Protects items inside. Simple materials like foam boards work well. Easy to install. Saves energy. Costs less than heating. Choose the right insulation for your needs. Consider climate and budget.
Follow steps carefully. Ensure tight seals. Test for gaps. Keep your shed efficient. Enjoy a cozy space all year. Perfect for storing tools or relaxing. With proper insulation, your shed stays comfortable. Ready to tackle the project? Grab your tools.
Start today. Your shed will thank you. Happy insulating!


