
Are you dreaming of a home makeover that won’t break the bank? Installing vinyl floors might just be the solution you’ve been looking for.
Imagine walking through your home, feeling the sleek, new surface underfoot, and knowing you did it all yourself. With the right guidance, you can transform any room in your house with this cost-effective, stylish flooring option. But before you dive in, you’re probably wondering: where do you start?
How can you ensure a smooth, professional-looking finish? In this guide, we’ll walk you through each step, making the process as simple and stress-free as possible. Get ready to unleash your inner DIY expert and give your home the upgrade it deserves. Your perfect vinyl floor is just a few steps away!
Tools And Materials Needed
Vinyl flooring needs some tools. You will need a utility knife. It helps cut the vinyl. Measuring tape is important. It measures your floor. Straight edge is used for straight cuts. Have adhesive ready. It sticks the vinyl down. Roller helps press the vinyl flat. Underlayment is optional. It smooths the floor. Some floors need transition strips. They join rooms together. Gloves protect your hands. Safety glasses keep dust away. Make sure to have a pencil. It marks the vinyl. All these tools help install vinyl floors. With them, the job is easier.
Preparing The Subfloor
Start by removing all dirt and debris from the floor. Use a broom or vacuum for this task. A clean floor helps the vinyl stick well. Next, mop the floor with water. Let it dry completely before continuing. This ensures no moisture is trapped underneath.
Check the floor for any bumps or holes. Fill small holes with a floor patch. Make sure it is smooth and level. Sand down any high spots. A flat surface is best for vinyl. Inspect the entire floor to ensure it is ready. A proper base is key for a long-lasting vinyl floor.
Measuring And Planning
Measure the room’s length and width. Use a tape measure for accuracy. Write down each measurement. Multiply the length by the width. This gives the total square footage. Always add 10% extra. This covers mistakes and future repairs.
Decide on the pattern you want. Plank, tile, or sheet? Choose what suits your style. Lay out the vinyl without glue. Adjust pieces to fit. Ensure all edges are neat. Avoid small strips at edges. They don’t look nice.

Acclimating Vinyl Flooring
Vinyl flooring needs time to adjust. This is called acclimation. It usually takes 48 hours. During this time, let the vinyl rest in the room. The room should be at normal temperature. Humidity should be stable. This helps the vinyl fit better. If you skip this step, problems can happen. The floor might not fit right.
Keep the boxes closed. This protects the vinyl. Place them flat on the floor. Avoid stacking them. This prevents damage. Keep the room temperature between 65°F and 85°F. Humidity should be around 30-50%. These numbers are important. They make sure the vinyl adjusts well. Follow these steps for a smooth install.
Cutting Vinyl Planks
Cutting vinyl planks needs the right tools. Utility knives are key. Straightedge rulers help guide cuts. Use tape measures for correct size. Pencil marks show where to cut. Safety gloves protect your hands. Cutting mats keep surfaces safe.
Measure twice. Cut once. Mark lines clearly. Use a straightedge to guide. Keep your blade sharp. Use steady pressure. Go slow. Check edges after cutting. Smooth any rough spots. Practice makes perfect.
Laying The First Row
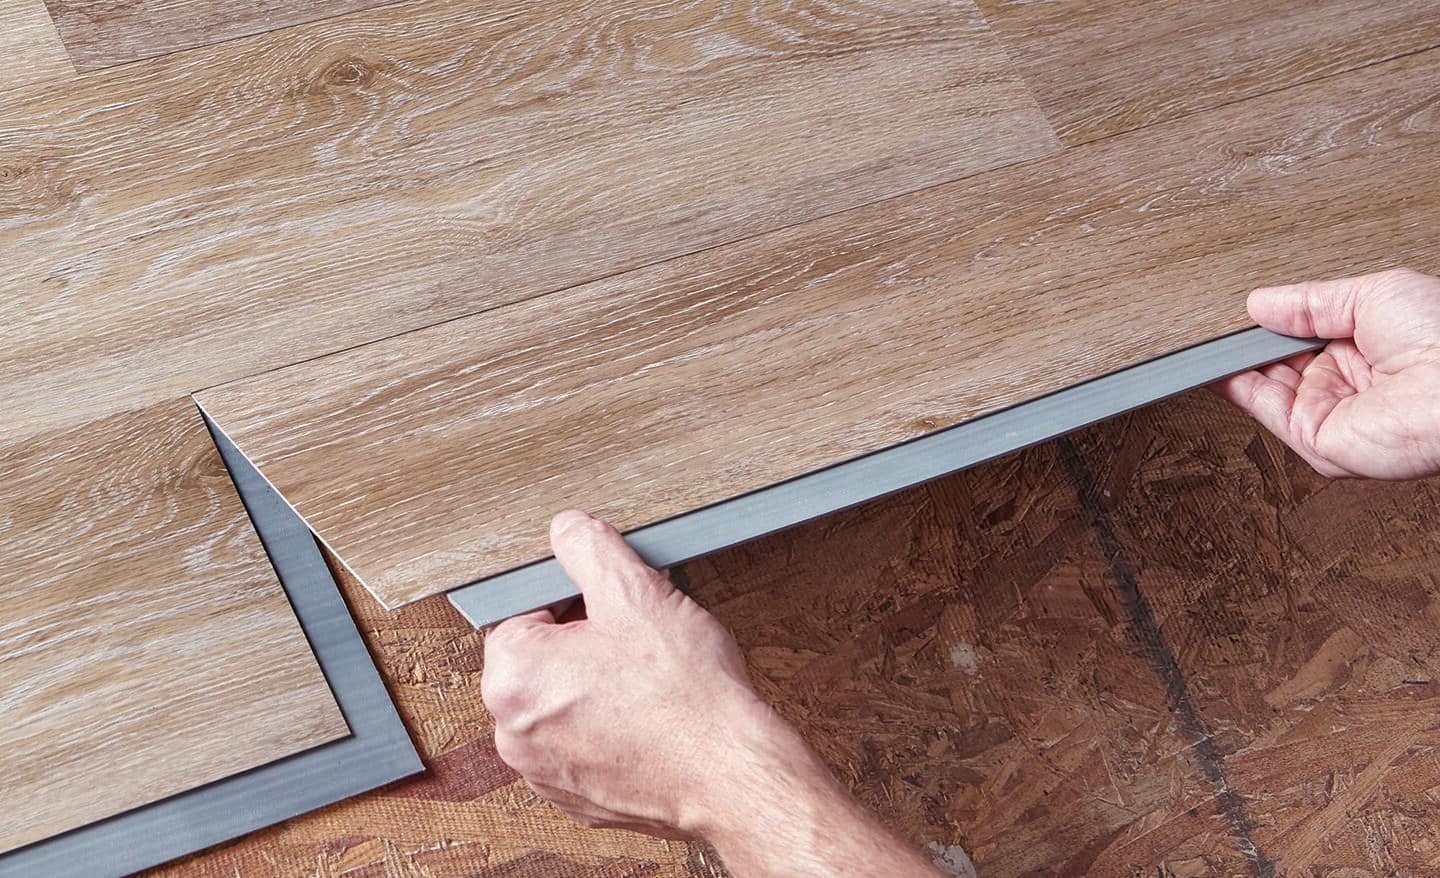
Start by placing the first plank against the wall. Make sure the plank is straight. Use a spacer to leave a gap from the wall. This gap helps the floor expand. Check the alignment with a straight edge. Adjust if needed. Keep all planks tight and straight.
Once aligned, secure the edges. Press the planks firmly together. Use a mallet to tap them in place. Ensure there are no gaps between planks. Repeat for each plank in the row. Check the row is stable and even.
Continuing The Installation
Maintaining even spacing is key for a smooth vinyl floor look. Use spacers to keep gaps even between planks. This helps in keeping lines straight. Push each plank snug against the spacers. Check every row for consistency. Adjust if any planks move out of place. This keeps your floor neat and tidy.
When handling obstacles and corners, be careful. Measure the space twice before cutting. Use a utility knife for precise cuts. For corners, cut the plank to fit snugly. Around obstacles like pipes, trace the outline first. Cut slowly and fit the piece carefully. This ensures a clean finish and a professional look.
Finishing Touches
Installing trim and molding completes the vinyl floor look. Trim hides gaps and gives a neat finish. Molding adds style to the room. Start by measuring the space. Cut the trim and molding to fit. Use a saw for clean edges. Attach them with nails or adhesive. Ensure they sit firmly against the wall. Check for gaps and adjust if needed. This step gives a polished appearance.
Cleaning and inspecting the floor is vital. Remove dust and dirt with a vacuum. Mop with a damp cloth. Avoid harsh chemicals. Inspect the floor for any issues. Look for scratches or damage. Fix them quickly. Regular cleaning keeps the vinyl shiny. Inspection helps find problems early. This keeps the floor looking new.
Frequently Asked Questions
What Tools Are Needed To Install Vinyl Floors?
To install vinyl floors, you’ll need a utility knife, tape measure, and adhesive. Also, have a straightedge and seam roller. A chalk line and a vinyl cutter can be helpful for precise cuts.
Can I Install Vinyl Floors Over Existing Flooring?
Yes, you can install vinyl floors over existing flooring. Ensure the surface is clean and level. Vinyl flooring works well over concrete, wood, or tile. Check for any height differences at doorways.
How Long Does Vinyl Floor Installation Take?
Vinyl floor installation usually takes one to two days. The time depends on room size and layout complexity. Preparation and acclimatization of vinyl can add extra time. Always plan for unexpected delays.
Is Underlayment Needed For Vinyl Floors?
Underlayment is not always required for vinyl floors. Some vinyl types come with a built-in underlayment. If the subfloor is uneven, consider using an underlayment. It can also provide added comfort and soundproofing.
Conclusion
Vinyl floor installation is easy and rewarding. Follow these steps carefully. Your space transforms with new flooring. Measure your area accurately. Cut your vinyl pieces precisely. Place them neatly. Press down for a smooth finish. Enjoy your new look. Remember, patience is key.
Take your time. Recheck your work. Mistakes can be fixed easily. Share your experience with friends. Inspire others to try this too. Vinyl floors bring beauty to any room. They offer durability and style. Start your project today. Enjoy the satisfaction of doing it yourself.
Your home will thank you.


