Are you dreaming of a bathroom upgrade that combines style and functionality? Installing a tile shower floor might be just what you need.
With tiles, you can achieve a sleek look that adds value to your home. But, where do you start? The process might seem daunting, but don’t worry—you’re not alone. This guide will break down each step, making it easy for you to transform your shower space.
Imagine the satisfaction you’ll feel stepping onto a beautifully tiled floor you installed yourself. The tips and tricks shared here will empower you to tackle this project with confidence. So, are you ready to learn how you can bring your vision to life and enjoy a spa-like experience every day? Let’s dive into the details that will make your tiling project a success.
Preparation
First, collect all the needed items for your project. You will need tiles, tile adhesive, grout, a trowel, and a sponge. Don’t forget a tile cutter for trimming tiles. Make sure to have safety goggles and gloves too. These will protect your eyes and hands. Gather a measuring tape and pencil for marking. Having everything ready will make the job easier.
Use the measuring tape to find the shower floor size. Measure both the length and width. Multiply them to get the total area. This helps in knowing how many tiles you will need. Write down the measurements on paper. Double-check to avoid mistakes. Measuring right is very important.
Always wear safety goggles to protect your eyes. Gloves are important to keep your hands safe. Work in a space with good airflow. This keeps you safe from dust. Keep kids and pets away from the working area. Safety is always first. Remember to be careful with sharp tools.

Removing Old Flooring
Gather all necessary tools. You will need a hammer, chisel, and utility knife. Bring a screwdriver and a putty knife too. Don’t forget safety goggles and gloves. Safety is important. You may also need a dust mask. Prepare a bucket and a trash bag for debris. Keep a dustpan and broom nearby.
Protect yourself first. Wear your goggles and gloves. Start by removing loose tiles. Use the hammer and chisel carefully. Tap gently to avoid damage. Remove grout with the utility knife. Work slowly to prevent injury. Clean as you go. Sweep the dust and debris. Use the dustpan and broom. Dispose of waste in the trash bag.
Work in small sections. This helps keep control. Take breaks if needed. Removing tiles takes patience. Stay safe and keep your area clean.
Waterproofing The Floor
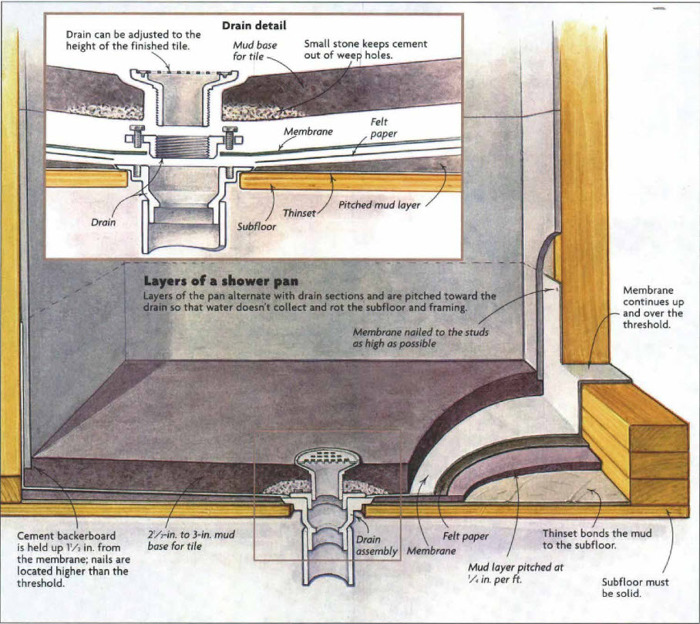
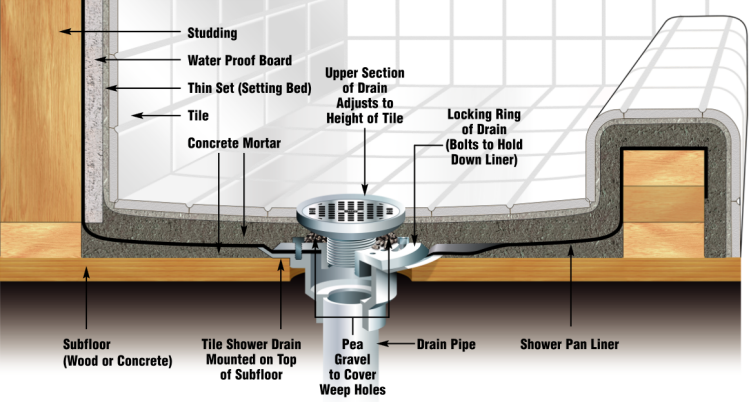
Start by cleaning the shower floor. Dust and dirt can ruin the job. Use a brush for this task. Next, apply the waterproof membrane evenly. Cover the whole floor. Make sure to reach corners and edges. Use a roller or brush for this step. Allow the membrane to dry. This can take a few hours. Check the instructions for drying time. Proper drying is very important. A dry membrane keeps water away.
Drainage needs special care. Place the drain in the right spot. It should be in the center. This helps water flow out. Check the slope of the floor. It should lead to the drain. Use a level tool to check this. A good slope prevents water pooling. Pooling can damage tiles. Adjust the slope if needed. This step is very important for a tile floor.

Laying The Base
Mortar is like glue for tiles. It keeps them in place. First, get a big bucket. Pour some water into it. Then, add the mortar mix. Stir well with a stick or tool. The mixture should be thick, not runny. Think of peanut butter. That’s the right thickness. Check for lumps. They make the mortar uneven. Smooth mortar is best. Let it rest a few minutes. This makes it stronger.
Use a trowel to spread the mortar. Start at one corner. Spread it evenly across the floor. Keep it smooth. No bumps allowed. Check the thickness. It should be about half an inch. Too thick is bad. Too thin is worse. Press tiles into the mortar gently. They need to stick well. Use a level to check the flatness. Flat floors are perfect. They look nice and neat.
Tile Selection
Tiles come in many types. Ceramic, porcelain, and glass are common. Ceramic tiles are easy to clean. Porcelain tiles are strong and last long. Glass tiles look shiny and modern. Think about your shower style. Choose tiles that fit the look. Color is also important. Light colors make spaces look bigger. Dark colors feel cozy.
Measure the shower floor first. Multiply length by width to find area. Tiles are sold in boxes. Each box covers a certain area. Divide floor area by box coverage. This tells you how many boxes you need. Add extra for broken tiles. Usually, add 10% more. This way, you have enough for mistakes.
Cutting Tiles
A tile cutter is easy to use. It helps cut tiles smoothly. Place the tile in the cutter. Align it properly with the blade. Apply gentle pressure on the handle. Score the tile by moving the blade across it. Snap the tile along the scored line. This cutter is great for straight cuts.
Edge tiles need special care. Measure the space for the edge tile. Mark the tile where you need to cut. Use a tile cutter for straight edges. Use tile nippers for curved edges. Take small bites with nippers. Smooth the edges with sandpaper. This ensures the tiles fit perfectly.
Setting Tiles
Start with clean surface. Use a trowel to spread adhesive. Apply thin layer first. The adhesive must be even and smooth. Check for lumps or gaps. This helps tiles stick better. Follow package instructions. Wait for a few minutes. This allows adhesive to set.
Place the first tile at the corner. Check alignment with a level. Ensure each tile is straight. Use spacers to keep gaps equal. Press each tile firmly. Avoid moving tiles after placing. Adjust if tiles shift. Look for patterns. Ensure design matches. Clean excess adhesive with a damp cloth. Let tiles dry overnight.
Grouting The Tiles
Grout comes in powder form. Measure it carefully. Add water slowly. Stir until smooth. No lumps should be visible. Use a bucket for mixing. Follow package instructions. Too much water makes grout weak. Too little makes it hard to spread. Mix until the grout is thick.
Use a rubber float to apply grout. Press it into the joints. Move in diagonal lines. Fill all gaps well. Excess grout can be scraped off. Work quickly but carefully. Let it dry slightly. Wipe tiles with a damp sponge. This removes any grout haze. Repeat if needed. Clean joints look neat and tidy.
Cleaning And Sealing
Grout can stick to tiles. It needs cleaning. Use a damp sponge. Wipe off the extra grout. Be gentle. Do not scratch the tiles. Check all tiles. Make sure all grout is gone. Dry the tiles with a cloth. This keeps tiles safe. Cleaning helps tiles last long.
Removing Excess Grout
Grout can make tiles dirty. Use a grout float. Scrape away the grout. Do not press too hard. Be careful with corners. Clean corners with a toothbrush. Check for any leftover grout. Tiles should look neat. Clean tiles shine bright.
Applying Sealant
Sealant keeps tiles safe from water. Pour sealant in a tray. Use a brush to apply. Cover all tile gaps. Let sealant dry for 24 hours. Do not touch the tiles. Sealant protects tiles. It stops water damage. Tiles stay new and fresh.
Final Inspection
Ensure the tile shower floor is smooth and even. Check for any loose tiles or grout. Confirm proper drainage and water flow.
Checking Alignment
Look at the tiles closely. Are they straight and even? Use a level to check. Lines should match up perfectly. If tiles are not aligned, it can cause problems. Fix any mistakes now. It is easier to adjust before the grout dries. Make sure all tiles look nice and neat.
Ensuring Waterproofing
Waterproofing is very important. Check for gaps or cracks between tiles. Fill any spaces with grout. Water should not seep through. Use a special sealant for extra protection. Apply it around the edges. Make sure everything is sealed well. Water must stay out to keep the shower safe.
Frequently Asked Questions
How Do I Prepare The Shower Floor For Tiles?
Start by cleaning the surface thoroughly to remove any debris. Apply a waterproof membrane to prevent moisture damage. Ensure the floor is level and smooth for a perfect tile installation. Use a primer to enhance adhesion, and let it dry completely before proceeding with the tiling process.
What Type Of Tiles Are Best For Shower Floors?
Choose slip-resistant tiles for safety, such as textured ceramic or porcelain. These tiles are durable and withstand moisture well. Consider smaller tiles for better grip and easier installation around slopes. Ensure your tiles complement the bathroom aesthetics while maintaining functionality.
How Do I Cut Tiles For Shower Floor?
Use a tile cutter or wet saw for precise cuts. Measure your tiles carefully and mark the cutting lines. Ensure the tools are suitable for your tile material. Wear safety gear to protect yourself during cutting, and smooth the edges with a file for a professional finish.
Can I Install Tiles On An Uneven Shower Floor?
No, the shower floor must be level before tiling. An uneven floor can cause tiles to crack and grout to dislodge. Use a leveling compound to correct any irregularities. Proper preparation ensures a durable and aesthetically pleasing tile installation.
Conclusion
Installing a tile shower floor can transform your bathroom. The process requires patience and precision. Start by gathering all necessary tools and materials. Prepare the surface carefully to ensure a strong foundation. Follow each step closely for best results. Choose tiles that fit your style and budget.
Take your time to lay them evenly. Use grout to seal the gaps and finish the look. Regular cleaning will keep your shower floor looking new. Enjoy the satisfaction of completing a beautiful project yourself. Your bathroom will have a fresh, stylish appearance.
Happy tiling!


