Imagine transforming your floors in just a few hours without the hassle of traditional flooring methods. With peel and stick flooring, it’s possible!
This innovative flooring solution allows you to revamp your space effortlessly and affordably. You don’t need to be a DIY expert to get the job done, and the results can be stunning. Curious about how you can achieve this transformation in your home?
Keep reading, and you’ll discover step-by-step guidance that makes the installation process a breeze. Let’s unlock the secret to beautiful floors that not only enhance your space but also boost your home’s appeal. You’re just a few steps away from a fresh, new look!
 Flooring: Easy DIY Guide”/>
Tools And Materials Needed
You need a utility knife. It cuts the flooring pieces. A tape measure helps you measure spaces. Use a straight edge for neat cuts. Pencil marks spots before cutting. A roller smooths the floor after installing. Safety glasses protect your eyes. Knee pads keep knees safe while working.
Get peel and stick flooring. Choose the color you like. Buy extra pieces for mistakes. Have underlayment ready. It makes the floor smooth. Transition strips cover edges. Adhesive primer helps the floor stick better.
Clean the floor with a broom. Remove dirt before starting. Use a vacuum for tiny dust. Have a bucket of water nearby. Use a mop to clean wet dirt. Rags help wipe spots. Sandpaper smooths rough areas.
Preparing The Surface
Start by sweeping the floor to remove dirt. Use a damp mop for sticky spots. Let the floor dry completely. A clean floor helps the tiles stick better.
Check for any cracks or holes on the floor. Use a filler to fix them. Smooth the surface with sandpaper. This ensures a flat base for the tiles.
Make sure the floor is completely dry. Wet floors may cause tiles to peel. Use a fan to speed up drying. Moisture can ruin the adhesive.
Measuring And Planning
Begin by measuring the floor area to ensure you purchase the right amount of peel and stick tiles. Proper planning includes sketching your layout, considering traffic flow, and marking starting points for even placement.
Calculating Square Footage
Start by measuring the length and width of the room. Multiply these numbers to get the total square footage. Use a calculator for accuracy. If the room has odd shapes, measure each section separately. Add up all the sections to find the total square footage. This helps in knowing how much flooring you need.
Planning The Layout
Think about how the tiles will look. Consider the room’s focal point. Start placing tiles from the center. Work your way outwards. This ensures symmetry and balance. Adjust tiles as needed. This helps achieve a neat and organized look.
Marking Guidelines
Use a chalk line to mark straight guidelines. Mark clear lines on the floor. This helps in placing the tiles evenly. Check these lines before sticking tiles. Make sure they are straight. This ensures tiles align properly.
Installing The Flooring
Peel and stick flooring offers a simple and quick installation process. Begin by cleaning and drying the surface thoroughly. Peel the backing and press each tile firmly onto the floor. Align edges carefully to ensure a seamless finish.
Peeling The Backing
Begin by peeling the backing off each tile. Do it slowly. This helps you avoid any damage. Hold the tile steady. Ensure the sticky side stays clean. Dust or dirt can reduce stickiness. Keep your fingers away from the sticky part.
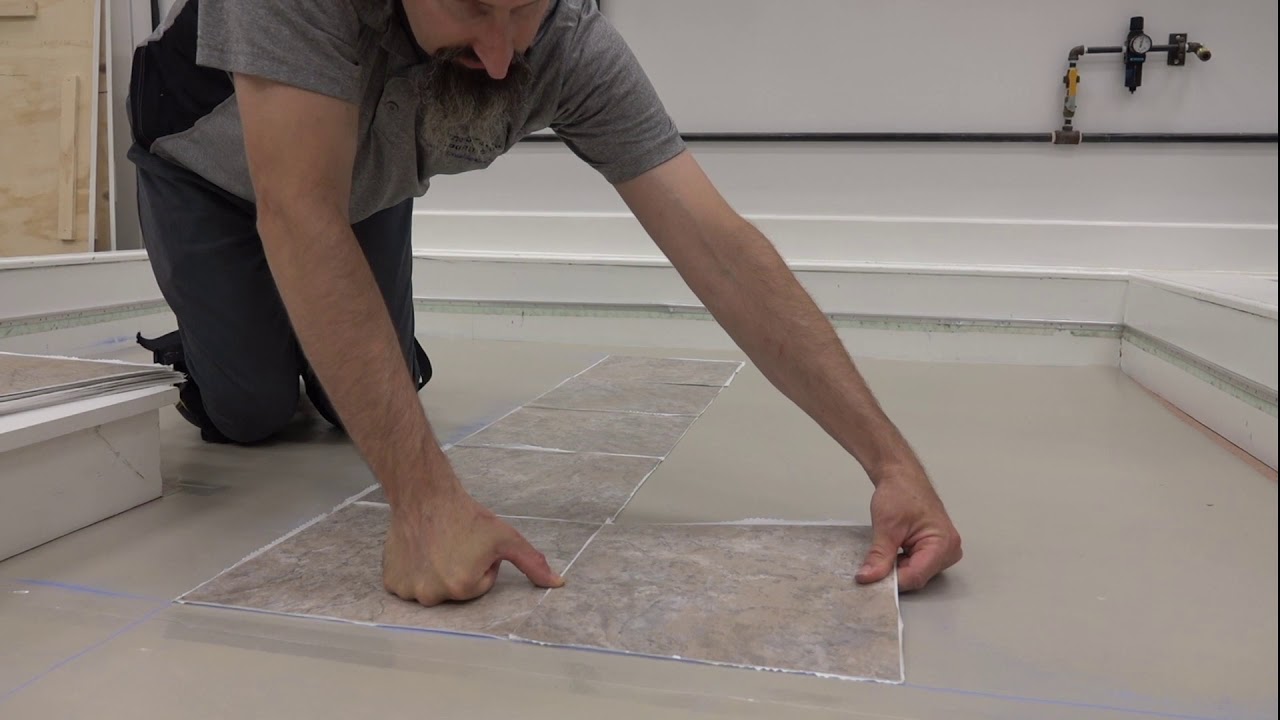
Placing The Tiles
Place the tile on the floor gently. Press down firmly. This ensures the tile sticks well. Align the edges with nearby tiles. Check that there are no gaps. Tiles should fit snugly. If a tile is crooked, peel it up and try again.
Cutting To Fit Edges
Measure the space before cutting tiles. Use a ruler for accuracy. Mark the tile with a pencil. Cut carefully with a utility knife. Make sure your cuts are straight. Place the cut tile into the space. Check the fit. If needed, trim small pieces to fit perfectly.
Finishing Touches
Easily transform your space by installing peel and stick flooring. Just clean the surface, peel the backing, and stick. Ensure proper alignment for a seamless finish.
Securing Edges
Press down the edges firmly. Use a roller or your hands. Ensure no gaps appear between tiles. Gaps can cause tiles to lift. Apply sealant to secure the edges. This helps in preventing moisture damage.
Rolling The Surface
Use a floor roller for this step. Roll over each tile with care. This ensures tiles stick well. Rolling removes air bubbles trapped below. It makes the floor look smooth and neat. Repeat this step twice for best results.
Cleaning Up
Clean the floor with a damp cloth. Remove any dust or glue residues. Do not use a lot of water. Too much water can damage the tiles. Dry the floor with a clean towel. Now your floor looks fresh and tidy.

Maintenance Tips
Installing peel and stick flooring is simple with careful preparation. Clean the surface thoroughly and ensure it’s dry. Align tiles carefully, pressing firmly for a secure fit.
Regular Cleaning
Use a soft broom to clean your floor often. A damp mop works well for deeper cleaning. Avoid harsh chemicals. They can harm the floor. Water should not sit on the floor for long. Wipe spills quickly to keep it safe.
Avoiding Damage
Place felt pads under furniture legs. This stops scratches. Keep pet nails trimmed to avoid marks. Do not drag heavy items. Lift them carefully instead. Keep sunlight away from the floor to stop fading. Use curtains or blinds for protection.
Handling Repairs
Replace damaged tiles easily. Peel off the bad tile and clean the spot. Stick a new tile in its place. Ensure it fits snugly. Press firmly to secure it. This keeps your floor looking new.

Frequently Asked Questions
What Tools Are Needed For Installation?
To install peel and stick flooring, you’ll need a utility knife, a tape measure, and a straight edge. These tools help ensure precise cuts and proper alignment. Additionally, a roller can be useful for pressing the tiles down firmly to ensure a secure bond.
Can Peel And Stick Flooring Be Installed Over Tiles?
Yes, peel and stick flooring can be installed over existing tiles. Ensure the surface is clean, dry, and flat. Any bumps or uneven areas might affect adhesion. It’s important to fill any grout lines with a leveling compound for a smooth surface.
Is Peel And Stick Flooring Waterproof?
Many peel and stick flooring options are water-resistant, making them suitable for bathrooms and kitchens. However, they’re not completely waterproof. Avoid excessive moisture exposure to maintain their durability. Always check the product specifications to ensure it meets your needs.
How Long Does Peel And Stick Flooring Last?
Peel and stick flooring can last between 5 to 25 years, depending on quality and maintenance. High-traffic areas may experience faster wear. Regular cleaning and avoiding moisture exposure can extend its lifespan significantly.
Conclusion
Peel and stick flooring offers a simple way to update any room. It’s quick, affordable, and easy to install. No special tools needed. Just clean the surface and peel the backing. Press the tile firmly into place. You’re done! Enjoy your new look instantly.
This flooring solution fits busy lifestyles. Perfect for DIY enthusiasts. Great for renters too. No permanent changes or damage. Peel and stick flooring allows creativity without stress. Feel proud of your refreshed space. Ready for compliments? Dive in and transform your home today!


