Are you dreaming of transforming your concrete floors into stunning hardwood masterpieces? Installing hardwood floors on concrete is a fantastic way to elevate the look and feel of your home.
But, the process might seem a bit daunting at first glance. Don’t worry! This guide is here to simplify the steps and ensure you achieve a flawless finish. You deserve a home that reflects your style and warmth, and hardwood floors can bring that vision to life.
Imagine walking into a room that feels inviting and luxurious, making every step a pleasure. The good news is, with the right techniques and a little patience, you can install hardwood floors on concrete without breaking a sweat. Let’s dive in and unlock the secrets to a successful installation that will leave you and your guests in awe.
Preparing The Concrete Surface
Start by sweeping the floor. Get rid of all dirt and dust. Next, use a vacuum to pick up small particles. A clean surface helps the floor stick better. Use a mop with warm water and soap. Make sure the floor is dry before moving on.
Moisture can damage hardwood floors. Use a moisture meter to check levels. The meter will show if water is present. High moisture means you need a barrier. This keeps the wood safe. It’s important to have dry floors for hardwood.
A level floor is key for hardwood. Use a long level tool. Place it on different spots on the floor. Check if the bubble is in the middle. If not, you need to fill the low areas. Use a concrete mix to fill these spots. Let it dry completely.
Choosing The Right Hardwood
Hardwood comes in many types. Oak and maple are very popular. Oak is strong and lasts long. Maple has a smooth look. Cherry wood is more expensive. It looks rich and warm. Each type has its own feel and look. Choose what you like best.
Think about where you will put the hardwood. Busy rooms need strong wood. Oak is good for these rooms. Bedrooms can have softer wood. You can choose pine for these rooms. It is softer but still nice.
Weather affects wood. In dry places, wood might crack. In wet places, wood can swell. Use engineered wood in these areas. It handles changes better.
Acclimating The Hardwood
Hardwood acclimation is essential. This step lets wood adjust to room conditions. If skipped, wood may warp or buckle. Ideal conditions for acclimation include stable temperature and humidity. Usually, it takes 48 to 72 hours. Some wood types need longer. Check with the manufacturer for exact time. The room should be dry and warm. Ventilation helps maintain the right environment. Open windows if needed. Place wood boxes on the floor. Leave them in the room. Do not stack them too high. This allows air to circulate. Proper acclimation ensures a smooth installation. Avoid costly repairs. Follow these steps carefully.
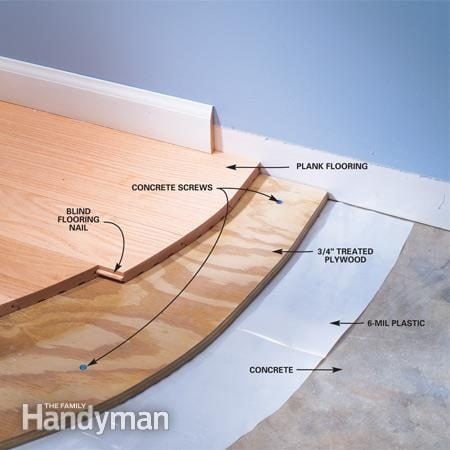
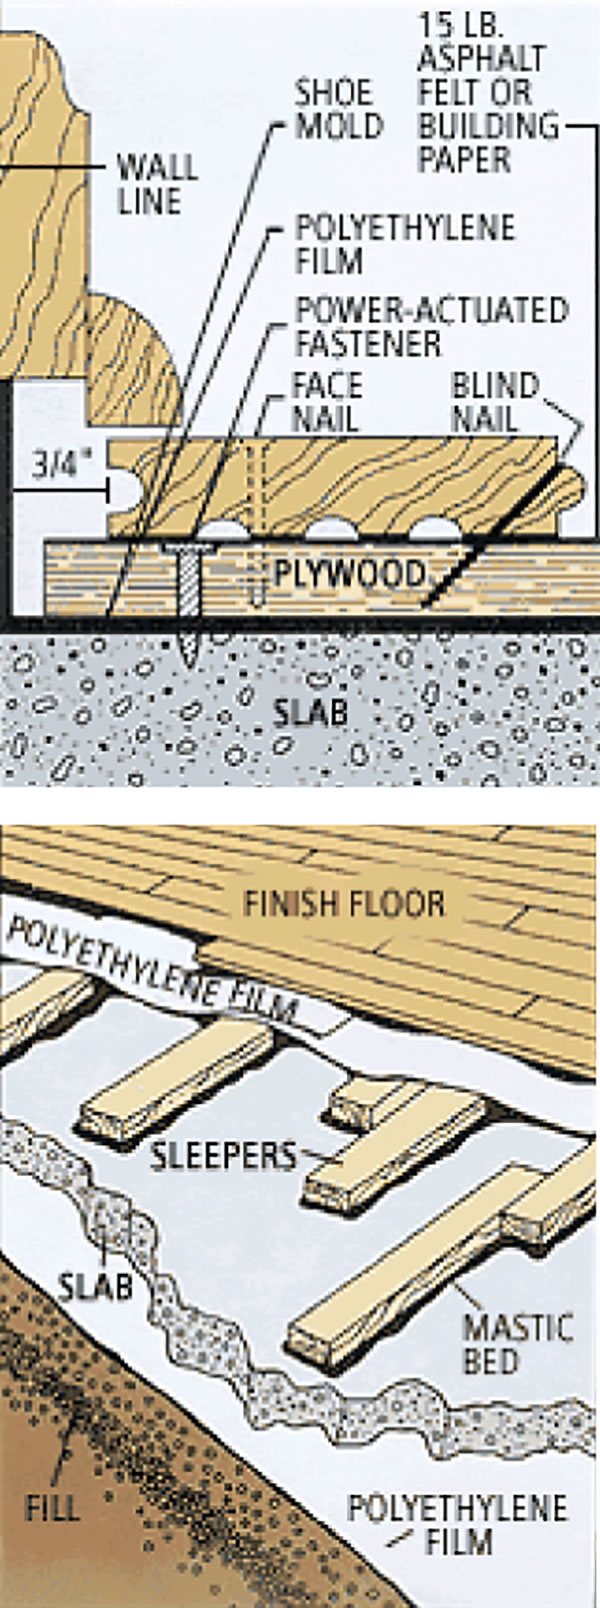
Installing A Moisture Barrier
Wood floors need protection from water. A moisture barrier is important. There are many types. Plastic sheets are common. They are easy to use. Tar paper is another option. It is thicker than plastic. Liquid sealants work too. They are painted on. Each type has pros and cons. Choose what fits your needs best.
The right method matters. Plastic sheets need tape. Tape keeps them in place. Tar paper is stapled down. Staples hold it firm. Liquid sealants need a brush. The brush spreads it evenly. Follow instructions carefully. Check for gaps. Gaps let water in. Fix gaps quickly. Good installation keeps floors dry.
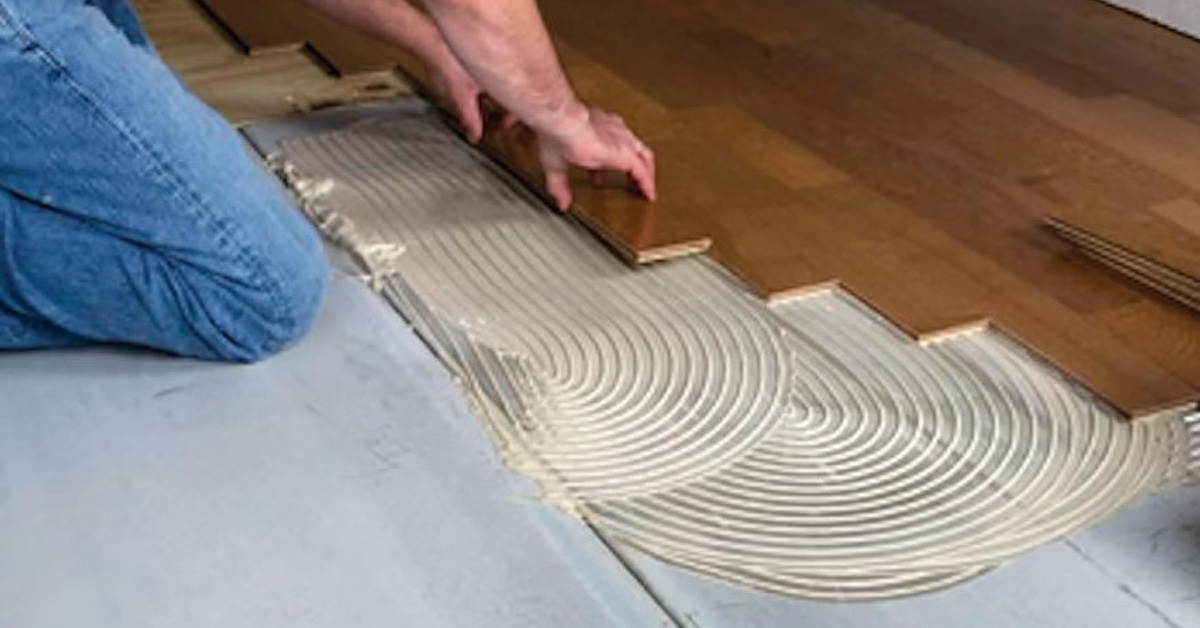
Selecting Installation Method
The glue-down method sticks wood to concrete. Strong glue keeps it in place. This method works well for thin wood floors. It reduces noise, making rooms quieter. Make sure the concrete is clean and dry first. Wet or dirty concrete won’t hold the wood well. Some people find this method hard and messy. Be patient. Follow instructions for the glue carefully. The glue must be spread evenly.
The floating floor method uses no glue or nails. Wood pieces fit together like a puzzle. This method is quick and easy. It works well in busy rooms. The wood can move a little, so it’s not tight. Use a good underlayment for extra comfort. It helps with sound and keeps floors warm. This method is great for DIY projects.
The nail-down method uses nails to hold wood. Special nails go into concrete. This method is strong and lasting. It’s best for thick wood floors. You need special tools to nail into concrete. Make sure the nails are long and sturdy. This method can be hard for beginners. Ask for help if needed. Follow safety rules when using tools.

Laying The Hardwood
First, clean the concrete floor well. Dust can ruin the look. Measure the room with care. This helps you know how many planks to use. Plan the plank direction. This impacts the room’s look. Most choose planks along the room’s longest wall. It makes the room feel bigger.
Use a saw to cut the planks. Make sure each piece fits well. Try fitting the pieces without glue first. This helps spot mistakes. Leave a small gap by the wall. Wood grows and shrinks. Gaps help it stay smooth.
Glue each plank to the concrete. Press down hard. This makes them stick well. Use floor weights if you have them. They help the glue stick better. Let the glue dry for a full day. Do not walk on it before it dries. This keeps the floor looking nice.
Finishing Touches
Preparing concrete for hardwood flooring involves cleaning and leveling. Use a moisture barrier to protect against dampness. Secure each plank with adhesive for a firm hold.
Trimming And Edging
Start with measuring the room edges. Cut the trim pieces to fit. Use a saw for accurate cuts. Attach the trim with nails or glue. This hides gaps between the floor and wall. Choose a trim color that matches the hardwood. It gives a neat and tidy look. Don’t forget to wear safety glasses while cutting.
Cleaning And Polishing
Sweep the floor to remove dust. Use a soft broom for this. After sweeping, mop the floor with a damp cloth. Avoid using too much water. Water can damage the wood. Once clean, apply a wood polish. This makes the floor shine. Polish also protects the wood from scratches. Follow the polish instructions on the bottle.
Maintenance Tips
Keep your hardwood floors clean. Use a soft broom daily. A vacuum with a hardwood setting is also good. It helps pick up dirt. Avoid wet mops. They can damage the wood. Use a damp cloth instead. Dry the floor quickly after cleaning. This keeps the wood safe.
Place rugs at doors. They trap dirt and dust. Use furniture pads under chairs and tables. This stops scratches. Keep pet nails trimmed. Sharp claws can harm floors. Avoid high heels on the wood. They cause dents easily. Be careful with water spills. Wipe them up fast.
Frequently Asked Questions
What Tools Are Needed For Hardwood Floor Installation?
To install hardwood floors on concrete, you’ll need tools like a moisture meter, saw, adhesive, trowel, and rubber mallet. Additionally, spacers, a floor roller, and a tape measure are essential. Ensure you have safety gear like gloves and goggles for protection during installation.
Can I Install Hardwood Over Concrete Without A Subfloor?
Yes, you can install hardwood directly on concrete using adhesive. Ensure the concrete is level, clean, and dry. Using a moisture barrier is crucial to prevent moisture damage. This method saves space and is ideal for basements or rooms with lower ceilings.
How Do I Prepare Concrete For Hardwood Flooring?
Start by cleaning the concrete thoroughly to remove dust and debris. Check for moisture using a moisture meter. Level the surface by filling any cracks or uneven spots. Finally, apply a moisture barrier to protect the hardwood from potential moisture damage.
Is A Moisture Barrier Necessary For Concrete Floors?
Yes, a moisture barrier is crucial when installing hardwood on concrete. It prevents moisture from seeping into the wood, which can cause warping or damage. Moisture barriers ensure the longevity and durability of your hardwood flooring, especially in basements or humid areas.
Conclusion
Installing hardwood floors on concrete transforms any space beautifully. It’s not just about style; it’s also about durability. You gain a timeless look that lasts for years. Remember to follow each step carefully. Precision ensures a flawless finish. Enjoy the warmth and elegance hardwood brings.
Your home will feel inviting and cozy. Take pride in the work you’ve done. It’s a rewarding project. You can admire your effort every day. Hardwood on concrete brings harmony and charm. With patience and care, you achieve stunning results.
Your floor becomes a masterpiece, enhancing your home’s beauty.


