Are you dreaming of transforming your space with a sleek, modern look? Engineered wood flooring could be your answer.
It offers the elegance of hardwood without the hassle, and you can install it yourself with a little patience and guidance. Imagine walking on a surface that combines beauty with durability, perfectly complementing your style. You might think installing flooring is a daunting task, but don’t worry! With the right steps, you can achieve a professional finish.
This guide will show you how to install engineered wood flooring, turning your space into a stunning masterpiece. Let’s dive into the details and make your flooring dreams a reality.

Choosing The Right Engineered Wood
Choose a wood type that fits your home style. Oak is strong and popular. Maple is smooth and light. Walnut is dark and rich. Each wood type has its own charm. Match the wood with your furniture. This creates a nice look.
A good finish protects your floor. It also makes it shine. Choose a color that suits your room. Light colors make rooms look bigger. Dark colors add warmth. Pick a finish that is easy to clean. This keeps your floor looking new.
Quality wood lasts longer. It also looks better. Set a budget before you buy. Good quality may cost more. But it saves money over time. Cheap wood might wear out fast. Spend wisely for a happy home.

Preparation Essentials
Start with a list of needed items. Gather a tape measure, saw, and hammer. You’ll also need nails, glue, and underlayment. Ensure your tools are in good shape. This makes the task easier.
Acclimate the wood for 2-3 days. Place it in the room where you’ll install it. This helps it adjust to the temperature and humidity. It prevents warping later.
Check the subfloor for any damage. It must be clean and dry. Use a level to ensure it’s even. Fix any uneven spots. This helps the wood lie flat.
Measuring And Planning
First, measure the room’s length and width. Multiply these numbers. This gives the room’s area in square feet. Always add 10% extra. This extra is for cutting and mistakes. Double-check your numbers to be sure. Use a calculator to help.
Decide the direction of the floorboards. Long boards can make rooms look bigger. Think about light and room shape. Place boards along the longest wall. This helps them look nice. Draw a layout on paper. This helps plan cuts and board placement.
Choose a starting wall. It should be the longest wall. Mark a line 1/4 inch from the wall. This gap lets the wood expand. Use a chalk line for straight lines. This line is where you start laying boards. It keeps boards straight.
Installation Techniques
This method is easy and quick. Wood planks are not fixed to the floor. They fit together like a puzzle. No nails or glue needed. Perfect for beginners. It allows for floor movement. Suitable for most rooms. Easy to replace damaged planks. It’s a popular choice for DIY projects.
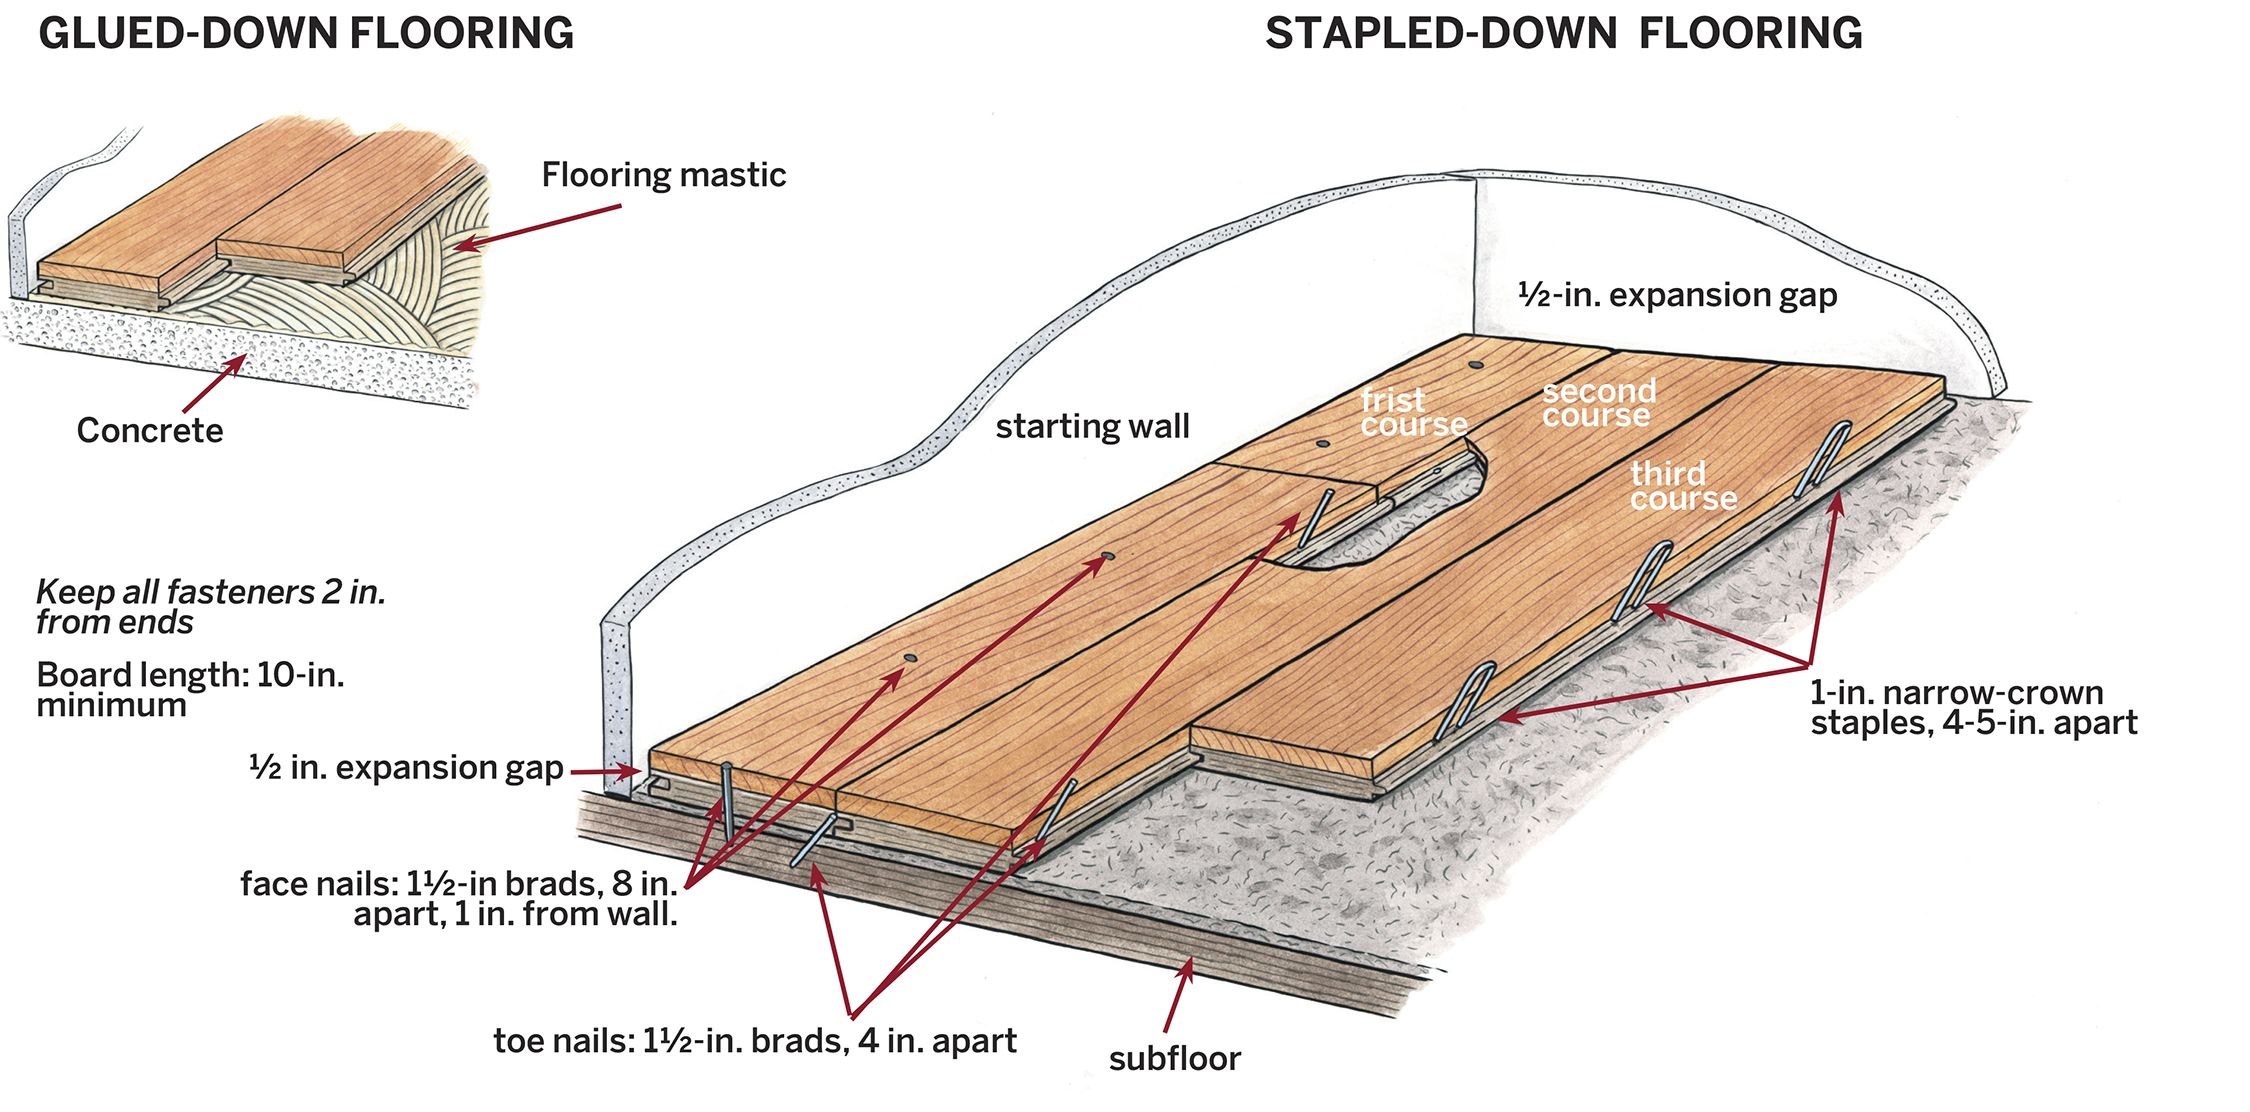
This method uses adhesive to secure planks. Provides stability and durability. Ideal for concrete floors. Reduces noise from footsteps. Requires careful application. Glue must be spread evenly. Professional help recommended for large areas. Permanent solution for long-term use. Suitable for high traffic areas.
This method uses nails to attach planks. Requires a wooden subfloor. Offers strong hold and durability. Needs hammer or nail gun. Provides a solid feel underfoot. More labor-intensive than other methods. Professional installation often preferred. Best for traditional wood floors. Ensures long-lasting performance.
Cutting And Fitting Boards
Proper tools are important for cutting wood boards. Use a saw for straight cuts. A jigsaw works well for curved lines. Keep your tools sharp. This helps to make clean cuts. Always wear safety goggles when cutting. This keeps your eyes safe.
Lay boards in a straight line. Use a chalk line for guidance. This helps in keeping the boards aligned. Spacing is important. Leave small gaps between boards. This allows the wood to expand. Check the alignment often. This avoids mistakes.
Measure the space carefully. Use a template for tricky spots. Cut the board to fit the space. Test the fit before placing it. Adjust if needed. This ensures a snug fit. Patience is key for odd spaces. Take your time.
Finishing Touches
Baseboards cover the edges between the wall and floor. They give a neat look. Use a saw to cut them to size. Nail the baseboards to the wall, not the floor. This allows the floor to move. Make sure each piece fits tightly. Fill any gaps with caulk. This keeps it looking clean.
After installing, the floor needs a good clean. Sweep away any dust or dirt. Use a damp mop for a gentle clean. Avoid using too much water. Too much water can damage the wood. Let the floor dry completely. It will shine and look beautiful.
Check the floor closely for any gaps. Look for areas that need fixing. Use a filler for small gaps. This helps keep the floor tight. For bigger issues, consider replacing the damaged plank. A perfect floor feels good and lasts longer.
Maintenance Tips
Sweep your floor daily to keep it clean. Use a soft broom for best results. Dirt and grit can scratch the surface. Vacuum your floor weekly with a soft floor attachment. This helps remove dirt in corners. A damp mop is good once a month. Use water with a few drops of mild soap. Avoid soaking the floor with water. Too much water can damage wood. Dry the floor with a clean towel after mopping.
Water is wood’s enemy. Wipe spills immediately. Use a dry cloth or mop. Place mats at entrances. They help catch water from shoes. Use a dehumidifier in humid rooms. This helps control moisture levels. Avoid using steam cleaners. They can damage your wood floor.
Minor scratches can be fixed easily. Use a wood repair kit. Follow the instructions on the kit. Apply the wax to the scratch. Buff the area with a soft cloth. For deeper scratches, consult a professional. Avoid DIY repairs for big damages. It may cause more harm.
Frequently Asked Questions
What Tools Are Needed For Installation?
To install engineered wood flooring, you’ll need a tape measure, saw, hammer, pry bar, and drill. A flooring nailer or stapler is also essential. Additionally, have a moisture barrier, underlayment, and adhesive ready. Safety gear like gloves and goggles are important to ensure a safe installation process.
Can You Install Over Existing Flooring?
Yes, you can install engineered wood over existing flooring if it’s stable and level. Ensure the existing floor is dry and clean before proceeding. It’s crucial to check for moisture issues, especially if the old floor is concrete. This helps prevent future problems with the new flooring.
How Long Does Installation Take?
Installation time for engineered wood flooring varies based on room size and installer experience. Generally, it takes one to three days. Proper preparation can significantly speed up the process. Ensure all materials and tools are ready before starting to avoid delays.
Is Acclimation Necessary Before Installation?
Yes, acclimation is necessary for engineered wood flooring. Allow the flooring to acclimate for 48 to 72 hours in the installation area. This helps prevent warping or gaps after installation. Maintaining room temperature and humidity levels during acclimation is also crucial for a successful installation.
Conclusion
Installing engineered wood flooring is a rewarding project. It adds beauty and value to your space. The process is straightforward with the right tools. Remember to measure twice and cut once. Follow each step carefully for best results. Make sure to acclimate the wood before installation.
This prevents future issues. Keep your floor clean and dry to maintain its look. Enjoy the warm, classic feel of wood underfoot. Start this project today and transform your home. Happy flooring!


