
Imagine walking across your wood floor, only to hear an unsettling creak beneath your feet. You glance down and notice cracks disrupting the once seamless surface.
These blemishes not only compromise the beauty of your space but also its value. If you’ve been staring at those unsightly gaps and wondering how to restore your floor’s charm, you’re not alone. Filling cracks in wood floors might seem like a daunting task, but with the right approach, you can transform your floor back to its original glory.
This article is crafted to guide you through the process step-by-step, ensuring you have all the knowledge needed to tackle this DIY project with confidence. You’ll discover the tools, techniques, and tips to achieve a flawless finish that will make your wood floor look as good as new. So, are you ready to bring back the elegance to your home? Dive in, and let’s get started!
Identifying Wood Floor Cracks
Wood floors can crack due to temperature changes. Hot weather makes wood expand. Cold weather makes it shrink. This movement causes cracks. Another reason is moisture. Water can damage wood. It makes wood swell or shrink. Heavy furniture can also cause cracks. It presses down on the wood. Over time, this can create gaps.
Some cracks are thin lines. These are small and often harmless. Bigger cracks are called gaps. These are wider and more noticeable. Sometimes, wood can have splinters. These are sharp edges poking out. Also, look for edge cracks. These appear at the sides of planks. Each type needs different fixes.
Gathering Necessary Tools And Materials
Tools make the job easy. You need a few things. A putty knife is very important. You will also need sandpaper. Get a vacuum cleaner too. It helps to clean dust. Don’t forget a clean cloth. A screwdriver can be useful. A small brush is good for cleaning. These tools help you fix cracks.
Wood filler is needed. Choose it carefully. Make sure it matches the wood color. Some fillers are for small cracks. Others are for bigger ones. Flexible fillers are best. They last longer. Read the label on the filler. It tells you what it can do. Always pick the right one.
Preparing The Floor Surface
Begin by sweeping the floor to remove dirt. Use a vacuum to get dust from small cracks. A clean floor is important for a smooth finish. After cleaning, start sanding the wood. Sanding makes the surface even. Use a medium-grit sandpaper first. Then, switch to a fine-grit sandpaper. This will help create a smooth surface. Sand until the wood is soft to touch. Be careful not to sand too much. You want the floor to remain even. After sanding, clean up the dust again. This makes sure the filler sticks well.
Check the floor for any remaining rough spots. Use your hand to feel the surface. If you find any, sand them gently. The floor should feel smooth all over. This step helps the filler work better. A smooth surface helps the filler stay in place. It also makes the floor look nice and neat. A good finish is important for a pretty floor.
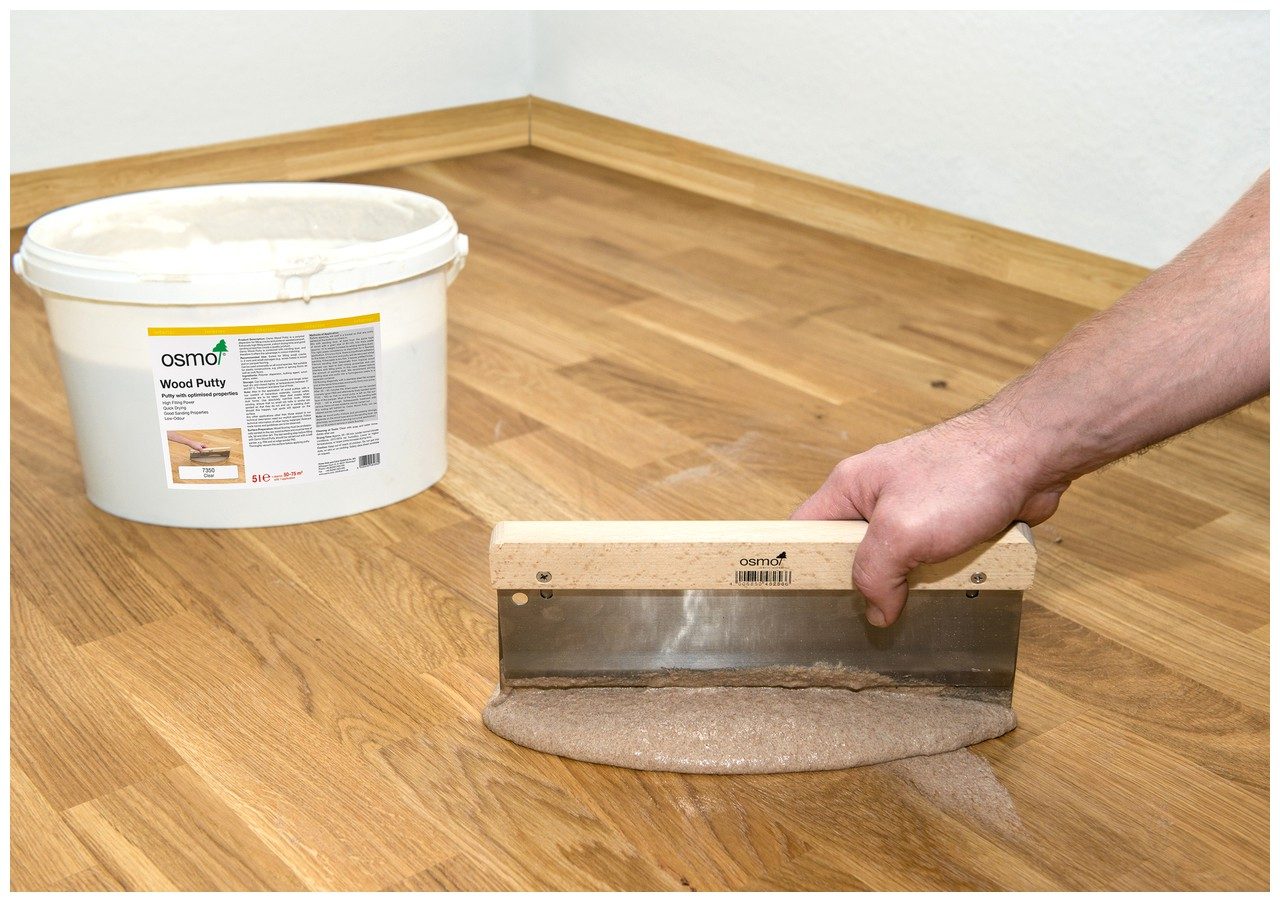
Filling Small Cracks
Use a putty knife to apply wood filler into small cracks. Press the filler deeply. This helps the filler stay in place. Choose a color that matches the wood. This makes the floor look smooth and even. Allow the filler to dry completely. Usually, it takes a few hours. Check the instructions on the filler package. Sand the area gently after it dries. Make sure the surface feels level. This step is very important for a nice finish.
After sanding, clean the floor. Remove dust and debris. Use a damp cloth for this. Apply wood stain if needed. This helps the filler blend better. Match the stain to the floor color. This step hides the filler well. Allow the stain to dry before using the floor. Seal the floor with a clear finish. This protects the wood and filler. Make sure the floor looks natural and beautiful.
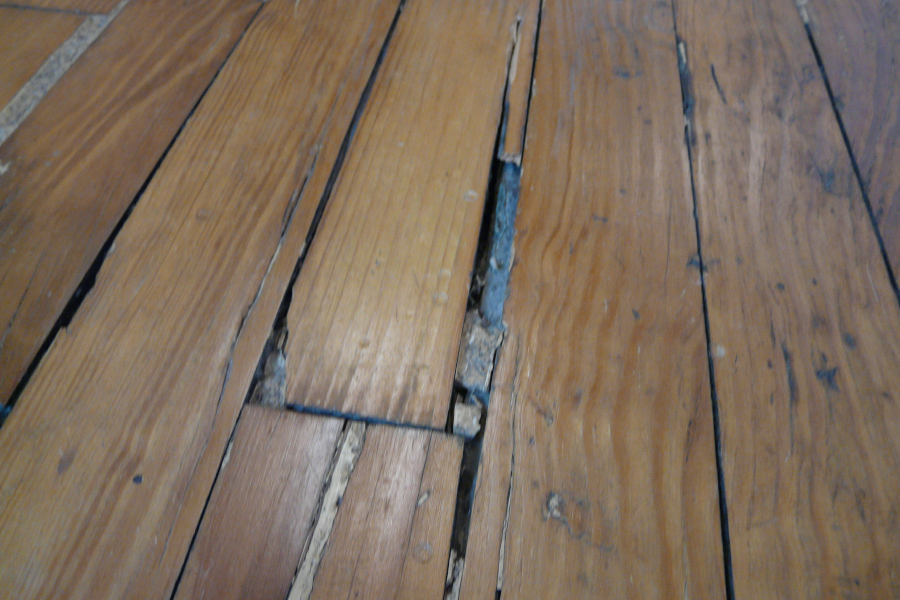
Repairing Larger Cracks
Large cracks can be tricky. Wood putty or epoxy works best here. First, clean the crack. Remove all dust and dirt. This helps the putty stick. Mix the putty or epoxy well. Follow the instructions on the box.
Now, fill the crack with the mixture. Use a putty knife. Smooth it out nicely. Let it dry completely. Drying time can vary. Check the package for details. Once dry, sand the area. Make it smooth to touch. A little paint can match the floor color.
This makes the repair seamless. Now your floor looks like new. Simple steps make a big difference.
Finishing Touches
Filling cracks in a wood floor enhances its appearance and longevity. Start by cleaning the floor thoroughly. Use wood filler to fill the gaps, smoothing it with a putty knife. Once dry, sand the area gently. Finish by applying a matching stain or sealant for a seamless look.
Sanding The Filled Areas
Sanding makes the floor smooth. Use fine-grit sandpaper for the job. Move the sandpaper in a circle. This helps blend the filled part with the rest. Be gentle. Too much pressure can damage the wood. Once done, wipe with a damp cloth. This removes dust.
Applying Stain Or Sealant
Choose a stain or sealant that matches your floor. Apply with a clean brush. Follow the wood grain while brushing. This ensures even coverage. Let it dry completely. This can take a few hours. After it dries, check for any missed spots. Apply a second coat if needed. This will protect the wood and make it shine.
Maintaining Your Wood Floor
Wood floors need care. To keep them nice, avoid heavy shoes indoors. Use rugs and mats in busy areas. They catch dirt and protect the floor.
Keep pets’ nails trimmed. Long nails can scratch the surface. Place pads under furniture legs. This stops dents and scratches.
Sweep the floor often. A broom or vacuum works well. This removes dust and dirt. Use a damp mop for deeper cleaning. Make sure it is not too wet.
Water can harm wood. A gentle cleaner is best. Avoid harsh chemicals. They can damage the finish.
Frequently Asked Questions
How Do I Prepare Wood Floor Cracks?
Start by cleaning the area with a vacuum or brush. Ensure the floor is dry and free of debris. Sand the edges of the crack gently to smooth out rough surfaces. This preparation ensures better adhesion of the filler, leading to a long-lasting repair.
What Tools Are Needed For Filling Wood Cracks?
You’ll need wood filler, a putty knife, sandpaper, and a vacuum. Choose a filler that matches the wood color for seamless repairs. Sandpaper helps to smooth the area after filling, while the vacuum removes dust. These tools ensure a clean and effective repair process.
Can I Use Homemade Wood Filler?
Yes, you can make wood filler with sawdust and glue. Mix sawdust with wood glue until it’s thick. Apply the mixture to the crack using a putty knife. This method can be effective for small repairs and is cost-efficient, but may require careful color matching.
How Long Does Wood Filler Take To Dry?
Wood filler generally dries within a few hours. Some types may take longer, depending on thickness and humidity. Follow the manufacturer’s instructions for drying times. Ensure the filler is fully dry before sanding or applying any finish for best results.
Conclusion
Filling cracks in wood floors can be simple with the right steps. Start by cleaning the area and selecting a suitable filler. Apply it carefully, then smooth it out for a seamless look. Let it dry completely. Regular maintenance helps prevent future cracks.
Your floor will look better and last longer. A well-maintained wood floor enhances your home’s beauty. Keep practicing these steps for best results. Enjoy the satisfaction of a smooth, crack-free surface. Your efforts will be worth it, creating a cozy and inviting space.
Happy flooring!


