
Imagine transforming your basement from a dull, lifeless space into a vibrant, inviting area. This change is not only possible but also easier than you might think.
Epoxying your basement floor can add that much-needed touch of elegance and durability. You might wonder, why epoxy? Well, it’s a cost-effective solution that provides a sleek finish while protecting your floor from wear and tear. By the end of this article, you’ll have the knowledge and confidence to tackle this project yourself, turning your basement into a beautiful and functional part of your home.
Get ready to unlock the secrets to a stunning epoxy basement floor that will impress anyone who steps into your space. Let’s dive in!
Benefits Of Epoxy Flooring
Epoxy flooring makes your basement look neat and clean. It offers a shiny finish that lasts long. The surface becomes very strong. It does not crack easily. Kids can run without slipping. Water spills will not damage it.
Cleaning is simple and quick. A mop is enough to clean. No need for special cleaners. Epoxy floors resist stains and dirt. Your basement stays bright. Light reflects well on this floor.
It can come in many colors. Choose one that you like. Make your basement look pretty. Epoxy floors are perfect for families with kids.
Tools And Materials Needed
Preparing your basement floor for epoxy is easy. Gather your tools first. You will need a broom and a dustpan. These will help you clean. A vacuum is also good for dust.
Next, you need a mop and bucket. These clean the floor well. Detergent will help remove stains. Painter’s tape is used to mark edges.
Now, let’s talk about materials. Epoxy resin is the main one. Hardener will be mixed with it. Use mixing sticks to stir them together. You will also need a roller. This will help spread the epoxy.
A paint tray holds the epoxy. Lastly, safety glasses and gloves are important. They keep you safe.
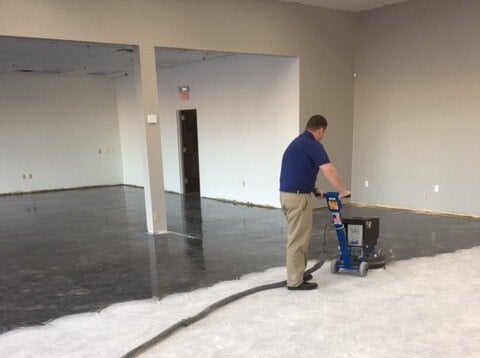
Preparing The Basement Floor
Start by removing all furniture and items. Sweep the floor to get rid of dust and debris. Use a vacuum cleaner for a deeper clean. Mop the floor with warm water and soap. Ensure the floor is fully dry before moving on. A clean surface helps the epoxy stick better. This step is very important.
Check the floor for cracks and holes. Use a concrete patching compound to fill them. Follow the instructions on the product. Let the patches dry completely. Smooth the surface with sandpaper. A smooth floor ensures even epoxy coverage. Don’t skip this step.
Etching makes the floor ready for epoxy. Use an etching solution for this. Pour the solution on the floor. Spread it evenly with a brush. Allow it to sit for the recommended time. Rinse the floor thoroughly with water. Let it dry completely before applying epoxy. Proper etching ensures a strong bond.
Choosing The Right Epoxy
Epoxy comes in many types. Water-based epoxy is easy to use. It dries quickly. Solvent-based epoxy is strong. It resists chemicals. 100% solid epoxy is the toughest. It lasts long. Each type has its own benefits. Choose the one that fits your needs. Think about how much wear and tear your floor will get. This helps you pick the best epoxy.
Epoxy offers many color and finish options. You can choose bright colors. Or subtle shades. There are also clear finishes. Glossy finishes reflect light. They make spaces look bigger. Matte finishes are less shiny. They hide dirt well. Think about your basement light. Choose a finish that suits your space. Colors can change the mood of a room. Pick colors that make you happy.
Mixing The Epoxy
Start by gathering all your materials. You’ll need epoxy resin and hardener. Use a clean bucket for mixing. Pour the resin in first. Add the hardener slowly. Stir with a wooden stick. Make sure it’s smooth. No lumps allowed.
Mix for about 3 minutes. Use a slow, steady motion. Avoid bubbles in the mix. If bubbles form, stir gently. Keep the room warm. This helps the epoxy mix better.
Always wear gloves. Protect your hands. The mix can be sticky. It might also irritate skin. Safety is important. Read all instructions on the label. Follow them carefully.
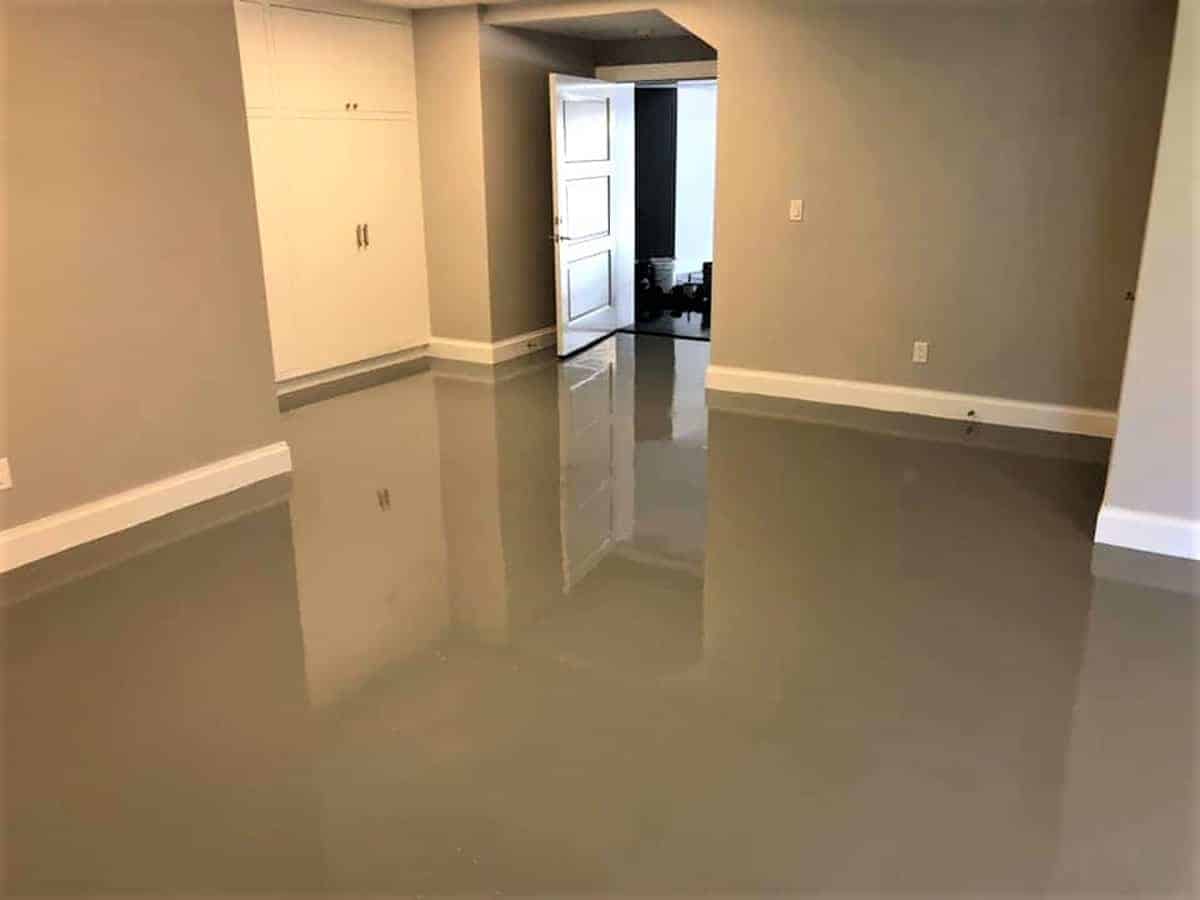
Applying The Epoxy
Applying the epoxy on a basement floor creates a durable and shiny surface. Start by cleaning the floor thoroughly to remove dust and grease. Mix the epoxy components as per instructions and spread evenly using a roller. Let it cure for a strong, attractive finish.
Starting With The Edges
Begin by cutting in the edges with a small brush. This helps in getting sharp lines around the corners. Be careful not to spill the epoxy. Work slowly. Take your time. Make sure all corners are covered well.
Rolling The Epoxy
Use a roller for the large areas. Pour a small amount of epoxy on the floor. Roll it out evenly. Keep a steady pace. Avoid leaving puddles. Smooth out any bumps. Overlap each stroke slightly. This ensures even coverage. Let it dry completely.
Adding A Second Coat
Applying a second coat of epoxy on basement floors enhances durability and shine. Ensure the first layer is dry before starting. Even application techniques help achieve a smooth finish, making floors resistant to wear and tear.
Timing For The Second Coat
The first coat must dry before adding a second coat. Drying time can depend on the brand of epoxy. Usually, this takes about 12 to 24 hours. Check the instructions on the label to be sure. If the first coat feels tacky, it is not ready. Make sure the area is clean and free of dust.
Ensuring Even Application
Use a paint roller to spread the epoxy. This helps to keep the coat even. Move the roller in straight lines. Overlapping strokes will give a smooth finish. Be careful not to leave puddles or thick spots. If you see any, use the roller to even them out. A second coat can make the floor stronger and more durable.
Curing And Drying Time
Epoxy floors need time to cure. This means the floor must sit still. It usually takes about 24 hours. But it can take longer if it is cold. Humidity can also slow drying. Always check the manufacturer’s instructions. They tell you the right time to wait. Touch the floor to see if it is dry. If it is sticky, it needs more time. Walking on it too soon can ruin it. So, be patient.
Good airflow helps the floor dry. Open windows if possible. Fans can also help speed up the process. Avoid adding water or any liquids during curing. This can cause damage to the floor. Follow these steps for a perfect epoxy floor.
Maintaining Your Epoxy Floor
Applying epoxy to your basement floor creates a durable and shiny surface. Clean the floor thoroughly before starting. Mix the epoxy resin and hardener, then spread evenly using a roller. Allow it to dry completely for a flawless finish. Regular sweeping and occasional mopping maintain its pristine look.
Regular Cleaning Tips
Epoxy floors need regular care to stay nice. Use a soft broom to sweep dust and dirt. A mop with warm water works well for cleaning. Add a gentle soap if needed. Avoid harsh cleaners. They might harm the shine.
Dry the floor after mopping. Wet floors can be slippery. This keeps the surface safe and clean. Clean spills quickly to prevent stains. Regular checks are important. Look for any cracks or chips.
Avoiding Common Damages
Keep sharp tools away from epoxy floors. They can scratch easily. Heavy objects may cause dents. Use pads under furniture legs. Protect the surface from heavy impacts.
Avoid dragging things across the floor. Always lift items instead. Be careful with chemicals. Some can damage epoxy. Choose mild options for cleaning. Regular inspections help spot problems early. Fix minor issues quickly.

Troubleshooting Common Issues
Bubbles can ruin the look of your epoxy floor. To fix them, use a torch or heat gun. This helps pop the bubbles. Keep the tool moving. Don’t stay in one spot too long. Too much heat can harm the epoxy. Ventilation helps too. Airflow stops bubbles from forming. Open windows or use fans.
An uneven surface feels rough. Sanding can help smooth it. Use a sanding machine for big areas. A hand sander works for small spots. Clean the floor after sanding. Dust can mess with the epoxy. Applying another layer can also even out the surface. Make sure each layer is thin. Thick layers cause problems.
Frequently Asked Questions
What Is The Best Epoxy For Basement Floors?
Choosing the best epoxy depends on durability and finish. Look for high-quality, industrial-grade epoxy with a glossy finish. Brands like Rust-Oleum and Epoxy-Coat offer excellent options. Ensure it’s designed for concrete surfaces and has good resistance to moisture and chemicals.
How Long Does Epoxy Floor Last?
Epoxy floors can last 10 to 20 years with proper maintenance. Regular cleaning and avoiding heavy impact can extend their lifespan. Quality installation and choosing the right epoxy product are crucial for longevity and durability.
Can Epoxy Be Applied Over Painted Floors?
Yes, epoxy can be applied over painted floors. Ensure the paint is well-adhered and clean the surface thoroughly. Sanding may be needed for better adhesion. It’s vital to check compatibility between epoxy and existing paint.
Is Epoxy Flooring Waterproof?
Epoxy flooring is waterproof and provides a moisture-resistant barrier. It prevents water seepage and protects the underlying concrete. This makes it ideal for basement applications, especially in areas prone to dampness.
Conclusion
Epoxying your basement floor transforms it into a durable, attractive space. Start with proper preparation to ensure long-lasting results. Clean the surface thoroughly, removing dust and debris. Check for moisture and seal any cracks. Choose the right epoxy type for your needs, considering color and finish.
Follow instructions carefully during application. Each step matters for a smooth, even coat. Allow ample drying time before using the space. Enjoy a refreshed, low-maintenance basement floor. With patience and care, your basement gains a fresh look. Embrace the change and enhance your home’s value.


