Are you tired of dealing with leaky showers or simply ready for a bathroom upgrade? Building a shower pan on a slab floor might be the perfect DIY project for you.
It may sound complicated, but with the right guidance, you can tackle it with confidence. Imagine stepping into a shower that not only looks great but also functions perfectly, without any worries about water seeping where it shouldn’t. In this guide, you’ll discover the secrets to creating a durable and watertight shower pan that will last for years.
We’ll walk you through each step, ensuring you know exactly what to do, from gathering materials to the final touches. So, if you’re ready to transform your bathroom and enhance your home’s value, keep reading to unlock the essentials of building a shower pan on a slab floor. Your dream shower is just a few steps away!

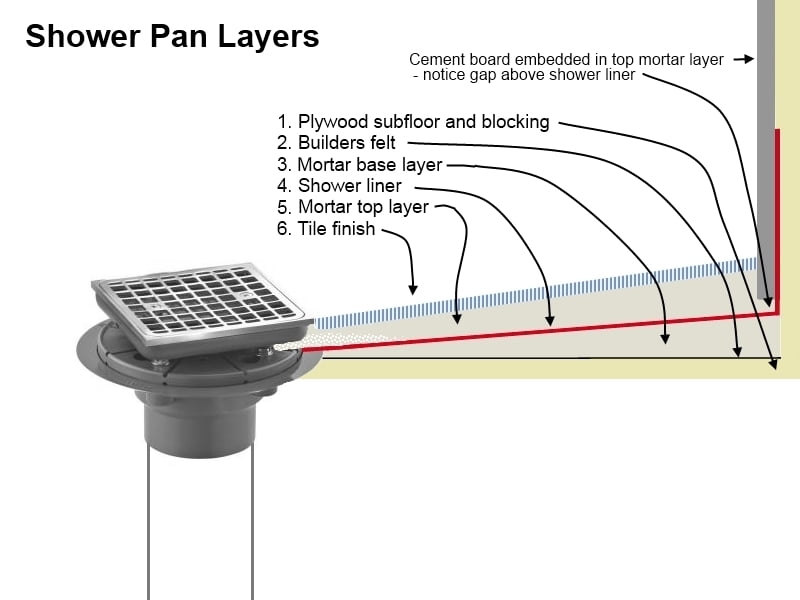
Materials And Tools Needed
The shower pan needs strong materials. Use quality cement, sand, and waterproof membrane. A good mix makes the pan last long. Tools are also important. You need a trowel, level, and mixing bucket. A trowel spreads the mix evenly. The level checks if the surface is flat. The mixing bucket holds the cement and sand. Safety gear is a must. Wear gloves and goggles while working. Gloves protect hands from sharp edges. Goggles keep dust out of eyes.
Important materials are the cement and sand mix. Without these, the shower pan will not be strong. A waterproof membrane is also vital. It prevents water leaks. Essential tools include the trowel and level. These help make the pan even. Using the right tools and materials ensures a solid shower pan.
Preparing The Slab Floor
Start by clearing everything from the floor. Remove all dust and dirt. Use a broom or a vacuum for a thorough clean. Sticky residues can be a problem. Use a cleaner to get rid of them. Ensure the floor is completely dry before proceeding. Wet surfaces can cause issues later on. Check for any cracks or holes. Fill them up with cement or another suitable filler. Ensure a smooth and even surface.
First, locate the drain on the floor. Check if it is in the right spot. It should be in the center if possible. Measure the distance from walls and edges. Keep the measurements for later use. If the position is not correct, you may need to adjust. This might involve moving pipes or the drain itself. Always ensure the drain is level with the floor.
Installing The Shower Drain
Picking the right drain is crucial. It helps water flow smoothly. Size matters. Make sure it fits well. Material is key too. Stainless steel lasts long. Ease of cleaning is important. Some drains clog less. Look for those types. Design affects looks. Choose one that matches. Installation should be easy. A complex drain is hard to install. Keep it simple.
Fixing the drain is vital. Ensure it’s tight and secure. Use a wrench to tighten. Check for leaks after securing. Water should not seep through. Apply sealant around edges. This prevents water damage. Double-check all connections. Everything must fit snugly. Testing is important. Pour water to check flow. Adjust if needed.
Building The Shower Curb
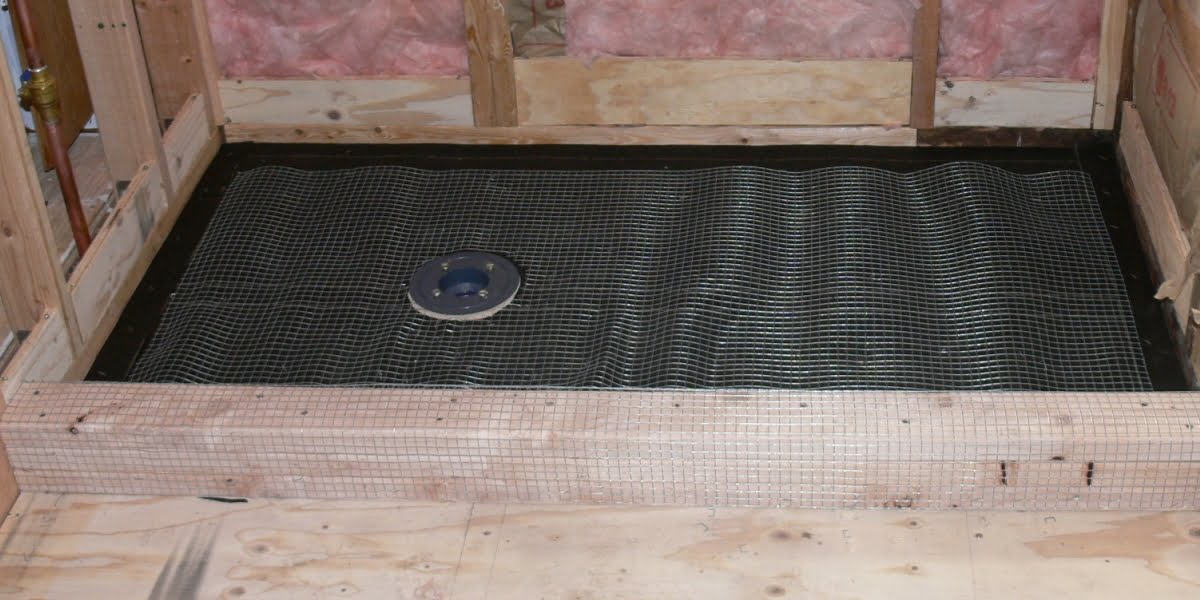
Concrete blocks form the base of the curb. They are strong and durable. Use mortar to hold the blocks together. Mix the mortar well for best results. A waterproof membrane ensures the curb stays dry. It prevents leaks and water damage. Buy a quality membrane for better protection. Tile backer board provides a smooth surface. It is perfect for tile installation. Choose a board that resists moisture. Metal lath adds extra support to the curb. It helps the mortar stick better. Cut the lath to fit the curb size. These materials are essential. They build a sturdy and reliable shower curb.
Start by laying the concrete blocks. Arrange them in a straight line. Ensure they are level. Apply mortar between each block. Smooth it out evenly. Next, place the waterproof membrane. Cover the entire curb area. Make sure no gaps are visible. Attach the tile backer board. Use screws to secure it. Check for tightness. Lay the metal lath over the backer board. This gives extra strength. Fasten it with nails. Ensure it fits snugly.
Laying The Mortar Bed
Preparing the mortar bed involves mixing cement and sand to form a sturdy base. Spread the mix evenly on the slab floor. Ensure the surface is level and smooth for proper water drainage.
Mixing The Mortar
Mix the mortar using a large bucket. Add water slowly to the mix. Stir it well until it’s thick like peanut butter. Mortar must not be too runny. Check the consistency with a trowel. If it holds shape, it’s ready. Avoid adding too much water. It makes the mortar weak.
Applying The Mortar Layer
Spread the mortar on the slab floor. Use a trowel for an even layer. Start from the corner and move outward. Ensure the mortar is spread evenly. Keep it smooth and level. Create a slight slope for water flow. This helps water drain properly. Smooth out any bumps with the trowel. Let it dry for 24 hours.
Waterproofing The Shower Pan
Picking the right materials is very important. Membrane liners are popular. They keep water from seeping. Liquid sealants are easy to apply. They dry quickly. Cement boards are strong. They last a long time. Consider your budget. Choose what fits best.
Start with a clean floor. Apply the first layer evenly. Use a brush or roller. Let it dry completely. Apply a second layer for better protection. Check for any gaps. Make sure all corners are sealed well. Test with water. Ensure no leaks occur.
Installing The Tile Layer
Installing the tile layer is crucial in building a shower pan on a slab floor. Ensure tiles are evenly spaced and securely adhered, providing a stable, waterproof surface. This step prevents water damage and enhances the shower’s durability and aesthetic appeal.
Selecting Suitable Tiles
Pick tiles that fit your shower style. Ceramic tiles are a good choice. They are strong and last long. Porcelain tiles work well too. They can handle water better. Choose a color you like. Make sure the tiles are not too slippery. Safety is important. Check the size of the tiles. Large tiles can be tricky on a slope. Small tiles fit better on curves. Think about cleaning. Smooth tiles are easier to clean. Tiles with texture need more care. Make a good choice for your shower.
Grouting And Sealing
Grout fills the gaps between tiles. It keeps water out. Choose grout that matches your tiles. Mix it well before use. Apply grout with a rubber tool. Wipe extra grout with a damp sponge. Let it dry for a day. Then, seal the grout. Sealer keeps water and dirt out. It makes grout last longer. Apply sealer with a brush. Cover all grout lines. Let it dry well. Keep your shower clean and dry.
Testing The Shower Pan
Fill the shower pan with water. Wait for a few hours. Look for any water puddles outside the pan. If you see any, it means there is a leak. Fix the leak before using the shower. Check the corners and edges carefully. Water can seep through small gaps. Use a flashlight to see better.
Pour some water in the pan. Watch how it flows. The water should go down the drain fast. If water stays in the pan, there is a drainage problem. Adjust the pan’s slope if needed. The slope should be about 1/4 inch per foot. This helps water move to the drain. A good slope prevents water from pooling.
Maintenance Tips
Building a shower pan on a slab floor requires careful preparation. Ensure the surface is clean and level. Use a waterproof membrane for protection. Mix and pour concrete smoothly. Let it dry completely before use.
Regular Cleaning
Clean the shower pan regularly. Use mild soap and water. Scrub gently with a soft brush. Rinse thoroughly to remove soap. Dry with a clean towel. This prevents mold and mildew. Keep the surface shiny and new. Regular cleaning helps maintain its beauty.
Inspecting For Damages
Check the shower pan often. Look for cracks or chips. Examine the grout lines closely. Small damages can cause big problems. Fix them quickly to avoid leaks. Use a flashlight to inspect corners. Pay attention to any discoloration. Regular inspections keep the shower safe.
Frequently Asked Questions
What Materials Are Needed For A Shower Pan?
To build a shower pan on a slab floor, you’ll need a shower liner, mortar mix, waterproof membrane, and drain assembly. Additionally, gathering tools like a trowel, level, and bucket is essential. These materials ensure proper waterproofing, drainage, and stability for your shower pan installation.
How Long Does It Take To Build A Shower Pan?
Building a shower pan can typically take two to three days. This includes preparation, setting the mortar, and allowing it to cure. The curing process is crucial for ensuring the shower pan’s longevity and effectiveness, so patience is key to a successful installation.
Can I Build A Shower Pan Myself?
Yes, you can build a shower pan yourself with the right tools and materials. It’s essential to follow detailed instructions for a successful DIY project. If you’re unsure or inexperienced, consulting with a professional might be beneficial to ensure a high-quality, waterproof finish.
What Is The Cost Of Building A Shower Pan?
The cost to build a shower pan on a slab floor can range from $200 to $500. This depends on materials and tools needed. DIY projects tend to be cheaper, while hiring a professional may increase costs due to labor fees.
Conclusion
Building a shower pan on a slab floor isn’t too hard. With basic tools, you can do it yourself. Start with a solid foundation. Choose the right materials. Follow step-by-step instructions carefully. This ensures a durable and waterproof finish. Remember, patience is key.
Take your time. Double-check each step. It’s rewarding to see the final result. A beautiful shower pan enhances your bathroom. Plus, it adds value to your home. So, grab your tools and get started. Enjoy your new shower space!


