Are you ready to transform your bathroom into a stunning oasis? Building a shower pan on a plywood floor might sound like a daunting task, but with the right guidance, it can be a rewarding project that elevates your home.
Imagine stepping into a perfectly crafted shower space, knowing you built it with your own hands. This article will guide you through each step, ensuring you avoid common pitfalls and achieve a flawless finish. Whether you’re a DIY enthusiast or tackling home improvement for the first time, this guide is designed to make the process easy and accessible.
Dive in, and discover how you can enhance your bathroom with a durable and stylish shower pan. Your dream bathroom is just a few steps away!
 Floor: Expert Tips”/>
Materials Needed
Building a shower pan requires the right tools. A strong plywood base is key. Use a tape measure to check sizes. Plywood sheets are the main material. Thin-set mortar helps in bonding. Waterproof membrane stops leaks. Drain assembly is crucial for water flow. Trowel spreads mortar evenly. Screws hold everything tight. Level checks the flatness. Notched trowel is for spreading thin-set. Bucket for mixing mortar. Screwdriver tightens screws. Utility knife cuts material. Rubber gloves protect hands. Safety goggles keep eyes safe.
Preparation Of Plywood Floor
First, remove all dirt and dust from the floor. Use a broom and a damp cloth. This makes the surface clean. Make sure there are no sticky spots. A clean floor helps the shower pan stick well. Check for any nails or sharp objects. These can cause problems later. Remove them carefully.
Use a level tool to check the floor. The tool tells you if the floor is even. If the floor is not level, fix it. Add or remove plywood sheets as needed. A level floor stops water from pooling. This helps the shower last longer.
Waterproofing Techniques
Building a shower pan on a plywood floor requires careful waterproofing to prevent leaks. Start by applying a waterproof membrane over the plywood. Ensure it covers all corners and edges for a secure seal.
Applying Waterproof Membrane
Start with a clean plywood floor. Spread the waterproof membrane over the surface. Use a brush or roller. Ensure even coverage. Let it dry completely. No gaps or bubbles should be visible. This keeps water out. Repeat the process if needed. More layers mean better protection. Check for any missed spots.
Sealing Edges And Corners
Edges and corners need special care. Use waterproof tape for sealing. Apply it firmly. Press down to secure it well. Corners can be tricky. Use extra tape if needed. This prevents leaks. Make sure no gaps are left. Double-check the tape job. Water should not escape from any part. Proper sealing is key.
Building The Shower Pan Frame
Crafting a shower pan frame on a plywood floor involves precise measurements and solid construction. Ensure a snug fit by cutting and securing the lumber tightly. A well-built frame prevents water leaks and supports the entire shower structure effectively.
Constructing The Frame
Start by measuring the shower area. Cut wooden planks to fit these measurements. Arrange the planks into a rectangle or square shape. Use screws to join the planks at the corners. Make sure the frame is secure and sturdy. Use a level to check if it is even. Adjust if needed. The frame should fit snugly around the shower space.
Securing The Frame To The Floor
Place the frame on the plywood floor. Ensure it aligns with the shower area. Use screws to attach the frame to the floor. Drill through the frame and into the plywood. This keeps it stable and fixed. Check if the frame is firmly secured. Tighten any loose screws. The frame should not move or wobble.
Mixing And Pouring Concrete
Building a shower pan on a plywood floor involves mixing and pouring concrete carefully. Ensure an even surface for proper drainage. This step is crucial for a waterproof and durable shower base.
Choosing The Right Concrete Mix
Selecting the correct concrete mix is crucial. Look for a mix made for shower pans. This ensures it will be waterproof and durable. A mix with sand is usually the best choice. It makes the surface smooth and even. The mix must be easy to work with. Check the instructions on the package. It will guide you on how much water to add. Remember, too much water makes the mix weak. Just follow the instructions carefully.
Pouring And Smoothing The Concrete
Pouring the concrete needs patience. Start by pouring it slowly. Use a trowel to spread it evenly. Make sure the concrete covers the whole area. Smooth the surface with the trowel. This prevents lumps and bumps. Work quickly but carefully. The concrete dries fast. Check for any air bubbles. Pop them with a trowel if you see any. Smooth the surface again after popping bubbles. Let the concrete dry completely. This usually takes a few days.
Creating Proper Drainage
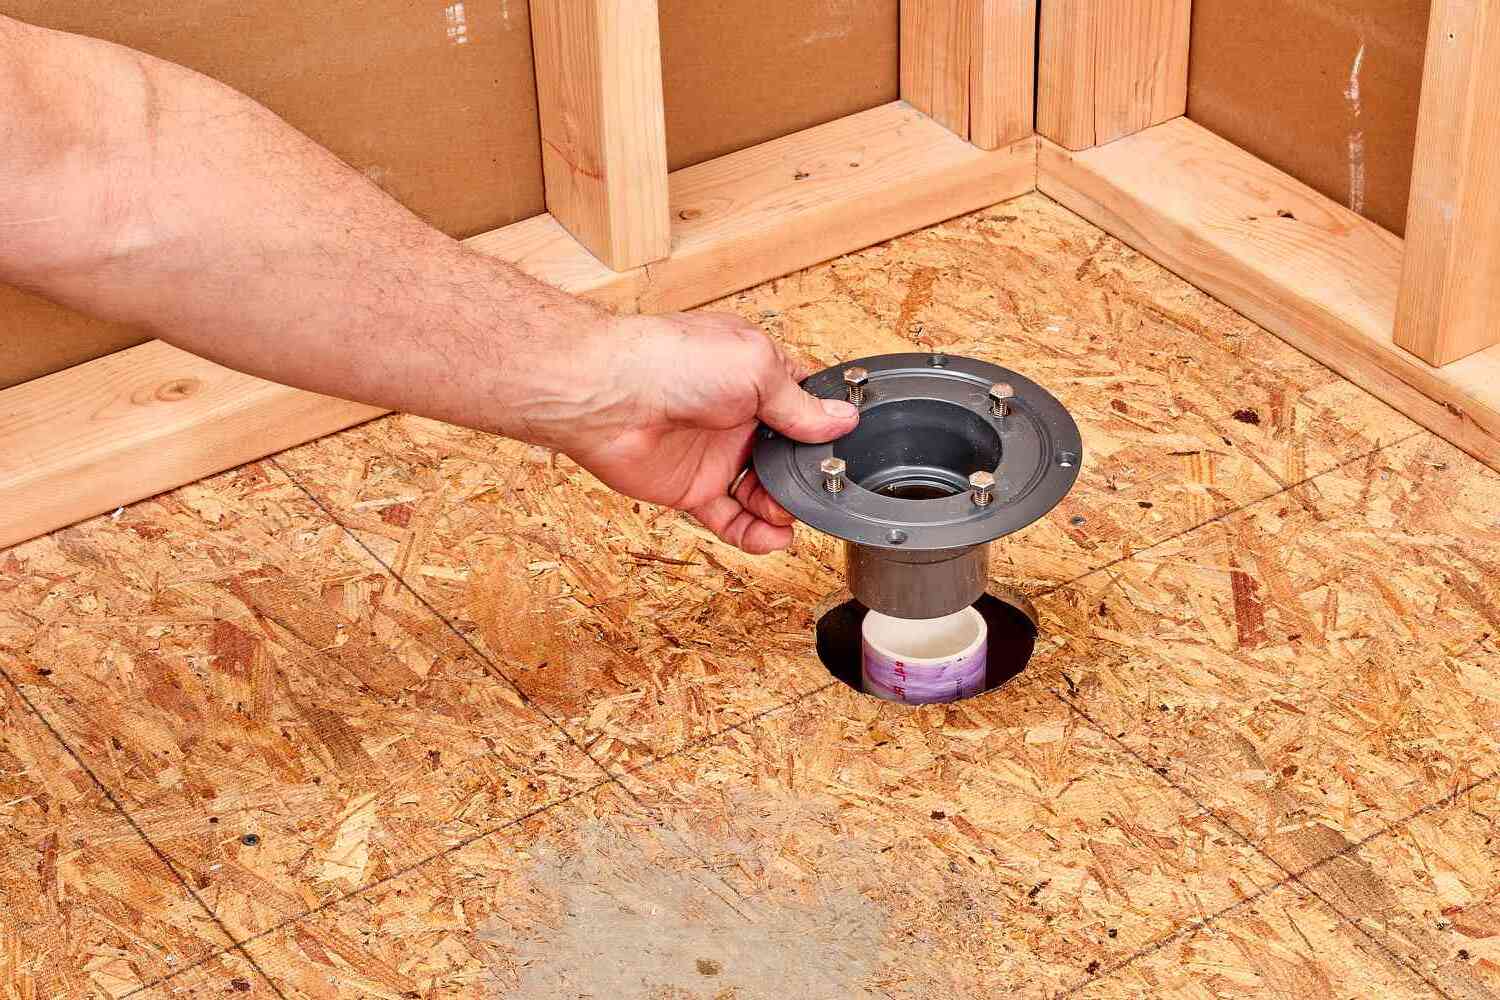
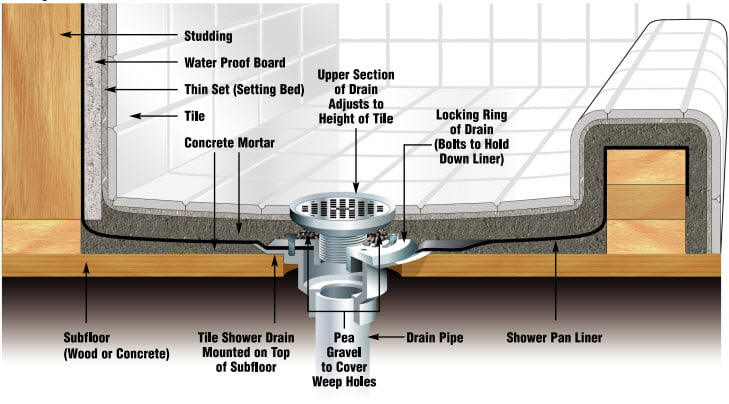
First, pick the right drain for your shower. It must fit well. Next, cut a hole in the plywood. Make sure it’s the right size for the drain. Then, place the drain into the hole. Use a good sealant to keep it watertight. Tighten all parts so nothing is loose. This stops leaks. It’s important to check everything twice.
A proper slope is key for water to flow right. The slope should lead water to the drain. A slope of 1/4 inch per foot is ideal. Use a level tool to check. Adjust by adding or removing material. Keep checking the slope often. This avoids water pooling.
Final Touches
Choose tiles that fit your design. Spread adhesive on the floor evenly. Place tiles one by one. Press firmly to ensure they stick. Use spacers for even gaps. Let dry as per instructions. Mix grout and spread it into gaps. Wipe extra with a damp sponge.
Inspect all edges for gaps. Use silicone sealant to close gaps. Smooth the sealant with your finger. Check corners for any missed spots. Seal well to prevent water leaks. Clean up any leftover grout or adhesive. Let everything dry completely.
Maintenance Tips
Cleaning keeps your shower pan nice and fresh. Use mild soap and water. Scrub gently with a soft brush. Avoid harsh chemicals. They can damage the surface. Rinse well with warm water. Dry the area with a clean cloth. This stops water spots from forming. Regular care keeps your shower looking new.
Look for water spots under the shower pan. These spots mean there might be leaks. Check the edges and corners carefully. Feel for dampness with your hand. If you find leaks, fix them quickly. This stops bigger problems later. Dry the area after each use. This helps prevent future leaks.
Frequently Asked Questions
What Is A Shower Pan?
A shower pan is a waterproof base for your shower. It prevents water from seeping into the subfloor. It’s typically made from fiberglass, acrylic, or PVC. Installing a shower pan ensures longevity and prevents mold. Proper installation on plywood is crucial for durability.
Can I Build A Shower Pan On Plywood?
Yes, you can build a shower pan on plywood. Ensure the plywood is sturdy and moisture-resistant. Use a waterproof membrane for extra protection. Proper sealing prevents leaks and mold. Follow installation guides for best results.
How Do I Waterproof A Shower Pan?
To waterproof a shower pan, apply a waterproof membrane. Use a liquid sealant or sheet membrane for best results. Ensure all seams are covered properly. Waterproofing prevents leaks and mold growth. Follow manufacturer’s instructions for effective protection.
What Materials Do I Need For A Shower Pan?
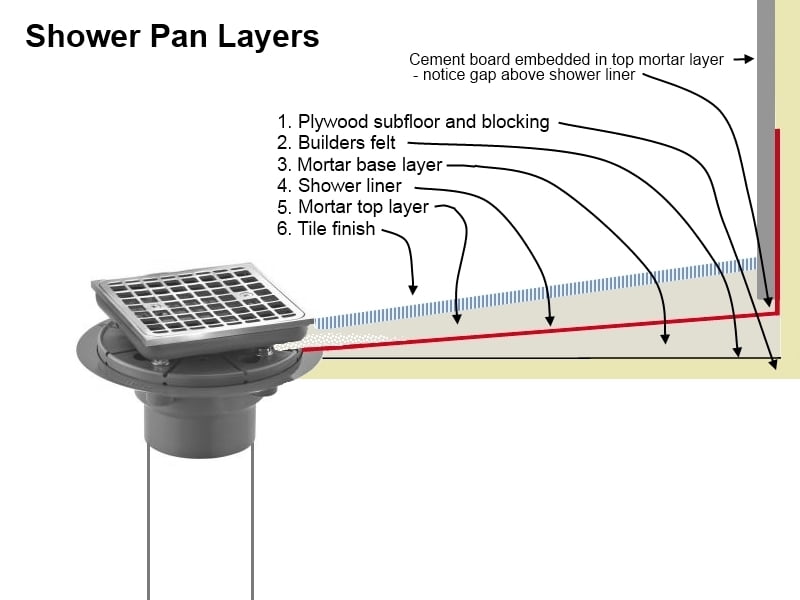
You’ll need plywood, waterproof membrane, mortar, and tile for a shower pan. Choose moisture-resistant plywood for durability. Use a waterproof membrane to prevent leaks. Mortar helps with tile adhesion. Always use materials recommended for wet areas.
Conclusion
Building a shower pan on a plywood floor can seem tough. But, with patience and the right tools, it becomes manageable. Start by gathering supplies and following step-by-step instructions. Pay attention to details for a waterproof finish. Remember, preparation is key.
Proper sealing prevents future leaks. Double-check your work for mistakes. Take pride in your craftsmanship. A well-built shower pan lasts years. Enjoy the satisfaction of a job well done. Now, your bathroom is ready for use. A solid foundation ensures durability and functionality.
Get started today and transform your space with confidence.


