Imagine transforming your living space with a sleek, modern look, all by yourself. Floating floors can do just that, and the best part?
They’re surprisingly easy to install. If you’ve ever felt intimidated by home improvement projects, this is one you can tackle with confidence. Whether you’re renovating your kitchen, sprucing up the living room, or updating the bedroom, a floating floor can give your home a fresh, new vibe.
Ready to learn how? In this guide, we’ll walk you through the simple steps to install a floating floor, ensuring professional results without the hefty price tag. Let’s dive in and make your home improvement dreams a reality.
Choisir les bons matériaux
There are many types of floating floors. Some popular choices are laminate, vinyle, et bois d'ingénierie. Laminate floors are easy to clean. Vinyl floors are water-resistant. Engineered wood looks like real wood. Each type has its own benefits. Consider your needs before choosing. Do you want easy cleaning? Or maybe water resistance? Think about the look and feel too. Stratifié is great for busy homes. Vinyle works well in bathrooms. Bois d'ingénierie is perfect for a warm look. Choose wisely for the best results.
The right underlayment is important. It helps with sound and comfort. Foam underlayment is soft and quiet. Cork underlayment is eco-friendly. Rubber underlayment is good for moisture. Each type suits different floors. Foam works well with laminate. Cork is great for wood. Rubber is best for vinyl. Pick the right one for your floor type. This ensures comfort and durability. Underlayment can also add warmth to floors. Make sure to install it properly. Follow the instructions carefully.
Préparation du sous-plancher
Commencer par cleaning the subfloor thoroughly. Remove all dirt and debris. A clean surface helps the floor stick well. After cleaning, check for any bumps. Use a composé de nivellement to make the floor even. This ensures a smooth finish.
Sols irréguliers can cause issues later. Take your time to smooth out all areas. Let the leveling compound dry fully. This might take a few hours. Be patient for the best results.
Moisture barriers are very important. They keep water away from the floor. This helps prevent damage. Roll out the barrier carefully on the subfloor. Make sure there are no gaps. Overlap edges by a few inches.
Tape the seams securely. This adds extra protection. A well-placed barrier keeps the floor dry and safe. Always use the right type of barrier for your floor. Follow the instructions for the best fit.
Rassembler les outils nécessaires
Having the right tools makes the job easier. You will need a mètre à ruban. This helps in getting accurate measurements. A saw is important for cutting. A rubber mallet is used to tap the boards. A tapping block helps protect the edges. You will also need entretoises. They keep the floor in place. A level ensures the floor is even. A pencil is helpful for marking. Keep a utility knife handy for trimming.
Safety is very important. Always wear safety goggles. They protect your eyes from dust. Use ear protection if it’s noisy. Gants can protect your hands. Wear knee pads for comfort. They help while kneeling.
Acclimatation du revêtement de sol
Acclimation helps the sol adjust to your room’s temperature et humidity. This process prevents gauchissement et lacunes after installation. The floor needs to be in the room for a few days. Usually, 48 hours is enough.
Conditions matter for acclimation. Keep the room at the usual living conditions. Ensure the temperature is steady, around 65°F to 75°F. Humidity should be between 30% et 50%. Don’t open windows or doors too much. This keeps the room stable.
Follow these steps for a smooth installation. Your flooring will stay nice and even. Proper acclimation saves time and hassle later.
Planning The Layout
Measure the room carefully. Use a tape measure. Note the length and width. Write these numbers down. Check corners for squareness. Use a square tool. Corners must be 90 degrees. This helps the floor fit well. Avoid gaps or overlaps.
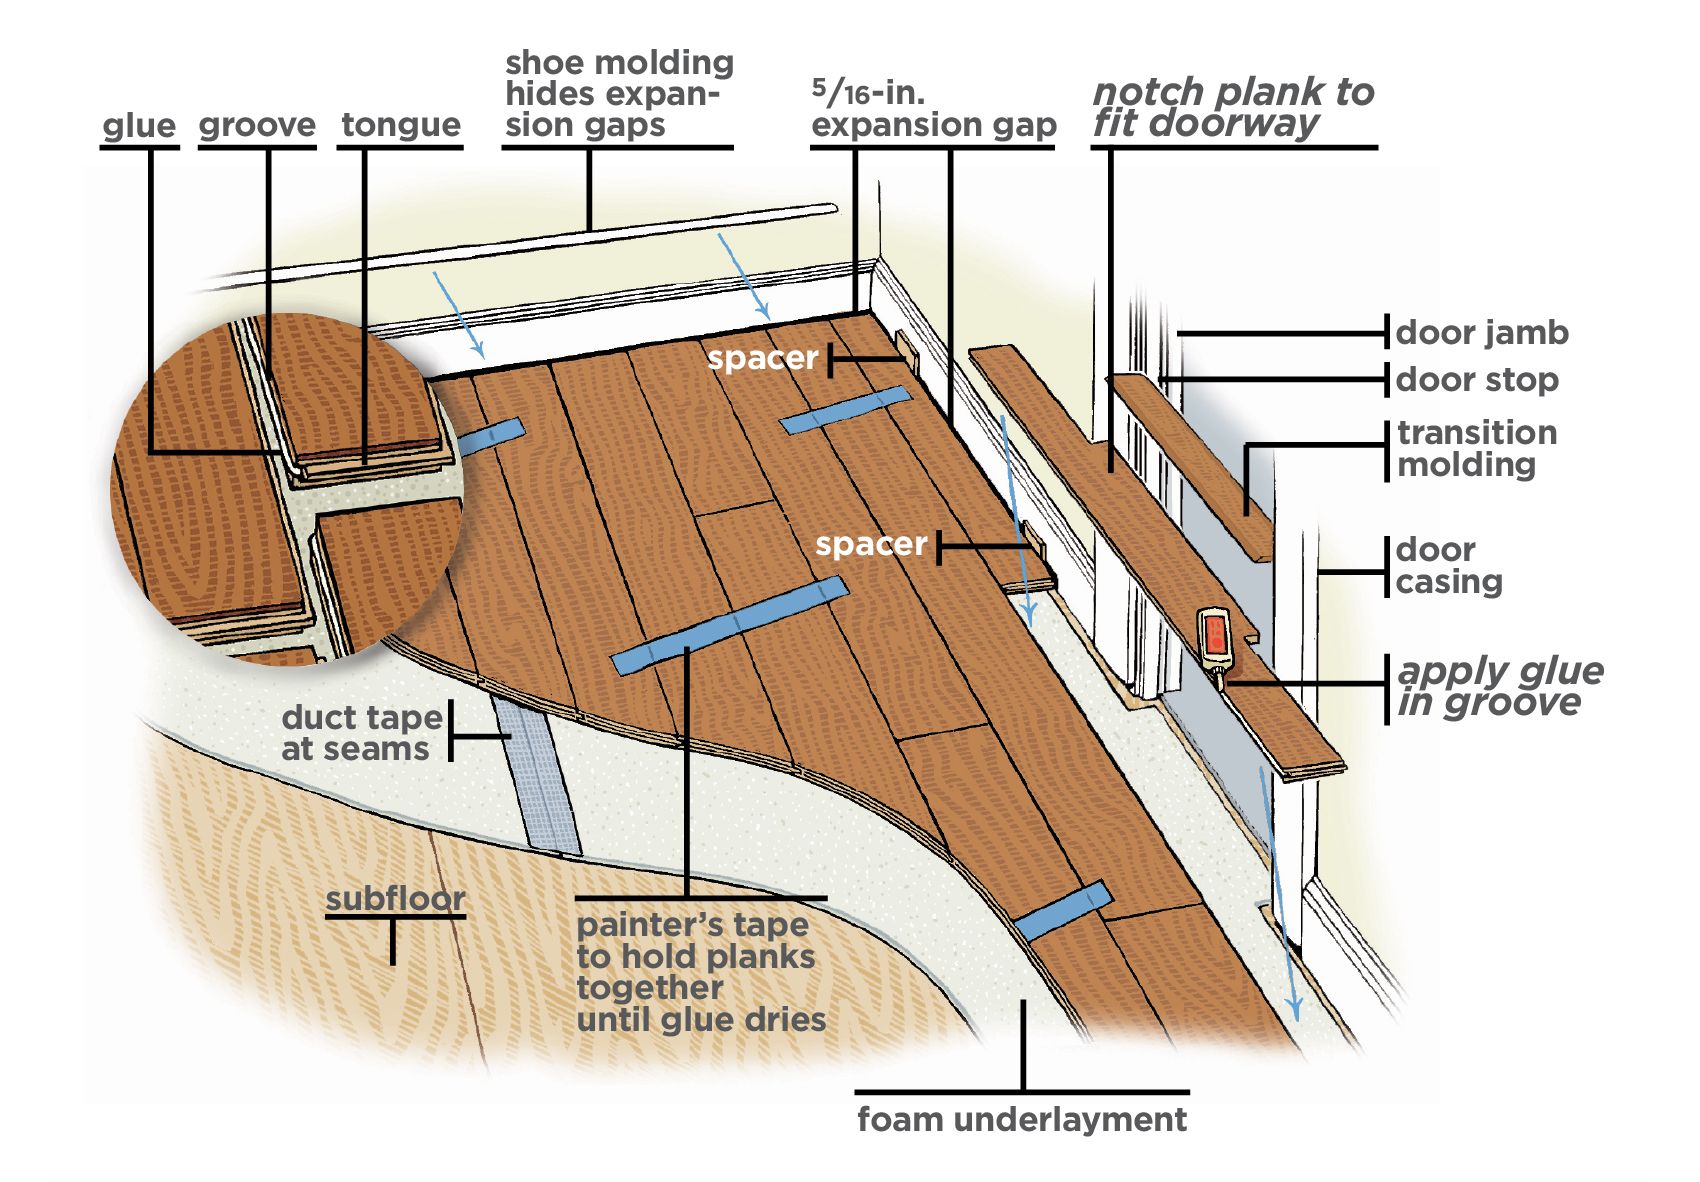
Choose the longest wall. Start from there. This makes the floor strong. Look for a straight wall. Avoid walls with curves. Leave a gap between the wall and floor. Use spacers for this. The floor needs room to expand. This prevents buckling.

Installing The Underlayment
Start by laying the sous-couche on the floor. This helps reduce noise. Make sure it covers the entire floor area. Cut the underlayment with scissors if needed. Join the edges with tape to keep them together. Place the first row of underlayment along the wall. Leave a small gap for expansion. This is important for the floating floor.
Now, secure the underlayment to the floor. Use tape or staples for this task. Ensure it stays flat and smooth. Bumps can cause problems later. Check every section for wrinkles. Fix them right away. The underlayment is now ready for the next steps.
Pose de la première rangée de revêtement de sol
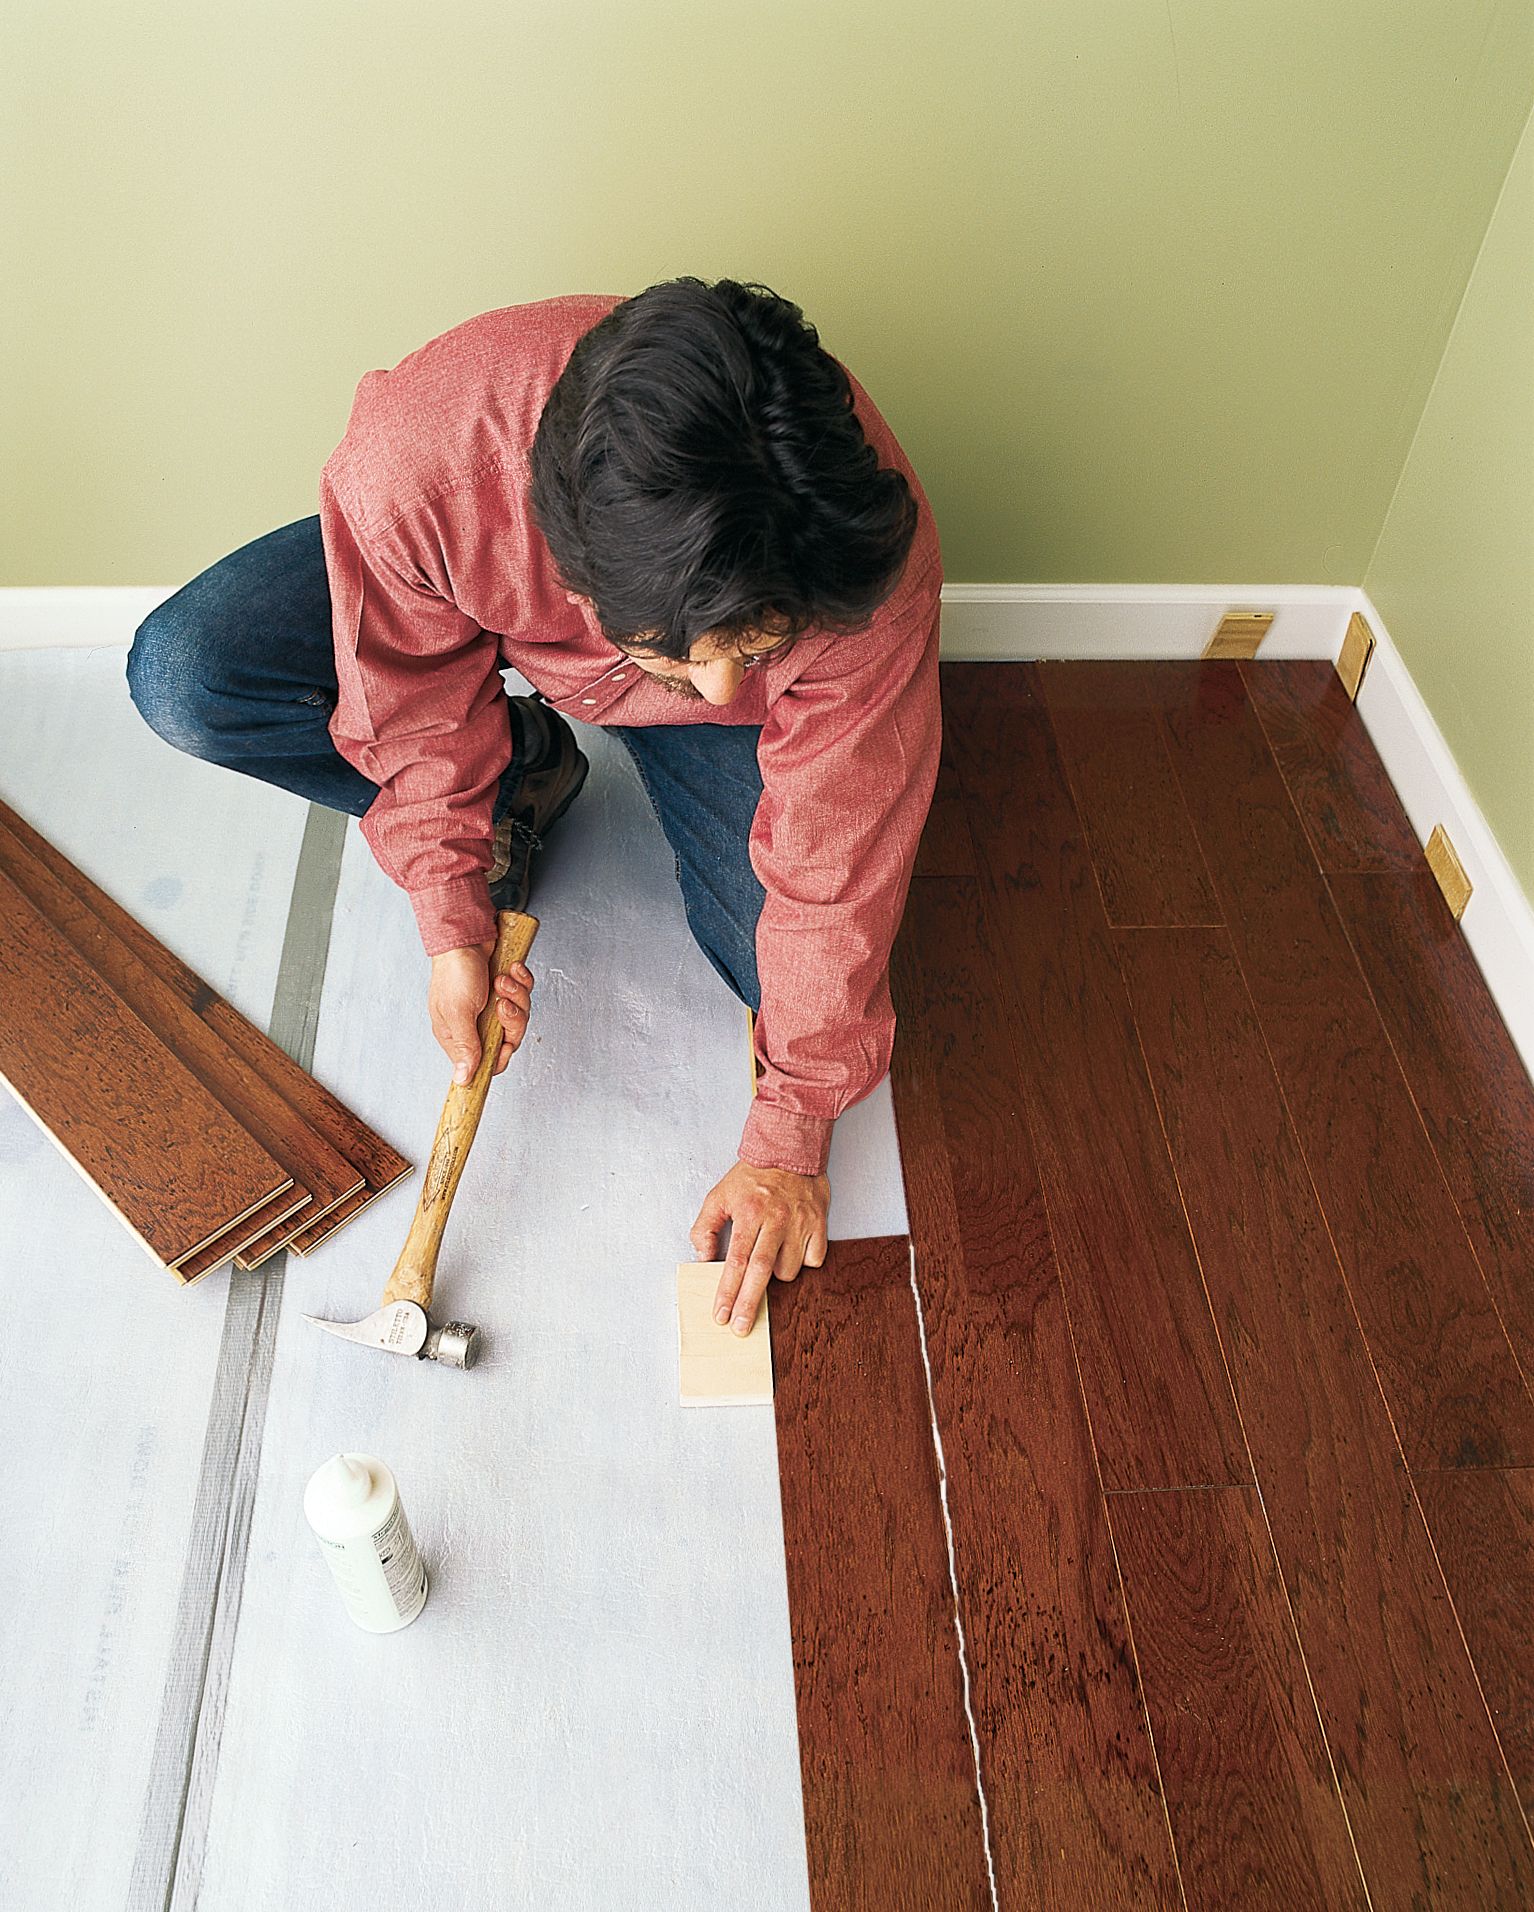
Start by placing the first board against the wall. Ensure it is straight. Use a spacer to keep a small gap. This is called an expansion gap. It helps the floor move as needed. The gap should be about a quarter inch.
Keep the expansion gaps consistent. These gaps stop the floor from buckling. Without them, the floor can get damaged. Always check your work. Make sure everything stays aligned. Use a tape measure for accuracy. If the board is not straight, adjust it. Your floor will look better with a proper start.
Continuing The Installation
Staggering the seams is very important. It makes the floor strong. Each row should not end at the same spot. This creates a more écurie floor. A good rule is to have seams at least 6 inches apart. This looks better and réduit movement. Make sure each new plank is different from the last one. This makes the floor look nice and neat.
Sometimes, you need to fit the floor around things like pipes. First, measure the obstacle size. Then cut the plank to fit. Use a jigsaw for tricky shapes. Cut small and check the fit often. This helps avoid mistakes. Careful cutting keeps the floor looking neat. Always leave a small gap for the floor to expand. This stops the floor from buckling.
Touches finales
Complete your floating floor installation with these finishing touches. Trim the edges with baseboards or moldings. Ensure all gaps are filled for a seamless look.
Installing Trim And Moldings
Trim and moldings make the floor look neat. They cover gaps between the floor and wall. Use a measuring tape to find the right length. Cut the trim with a saw. Secure it with nails or adhesive. Check if they fit snugly. Corners need special attention. Cut them at angles for a perfect fit. Trim improves the room’s appearance.
Cleaning And Inspecting The Floor
Clean the floor to keep it shiny. Use a soft broom or vacuum. Avoid water; it can damage the floor. Look for any rayures ou marks. Fix them with repair kits. Check if all planks are secure. Loose planks make noise. Tighten them if needed. Inspection helps maintain the floor’s beauty.

Dépannage des problèmes courants
Installing a floating floor can present challenges like uneven subfloors and incorrect plank alignment. Ensure a smooth installation by leveling the subfloor and snapping planks tightly together. Proper preparation helps prevent gaps and squeaks, ensuring a durable floor.
Dealing With Gaps
Gaps can appear between floorboards. This happens if boards shrink. Temperature changes can cause this. Use a wooden filler for small gaps. Push it in with a putty knife. For bigger gaps, add a small strip of wood. Match the color for a neat look. Regular cleaning helps. Dirt can make gaps look bigger. Keep floors dry too. Moisture can cause gaps to widen.
Fixing Squeaks And Creaks
Squeaky floors can be annoying. This happens when boards rub together. Sprinkle some talcum powder between the boards. It helps reduce noise. For stubborn squeaks, use a screw. Drill it carefully into the floor. Make sure it doesn’t go all the way through. Test the floor by walking on it. If it still squeaks, try again. Always be gentle. Floors can be delicate.
Questions fréquemment posées
What Tools Are Needed To Install A Floating Floor?
To install a floating floor, you’ll need a tape measure, utility knife, and tapping block. You might also require a rubber mallet, spacers, and a saw. These tools help ensure precise measurements and a secure fit. Always check the manufacturer’s instructions for any specific tools required.
Can I Install A Floating Floor Over Carpet?
Installing a floating floor over carpet isn’t recommended. Carpet creates an unstable surface for the flooring. It’s best to remove the carpet and prepare the subfloor properly. A stable, flat, and clean subfloor ensures a successful installation and longevity of your floating floor.
How Long Does Floating Floor Installation Take?
Floating floor installation typically takes one to three days, depending on the room size and complexity. Smaller rooms might be quicker, while larger or intricate spaces take longer. Preparation, acclimatization of materials, and careful installation contribute to overall time. Always plan for extra time in case of unforeseen challenges.
Is Underlayment Necessary For Floating Floors?
Underlayment is often necessary for floating floors. It provides cushioning, reduces noise, and improves moisture resistance. Some floors come with pre-attached underlayment, while others require separate installation. Always check the flooring specifications to determine the need for underlayment to ensure optimal performance and comfort.
Conclusion
You’ve learned the steps to install a floating floor. It’s easier than it seems. Start with a clean, dry surface. Follow each step carefully. Use the right tools. Check the boards for defects before installation. Make sure everything lines up.
Enjoy your new flooring. It adds beauty and value to your home. Now, you’re ready to tackle this project with confidence. You can create a stunning floor. Happy flooring installation!