Are the unsightly gouges in your beautiful hardwood floors causing you stress every time you walk through your home? You’re not alone.
These imperfections can make even the most luxurious spaces feel neglected and uncared for. But here’s the good news: you can fix them! Imagine the satisfaction of restoring your floors to their original glory, making them look as if they’ve never been damaged.
You’ll learn simple, effective techniques that you can use to tackle those pesky gouges. So, get ready to reclaim the beauty of your home and feel proud of your floors once again. Dive in and discover how easy it is to transform your space with just a little effort and the right know-how.
Identifying Gouges
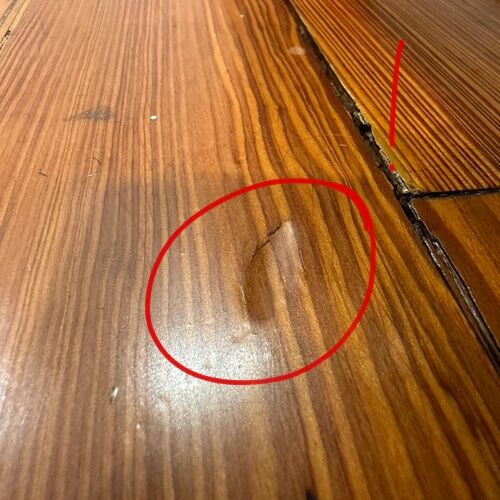
Finding a gouge in your hardwood piso can be upsetting. These marks are deeper than scratches. They are visible and can affect the look of the floor. Gouges often happen because of heavy objects. Dropping things or moving furniture can cause them. The first step is to check the size and depth. Small gouges might only need a simple fix. Bigger ones may require more work. Use your fingers to feel how deep they are. Look closely at the color and texture. This helps in deciding the best repair method. Knowing the type of wood is also important. Different woods may need different treatments.
Identifying these details helps in fixing the floor. It ensures the repair blends well. This keeps your floor looking nice and smooth.
Herramientas y materiales necesarios
Fixing gouges in hardwood floors needs some tools and materials. A espátula is needed to spread filler. Use a sanding block to smooth the surface. Get a relleno de madera that matches your floor color. A clean cloth will help wipe dust away. Use a vacío to pick up small particles. A soft brush is useful for applying finishes. You need a floor finish to complete the repair. These tools help fix the gouges properly. Make sure to gather all items before starting. This will help save time and effort.
Preparing The Damaged Area
Begin by cleaning the damaged area to remove dust and debris. Sand the gouge gently to smooth edges. Ensure the surface is dry and clean before applying any filler. This preparation ensures the repair materials adhere properly for a seamless finish.
Cleaning The Surface
Start by removing any dirt or dust. Use a soft cloth to wipe the area. Make sure the floor is clean and dry. This helps the repair materials stick better. Avoid using harsh chemicals. These can harm the wood. A little water with a soft detergent works best. Dry the area well before moving on.
Sanding The Gouge
Use a piece of fine-grit sandpaper. Gently rub over the gouge. Sand until the edges are smooth. Be careful not to sand too hard. This could damage the wood more. Clean the dust with a damp cloth. Let the area dry completely. Now it’s ready for the next steps.
Filling The Gouge
Fixing gouges in hardwood floors involves cleaning the area and applying wood filler. After drying, gently sand the surface for smoothness. Finally, apply a matching stain or finish to blend the repair seamlessly with the floor.
Choosing The Right Filler
Gouges need special care. Wood filler is a great choice for small gouges. Epoxy works well for big gouges. Wax sticks can fill shallow gouges. Color matters. It should match the floor. Test the filler in a hidden spot. Look at the texture. It should blend well.
Applying The Filler
Clean the gouge first. Use a soft cloth. Apply filler con un espátula. Press it in. Make it smooth. Let it seco. Drying takes time. Sand the area lightly. Make it even. Finalizar with a touch of stain. Polish for a shine.
Sanding And Smoothing
Fine grit sandpaper is used to fix floor gouges. It makes the surface smooth. Start by gently rubbing the sandpaper over the gouge. Use small, circular motions. Be careful not to sand too hard. This helps avoid more damage. Controlar the gouge often. Make sure it is getting smoother.
After sanding, feel the surface with your hand. It should feel even. If not, sand a bit more. Wipe away any dust with a damp cloth. This keeps the area clean. A smooth surface is ready for the next step. Sanding properly is key.

Staining And Sealing
Matching the stain color is important for a good look. Start by testing stains on a hidden spot. Check which one matches best. Use a small brush for the test. Compare the dried color to the floor. Repeat with new stains until you find a match.
Applying the sealant keeps the floor safe. Use a clean brush for this. Dip the brush in the sealant. Spread it evenly over the stain. Cover the whole area. Let it dry completely. This protects the wood from future damage.
Preventing Future Damage
Fixing gouges in hardwood floors protects them from future damage. Start by cleaning the affected area. Then, fill the gouge with wood filler, smoothing it with a putty knife. Once dry, sand the surface gently. Finish by applying a matching stain or sealant to blend with the rest of the floor.
Using Protective Pads
Protective pads can help keep floors safe. Place them under furniture legs. They stop scratches and reduce gouges. Choose pads made from felt or rubber. These materials cushion impacts. They also make moving furniture easier. Remember to check pads regularly. Replace them if they wear out. This simple step keeps floors looking nice.
Consejos de mantenimiento regular
Regular cleaning keeps floors in top shape. Sweep daily to remove dirt. Dirt can scratch wood. Mop with a damp cloth weekly. Avoid using too much water. Water can harm wood. Use a gentle cleaner for best results. Never use harsh chemicals. They can damage the finish. Maintain your floors, and they will last longer.

Preguntas frecuentes
How To Repair Small Gouges In Hardwood Floors?
To fix small gouges, use wood filler matched to your floor’s color. Clean the area, apply the filler, and smooth it with a putty knife. Let it dry completely and sand it for a smooth finish. Finally, apply a coat of matching stain or sealant to blend it seamlessly.
Can Scratches Be Removed From Hardwood Floors?
Yes, scratches can be removed using a hardwood floor repair kit. Clean the area thoroughly, then apply the kit’s filler to the scratch. Smooth it out and let it dry. Sand it lightly, and finish with matching stain or sealant to restore the floor’s appearance.
What Tools Are Needed To Fix Floor Gouges?
To fix floor gouges, you’ll need wood filler, a putty knife, sandpaper, and matching stain or sealant. A cleaning cloth and vacuum are useful for cleaning before repairs. These basic tools help ensure the gouges are repaired smoothly and effectively, maintaining your floor’s beauty.
How Do I Match Wood Filler Color?
Match wood filler color by selecting a shade closest to your floor’s stain. Test a small area first to ensure compatibility. Some fillers can be mixed to achieve a better match. Always finish with a stain or sealant to blend the filler seamlessly into the surrounding wood.
Conclusión
Fixing gouges in hardwood floors is simple with the right steps. Clean the area first. Choose the correct filler for the gouge. Apply the filler evenly and let it dry. Sand gently for a smooth finish. Finally, protect the repair with a matching finish.
Regular care prevents future damage. These steps help maintain beautiful floors. A little effort keeps your home looking great. Enjoy your smooth and elegant floors. Your hardwood floors deserve attention and care. Keep them shining for years to come.