To lay laminate flooring on concrete, start by evaluating and repairing any cracks, ensuring the floor is clean, dry, and level. Select an underlayment with a moisture barrier to protect against dampness and improve soundproofing. Acclimate your laminate planks to the room’s temperature and humidity before installation. Lay a vapor barrier, then the underlayment, and begin installing planks with spacers for expansion gaps. Proper preparation and precise technique are key; further insights will help you achieve a flawless finish.
Assessing the Condition of the Concrete Floor
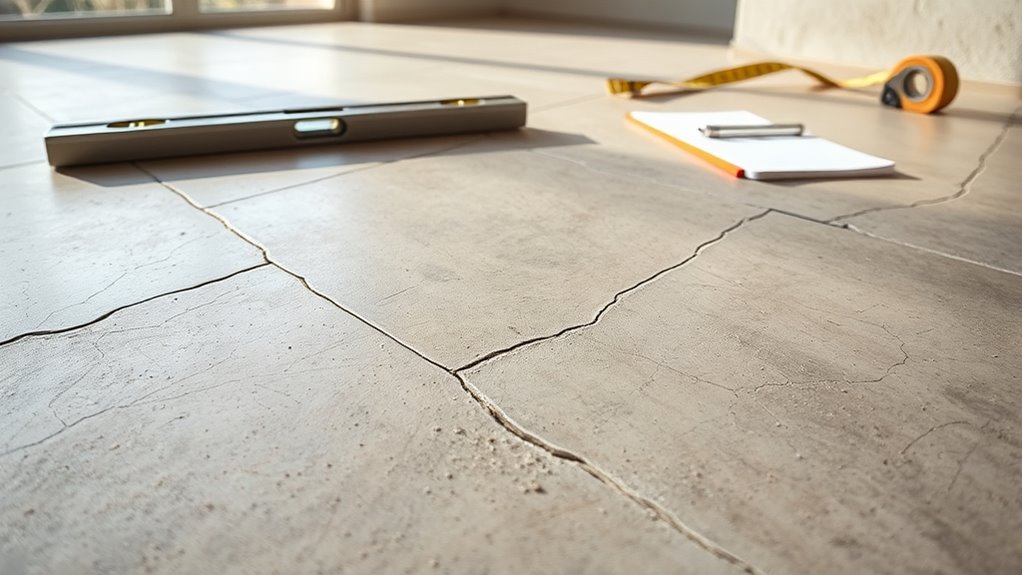
Before you install laminate flooring, you need to thoroughly assess the concrete floor’s condition to confirm a stable base. Start with a crack assessment, identifying any fissures that could compromise the structural integrity or cause unevenness. Small cracks may require filling, while larger ones might need professional repair. Next, evaluate the surface level using a straightedge or laser level to detect any dips or high spots. Uneven surfaces can lead to laminate damage over time, so addressing these irregularities is crucial. Pay close attention to moisture content as well, as excess moisture can affect adhesion and durability. By performing a precise crack assessment and confirming a flat surface level, you guarantee the laminate flooring will lay smoothly, enhancing durability and preserving your freedom to enjoy a flawless floor.
Gathering Necessary Tools and Materials
Before you start laying laminate flooring, make certain you have all essential tools like a tapping block, pull bar, spacers, and a saw for cutting planks. Choose the right type and quantity of flooring materials based on your room’s dimensions and expected traffic. Additionally, prepare any adhesives and accessories required for your specific laminate system to guarantee a seamless installation.
Essential Tools Checklist
To lay laminate flooring efficiently, you’ll need a specific set of tools and materials that guarantee accuracy and ease throughout the installation process. The right tool types and essential accessories assure your work is precise and your progress steady. Here’s a checklist to prepare you for the task:
| Tool Type | Essential Accessories |
|---|---|
| Measuring Tape | Spacers |
| Laminate Cutter | Pull Bar |
| Rubber Mallet | Tapping Block |
These tools help you measure accurately, cut cleanly, and fit planks tightly without damaging edges. Spacers maintain expansion gaps, while the tapping block and pull bar assist in locking planks securely. Having these ready means you’re equipped for smooth installation, giving you the freedom to work confidently on your concrete floor.
Selecting Flooring Materials
Anyone planning to install laminate flooring needs to carefully select materials that match both the functional requirements and aesthetic goals of the space. Begin by evaluating laminate types to guarantee durability and moisture resistance suitable for concrete subfloors. Next, consider flooring colors that complement your room’s lighting and décor, balancing style and practicality. You’ll also need underlayment material for moisture control and sound reduction. Quality spacers are essential to maintain expansion gaps during installation. Finally, choose transition strips that blend seamlessly with your laminate flooring for a professional finish.
- Durable laminate types with moisture resistance
- Flooring colors matching room ambiance
- Moisture barrier underlayment
- Spacers for expansion gaps
- Transition strips for clean edges
Selecting these materials precisely guarantees a lasting, visually appealing laminate floor.
Preparing Adhesives and Accessories
Three essential categories of materials you’ll need to prepare for installing laminate flooring include adhesives, tools, and accessories. Start by selecting the appropriate adhesive types—pressure-sensitive tapes, polyurethane glues, or specialized laminate adhesives—based on your flooring system and subfloor conditions. Make sure you have a notched trowel for even adhesive application. For tools, gather a tapping block, pull bar, spacers, and a rubber mallet to facilitate precise plank fitting and expansion gaps. Accessory options like moisture barriers, underlayment, and connector strips are vital for durability and finishing. Choose moisture barriers compatible with your concrete floor to prevent damage. Underlayment should offer sound reduction and cushioning. Preparing these materials beforehand guarantees a streamlined installation process, granting you the freedom to work efficiently without interruptions or compromises in flooring performance.
Preparing the Concrete Surface for Installation
Before you begin laying laminate flooring, verifying the concrete surface is properly prepared is essential for a durable and level installation. Start with thorough surface cleaning to remove dust, grease, and debris that could compromise adhesion. Next, inspect the floor for cracks and perform crack repair using a suitable epoxy or patching compound to prevent future movement. Check the moisture level, as excess dampness can damage laminate. Level any uneven areas with a self-leveling compound to create a flat base. Finally, allow the concrete to cure completely before proceeding.
- Clean surface thoroughly
- Repair cracks with epoxy or patch
- Test moisture content
- Level uneven spots
- Verify full curing before installation
This preparation guarantees a stable foundation, securing your laminate’s longevity and performance.
Choosing the Right Underlayment for Laminate
You’ll need to select an underlayment that includes a moisture barrier to protect your laminate from concrete vapor. Consider materials that offer soundproofing to reduce noise transmission between floors. Also, pay attention to thickness and composition, as these factors impact durability and comfort underfoot.
Moisture Barrier Importance
Although laminate flooring offers durability and aesthetic appeal, selecting the appropriate underlayment with a moisture barrier is critical to prevent damage from subfloor moisture. Without proper moisture control, your flooring can warp, swell, or develop mold, drastically shortening installation longevity.
When choosing your underlayment, focus on these key factors:
- Effective vapor barrier to block concrete moisture
- Compatibility with laminate locking systems
- Adequate thickness for leveling minor subfloor imperfections
- Durability to withstand foot traffic and pressure
- Ease of installation for a tight, continuous seal
Soundproofing Benefits
Soundproofing plays an essential role in laminate flooring installation, especially in multi-level homes or apartments where noise transmission can be a significant concern. Choosing the right underlayment enhances acoustic insulation, reducing impact and airborne noise effectively. Employ soundproofing techniques by selecting materials designed for noise dampening. Here’s a comparison of common underlayment options to guide your choice:
| Underlayment Type | Acoustic Insulation Rating (STC) | Impact Noise Reduction (IIC) |
|---|---|---|
| Foam | Moderate (50-55) | Moderate (45-50) |
| Cork | High (55-60) | High (50-55) |
| Rubber | Very High (60-65) | Very High (55-60) |
Thickness and Material Choices
Selecting the appropriate thickness and material for your laminate underlayment greatly impacts both performance and durability. You’ll want to evaluate thickness options carefully to balance comfort, soundproofing, and stability. Material durability is vital to withstand foot traffic and moisture, especially on concrete floors. Consider these factors when choosing your underlayment:
- Thickness options typically range from 2mm to 6mm, affecting cushioning and leveling.
- Foam underlayments offer affordability but moderate durability.
- Rubber underlayments provide superior soundproofing and long-term resilience.
- Moisture barriers are necessary for concrete to prevent damage.
- Cork underlayments combine natural sound absorption with eco-friendly durability.
Selecting the right combination guarantees your laminate flooring remains stable, comfortable, and protected, giving you freedom from future issues.
Acclimating Laminate Flooring Before Installation
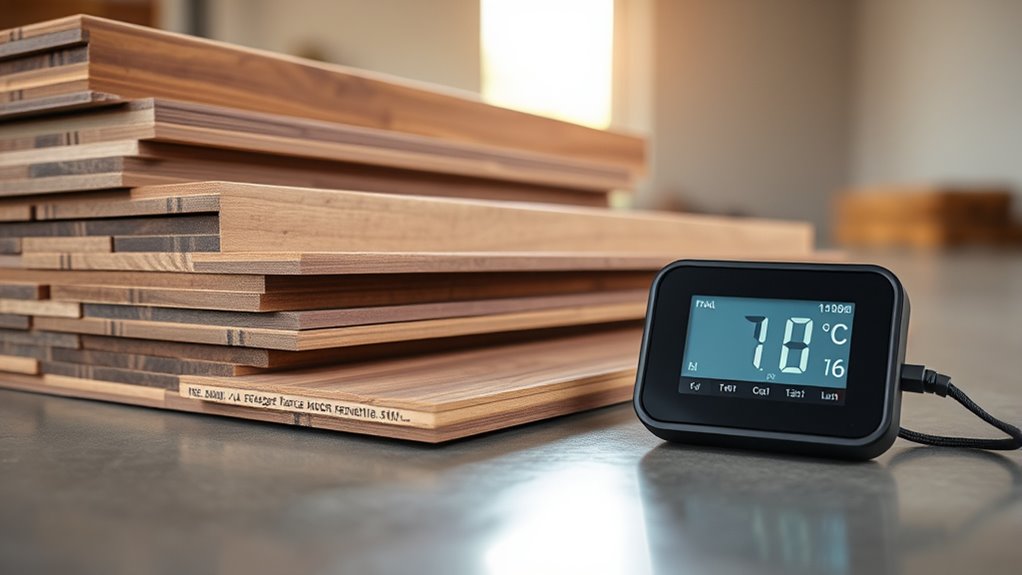
Before you start installing your laminate flooring, you’ll need to acclimate the planks to the room’s temperature and humidity. This step guarantees dimensional stability and prevents warping or gaps after installation. Store the unopened laminate boxes flat in the installation room for 48 to 72 hours. During this period, maintain consistent temperature adjustment within 65-85°F (18-29°C) and relative humidity between 30-50%. Avoid placing planks near heat sources or in direct sunlight, as uneven exposure can cause moisture imbalance. Proper humidity control is crucial to allow the laminate to adapt to the concrete subfloor environment. Skipping this step risks compromising the flooring’s integrity, limiting your freedom to enjoy a flawless, durable surface. Acclimation prepares the material for peak performance and longevity.
Planning the Layout and Measuring the Room
When you start planning the layout, measuring the room accurately is essential to guarantee a seamless installation. Precise room dimensions help you select appropriate layout patterns and minimize waste. Begin by measuring the length and width at multiple points to check for irregularities. Note any obstacles that could affect installation, such as doorways or vents. Use this data to sketch your layout, aligning planks parallel to the longest wall for a balanced look. Key steps include:
- Measure length and width at several locations
- Record irregularities and features
- Determine plank direction based on room shape
- Calculate number of planks needed with waste factor
- Plan expansion gaps around perimeter
Accurate measurements and thoughtful layout patterns affirm your laminate flooring fits perfectly and looks professional.
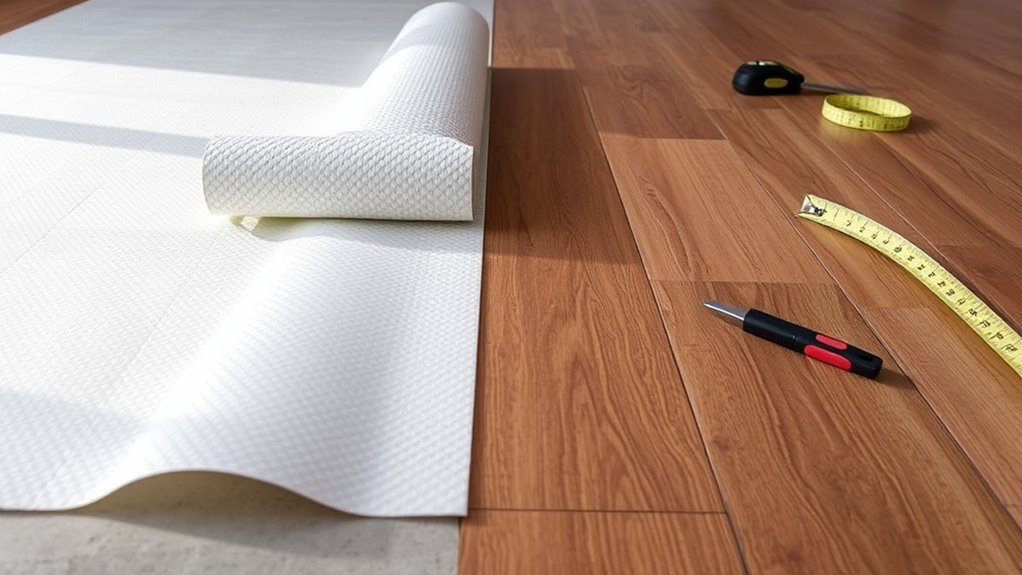
Installing Vapor Barrier and Underlayment
Although it might seem straightforward, properly installing a vapor barrier and underlayment is essential to protect your laminate flooring from moisture and to provide a smooth, stable surface. You’ll choose vapor barrier types based on your concrete’s moisture level. Underlayment benefits include sound reduction, cushioning, and improved insulation. Lay the vapor barrier first, overlapping seams by at least 8 inches, then roll out the underlayment, cutting to fit.
| Vapor Barrier Types | Description | When to Use |
|---|---|---|
| Polyethylene Sheet | Moisture-resistant plastic | High moisture concrete |
| Foil-backed Barrier | Reflects moisture & heat | Cooler climates |
| Combination Barrier | Vapor + sound control | Multi-purpose floors |
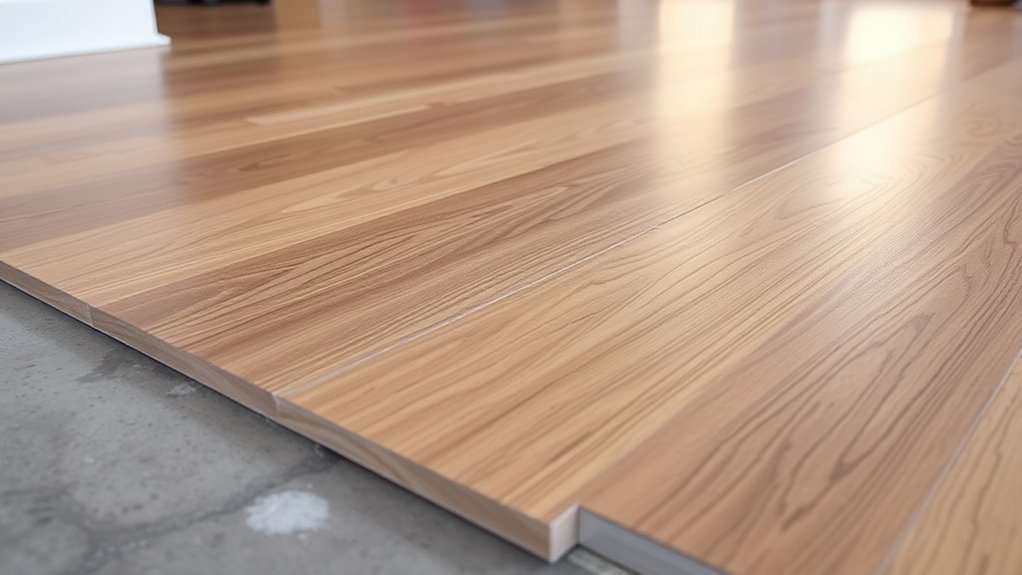
Starting the Laminate Flooring Installation
To begin installing your laminate flooring, start by selecting the longest, straightest wall as your reference point. This guarantees alignment and a clean visual flow. Proper installation techniques here are essential to avoid common mistakes like uneven gaps or misaligned planks.
Keep these steps in mind:
- Lay spacers along the wall to maintain a consistent expansion gap.
- Position the first row with the tongue side facing the wall.
- Use a chalk line to guarantee your rows stay straight.
- Check each plank for defects before installing.
- Avoid forcing planks together; they should click in smoothly.
Cutting and Fitting Laminate Planks
Since laminate planks rarely fit perfectly without adjustment, precise cutting and fitting are essential to achieve a professional finish. Start by measuring the space accurately, accounting for expansion gaps along walls. Use appropriate cutting techniques—such as a fine-toothed saw or laminate cutter—to make clean, straight cuts without splintering. Always cut planks with the decorative side facing down to protect the surface. When fitting, maintain consistent plank alignment to guarantee tight joints and a uniform appearance. Test-fit each plank before securing it in place, making any minor adjustments necessary for seamless edges. Proper cutting and plank alignment not only enhance the floor’s aesthetic but also its durability, granting you the freedom to install confidently and achieve a flawless laminate floor over your concrete base.
Finishing Touches and Maintenance Tips
When you’ve completed laying your laminate flooring, applying the finishing touches is essential to protect your investment and guarantee longevity. Start by installing baseboards or quarter-round molding to cover expansion gaps. Use proper cleaning techniques such as dry mopping or a damp microfiber cloth to avoid moisture damage. Address scratches and minor damages with laminate repair kits or putty sticks, following precise repair tips for seamless restoration. Maintain airflow and avoid prolonged exposure to direct sunlight to prevent warping or discoloration.
- Install baseboards or molding to conceal gaps
- Use dry or slightly damp cleaning methods only
- Apply laminate repair kits for scratches and dents
- Avoid standing water to prevent swelling
- Regulate humidity and sunlight exposure for durability
These steps guarantee your flooring stays pristine and functional.


