Are you tired of dealing with a shower floor that doesn’t drain properly? Or perhaps you’re planning a bathroom renovation and want to ensure everything is just right.
Learning how to slope a shower floor is a crucial skill that can save you from future headaches and costly repairs. But, where do you start? The process might seem daunting, but with the right guidance, you can achieve a perfectly sloped shower floor that enhances both functionality and style.
Imagine stepping into your shower and feeling the water seamlessly flow towards the drain without any lingering puddles. It’s more than just a dream; it’s a reality you can create. This guide will walk you through the essentials of sloping a shower floor, making it accessible, even if you’re not a seasoned DIYer. By the end of this article, you’ll have the confidence and knowledge to tackle this home improvement project and transform your shower experience. So, are you ready to dive in and learn the secrets to a flawless shower floor slope? Let’s get started!
Tools And Materials Needed
Gathering tools is the first step. You will need a spirit level to check the slope. A trowel helps in spreading the mortar. Have a bucket ready for mixing. Use a measuring tape to get accurate dimensions. A rubber mallet is useful for gentle taps. Screws and nails are needed for securing parts. A drill makes holes faster. Don’t forget safety glasses to protect your eyes.
Materials are just as important. Concrete mix is the base for the floor. Waterproof membrane prevents leaks. Tile adhesive sticks tiles to the floor. Tiles come in many styles. Choose your favorite. Grout fills gaps between tiles. Always buy extra material. Mistakes happen. Better to have more than less.

Assessing The Space
First, measure the shower area with a tape. Write down the length and width. These numbers help in planning. Keep your numbers clear and simple. Accuracy is key. Mistakes can lead to water pooling. So, check your measurements twice. This saves time and effort later.
Find where the drain is. This is usually in the center. But sometimes, it’s not. Check the floor plan if unsure. Knowing the drain spot is important. The floor must slope towards it. This ensures water flows away easily. No puddles, no mess. A good slope keeps the shower dry and safe.
Choosing The Right Slope
Shower floors need a proper slope. Water must flow to the drain. The standard slope is 1/4 inch per foot. This helps water move. Avoid water pooling. Pooling can cause damage. Measure the slope carefully. Use a level tool. It helps ensure accuracy.
Some showers have different shapes. Customizing the slope is important. Wider showers might need a different slope. Calculate based on size. Keep the slope even. Uneven slopes can lead to water issues. Adjust the slope for each unique space. Test with water. Make sure it flows correctly.
Preparing The Subfloor
Remove all dirt and dust from the floor. Use a broom or vacuum for cleaning. Ensure the surface is smooth. Check for any cracks or holes. Repair them before moving on. A clean surface helps in better adhesion. It is crucial for effective waterproofing.
Apply a waterproof membrane on the subfloor. This prevents water damage. Use a brush or roller for application. Cover the entire area evenly. Let it dry completely. The membrane acts as a protective barrier. It keeps moisture away from the floor. Ensure corners and edges are covered well.
Mixing And Applying Mortar
Picking the right mortar is important for shower floors. Thin-set mortar works best for tile. It is sticky and easy to spread. Pre-mixed mortar is convenient but costs more. Dry-mix mortar needs water added. It’s cheaper and can be adjusted for thickness. Always check the bag for instructions. Ensure the mortar is waterproof.
Start by cleaning the shower floor. Mix the mortar until smooth. Use a trowel to spread it evenly. Create a slope towards the drain. Check the angle often. Let it dry fully before adding tiles. Keep hands clean to avoid mess. Follow safety steps. Wear gloves and goggles. Practice makes perfect.
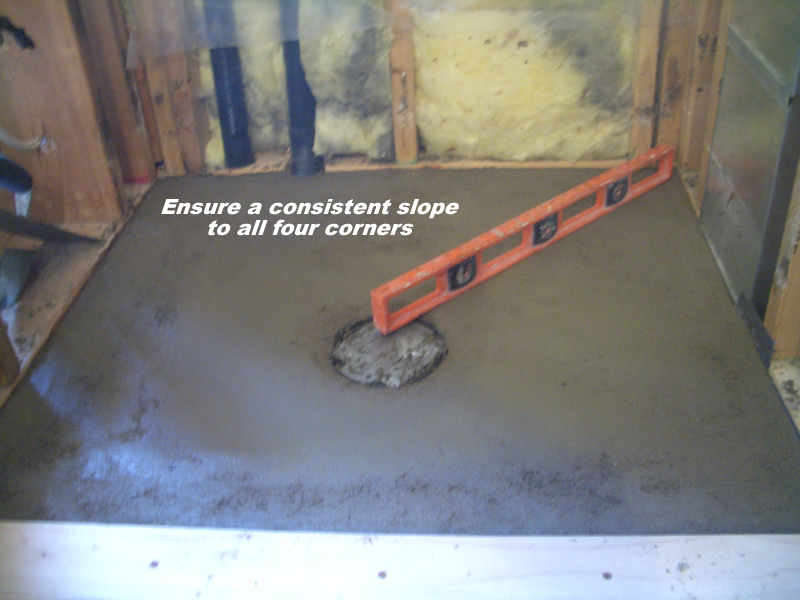
Creating The Slope
A level is a tool that helps make surfaces even. Place the level on the shower floor. It helps find high and low spots. This is important for a good slope. Adjust the floor until it is slightly angled. A gentle slope makes water flow to the drain.
Always check with the level. Make sure the slope is not too steep. An ideal slope ensures no water stays on the floor. This makes the shower safe and clean.
Proper drainage keeps water from pooling. Start by checking the drain’s location. It should be at the lowest part of the floor. This helps water move quickly to the drain.
The floor should slope towards the drain. A well-sloped floor prevents water from collecting. This keeps the shower area dry and tidy. Regular checks with a level ensure the slope remains correct.
Finishing Touches
Make the shower floor smooth for comfort. Use a trowel to even it out. The trowel should be moved gently over the floor. Pay special attention to the edges and corners. This helps remove any bumps or uneven spots. A smooth surface also helps water flow properly.
Allow time for the shower floor to cure. This means letting it dry fully. It often takes about 24 to 48 hours. During this period, avoid stepping on the floor. Proper curing ensures the floor is strong and lasts longer. Check the instructions on your materials for exact times.

Common Mistakes To Avoid
Avoiding common mistakes is key to properly sloping a shower floor. Incorrect slope can lead to water pooling, causing potential damage. Ensure the slope directs water efficiently toward the drain to prevent issues.
Incorrect Slope Angles
The shower floor must slope correctly to drain water. Too steep and water will flow too fast. Too flat and water will not drain. Aim for a gentle slope. The slope should guide water to the drain. Many people use the wrong angle. This can cause water pooling. It might lead to leaks. Use a level to check the slope. Adjust until the water flows smoothly.
Ignoring Waterproofing
Waterproofing is very important. Without it, water can damage floors. It can seep into walls. Mold can grow if moisture stays. Use waterproof materials under tiles. Seal all joints and corners. A waterproof membrane can help. This keeps water where it should be. Check for gaps in the waterproofing. Patch any leaks quickly. A well-waterproofed shower lasts longer.
Maintenance Tips
Keep your shower floor clean. It stops dirt and mold. Use a gentle cleaner weekly. Scrub gently with a soft brush. Rinse with warm water. Dry the floor with a towel. This prevents slipping and staining. A clean shower is safe and pleasant.
Check the shower floor often. Look for cracks or chips. These can cause leaks. Feel the tiles with your hand. Loose tiles need fixing. Inspect the grout lines. Missing grout lets water in. Repairs stop bigger problems. Regular checks keep the shower in good shape.

Frequently Asked Questions
What Is The Ideal Slope For A Shower Floor?
The ideal slope for a shower floor is 1/4 inch per foot. This ensures effective water drainage, preventing water pooling. Proper slope installation minimizes the risk of leaks and mold growth. Always use a level and measure carefully to achieve the correct slope.
How Do You Measure Shower Floor Slope?
Use a level and a tape measure to determine the slope. Measure from the shower drain to the perimeter. Ensure the slope is 1/4 inch per foot. Accurate measurement prevents drainage issues and ensures a properly sloped shower floor.
Why Is Shower Floor Slope Important?
Shower floor slope prevents water pooling and ensures proper drainage. It reduces the risk of leaks and mold growth. A correctly sloped floor enhances shower safety by minimizing slip hazards. Proper slope contributes to overall bathroom hygiene and functionality.
Can You Fix An Incorrect Shower Floor Slope?
Yes, you can fix an incorrect shower floor slope. This involves adding or removing material to adjust the slope. It may require professional help for accurate slope correction. Ensuring the correct slope prevents water damage and maintains shower functionality.
Conclusion
Creating a well-sloped shower floor is essential. It ensures water drains properly. This prevents puddles and keeps your shower clean. Accuracy in measuring slope matters. It avoids future repair hassles. Use the right tools for the job. They help achieve a perfect slope.
Always check the slope with a level. This guarantees even water flow. Practice patience during installation. Rushing might lead to mistakes. A well-done shower floor adds value to your bathroom. It enhances both function and style. Follow these steps and enjoy a flawless shower experience.


