Are you feeling a little uneasy every time you step on that soft spot in your camper floor? You’re not alone.
Many camper owners face this common problem, and it can be a source of worry. But don’t let it ruin your adventure plans just yet! Imagine the peace of mind you’ll have once you know exactly how to fix it.
In this guide, we’ll show you simple, step-by-step solutions to get your camper floor back to its solid, dependable self. With our tips, you’ll save money, prevent further damage, and ensure your camper is safe and comfortable. Ready to turn that squishy spot into a solid foundation? Let’s dive in and fix it together!
Identifying The Problem
Feeling a dip or sag in the camper floor? That’s a soft spot. Water damage often causes these spots. A musty smell can be another clue. Stains or spots on the floor might show a problem. Listen for squeaky sounds when walking. They can hint at weak areas.
Water leaks are a big cause of soft spots. Rain or plumbing issues can be culprits. Poor maintenance can worsen the problem. Over time, wear and tear might weaken the floor. Heavy items left in one spot can also create issues. Check seals and seams regularly to avoid these problems.

Gathering Necessary Tools
Having the right tools is very important. Start with a screwdriver and hammer. A saw is needed to cut wood. Use a measuring tape to measure the space. A drill helps make holes quickly. Wood glue and nails keep things together. Get some sandpaper for smooth surfaces. Always have extra wood handy.
Safety is very important. Wear gloves to protect your hands. Use safety glasses for your eyes. A dust mask keeps you safe from dust. Knee pads help when kneeling down. Ear protection is useful if it’s noisy. Always keep a first aid kit close by.
Preparing The Area
Remove all items from the camper floor. Check for loose objects. Clear everything to make the space safe to work. Look for any hidden items. These might cause trouble later. Organize tools nearby for easy reach. Make sure the area is clean. Dust and dirt can hinder repairs. Vacuum the area to remove small debris. Prepare a smooth surface for fixing.
Ensure the camper is stable. Check all supports. Make sure it’s not wobbling. Secure the wheels with blocks. Safety is important. Double-check all locks and supports. This prevents accidents. Use a level to check camper balance. Adjust if necessary. Proper stability avoids further damage. Ready the camper for repair.
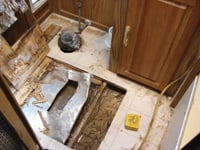
Removing Damaged Flooring
Identify the soft spot on the camper floor. Use a marker to draw clear lines around it. Make sure the marked area covers all the damaged parts. Check twice to avoid missing any spots. This helps in precise cutting later. Proper marking saves time and effort.
Use a sharp tool to cut along the marked lines. Work carefully to avoid damaging other parts. Once cut, lift the damaged section slowly. Ensure safety while lifting. Inspect the area beneath for further damage. Remove any debris found. Prepare the surface for new flooring.
Inspecting The Underlying Structure
Water can cause big problems in campers. Check the floor for signs of water. Look for dark spots or soft areas. These can mean water damage. Feel the floor. Is it squishy? That’s a bad sign. Use a flashlight to see better. Check corners and edges. These places hide water damage.
The floor needs to be strong. Walk on it. Does it feel weak? That’s not good. Use a screwdriver to tap the wood. Hear a hollow sound? That might mean trouble. Look under the camper if you can. Check for broken parts or missing pieces. Everything should look strong and solid.
Repairing The Subfloor
Soft spots mean damaged wood in your camper floor. First, find the bad spots. Use a screwdriver to poke the floor. The soft areas will give way easily. Cut out the bad wood using a saw. Be sure to cut straight lines for a good fit. Get new wood that matches the old one. Fit the new wood into the hole. Secure it with screws or nails. Make sure the wood is tight and doesn’t move. This will keep your floor strong and safe.
After replacing the wood, seal the seams. Use a quality sealant to keep water out. Water can make the wood soft again. Spread the sealant evenly along all edges. Let it dry completely. A dry sealant protects better. For extra safety, add a waterproof layer. This keeps the floor safe from spills and leaks. Check the seals every few months. Fix any cracks or gaps you find. This helps keep the camper floor strong.
Installing New Flooring
Picking the right flooring material is very important. It makes your camper floor strong. Vinyl and laminate are popular choices. They are easy to clean and water-resistant. These materials last long and look nice. Carpet is soft but can get wet. Wet carpet is hard to dry. So, think carefully about what you need. Always check the material’s thickness. A thicker floor can be sturdier.
Start by cleaning the camper floor. Remove any dust and dirt. Use a measuring tape to measure the space. Cut the flooring to fit the space. Lay the pieces slowly and carefully. Make sure each piece fits well. Press down firmly to stick them. Use a roller to remove air bubbles. Check the edges for gaps. Fill any gaps with sealant. This keeps the floor neat and tidy.
Finishing Touches
Fixing a soft spot in a camper floor involves identifying the weak area, removing damaged sections, and reinforcing with new materials. Use plywood or similar sturdy materials for patching, ensuring a stable and even surface. Finish with a sealant to protect against future moisture damage.
Securing Edges
It’s important to secure the edges of the camper floor. Use strong screws for extra hold. Make sure each edge is tight and firm. This prevents the floor from moving. A tight fit keeps the floor strong. Don’t leave any gaps between the edges. Gaps can cause more damage. Use a sealant to fill small spaces. This adds extra protection. The sealant helps keep water out. Water can harm the floor. A secured edge makes the floor last longer.
Testing The Repair
After securing, test the floor’s strength. Walk on the repaired area slowly. Check if the floor feels firm. A firm floor means a good repair. Listen for any creaking sounds. Creaking can mean a loose spot. Fix any loose spots right away. Press down on different areas. Make sure nothing moves. A steady floor is a safe floor. Testing ensures the repair is complete.
Preventive Measures
Regular inspections can prevent soft spots in camper floors. Check for water leaks and seal them promptly. Keep your camper dry and well-ventilated to maintain floor integrity.
Regular Inspections
Checking the camper floor often is crucial. Look for any soft spots or damage. Small problems can become big ones if ignored. Inspect under furniture and around sinks. Wood rot is common near water sources. Use a flashlight to spot hidden issues. Feel for soft spots with your hands. Make sure to check corners and edges. These areas can hide damage. Regular checks help you find problems early.
Waterproofing Tips
Waterproofing keeps your camper floor safe. Seal the edges of the floor properly. Use waterproof sealant on all seams. Check seals around doors and windows. Water can enter through tiny gaps. Apply a waterproof layer over the entire floor. Choose durable materials for your camper floor. They resist water better. Replace old seals before leaks happen. Waterproofing is key to a strong camper floor.

Frequently Asked Questions
What Causes Soft Spots In Camper Floors?
Soft spots in camper floors are often caused by water damage or rot. Leaks from plumbing or windows can lead to moisture accumulation. Over time, this weakens the flooring material. Regular inspections and maintenance can prevent such issues. Repairing any leaks promptly can save you from costly floor repairs.
Can You Repair A Soft Camper Floor Yourself?
Yes, you can repair a soft camper floor yourself with some basic tools. Start by identifying the affected area and removing any damaged material. Replace the weakened section with new plywood or flooring material. Ensure the new section is securely attached and sealed to prevent future damage.
How Do You Prevent Floor Damage In Campers?
Prevent floor damage in campers by ensuring proper sealing and maintenance. Regularly check for leaks around windows, doors, and plumbing. Use waterproof sealants where necessary. Avoid prolonged exposure to moisture by keeping the interior dry. Proper ventilation can also help in reducing humidity levels inside your camper.
What Materials Are Best For Camper Floor Repair?
For camper floor repair, plywood and vinyl are popular choices. Plywood offers strength and durability, making it ideal for structural repairs. Vinyl flooring is water-resistant, easy to clean, and affordable. Consider your camper’s weight restrictions and personal preference when choosing materials for repair.
Conclusion
Fixing a soft spot in your camper floor can be simple. Start by assessing the damage. Gather your tools and materials. Follow the steps outlined above for repair. Regular checks help prevent future issues. Maintain your camper for safe travels.
DIY repairs save money and time. Enjoy a sturdy camper floor once again. Share these tips with friends who love camping. A well-maintained floor enhances the camping experience. Feel confident in handling small repairs. Keep exploring with your camper!


