Are you ready to transform your space with a fresh, modern look that’s both stylish and durable? Laying Luxury Vinyl Plank (LVP) flooring is your answer.
This popular choice combines aesthetic appeal with practicality, making it perfect for high-traffic areas and cozy living spaces alike. Imagine walking into your room and feeling the smooth, sleek surface beneath your feet, knowing you accomplished this upgrade with your own hands.
Whether you’re a seasoned DIY enthusiast or a beginner eager to tackle your first project, this guide will show you step-by-step how to lay LVP flooring like a pro. You’ll discover tips and tricks to avoid common pitfalls, ensuring your floors look flawless and last for years. Are you intrigued by the idea of enhancing your home while saving money and gaining a sense of accomplishment? Let’s dive into the world of LVP flooring and unlock the potential of your space.
Tools And Materials
A few basic tools make the job easier. A tape measure helps measure the room. Use a utility knife to cut the planks. A rubber mallet helps tap the planks into place. A pull bar helps fit planks near the wall. Spacers keep the planks even. A speed square ensures straight cuts. These tools are easy to find in stores.
Luxury vinyl planks (LVP) are needed for the floor. Buy extra in case of mistakes. Underlayment goes under the planks. It makes the floor smooth. Adhesive helps hold planks in place. Cleaning supplies keep the area tidy. Always have a trash bag for waste. These materials help make a perfect floor.
Preparing The Subfloor
Remove all dirt and dust from the floor. Use a broom or vacuum for this task. A clean surface helps the flooring stick better. Ensure no debris is left. Even tiny bits can cause issues.
The floor must be flat. Check for bumps or holes. Fill holes with a filler. Sand down any high spots. A level floor ensures a smooth finish. Use a long level tool to check. Correct uneven spots carefully.
Moisture can damage floors. Test the subfloor for moisture. Use a moisture meter for this. Follow instructions on the device. Ensure levels are within safe limits. High moisture needs fixing first. It protects your new flooring.
Acclimating The Lvp
Acclimation helps the LVP adjust to your home’s climate. Floors can expand and contract. Without acclimation, they may not fit well. This can cause gaps or bubbles. Proper acclimation keeps the floor smooth. It also prevents future problems. Always check the manufacturer’s instructions. They guide you on the best practices.
Acclimation usually takes 48 hours. Always place the LVP in the room where it will be installed. Make sure the room is at normal living conditions. This means usual temperature and humidity. Temperature should be around 65 to 85 degrees Fahrenheit. Humidity should be between 40% and 60%. These conditions help the LVP adjust properly.
Planning The Layout
Choosing the right direction for your LVP flooring is key. Floors often look better when laid parallel to windows. This direction helps catch light beautifully. Always check the room’s length. Long rooms might need a different approach. Align the planks with the longest wall. This can make the room seem bigger. Think about how you enter the room. Make sure the first view is pleasing.
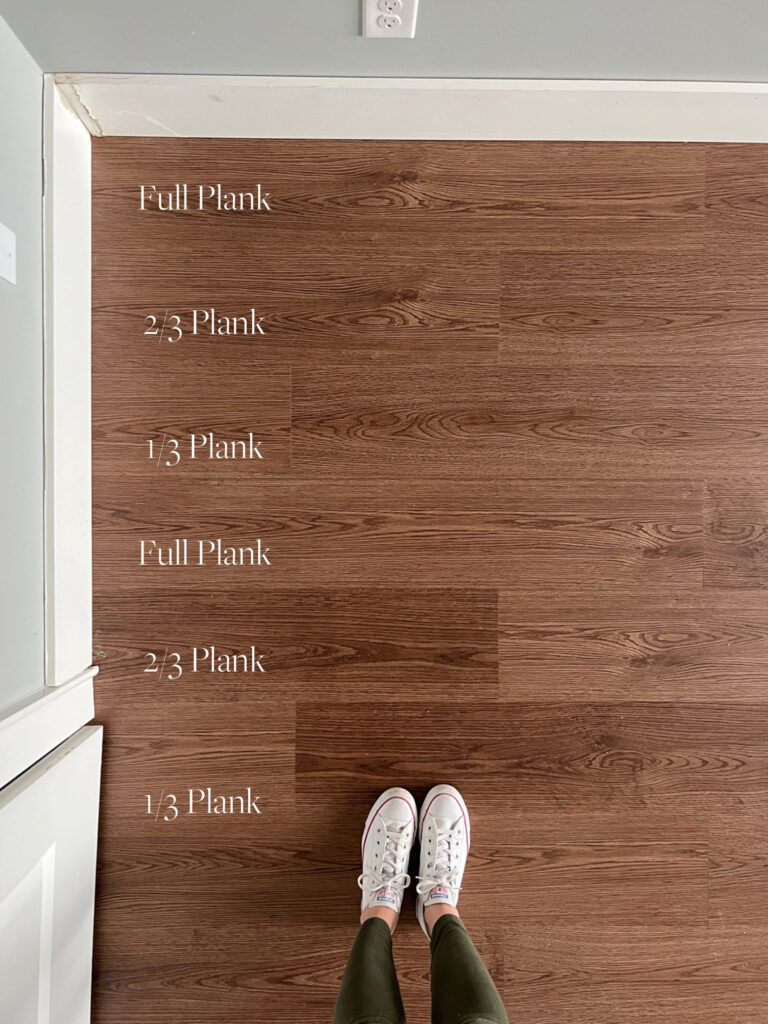
Staggered patterns help in strong floors. Avoid aligning seams. This makes floors weak. Use a random pattern. Make sure seams are apart by at least 6 inches. This adds strength and beauty. Cut planks if needed. Ensure balance between long and short pieces. Mix plank lengths for a natural look. Always check your progress. Adjust if the pattern seems off.
Installing The First Row
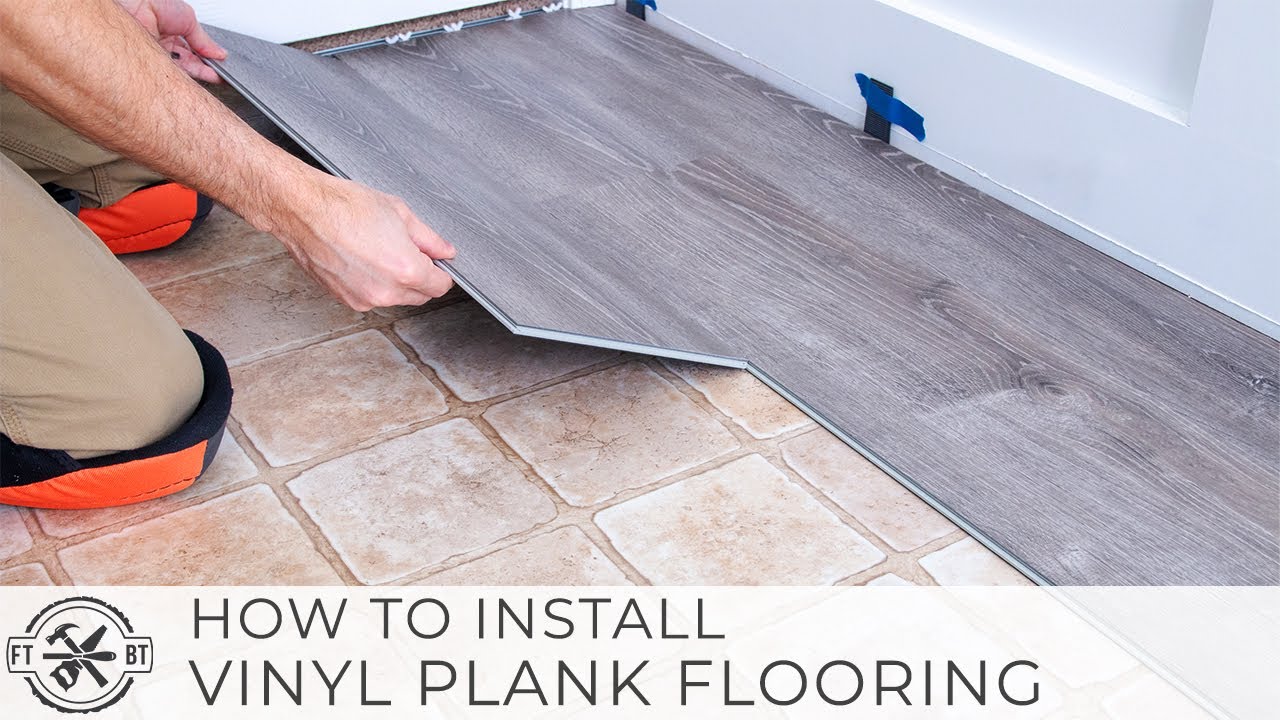
Begin by laying the first plank against the wall. Make sure the side with the tongue faces the wall. This helps with a snug fit. Use a tape measure to check the alignment. The plank must be straight. Otherwise, the entire floor will be crooked.
Place spacers between the plank and the wall. This creates a small gap. The gap allows the floor to expand. Without spacers, the floor might buckle. Spacers ensure the first row stays in place. They are important for a tight fit. Make sure each spacer is the same size. This keeps the gap even all around.

Laying Additional Rows
With the click-lock installation, pieces fit easily. Start by clicking the short ends first. Push them together until they snap. This locks the planks in place. Each row should be tight. Gaps should not be there. Use a tapping block if needed. This tool helps keep planks tight. Keep checking each row. Make sure they are straight.
Click-lock Installation
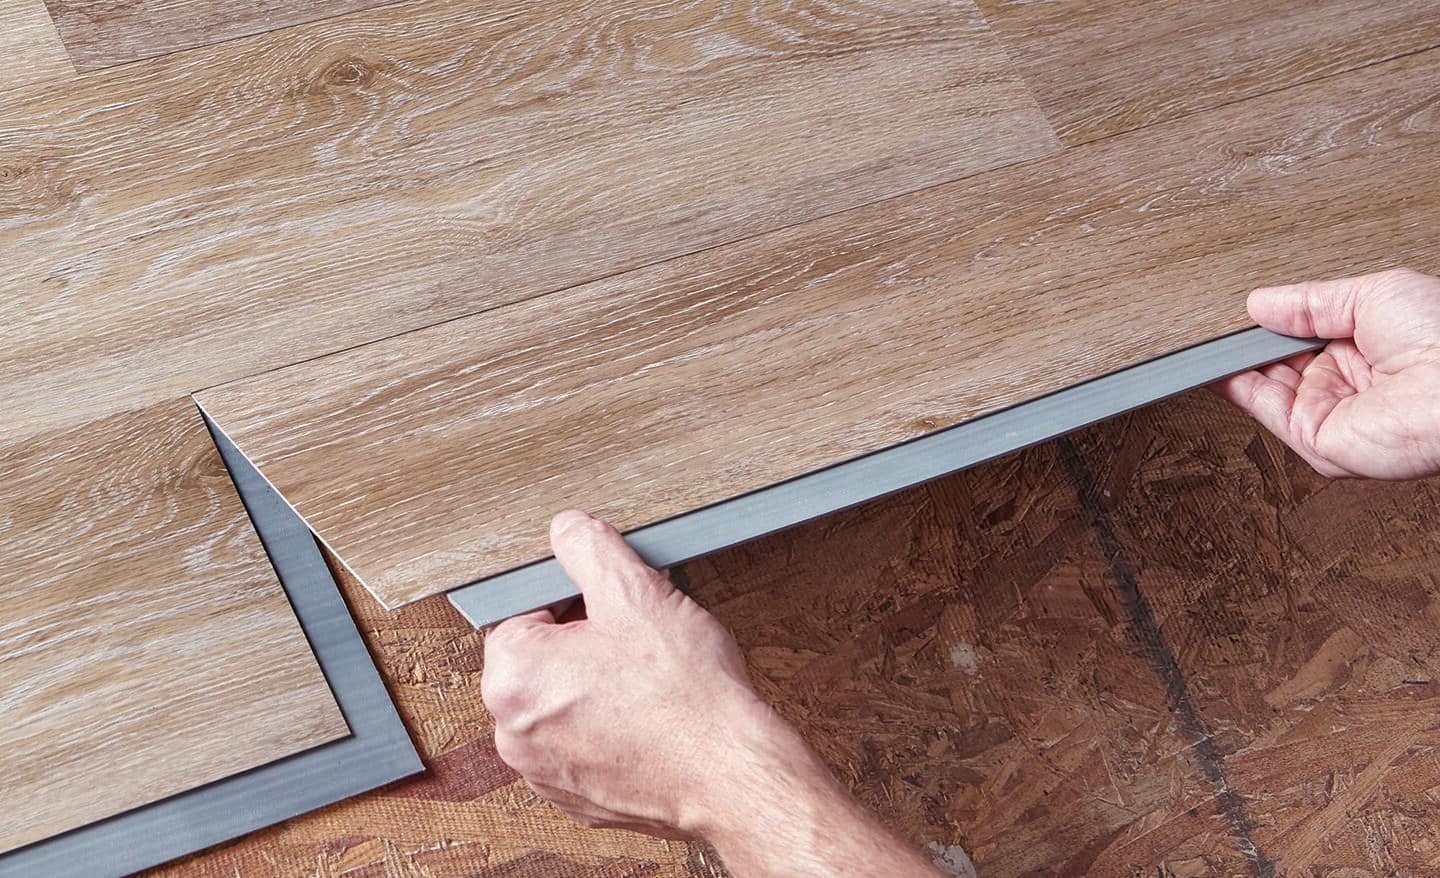
Cutting around obstacles can be tricky. Measure the space you need first. Use a pencil to mark the plank. Cut the plank with a saw. A jigsaw works well for this. Carefully fit the cut piece. It should match the obstacle shape. Check it fits before locking. Adjust if needed. This helps to avoid mistakes.
Finishing The Installation
Ensure smooth installation by sealing edges and gaps. Clean the floor surface thoroughly to eliminate dirt and debris. Check alignment and press planks firmly for a secure fit.
Removing Spacers
Spacers help keep gaps while installing. Gaps are necessary for floor movement. Start by gently pulling out the spacers. Be careful not to damage the edges. Gaps allow the floor to expand and contract. This helps in preventing buckling. After removing, check the edges for alignment. Make sure all pieces fit snugly.
Installing Baseboards
Now, it’s time to install baseboards. Baseboards cover gaps near walls. They provide a neat finish to your flooring. Measure the length needed for each wall. Use a saw to cut baseboards to size. Attach them using nails or adhesive. Ensure they are flush against the wall. This will give a clean look. Gaps should not be visible. You can paint or stain baseboards for extra style. This step completes your flooring project.
Post-installation Tips
Keep your LVP floor clean and shiny. Sweep daily with a soft broom. Use a damp mop for deeper cleaning. Avoid using harsh chemicals. These can damage the flooring. Use a mild cleaner instead. Dry the floor with a soft cloth after mopping. This prevents water spots.
Protect your floor from scratches. Use furniture pads under chairs and tables. Keep pet nails trimmed. This stops scratches on the floor. Clean spills quickly to prevent stains. Place mats at entrances to trap dirt and dust. This keeps your floor looking nice. Regular care makes your LVP flooring last longer.
Frequently Asked Questions
What Tools Are Needed For Lvp Flooring?
To lay LVP flooring, you’ll need a utility knife, measuring tape, straightedge, and spacers. A tapping block and rubber mallet are also useful. These tools help ensure precise cuts and proper alignment. Having the right tools makes the installation process smoother and more efficient.
Can Lvp Be Installed Over Existing Floors?
Yes, LVP can often be installed over existing floors, like tile or hardwood. Ensure the surface is clean, dry, and level before installation. This can save time and effort by avoiding the need to remove old flooring. Always check the manufacturer’s guidelines for specific recommendations.
How Long Does Lvp Installation Take?
LVP installation time varies based on room size and preparation. For an average room, it typically takes one to two days. This includes time for acclimation, preparation, and laying the planks. Proper planning and having all tools ready can speed up the process.
Do I Need Underlayment For Lvp Flooring?
Underlayment is not always required for LVP, but it can enhance comfort and insulation. Some LVP products come with a pre-attached underlayment. Check your specific product’s guidelines to determine if additional underlayment is needed. It can also help reduce noise and improve floor longevity.
Conclusion
Laying LVP flooring transforms your space with style and durability. Simple steps make installation easy for anyone. Measure your room. Prepare the surface. Choose the right tools. Take your time with each plank. Follow the pattern carefully. Ensure tight seams for a professional look.
Enjoy your new floor for years to come. It’s both beautiful and practical. With patience, anyone can do it. A fresh floor changes the feel of your home. Start today and see the difference. Your room will thank you!


