Are you looking to transform your space with a sleek, modern look? Installing a floating floor might be the perfect solution for you.
Not only is it an affordable option, but it’s also incredibly easy to install yourself, even if you’re not a DIY expert. Imagine walking into a room that feels brand new, with a floor that seems almost effortless in its beauty.
You can achieve this with just a few tools and a bit of patience. But before you start, you might be wondering, “How do I lay a floating floor correctly? ” Don’t worry; you’ve come to the right place. This guide will walk you through each step, ensuring your project is a success, and your new floor looks as stunning as you imagined. Keep reading, and soon you’ll be on your way to enjoying a transformed space that you’ll be proud to show off to friends and family.
Tools And Materials Needed
You need some basic tools to lay a floating floor. A tape measure helps measure the room. Use a saw to cut the boards. A hammer taps the boards in place. Get a pull bar for tight spaces. A spacer ensures even gaps between boards.
Materials are important too. Choose the right flooring for your room. Underlayment is needed for soundproofing. Get adhesive if your floor requires it. Have clean cloths for wiping. Safety goggles protect your eyes.
Preparing The Subfloor
Make sure the floor is clean. Remove all dirt and debris. Use a broom or a vacuum for this. A clean floor helps the new floor stick better. Wet a mop with warm water. Clean the floor with it. Let it dry fully before moving to the next step.
Check if the floor is level. Use a long ruler or a level tool. Place it on the floor. Look for gaps under the tool. Small gaps are okay. Big gaps need fixing. A level floor means a strong floating floor.
Fix any cracks or holes in the floor. Use a patching compound. Follow the instructions on the box. Fill the cracks and holes. Let the compound dry. Sand it smooth with sandpaper. This makes the floor ready for new flooring.
Acclimating The Flooring
Unpack the flooring and lay it on the ground. Leave space between the planks. This helps them breathe. Make sure the room is clean and dry. Temperature should be stable. Keep the flooring away from direct sun. This can cause damage. Spacing helps in even expansion. The planks need time to adjust. Usually, 48 hours is good. This prevents future problems. Remember, floors expand and contract. Proper spacing is important. Arrange planks neatly. Avoid stacking too high. This keeps them safe. Flooring should be laid on a flat surface. Check the ground before starting. Make sure it’s even. This makes it easier to install later. Good preparation is key.

Installing Underlayment
Different types of underlayment are available. Foam underlayment is soft and easy to install. It works well in most rooms. Cork underlayment is thicker and reduces noise. It is great for apartments. Rubber underlayment stops moisture and is strong. It is perfect for basements. Each type has its own benefits. Choose the right one for your space.
Start by cleaning the floor. Make sure it is smooth and dry. Roll out the underlayment across the floor. Cut it to fit the room. Leave no gaps. Overlap the edges slightly. Tape the seams together. This keeps it in place. Now, you are ready to lay the floating floor. Make sure it fits perfectly.
Laying The First Row
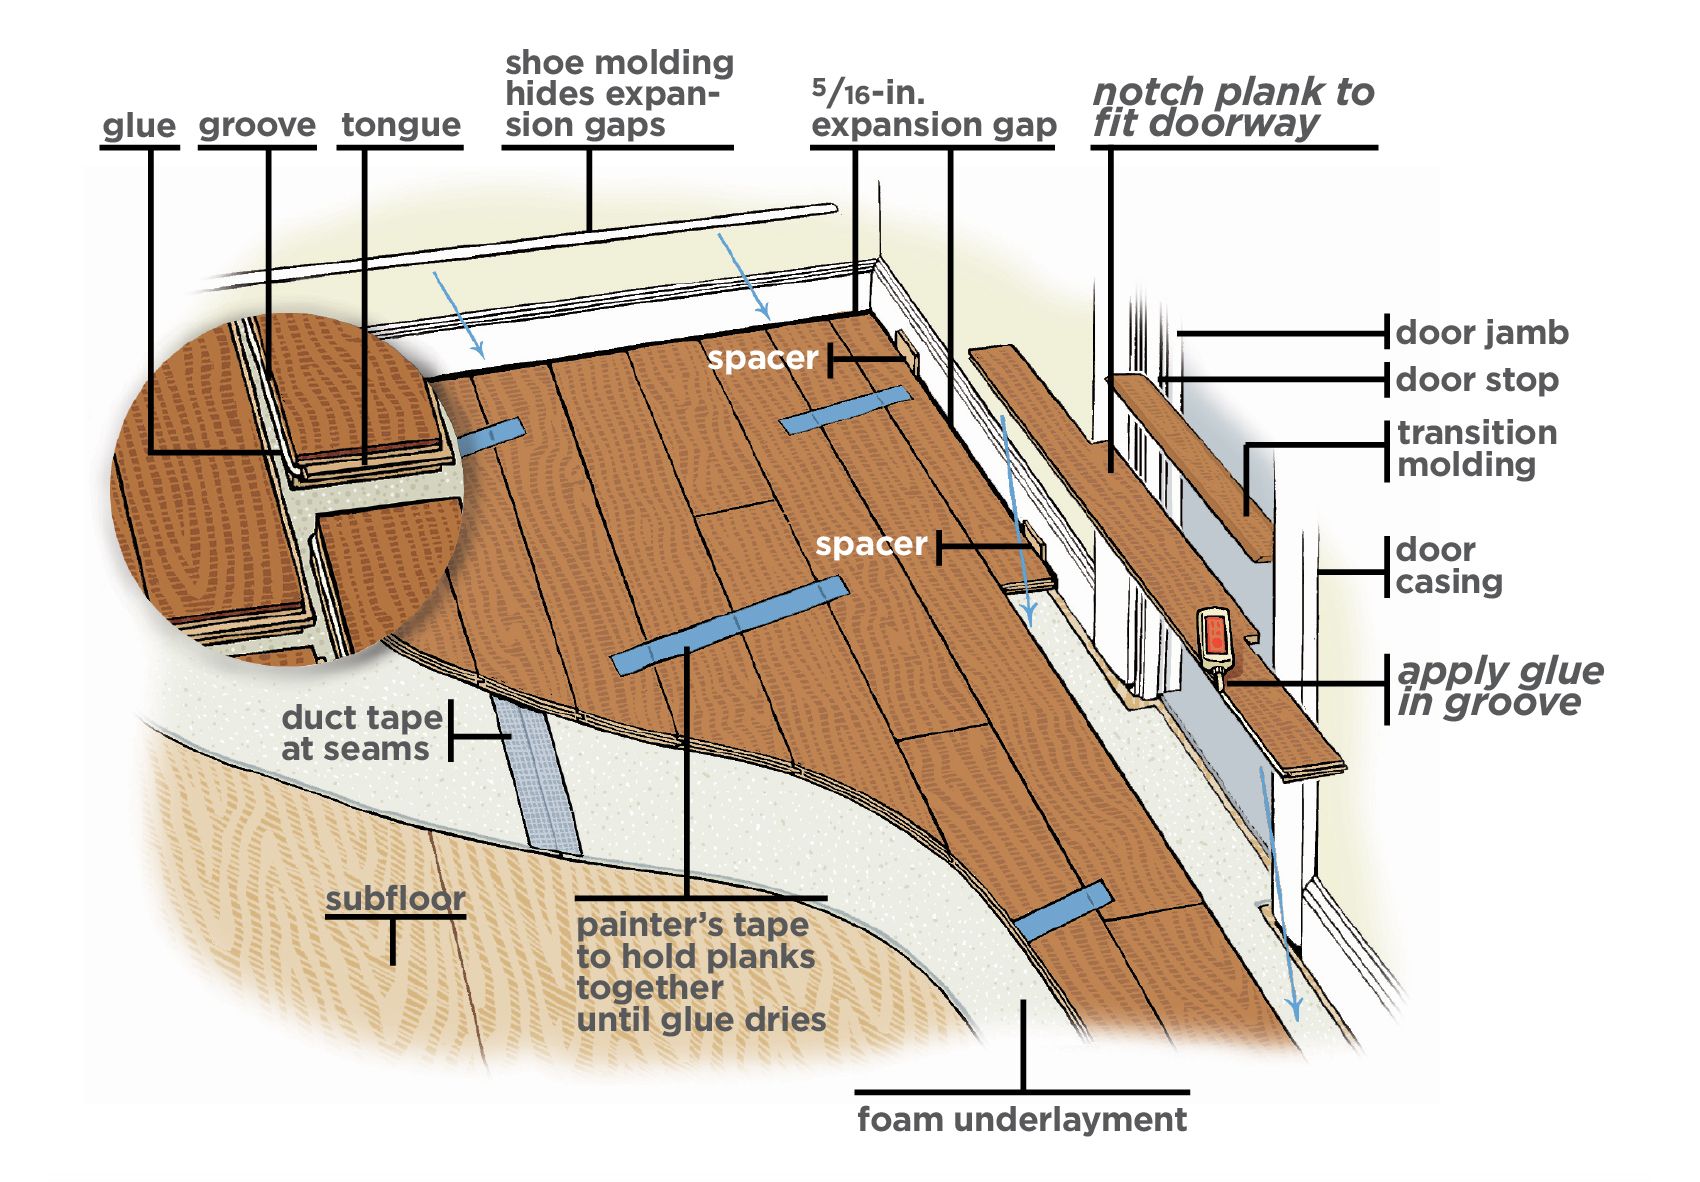
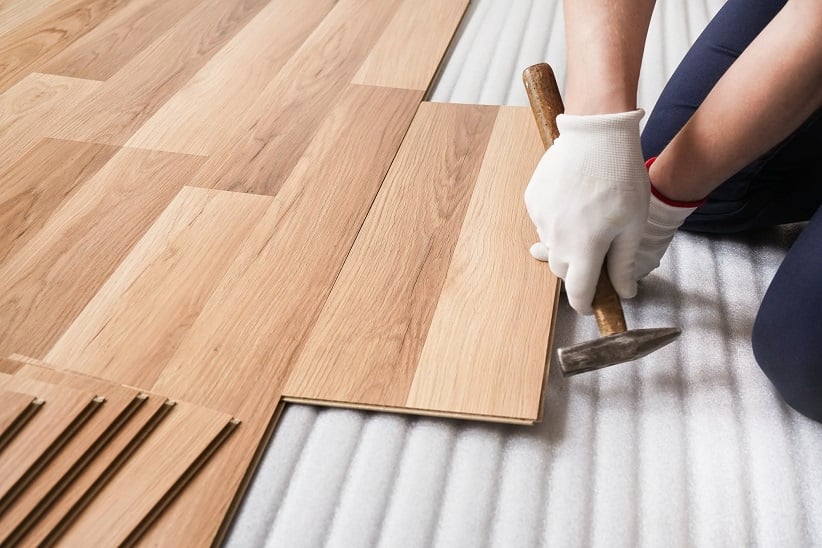
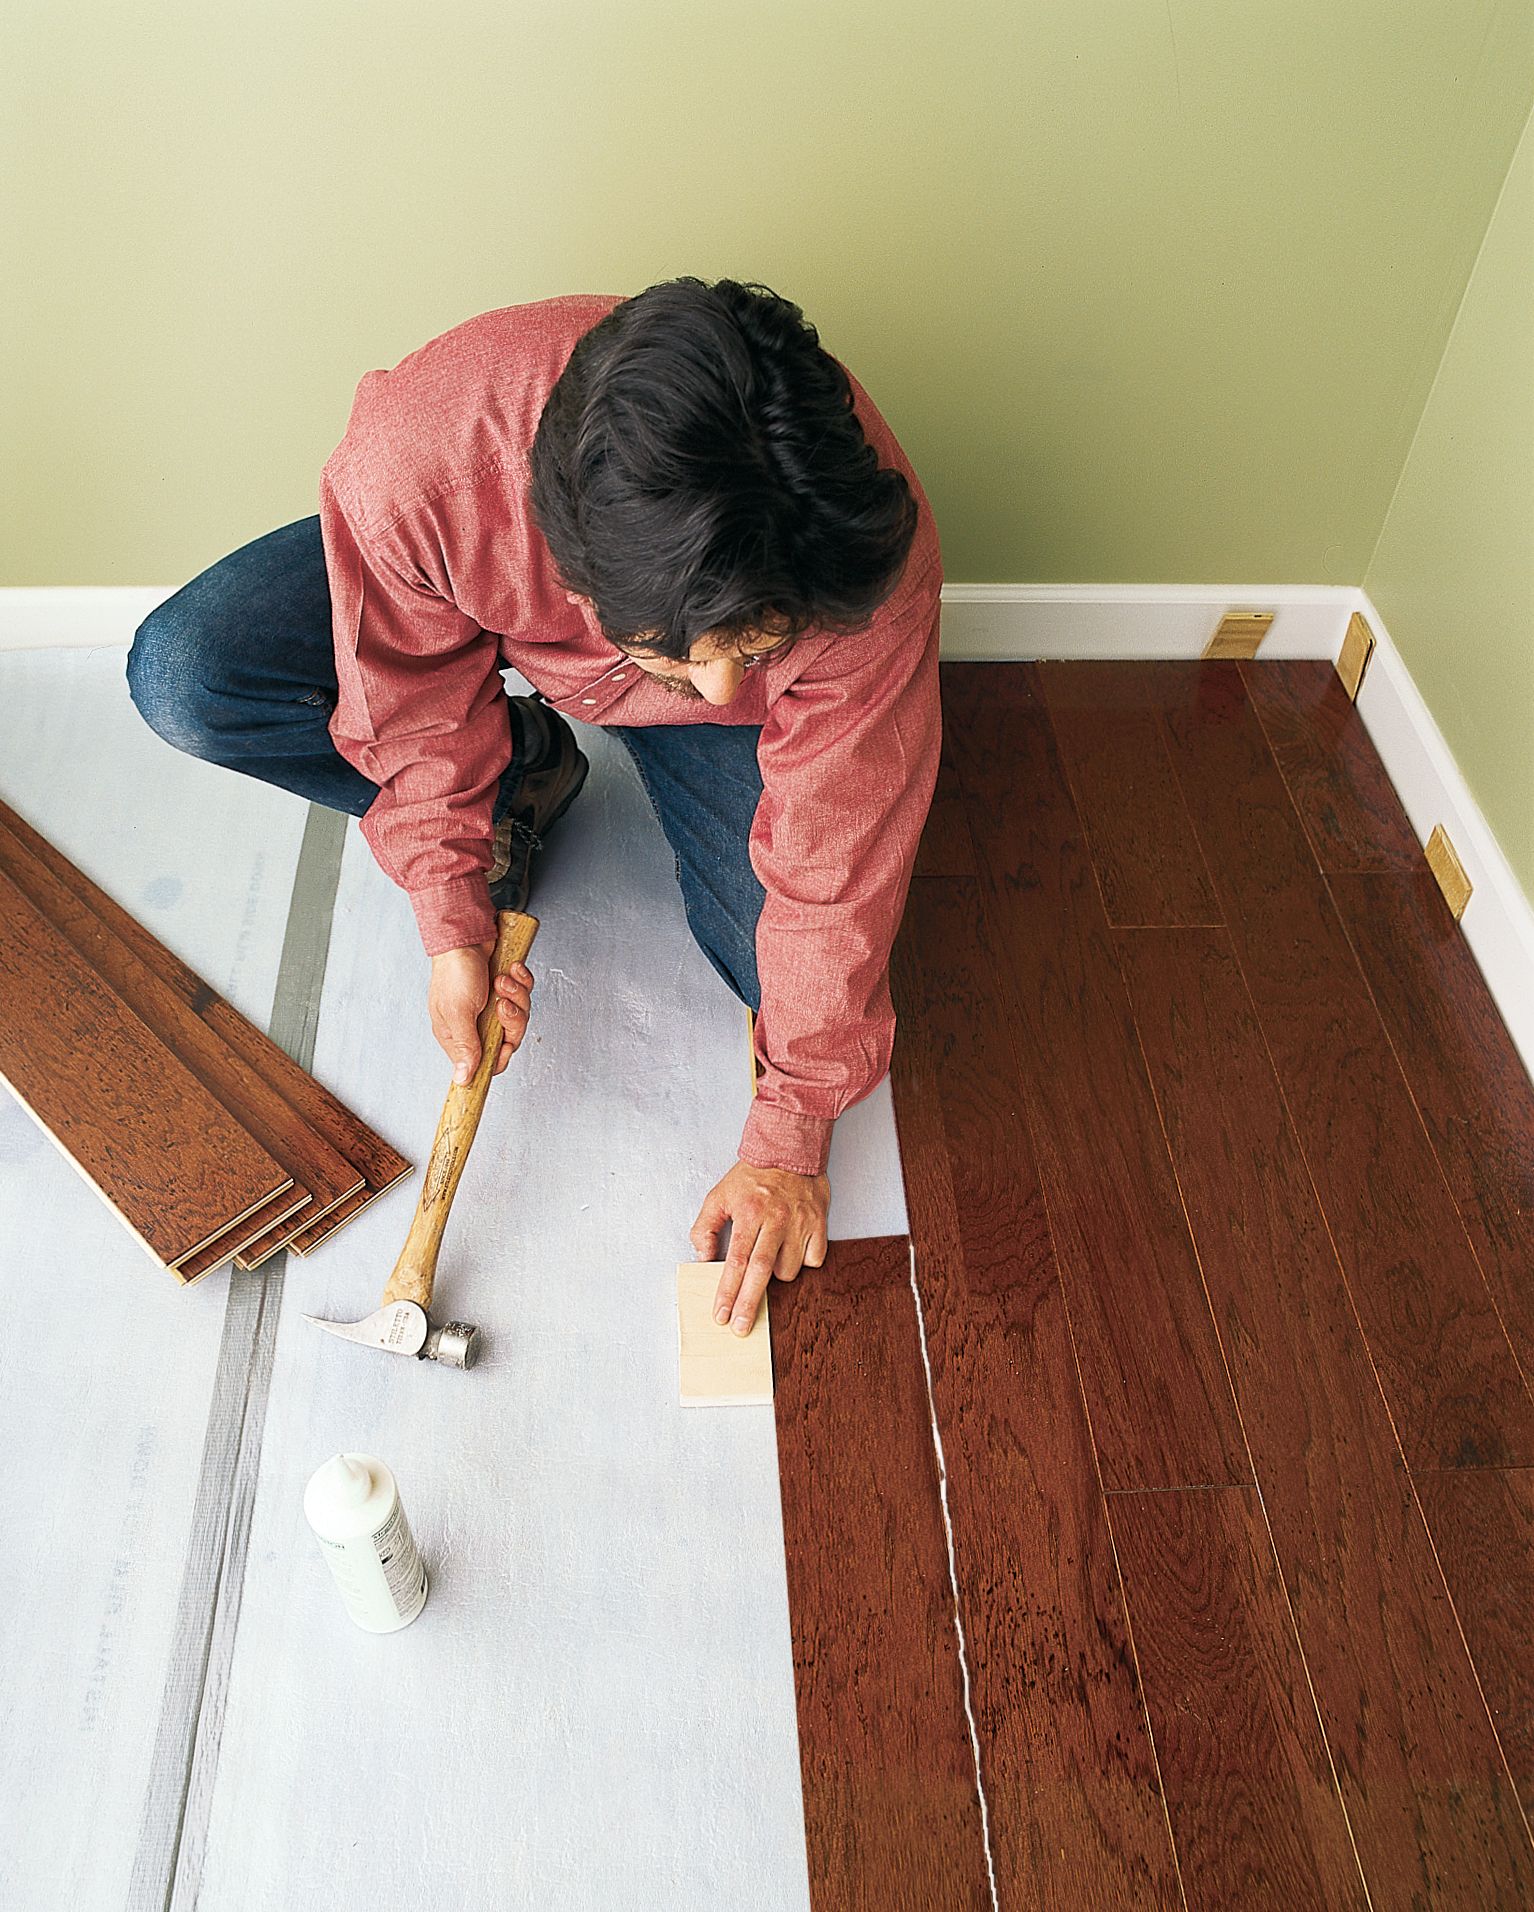
Start by placing the first plank in the corner. Make sure it’s straight. Use a spacer to create a gap from the wall. This gap helps with floor expansion. Align the next plank with the first one. Click it into place. Keep going until the first row is done. Check that all planks are tight together. Gaps between planks are not good.
Always keep a small gap between floor and wall. About 1/4 inch is good. This is for the floor to breathe. Use spacers to keep this gap even. Remove spacers after floor is done. Never let the planks touch the wall. This can cause damage later. Keep the gap consistent along the wall.
Continuing With Subsequent Rows
Staggering the planks helps in creating a strong floor. Each plank should not line up with the others. Leave at least 6 inches between the ends of planks. This stops the floor from looking like a ladder. It’s important to check the pattern of the floor. Random patterns make it look more natural.
Spacers are small tools to keep gaps between the floor and wall. They help the floor to expand and shrink. Without gaps, the floor may buckle or crack. The gap should be about 1/4 inch. Place spacers along the wall. Remove them when the job is done. This keeps the floor safe and strong.
Cutting Planks To Fit
Measuring and marking are key steps when fitting planks. Start by measuring the space. Use a tape measure for accuracy. Mark the plank with a pencil. Ensure your lines are straight. Check your measurements twice. Mistakes can waste materials.
Using a saw safely is important. Wear safety goggles to protect your eyes. Use gloves to keep your hands safe. Hold the saw firmly with both hands. Keep fingers away from the blade. Cut slowly and steadily. Ensure the saw is sharp for clean cuts. Always follow safety rules.
Installing The Final Row
Installing the final row of a floating floor requires precise measurement and cutting. Ensure a snug fit without gaps. Use a tapping block to secure the last pieces in place, maintaining the floor’s seamless look.
Fitting Planks Precisely
Place each plank close to the wall. Ensure they fit snugly. Align the edges carefully. Use spacers if needed. They keep gaps consistent. Double-check each plank’s position. A tight fit prevents shifting. It makes the floor look neat.
Adjusting For Expansion
Leave a small gap at the wall. This allows for expansion. Wood changes with temperature. Too tight can cause damage. Use spacers to keep gaps even. This helps with long-term durability. The floor stays in place. It looks good for years.
Finishing Touches
Achieving a polished look when laying a floating floor involves careful attention to detail. Trim excess material and ensure edges fit snugly against walls. Secure moldings and baseboards to conceal gaps, enhancing the room’s overall appearance.
Trimming And Molding
Trimming adds a neat look to your floating floor. Use molding around the edges. It hides gaps and gives a polished finish. Choose molding that matches your floor color. Measure the walls carefully. Cut molding to fit each wall. Use a saw for clean cuts. Attach molding with nails or glue. Check corners for snug fit. Proper trimming keeps your floor looking new.
Cleaning And Inspection
Cleaning is key for a shiny floor. Sweep or vacuum to remove dust. Use a damp mop for deeper cleaning. Avoid too much water. Check for any loose boards. Inspect the floor for damage. Fix any issues right away. Regular cleaning helps keep the floor beautiful. Inspect every month to ensure everything is perfect.
Maintenance Tips
Laying a floating floor requires careful preparation. Ensure the subfloor is clean and smooth. Use spacers along walls for expansion gaps. Gently click planks together for a seamless fit. Regularly check alignment to maintain a straight line. Trim edges for a neat finish.
Follow these steps for a durable floor.
Regular Cleaning
Floors need regular cleaning. Use a soft broom or vacuum. Remove dirt and dust often. Wet mops can damage the floor. Use a damp mop instead. Clean spills quickly to prevent stains. Avoid strong chemicals. They can harm the floor.
Protecting The Floor
Use furniture pads to prevent scratches. Heavy furniture can damage the floor. Don’t drag furniture across the floor. Place rugs in high traffic areas. They protect the floor from wear. Avoid high heels on the floor. They can cause dents. Keep pets’ nails trimmed. This prevents scratches.
Frequently Asked Questions
What Tools Are Needed For Floating Floor Installation?
To install a floating floor, you’ll need a tape measure, utility knife, spacers, and a tapping block. A rubber mallet and a saw may also be necessary for precise cuts. Using the right tools ensures a smooth installation process and a professional finish for your floating floor.
Can Floating Floors Be Installed Over Carpet?
Floating floors should not be installed over carpet. Carpets provide an unstable surface, affecting the floor’s durability and stability. It’s best to remove the carpet and ensure the subfloor is clean and level. Proper preparation helps avoid issues and extends the life of your floating floor.
How Long Does It Take To Lay A Floating Floor?
Laying a floating floor typically takes one to two days, depending on room size and complexity. Preparation, such as cleaning and leveling the subfloor, impacts the timeline. Proper planning and using the right tools can expedite the process and ensure a successful installation.
Do Floating Floors Require Underlayment?
Yes, floating floors generally require underlayment to provide cushioning and sound absorption. Underlayment helps smooth out minor subfloor imperfections and adds thermal insulation. It also enhances the floor’s longevity and comfort, making it an essential component in the installation process.
Conclusion
Laying a floating floor can be simple and rewarding. Start with proper preparation. Ensure the surface is clean and level. Gather all necessary tools and materials. Follow the step-by-step instructions carefully. Take your time to fit each plank snugly. Secure the edges for a polished look.
Remember to leave space for expansion. Check your work frequently to avoid mistakes. With patience, you’ll achieve a stunning floor. Enjoy your new space. It adds style and comfort to any room. Now, you’re ready to admire your handiwork. Celebrate your success in transforming your home!


