Are you looking to create the perfect floor plan? Drawing stairs can be a crucial element that elevates your design.
Whether you’re an aspiring architect or a DIY enthusiast, mastering this skill can make your floor plan not only functional but also visually appealing. Imagine how stairs can transform spaces, creating seamless transitions between levels and adding character to your layout.
We’ll show you how to draw stairs on a floor plan with simple steps and practical tips, so your design stands out. Get ready to unlock the secrets to creating stunning staircases in your blueprints, and make your floor plan a masterpiece!
Gather Necessary Tools
First, gather all the tools you need. A pencil is important for sketching. Use a ruler to draw straight lines. Graph paper helps keep everything neat. You will also need an eraser for mistakes. If you have a protractor, it’s great for angles. Tracing paper can be useful too. Keep all these tools close by. Having them ready saves time. It makes drawing easier and more fun.
Understand Stair Terminology
Treads are the steps you walk on. Risers are the vertical parts between treads. Proper size of treads and risers is important. It makes stairs easy to use. A common size is 10 inches for treads. For risers, it is about 7 inches. Check your local rules for sizes.
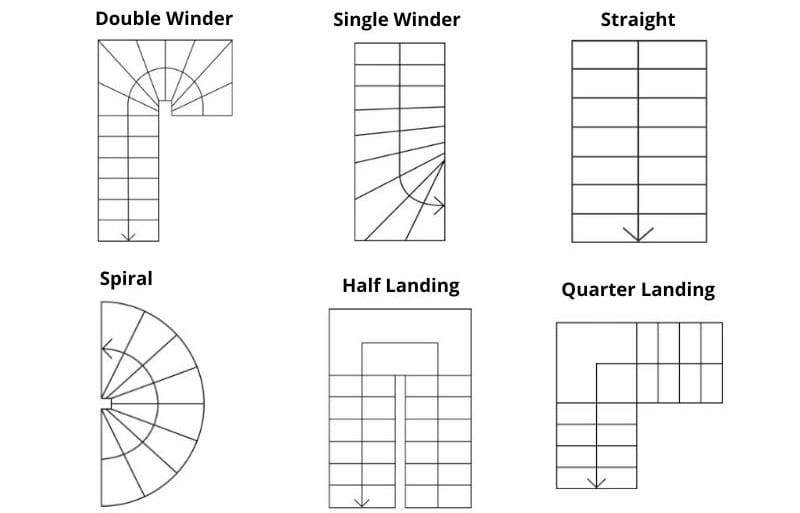
Different stairs have different shapes. Some are straight. Others turn or curve. Straight stairs are easy to draw. L-shaped stairs have a turn. U-shaped stairs turn twice. Each type fits different spaces. Think about your space before drawing.
Stairs must follow rules. These rules keep people safe. They tell you how wide stairs should be. They say how tall railings need to be. Check the building codes in your area. This helps you make safe stairs.
Measure The Space
First, find a good spot for your stairs. Look for open areas. Avoid blocking doors or windows. Keep safety in mind. Stairs need space to fit well. Measure the length and width of the spot. Write these numbers down. Check the ceiling height too. This helps in planning the steps. Make sure the area is clear. No furniture should block the path. Stairs should be easy to use. Plan carefully to make them fit right.
Next, figure out the size of each step. Start with the riser height. This is how high each step is. A good height is 7 inches. Then, find the tread depth. This is how deep each step is. A good depth is 11 inches. Use these sizes to plan your stairs. Add the riser heights to reach the floor above. Count the number of steps you need. Make sure all steps are the same size. This makes stairs safe to use.
Sketch The Basic Layout
Begin by drawing the stair footprint. This shows where the stairs will go. Use a ruler to keep lines straight. The stairs should fit the available space. Make sure they are not too wide or narrow.
Next, mark the starting point of the stairs. This is where people will step first. Choose a spot that makes sense. It should be near a door or hallway. Avoid areas with heavy foot traffic.
Draw The Treads And Risers
First, measure the space for the stairs. Then, decide how wide each tread should be. The tread is where your foot goes. Treads should all be the same width. This keeps the stairs safe. Make a line for each tread on your plan. Use a ruler for straight lines.
Risers are the vertical parts of stairs. Align all risers evenly. They should be the same height. Draw each riser line below a tread line. This makes the stairs look neat. Keep checking your lines. They should stay straight and even.

Incorporate Landings
Landings are flat areas in stairs. They help in changing direction. Positioning landings well can make stairs safe. They also make stairs look nice. Place them where stairs turn. Use landings at long stairs. This way, people can rest. Landings are not just for looks. They help in emergencies too.
Stair continuity is important. Continuous stairs help people move smoothly. Breaks in stairs can be dangerous. Landings help keep continuity. They give a smooth flow. Make sure each step is the same size. This helps in walking safely. Adjust stairs if needed. Keep them even and safe.
Add Details And Features
Adding railings makes stairs look real. Railings keep people safe. Draw them on the side of stairs. Use straight lines to show them. Make sure they are even. Railings can be on one or both sides. Use a ruler for straight lines. Railings are important in stair design.
Lighting helps people see the stairs. It makes stairs safer. Draw small lights on the wall or ceiling. Use circles to show lights. Place them evenly. Good lighting stops accidents. It makes stairs look nice, too. Think about where light will shine. Bright stairs are easy to use.

Review And Refine
Check Compliance with building codes is vital. Ensure stairs meet safety standards. Measure the width and height of steps. They must be safe for all users. Use a ruler for accurate measurements. Check if the railing is the right height too. It must be easy to grab.
Ensure Accuracy in your floor plan. Double-check all lines and angles. Use a pencil to correct mistakes. Precision helps avoid building issues later. Stairs should fit the space perfectly. Check again before finalizing the design.

Frequently Asked Questions
How Do You Start Drawing Stairs On A Floor Plan?
Begin by identifying the staircase location on your floor plan. Ensure it adheres to building codes and requirements. Use graph paper for accuracy and draw the stair’s footprint. Consider rise and run dimensions, width, and number of steps. Sketch the stairs in relation to other elements on the plan.
What Are The Key Dimensions For Stairs?
Key dimensions include rise, run, and width. The rise is the vertical height of each step. The run is the horizontal depth of each step. Standard stair width is around 36 inches. Ensure these dimensions comply with local building codes for safety and accessibility.
How Do You Ensure Stair Safety In A Floor Plan?
Ensure stair safety by adhering to building codes and regulations. Include handrails and guardrails in your design. Consider non-slip materials for stair treads. Maintain consistent rise and run dimensions for each step. Adequate lighting and clear visibility are also crucial for stair safety.
What Tools Do I Need To Draw Stairs?
To draw stairs, you’ll need graph paper, a pencil, and a ruler. Use architectural software for digital plans. A scale ruler is helpful for accuracy. Ensure tools are precise for drawing straight lines and angles. Consider a protractor for measuring angles if necessary.
Conclusion
Drawing stairs on a floor plan is simpler with practice. Visualize the layout before starting. Keep measurements accurate and proportional. Pay attention to the stair width and height. These factors ensure a safe and functional design. Review your drawing for errors or improvements.
Adjustments might be necessary. This process enhances the plan’s clarity and usability. Now, you can create a detailed floor plan with stairs. Your design skills will improve with each project. Explore more techniques for better results. Happy drawing!


