Have you ever imagined transforming your home with the classic elegance of wood flooring? The good news is, even if you have concrete underneath, achieving this timeless look is within your reach.
Installing wood flooring on concrete might sound daunting, but with the right guidance, you can turn this project into a rewarding experience. Imagine walking through your home and feeling the warmth and sophistication of wood underfoot. It’s not just a dream; it’s a reality waiting to unfold.
In this guide, we’ll break down the process into simple, actionable steps, ensuring you feel confident every step of the way. Get ready to enhance your living space and add value to your home. Let’s dive into the details and unlock the secrets to a successful wood floor installation on concrete.
Preparation
Preparing to install wood flooring on concrete involves cleaning the surface thoroughly and ensuring it’s dry. Use a moisture barrier to prevent damage. Measure the area accurately and gather necessary tools for a smooth installation process.
Assess Concrete Condition
Check for cracks in the concrete. Cracks can affect the wood. Look for moisture too. Wet concrete can ruin the wood floor. Ensure the surface is level. Uneven concrete makes installing wood hard. Use a level tool to check.
Gather Necessary Tools And Materials
Collect all the tools first. You need a hammer and nails. Get a saw for cutting wood. You will need adhesive too. Ensure you have measuring tape. This helps in measuring the space. Gather the wood planks. They should fit your space.
Acclimate Wood Flooring
Let wood adapt to the room. Place wood in the room for 48 hours. This helps the wood adjust to the climate. Wood expands and contracts. Temperature can change wood size. Acclimation prevents warping. Keep room temperature steady.
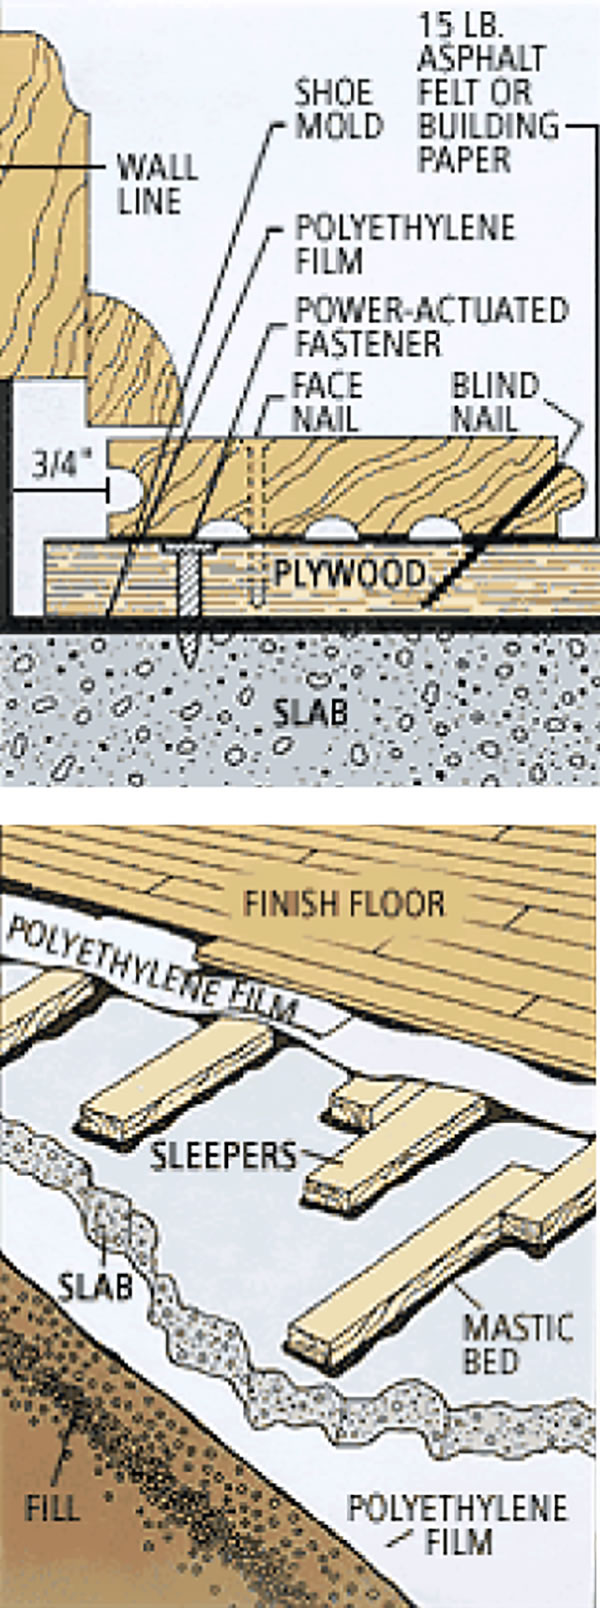
Moisture Barrier Installation
Installing wood flooring on concrete requires a moisture barrier to prevent damage. First, clean and level the concrete surface. Next, lay the moisture barrier sheet smoothly. Finally, secure it properly before installing the wood flooring. This ensures durability and protects against moisture-related issues.
Select Moisture Barrier Type
Choosing the right moisture barrier is crucial. It protects your wood floor. There are different types available. Some are sheets. Others are liquids. Sheets are like big plastic wraps. They are easy to use. Liquid barriers are painted on. They dry to form a shield. Both types work well. Your choice depends on your needs. Consider your budget too. Some barriers cost more.
Apply Moisture Barrier
Start by cleaning the concrete. It must be free of dust. Unroll the sheet barrier if you chose one. Lay it flat on the floor. Make sure there are no wrinkles. Overlap edges by a few inches. This keeps moisture out. If using liquid, pour it on the floor. Spread it evenly with a brush. Let it dry before adding wood. Follow the instructions for best results.
Subfloor Installation
Picking the right subfloor is important. Plywood is a good choice. It is strong and resilient. Ensure the thickness is correct. This helps with stability. Moisture can damage wood. Select a moisture-resistant option. This keeps floors safe and lasting.
Lay panels carefully. Start in one corner. Use glue and screws. This keeps panels secure. Check alignment often. Panels must fit tight. Leave small gaps for expansion. Inspect all edges. They should be smooth and level. This makes flooring look good.

Wood Flooring Layout
Choosing the right flooring pattern is important. A good pattern makes the room look nice. Think about the size of the room. Big rooms can have bold patterns. Small rooms might need simple designs. Diagonal layouts can make rooms look bigger.
Start planning by measuring the room. Keep a notebook of measurements. Sketch the pattern on paper. Try different layouts. Use a ruler to draw straight lines. This helps to see how the floor will look.
Mark the guidelines before installing. Use chalk to draw lines on the concrete. These lines show where to place the wood. Make sure lines are straight. Straight lines are important for a neat finish. You may need a measuring tape for this.
Double-check the markings. It’s crucial to avoid mistakes. Correct any errors right away. This ensures a smooth installation process. Take your time. Rushing might lead to problems.
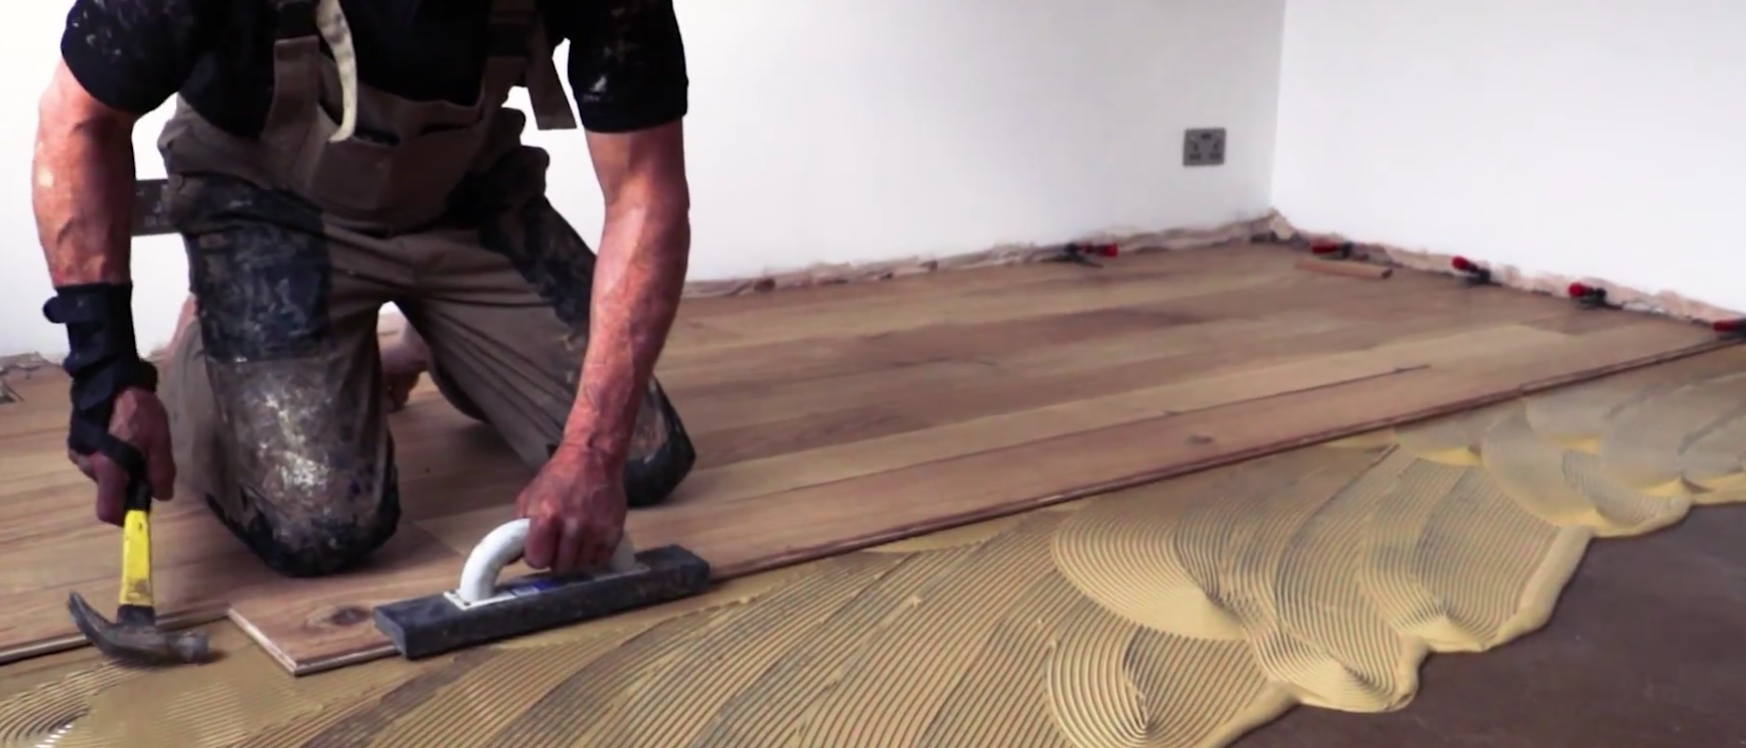
Installing The First Row
Start by placing the first plank against the wall. Use a spacer to create a small gap. This gap lets wood expand over time. Alignment is key for a straight row. Use a chalk line for guidance. Adjust the plank until it is straight. Check often to ensure accuracy.
Use a flooring nailer to secure the plank. Drive nails through the tongue of the plank. Nails must be at an angle. This keeps them hidden. Keep the nailer steady for a secure fit. Repeat for each plank in the row. Ensure each plank is tightly connected. This prevents gaps and ensures a smooth surface.
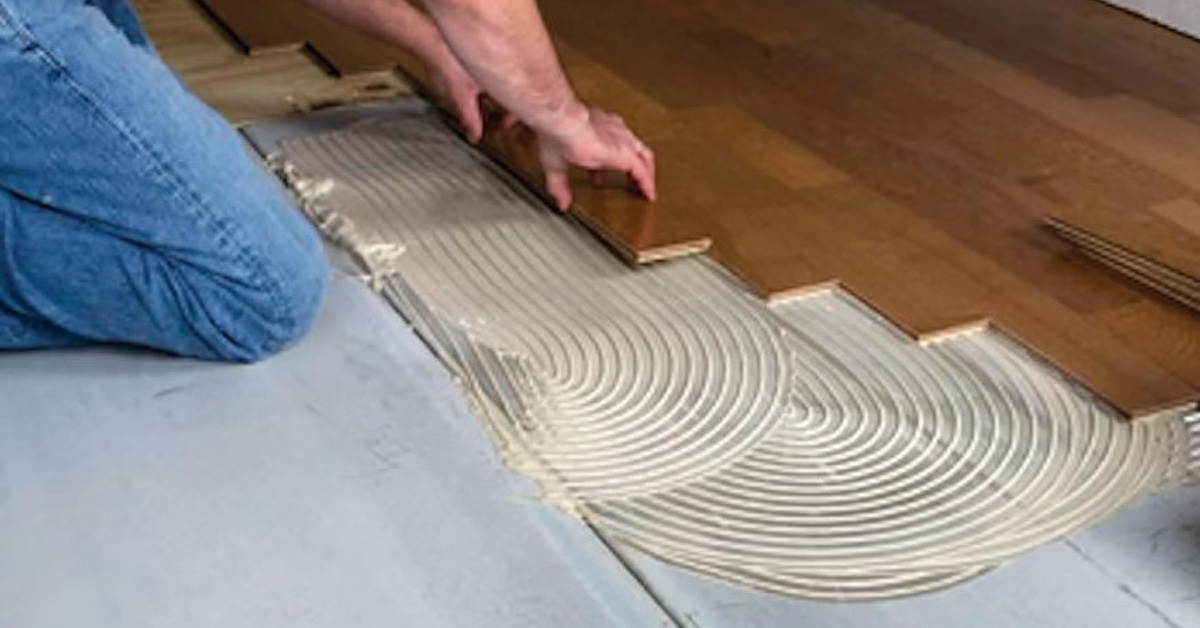
Continuing Installation
Staggering plank joints makes the floor strong. It also looks nice. Always keep joints at least 6 inches apart. This stops the floor from bending. It also helps in keeping it stable.
Lay the first row of planks. Cut the last plank to fit. Use the leftover piece to start the next row. This makes sure that joints do not line up.
Wood needs space to move. Keep a gap of 1/4 inch at walls. This is called an expansion gap. It lets wood expand and contract. Use spacers to keep this gap.
Without this gap, wood can push against walls. This might make the floor pop up. Always check the gap as you go.
Finishing Touches
Installing wood flooring on concrete requires careful preparation. Ensure the concrete is clean and dry. Use a moisture barrier to protect the wood.
Install Trim And Molding
Trim and molding complete the look of your floor. First, measure the room’s edges. Cut the trim pieces to fit these edges. Use a saw for neat cuts. Nail the trim to the walls. Ensure the nails are secure. This prevents loose trim. After this, check the molding. Align it with the floor’s edge. Attach it using nails or glue. Make sure the molding is tight. This gives a clean finish.
Inspect And Clean Finished Floor
Start by looking for any dust or dirt. Use a soft broom to sweep the floor. A vacuum can help too. Check the floor for scratches. If found, fix them with a wood repair kit. Use a damp mop to wipe the floor. Make sure the mop is not too wet. Water can damage wood. Always dry the floor after cleaning. This keeps it safe and shiny.
Maintenance Tips
Installing wood flooring on concrete requires proper preparation. Ensure the concrete surface is clean and dry. Use a moisture barrier to prevent damage. Secure the wood planks using adhesive designed for concrete surfaces. Regularly check for gaps and fix them promptly.
Regular Cleaning Practices
It’s important to sweep your wood floor every day. This helps to remove dirt and dust. Use a soft broom to avoid scratches. Every week, mop the floor with a damp cloth. Make sure the cloth is not too wet. Water can damage wood. Use a cleaner made for wood floors. It keeps the floor shiny and clean. Avoid using harsh chemicals. They can harm the wood surface.
Protecting Your Wood Floor
Place rugs in busy areas. They reduce wear and tear on the floor. Use furniture pads under chairs and tables. This stops scratches. Keep the room’s humidity stable. Wood can swell in high moisture. Avoid direct sunlight on the floor. It can fade the wood color. Use curtains or blinds to block sunlight. Always wipe spills quickly. Wet spots can cause stains and damage.
Frequently Asked Questions
Can Wood Flooring Be Installed On Concrete?
Yes, wood flooring can be installed on concrete. It’s essential to use a moisture barrier to prevent damage. Ensure the concrete surface is clean and level for best results. Proper acclimation of the wood to the room’s climate is also important before installation.
What Is The Best Wood Flooring For Concrete?
Engineered wood is the best choice for concrete. It resists moisture better than solid wood. It also provides the aesthetic appeal of real wood. Engineered wood’s layered construction makes it more stable and durable in various conditions.
Do I Need Underlayment For Wood Flooring On Concrete?
Yes, underlayment is necessary for wood flooring on concrete. It provides a moisture barrier and sound insulation. Underlayment also offers cushioning, making the floor more comfortable. It helps in leveling minor imperfections in the concrete surface.
How Do I Prepare Concrete For Wood Flooring?
Start by cleaning the concrete thoroughly. Remove all dust, debris, and oil stains. Check for levelness and fill any cracks or holes. Use a moisture barrier to prevent dampness from affecting the wood flooring. Acclimate the wood to the room’s conditions before installation.
Conclusion
Wood flooring on concrete adds beauty and warmth. Follow the steps to ensure success. Start with proper preparation. Make sure the concrete is clean and dry. Choose quality materials for durability. Install with care and precision. Take your time for the best results.
Maintenance is key to long-lasting floors. Regular cleaning helps protect your investment. Remember, wood adds elegance and value to your space. Enjoy the transformation and comfort. You’ve learned a valuable skill. Share your experience with others. Inspire them to enhance their homes too.
Happy flooring!


